
Energy Seal™ is specially formulated for sealing narrow gaps in log home joinery such as butt joints, window trims, door trim and corners. These gaps should be no larger than one inch wide. Energy Seal contains a fine aggregate that gives it a texture which enables it to more closely match the texture of wood and accept a stain, so that it will blend in with the stained wall color if so desired. Although it can be used in wider joints, we typically recommend using Perma-Chink® Log Home Chinking for wide chink joints.
When Should Energy Seal Be Applied?
The best time to apply Energy Seal is after the home has been cleaned and before the finish is applied. The wood surfaces will be fresh and clean and Energy Seal adheres best to bare wood surfaces. That's not saying that it won't adhere to stained and/or top-coated surfaces, but it adheres best to bare wood. Application to surfaces with a freshly applied oil-based stain should be avoided. For the least visible caulk lines choose a color that's a shade lighter than the stain color you plan to use. It's easier to cover a lighter color sealant with a darker color stain than it is to hide a dark colored sealant with a light colored stain. However, if you prefer the look of visible caulk lines, apply Energy Seal after you stain. Just be sure that the surface is clean and dry.
If you are going to be applying Lifeline Advance Topcoat, apply the topcoat after the Energy Seal. This results in a more even appearance to the sealed areas and helps them blend in with the rest of the wall. Furthermore, it helps keep the Energy Seal application clean and easier to clean when maintenance cleaning is required.
Using Backing Materials
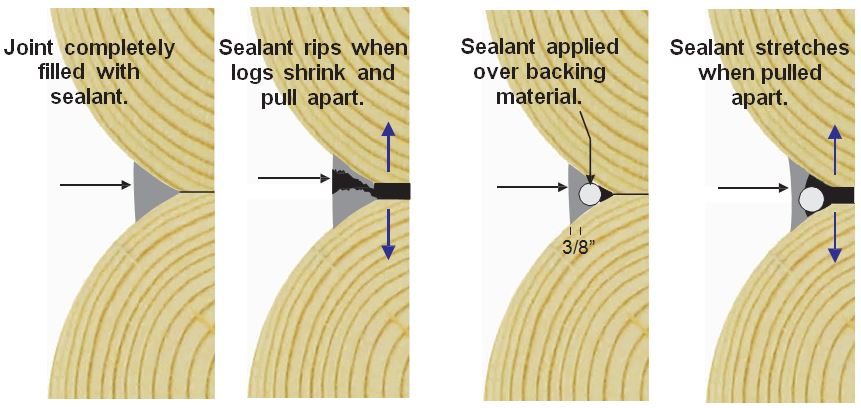
 Backing materials furnish an even surface for the application of a sealant and make it easier to apply a uniform thickness across the joint or gap. They also provide two-point adhesion to ensure maximum elasticity and flexibility after the sealant has cured (they form a bond breaker in the center of the sealant band with adhesion to the wood at both sides). The use of improper or poorly installed backing materials can result in unsightly sealant joints and substandard performance. They are an integral part of the sealant system and should always be used whenever and wherever possible.
There are a number of products specifically designed for use as backing materials for sealants. For smaller gaps, joints and cracks the most commonly used material is round backer rod. It comes in a range of sizes and is relatively inexpensive. Since it is flexible it can be pushed into a crevice without needing to be nailed or stapled. Grip Strip is designed for sealing larger gaps. Similar in composition to backer rod, it is shaped like a trapezoid so it can be squeezed in between round logs although it can be used in a variety of situations. It provides a flat surface for chinking or sealing.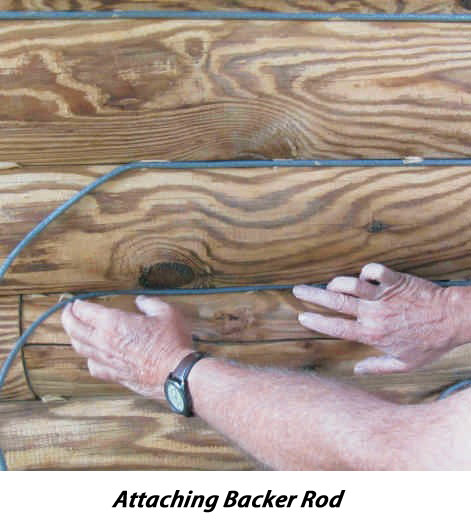
In situations where a joint, seam or gap is too small to insert Backer Rod you can hold it in place by applying small dabs of Energy Seal along the seam and then pressing the Backer Rod into them. The dabs of Energy Seal will hold the Backer Rod in place while a proper thickness of Energy Seal is applied on top. You can also use a narrow strip of water-resistant masking tape. You don't want to use masking tape that wrinkles when it gets wet, since the wrinkles may show through the sealant. For extremely narrow seams an excellent option is to use pinstripe tape available at most automotive supply stores. The tape is vinyl; therefore, it's waterproof and since our sealants do not bond to it, it makes an excellent material to use. Pinstripe tape is available in widths down to 1/8”.
Approved Backing Materials
- Grip Strip
- Backer Rod
- Log Gap Cap
- Expanded polystyrene (EPS) beadboard, foil-faced
- Polyisocyanurate board (Polyiso or R Max)
- Water-resistant masking tape or pinstripe tape
DO NOT USE
- Extruded Polystyrene (causes blisters)
- Polyurethane foam (Pur Fill, Great Stuff, Styrofoam)
- Blue Board, Pink Board or any other colored board (outgases and causes blisters)
- Bare wood or strips of bare wood (outgases and loss of elasticity, 3-point adhesion)
- Anything that you are unsure about check with Perma-Chink Systems before using it
The Role Backing Materials Play When Sealing a Seam
Round Logs
When deciding the width of a sealant joint between round logs a good guideline to follow is for the width of the sealant to be one-sixth the log diameter. For example, with six inch diameter logs 6” ÷ 6 = 1.0” wide sealant joint. The width of the backing material you require depends on the profile of your logs but you need to take into account that you will be applying a 3/8” thick layer of sealant over it and you'll need at least ¼” top and bottom for adequate adhesion to the wood.
 Squared Logs
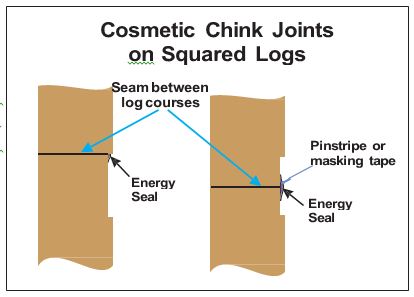
We rarely see squared log chink joints less than 2” wide, so Energy Seal or Woodsman is seldom used in these situations. However, for cosmetic chink joints less than 3/8 inches deep we recommend sealing the seam with Energy Seal and then applying Chink Paint over the entire joint. On the other hand Energy Seal is often used on squared logs for sealing corners, butt joints, widows, door frames and other areas where a visible chink joint is not desired.
Applying Energy Seal
The overall performance of any sealant system is dependent on the use of proper application methods. Any sealant must be applied in a manner that will allow it to stretch in order to compensate for log movement. If it is applied too thick, once it cures it won't be able to stretch enough to compensate for the movement and it may tear away from the wood. Think of it like a rubber band. A thick rubber band will not stretch as far as a thin one. However if the rubber band is too thin, it will break when it is stretched. The same thing applies to sealants. If applied too thick, they can't stretch and if too thin they may be weak and will tear when pulled apart. In the case of our sealants the magic number is an applied wet thickness of 3/8”. When cured this results in the best elongation with maximum strength.
Have the Proper Tools
Before you start have all of the tools that you will need at hand and be sure that they are clean and in good working order.
These may include:
- Caulk gun or bulk loading gun
- Rags
- Trowels and/or spatulas
- Plant mister with water
- Masking tape
Weather Conditions
Freshly applied sealants should be protected from direct rainfall for a minimum of 24 hours. Either watch the weather or drape a newly sealed wall with plastic film. Be sure to allow some airspace between the wall and the plastic to facilitate drying. Avoid applying sealants in direct sunlight or when the temperature is less than 40° F. In cold weather it's important that the logs be free of frost and dew in order to ensure that the sealant adheres tightly to the wood. The best surface temperature range for easiest application and best results is between 50° F and 80° F.
Application
Cut the applicator or tube tip to the desired diameter of the sealant bead you want to apply.
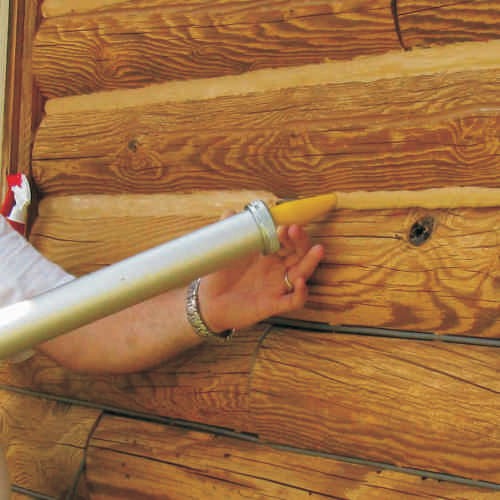 |
| Step 1: Begin by holding the tip firmly against the seam or joint and apply a bead of sealant. You need to apply enough sealant to maintain a wet thickness of at least 5/16” and no more than ½” (target = 3/8”) across the entire seam or joint after tooling. Only apply as much sealant as you can tool smooth in about 15 minutes. |
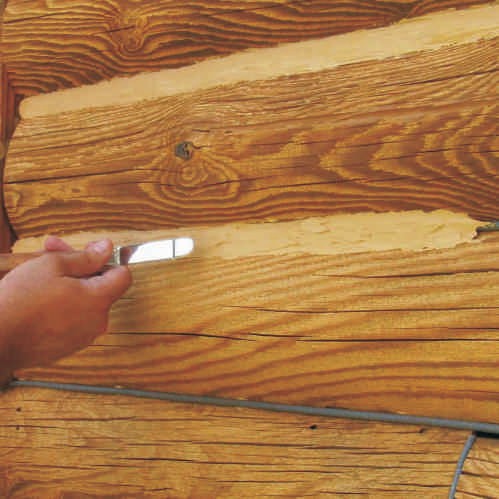 |
| Step 2: Once the joint is filled trowel it out to approximately 3/8th of an inch thick across the entire joint. Do not spray it with water at this time! Make sure there is good contact between the sealant and the exposed edges of the wood. The most difficult areas to tool are corners. You tend to drag product out of the corners resulting in the sealant becoming too thin. You can occasionally check the thickness of the sealant using a toothpick to see if you are maintaining the proper thickness. |
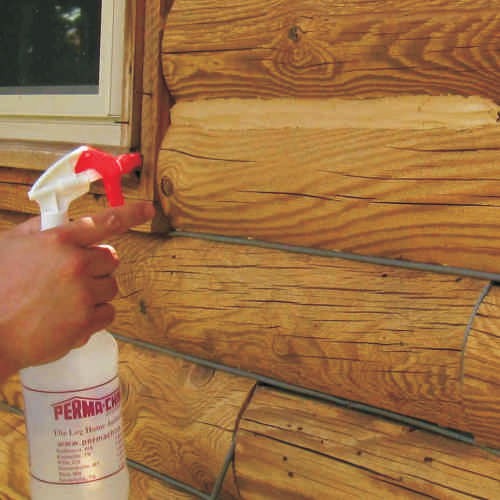 |
| Step 3: Once the sealant is roughly in place and any entrapped air worked out of it, spray it with a light mist of water. Do not saturate the surface with water. If water begins to run down the wall, you have applied too much. |
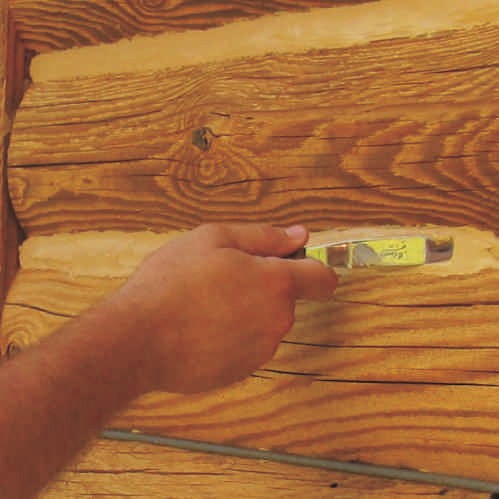 |
| Step 4: Tool the surface smooth with a trowel or spatula. If you used masking tape to protect the surrounding wood be sure to remove it as soon as you are finished tooling and make sure that you have not left any lip on the top edge of the sealant that may catch water. If you have, tool it smooth. |
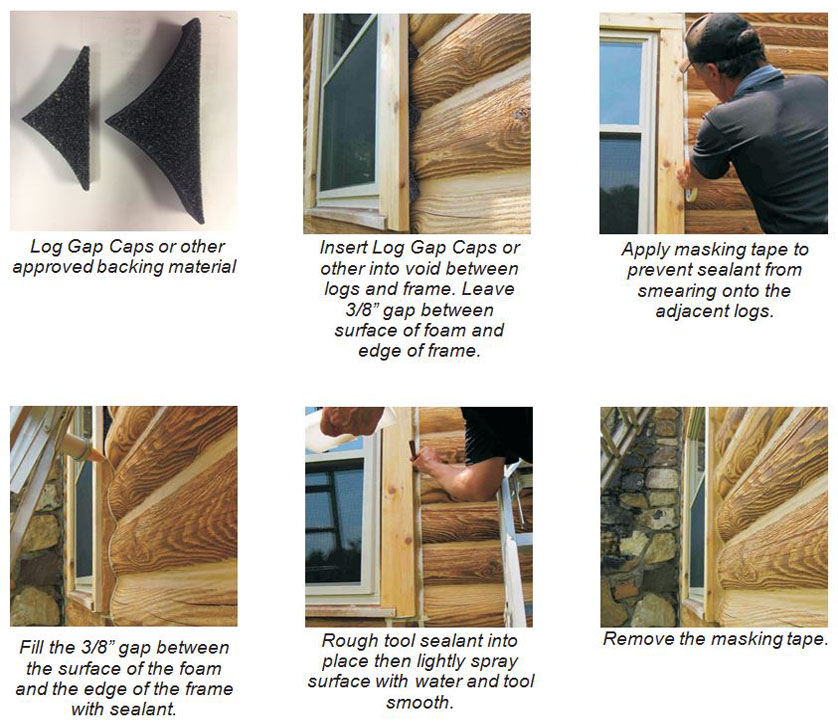
Sealing Window & Door Frames
Clean-Up
If you get any sealant on the surface of the wood, be sure to wipe it off with a wet rag as soon as possible. If you allow it to dry it will be just about impossible to completely remove. Make sure to clean your tools and equipment with clean water occasionally during application. Dried sealant is difficult to remove from just about anything including clothes.
Drying and Curing
Drying time and curing time are two entirely different terms. In warm or hot weather, Energy Seal may begin to skin over in as little as ten minutes while a complete cure may take a couple of weeks. Cooler temperatures will slow both the drying time and curing process.