![]()
![]()
![]()
 Perma-Chink Systems, Inc
Log & Timber Home Care Experts
Perma-Chink Systems, Inc
Log & Timber Home Care Experts
Download the "Inspection Checklist" in PDF here. ![]()
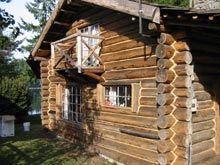
Exterior Inspection
General Inspection Surrounding the Home:
- Landscape plants should be more than 36 inches of exterior walls. Landscaping tips.
- Gutters & down spouts in good working order, evacuating water away from the home.
- Check for decaying wood within 12 inches of (or especially in contact with) ground.
- Wood piles at least 18 inches away from house.
- General patterns of fading of the finish.
- Look more carefully at areas that are most exposed to weather. South- and West-facing walls usually receive more sun exposure. Walls facing prevailing winds are exposed to more rain, dust, and pollen.
- Pay special attention to all logs and ends extending to or beyond roof overhangs.
- Make sure that no sprinkler directs water at the wall. Including water patterns on windy days!
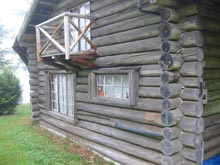
Check for Weathering Patterns:
- Fading of the finish.
- Water staining on exposed log ends.
- Water staining on exposed walls.
Most preservatives offer some type of guidelines to the actual life expectancy of the product, but as a rule of thumb, left exposed to the elements, you can expect two to four years before a reapplication is necessary.
Typically, Shell-Guard is applied with a garden type pump sprayer, although for smaller jobs, a hand held mist type sprayer is more efficient. When in doubt, follow application recommendations found on the label.
The First Step to renewing your log home is cleaning the surface. On new wood sufaces brush or wipe off any extraneous debris that might be present. On the log surface where the buildup of fungi is under the surface of a stain or finish - power wash, strip or sand off this coating and wipe it down with a damp cloth or sponge prior to the application. There are several ways to clean dirty, weathered wood. The most common types of surface cleaners offered by Perma-Chink Systems:
 Wood ReNew - is an excellent surface preparation prior to staining or restaining, preserving or sealing. Wood ReNew works well on logs, decks, fences and cedar shakes.
Wood ReNew is a concentrated powder that is mixed with water and applied to wood. It removes stains and discoloration caused by dirt, mildew, and mold-renewing the natural beauty of wood.
Apply solution liberally with sprayer, brush or mop from bottom up. Allow solution to work for ten minutes, keeping the surface wet with additional amounts of solution. When necessary, use a medium bristle scrub brush or stiff broom to help clean surface.
Since 1981, Perma-Chink Systems' log home sealants have proven themselves on thousands of chinked and chinkless style log homes to become the most widely applied log home sealants in the world and simply the best by every measure:
- Longevity
- Appearance
- Performance
- Ease of Application
Lifeline™ finishes bring your log homes appearance to life. All Lifeline products are waterborne, breathable, flexible, durable wood finishes which also highlight the natural beauty of your log home. There are Lifeline products available for both interior and exterior walls.
What are the benefits of applying an exterior finish?
- To make your home look it’s best
- To protect your home from UV damage
- To protect your wood from water damage
- To provide protection from unsightly mold and mildew
There is no secret in retaining the beauty of your log home. A little care and maintenance along with the use of quality products designed specifically for log homes will not only keep your home looking great, but will also preserve the integrity of the logs and help prevent costly repairs. You can do no better than selecting any of Perma-Chink Systems Family of Log Home Products.