Leading Log and Timber Home Supply since 1981

National Log Home Month. 10% OFF Orders of $500+. Free Shipping on orders $99+

Blog

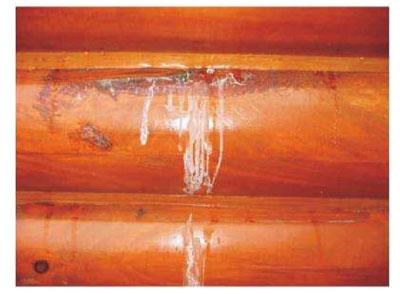
As hot weather approaches, we begin receiving calls about resin bleeding out of logs, and what can be done to stop it. Some people call it sap, or pitch, or resin, but it’s all the same, and short of replacing the log or logs that are bleeding, there is nothing anyone can do to stop it from occurring.

Resin is made up of a combination of rosin acids, fatty acids, and hydrocarbon compounds. It is produced by most trees, but particularly softwood species like spruce, pine, and fir. Amber is fossilized tree resin.

One problem with resin bleed is that the log may continue to bleed each summer for many, many years. Most of the time it’s just a few logs on a wall that bleed resin, but occasionally we do encounter a log home where just about every log or knot on a south or west facing wall bleeds resin, and when that happens, it can be very unsightly. There is no way to outwardly determine if a log will bleed resin or not.

Trees may form pockets of resin due to a past injury, or for a variety of other reasons, and when that tree is harvested it may take months or even years for the resulting log to begin to bleed resin. Tree resin is typically thick and viscous, but gets quite thin when heated. During the summer months, logs on the sunny sides of homes get hot enough for pockets of resin to thin and bleed out of the wood. Once this begins, it is virtually impossible to halt the flow of the resin out of the wood. It will easily burst through coatings like paint or stain due to its highly acidic nature, and form an ugly, sticky mass on top of the finish.

So is there anything that can be done about resin, pitch, or sap bleed? Since the resin is soft and sticky, it is impossible to wipe off the surface without making an even bigger mess. It’s not water soluble, so it can’t be washed off. Small spots of resin can sometimes be cleaned off with alcohol or other organic solvents (i.e. xylene or toluene), but if there is a finish present, the alcohol or organic solvents can also degrade the existing finish.

It is important to remove any remaining solvent residue that could possibly interfere with the adhesion of the reapplied finish. The only effective method of removing resin that we are aware of is to chip it off, but in order to do this the resin must be cold enough to become brittle. In the north, it’s best to wait for a cold winter day, but in the south, cold days are few and far between. In warmer climates, you can use an ice pack to cool down the resin then try to chip it off. Sometimes this works and sometimes it doesn’t, but it may be worth a try. The problem is that come summer, the bleeding will most likely start up again.

One of the biggest challenges relating to resin bleed is when it occurs on bare wood prior to the application of a finish. Since there is no effective way to totally remove the resin, the finish ends up being applied on top of it. When the wall heats up and the resin starts to flow, it carries the finish along with it leaving unsightly spots of exposed bare wood. Again, there is not much that can be done to end this process until the resin eventually stops bleeding out of the wood.

Let us assume that you have a brand new log home, or a home that has had an old finish recently removed. The bare wood is nice and bright, and the color is exactly what you always envisioned for your log home. What’s wrong with applying one or two coats of some type of clear sealer to hold the color of the wood and protect your logs from rain, snow, and ultraviolet (UV) light damage?

Here are the problems with this approach:

The most damaging environmental factors to wood are water and sunlight. Water penetration creates conditions conducive to decay while the UV component of sunlight destroys the integrity of the wood’s cellular structure. Technically, we define this UV damage as the photo-oxidation of the lignin. Although clear coats alone can temporarily provide a barrier against water penetration, they have difficulty dealing with UV light for more than a few months. Clear coats rely on two mechanisms to protect the underlying wood from UV light, reflection and absorption. If the clear coat is slick and shiny, it will reflect much of the UV light but as it gets dirty or dull less and less light is reflected allowing more UV light getting through to the wood.

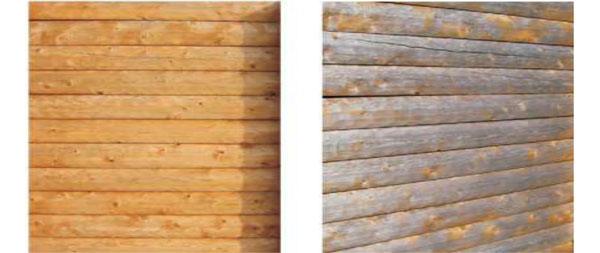
Chemical UV inhibitors may be included in the formulation, but these are sacrificial, in other words the more UV light that they are exposed to, the quicker they get used up. The bottom line is that if only clear coats are applied to exterior bare wood they provide only temporary protection against UV damage and degrade fairly rapidly so that even their ability to repel water may only last for a year or two. Within a few months the home will end up being multicolored with sun protected areas being significantly lighter than those areas exposed to direct sunlight.

So how does a colored finish avoid these same issues?

The colorants or pigments contained in a colored finish absorb UV light and remain active as long as the pigments remain on the surface. It’s the pigments that do the majority of the work protecting the underlying wood from the effects of UV exposure. The purpose of our Lifeline Advance™ clear topcoat is to protect the color coats just like the clear coat on a car. In addition to making a car attractive, car paint is designed to protect the underlying metal. The job of the clear coat is to protect the paint. The same concept applies to our exterior finish systems.

The color coats protect the underlying wood and the Lifeline Advance clear topcoat protects the color coats from the effects of dirt, wind, sunlight and weather. If you want a bare wood look, you can choose a color like Butternut or Wheat. They have the appearance of bare wood, but offer the UV protection inherent in a high quality pigmented stain. Note: These colors still need to be topcoated with Advance.

We occasionally hear from prospective customers who want to purchase Lifeline Advance as a stand-alone finish for application directly to bare wood. When we explain that we do not recommend or sell it for that purpose, some are understandably disappointed.

The reason is simple: we know the results will not meet their expectations.

At Perma-Chink Systems, we are committed to providing the highest-performing finish systems available for log and timber homes. Lifeline Advance is designed to be used as part of a complete finishing system, not as a substitute for a stain on bare wood. Using it outside of its intended application can lead to disappointing appearance, durability, and performance.

We could make the sale, but that has never been our approach. Our reputation is built on helping homeowners achieve long-lasting, beautiful results, and that means being honest about what our products will and will not do. Knowingly recommending a product in a way that falls short of our performance standards is simply not how Perma-Chink Systems does business.

UV Boost™ is a concentrated water-based, liquid stain additive that contains a hindered amine light stabilizer specifically designed for wood protection.

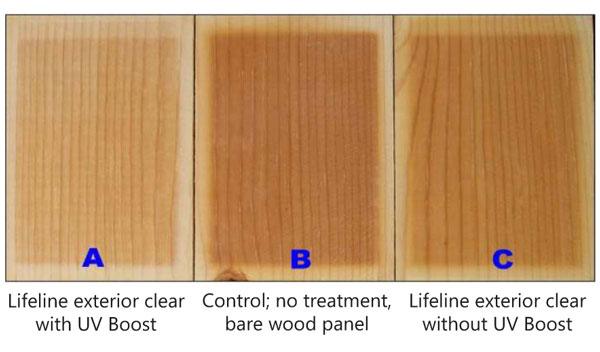
Some regions of the country such as the southeast, southwest, and higher altitude areas are subject to high intensity sunlight. Over time, the ultraviolet light in sunlight photo-oxidizes the lignin component of wood. When added to the first coat of any of our Lifeline™ water-based stains, UV Boost interacts with the lignin thus slowing the photo-oxidative rate that results in wood darkening and eventually wood graying beneath the stain.

Application Tips

1. UV Boost is only effective when used in the first coat of stain or finish applied to bare wood. UV Boost must be in direct contact with the wood for it to work. It is not effective when added to topcoats or stains applied over an existing finish.

2. UV Boost may be used in both interior and exterior applications. When used inside it will help prevent the “picture frame” or “carpet frame” effect.

3. UV Boost is designed to be used in any Lifeline water-based stain as well as Acrylic Gloss/Satin and Sure Shine™ Gloss/Satin. It is not suitable for use in oil-based finishes or stains produced by manufacturers other than Perma-Chink Systems, Inc.

4. Lifeline Ultra-2™, Lifeline Ultra-7™, and Prelude™ are already formulated with the maximum recommended  oncentration of UV Boost; therefore, it is not necessary to purchase or add additional UV Boost to these products.

5. UV Boost is available in two sizes, one for the addition to one gallon containers and one for addition to five gallon containers.

Application

1. Shake container of UV Boost.

2. Add entire contents to the appropriately sized full container of stain or finish.

3. Shake or stir the container of stain or finish until the contents are thoroughly mixed.

4. Apply stain or finish according to the labeled directions.

5. Any stain containing UV Boost that is left over once the initial coat is applied may be used for subsequent coats. Just be sure to “box” the remaining stain to assure a uniform color.

Cleanup

UV Boost that has been spilled may be cleaned with soap and water.

Storage/Shelf Life

1. Keep container tightly sealed until ready for use.

2. Do not freeze.

3. UV Boost has a shelf life of three years from date of manufacturing.

Packaging

UV Boost is available in both 120 mL for adding to one gallon of stain or finish and 240 mL for adding to five gallons of stain or finish. Since the concentration of the active components differ, be sure to use the appropriate size for the amount of stain or finish you are using.

Results from panels exposed in an accelerated weathering tester for 1200 hours:

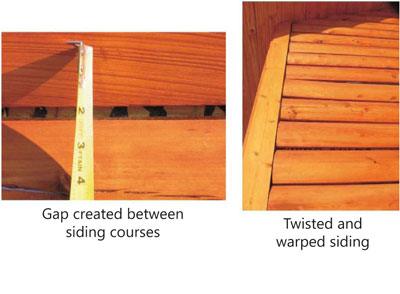
Log siding presents much more of a sealing challenge than stacked logs for several reasons. As stacked logs season and shrink, they settle on top of each other. If there are sealed gaps between the logs, the width of the gaps between the logs may remain fairly uniform as the logs settle. On the other hand, log siding is nailed or screwed into dimensional lumber which holds the siding in place. As shrinkage occurs, the gaps between the courses can become wider and wider (see pictures below). In addition, if the siding is not properly attached to the wall, it can twist and warp, creating even larger gaps between the courses.

There is not much anyone can do in these situations. The problem is related to the quality of the siding and the way it was installed. Even a sealant with 1000% elongation would not be able to handle the dynamics encountered in these circumstances. Trying to keep up with the gaps as they develop is an exercise in futility. It is a lot less work to wait until the siding has finished shrinking and moving and then address sealing the gaps using the appropriate backing materials.

Another problem encountered when sealing log siding is that its design rarely leaves enough room for Backer Rod or other types of backing materials. If no backer is used, even a small amount of shrinkage will result in a split forming in the sealant along the seam. About the only thing that can be done to avoid this from occurring is to run a strip of masking tape along the seam and then trim the tape to the desired width.

Pinstripe tape available at most auto supply stores also works well. Don’t forget that you will need at least 1/4 inch of bare wood above and below the tape for the sealant to adhere to, while maintaining a wet sealant thickness of 3/8 inch. This will allow some movement of the siding without the sealant splitting along the seam.

The last topic about sealing log siding has to do with the siding ends. Just like logs, the exposed end grain of siding is prone to absorb water. Once the window, door, and corner trim is installed, it is almost impossible to completely protect the ends of the siding from contact with rainwater. This is especially true on dormers and other exposed areas of a home. The consequences of water absorption from the end grain include finish adhesion failures and dark discolorations due to water infiltration. However, if the ends of the log siding are coated with Log End Seal™ after staining, water absorption by the end grain will no longer be an issue. But to do it properly the siding will have to be stained and the Log End Seal applied before the trim-work is installed.

Tip: Stain all six sides of the wood siding prior to installation to prevent water vapor from pushing through the back side of the wood siding and negatively impacting the finish system.

All of our stains and sealants are water-based, and while they are still wet, most clean up quite easily with just soap and water. That’s usually the best method to use for cleaning our wet, uncured products off of windows, gutters, downspouts, and other smooth surfaces, but there are occasions when other clean-up techniques should be used to remove some of our textured sealants from wood surfaces.

Obviously soap and water won’t remove dried or cured products, so it’s good to know how to remove them too. Just remember to always try a small spot before using any type of cleaner over a large area. You never know if it will discolor a surface without checking it first.

Now let’s take a look at some specific products and situations.

All Lifeline™ interior and exterior stains and Advance™ Topcoats

If you are working on small areas at a time, it’s not difficult to carry a damp rag with you and wipe off any product that gets onto surfaces that you don’t want stained or topcoated. But if you are using an airless sprayer and overspray gets onto surfaces like windows, gutters, or doorknobs, there is a good chance that the product will dry before you get a chance to wipe it off.

If the stain or topcoat has been on for less than an hour, isopropyl (rubbing) alcohol may remove it, but if it has had enough time to start curing, it will probably require something stronger. The most effective group of products we’ve found for removing dried finishes are automotive glass cleaners available at most automotive supply stores. There are several brands of aerosol foam cleaners that work, but be sure that removing bugs, grime, and tar is on the label. If it is, it will probably do a good job. You need a foam type product to assure that it does not quickly run off of the surface. If you are attempting to remove the stain or topcoat off a painted surface, be sure to test a small spot to make sure that it does not discolor or remove the paint as well.

Energy Seal™ and Perma-Chink®

Both of these sealants contain an aggregate that gives them their texture. If you get either one on a smooth, slick surface they can be easily removed with a damp rag. But if you get a clump on a rough surface like bare or stained wood, the aggregate and polymer will get imbedded in minute nooks and crannies on the surface, and it becomes very difficult to completely wipe it off without smearing it over a wide area.

If the wood is bare, once stained the spot may stick out from the surrounding area, since the sealant residue will change the porosity of the wood. It is sometimes better to allow the Perma-Chink or Energy Seal time to partially cure and then try to roll it off with your thumb and fingers.

Once Perma-Chink or Energy Seal fully cure, they become very difficult to remove from just about any surface. The best way to remove them from hard, smooth surfaces is to scrape or cut them off with a razor knife. If they cure on bare or stained wood, they are almost impossible to remove without doing some damage to the surface and the finish.

Cured Perma-Chink and Energy Seal are impervious to most solvents, but if you want to soften them for easier removal, you can use a paint stripper containing methylene chloride. You’ll need to put on a thick coat and since it needs to be left on the sealant for at least four to six hours, it’s best to cover it with plastic film to keep it from drying out. When the sealant softens, you can try removing it with a scraper or stiff nylon bristled brush. Do not use a wire brush. No matter which method you’ve used to remove Perma-Chink or Energy Seal, if the surface was stained, you’ll need to do some touch-up work. Sand the spots with 60 or 80 grit sandpaper then touch-up using a rag rather than a brush.

Woodsman™ and Check Mate 2®

Since neither of these smooth-surfaced sealants contain an aggregate they are much easier to remove with a wet rag, as long as it is done quickly. Once they cure, you’ll need to use the same techniques as removing cured Perma-Chink or Energy Seal.

Log End Seal™

Wet Log End Seal is fairly easy to remove using just water, but once it cures it becomes just about impossible to remove without physically grinding or sanding it off. The problem is that since it is a soft polymer, it will quickly fill sandpaper or a sanding disk. Probably the best tool to use is a Wood Shark. If the teeth of the Wood Shark do become filled with polymer, it can be burned away with a blow torch and the Wood Shark can be reused indefinitely.

Borates, Wood ReNew™ and Log Wash™

Borates (Bora-Care®, PenaShield®, and Tim-Bor®), Wood ReNew and Log Wash are all very water soluble, but if not adequately rinsed off of glass or painted surfaces, they can leave a white haze. The best thing to use to remove any borate, Wood ReNew or Log Wash residue is pure warm water. Don’t add any ammonia, soap, or detergent. Once the residue is washed off you can use a commercial glass cleaner to remove any streaks.

M-Balm™ and E-Wood™

Both of these products are two-component epoxies that are not water soluble, so just soap and water won’t have much effect on them. You can use white vinegar to clean up the individual components, or even mixed material before it cures.

To remove cured M-Balm and E-Wood, you have no choice but to grind or sand it off. That’s not difficult with E-Wood putty, but since M-Balm soaks into the wood surface, sanding will still leave the wood impregnated with epoxy and prevent that area from properly taking a stain.

Log siding presents much more of a sealing challenge than stacked logs for several reasons. As stacked logs season and shrink, they settle on top of each other. If there are sealed gaps between the logs, the width of the gaps between the logs may remain fairly uniform as the logs settle. On the other hand, log siding is nailed or screwed into dimensional lumber which holds the siding in place. As shrinkage occurs, the gaps between the courses can become wider and wider (see pictures below). In addition, if the siding is not properly attached to the wall, it can twist and warp, creating even larger gaps between the courses.

There is not much anyone can do in these situations. The problem is related to the quality of the siding and the way it was installed. Even a sealant with 1000% elongation would not be able to handle the dynamics encountered in these circumstances. Trying to keep up with the gaps as they develop is an exercise in futility. It is a lot less work to wait until the siding has finished shrinking and moving and then address sealing the gaps using the appropriate backing materials.

Another problem encountered when sealing log siding is that its design rarely leaves enough room for Backer Rod or other types of backing materials. If no backer is used, even a small amount of shrinkage will result in a split forming in the sealant along the seam. About the only thing that can be done to avoid this from occurring is to run a strip of masking tape along the seam and then trim the tape to the desired width.

Pinstripe tape available at most auto supply stores also works well. Don’t forget that you will need at least 1/4 inch of bare wood above and below the tape for the sealant to adhere to, while maintaining a wet sealant thickness of 3/8 inch. This will allow some movement of the siding without the sealant splitting along the seam.

The last topic about sealing log siding has to do with the siding ends. Just like logs, the exposed end grain of siding is prone to absorb water. Once the window, door, and corner trim is installed, it is almost impossible to completely protect the ends of the siding from contact with rainwater. This is especially true on dormers and other exposed areas of a home. The consequences of water absorption from the end grain include finish adhesion failures and dark discolorations due to water infiltration. However, if the ends of the log siding are coated with Log End Seal™ after staining, water absorption by the end grain will no longer be an issue. But to do it properly the siding will have to be stained and the Log End Seal applied before the trim-work is installed.

Tip: Stain all six sides of the wood siding prior to installation to prevent water vapor from pushing through the back side of the wood siding and negatively impacting the finish system.

Many people are under the impression that the winter months are hard on their logs and finishes. To some extent that’s true. In cold climates where the exterior log surfaces may be covered with ice and snow for several months can be damaging if the logs aren’t properly finished. But even then, the most damaging effects of weather on wood and coatings actually occur during the hot summer months.

One component of sunlight is ultraviolet light, commonly referred to as UV light, or UV rays. UV light is responsible for most damage to exposed wood because it changes or destroys the wood’s lignin, a component of wood that hardens and strengthens the cell walls. In more scientific terms, this process is called photo-oxidation.

Lifeline™ finish systems help retard this photo-oxidation process through three distinct mechanisms: reflection, absorption, and chemical reaction. Our Advance Gloss and Advance Satin topcoats help reflect the sun’s rays, thus reducing the amount of UV light hitting the color coats and the underlying wood.

Glossy surfaces are better reflectors than dull surfaces, which is why our Advance Gloss provides a bit more protection than Advance Satin. However, an accumulation of dirt on the finish will significantly reduce the reflective properties of the topcoat, one reason why a home should be routinely cleaned with Log Wash™. Advance topcoats also help protect the color coats and wood from the abrading effects of wind, rain, ice, and snow.

The colorants contained in the color coats are responsible for absorbing UV light. The more colorant a finish contains, the less UV light will get through to the wood itself. Opaque finishes, like paint and solid body stains, pretty well block all of UV light from hitting the wood. That’s why when they peel off, the freshly exposed wood may still look bright. On the other hand, the objective of transparent stains like Lifeline is to allow the character of the wood to show through the finish. In order to accomplish this transparency, the pigment loading is significantly less than that contained in opaque finishes. So although some of the UV is blocked by the colorants, enough of it gets through to eventually photo-oxidize the wood. Since darker colors typically contain more colorant than lighter ones, they tend to last longer. However, some of our light colors like Butternut and Wheat also contain a high colorant loading which extends their life, but they do give up some degree of transparency in return.

High quality finishes like Lifeline also contain components known as UV inhibitors that chemically protect both the finish itself, and the underlying wood from the effects of sun exposure. The limitation of these constituents is that they are sacrificial. In other words, over time they get used up. The more sunlight that hits them, the quicker they lose their effectiveness. In shaded areas of a home, these UV inhibitors may continue to work for many, many years, but in those highly exposed areas of a home like the south and west facing walls, they may only last a few years. That’s why occasional maintenance on a home is so important.

Round Logs

The profile of the logs has a significant impact on the weathering characteristics of a wall. The effect of sunlight and the weather on round logs is altogether different than on squared logs or flat, vertical siding. The top third of a round log is subjected to much more intense weathering than the bottom third. In cold weather climates snow and ice can accumulate on the upper third while the bottom third remains somewhat protected. Upward facing checks that have formed in the top section of the log will funnel rainwater directly into the interior of the log where it can soak into the surrounding wood. But most damaging of all is the angle of the top third of a round log towards the sun.

The top third of round logs catches many times more UV light than the bottom third. Besides exposing the wood to more UV exposure, the UV inhibitors in the upper third may become used up, whereas in the lower third they may still be active. Over time this can result in a noticeable difference in color and signs of weathering between the upper and lower sections of the logs. Providing some maintenance to the upper sections of round logs without creating lap marks or color differences can be accomplished, but it may be a bit of a challenge. The key is to do the maintenance before the wood becomes gray due to photo-oxidation.

Squared Logs

Squared logs and vertical flat siding are easier to maintain since the sun hits the logs at the same angle, and the UV light is evenly distributed over the entire surface. In addition, the flat vertical surfaces cannot accumulate snow and ice and even upward facing checks are not as prone to rainwater entering the logs. Although squared logs are subject to the same weathering parameters as round logs, and since the weathering is mostly uniform over the entire exposed surface, maintenance is easier to accomplish without worrying about lap marks and color differentiation.

Log Siding

Round log siding probably presents the greatest challenge to forestalling the effects of weathering. Typically used in high exposure locations such as dormers and gable ends, in addition to suffering the same weathering characteristics as round logs, log siding has some features which makes it even more difficult to protect from the effects of the weather. Siding is often manufactured from lower quality wood than logs, frequently using green wood. This makes it more susceptible to twisting, warping and cracking. Since siding does not have the high thermal mass of full logs, during the summer months their temperature can range from 80ºF to 160ºF – or higher – during the course of one day. This puts a lot of mechanical stress on both the siding and its finish system resulting in small fissures forming on the surface. Rainwater can then enter these fissures and get behind the finish.

Fissuring of Log Siding

Round log siding is typically milled quite smooth. The extreme smoothness presents a challenge applying the proper thickness of pigmented film necessary for adequate protection of the underlying wood. Smooth log siding should be coarse sanded or pressure washed using Wood ReNew™ before the application of the pigmented stain. Prelude™ Clear Primer should never be used on log siding unless it is unusually porous or has been media blasted.

Protecting Your Home

There are two basic ways to combat the effects of weathering. The most effective method is to keep log walls and siding in the shade by extending roof overhangs or constructing roofed porches around the home. The next best way is to apply a high quality finish system like Lifeline and Advance Topcoat. But the overall performance of even the best finish system is dependent upon proper surface preparation and application technique. Avoiding the use of chlorine bleach and back-brushing all coats of finish to assure adequate film thickness is crucial for long term protection of the wood.

Routine maintenance also plays a role in extending the life of your finish system. Our Advance Topcoats help reflect  sunlight thus decreasing the amount of UV light that hits the surface of the wood. If the surface is dirty, it diminishes the reflective properties of the topcoat so giving your home a good washing a couple times a year not only keeps your home looking attractive, but helps retain the color of the stain and protects the underlying wood from UV damage.

NBS-30

NBS-30 is an oil-based insecticide additive for paints and stains. Pure and simple, oils and water do not work together and we DO NOT approve the use of NBS-30 in any of our finishes.

Bug Juice

Bug Juice is also an insecticide additive consisting of a suspension of Deltamethrin in water. Since it is water-based, it is chemically compatible with our finish systems, but when added to Lifeline Advance™ Gloss, it significantly reduces the transparency and gloss of the topcoat.

One of the questions regarding Bug Juice is, does it work? First, insects like carpenter bees, lady bugs, boxelder bugs, and other annoying log home pests are not included on the Bug Juice label. In fact, the only labeled target pests are cockroaches, ants, silverfish, mosquitoes, and weevils. Second, according to their web site, no efficacy studies were conducted longer than 48 hours after application. The bottom line is that there is no data to support the notion that Bug Juice deters carpenter bee infestations, nor does the manufacturer make any claims to that effect.

Bitrix

Bitrex is a bittering agent occasionally used to discourage wildlife from gnawing on logs and other wood members. Its major use is as an additive to liquid household products to keep young children from tasting them. Although it is occasionally added to paint, Bitrix is not compatible with Advance and should never be mixed together with any our finishes. It can be used in a water solution on top of our finishes once they have cured, but it must be reapplied after a heavy rain since it is easily washed away.

Stay Clean I/E

In high humidity environments that are prone to heavy mold growth we do recommend the addition of Stay Clean I/E to give the finish an added boost of mildewcide. Stay Clean I/E is only effective when added to the last coat of finish that’s exposed to the atmosphere. Adding it to our color coats does no good at all.

However, there is one situation where the addition of Stay Clean to Lifeline Prelude™ should be considered. Occasionally we get a call from someone who has built a new home or is in the process of refinishing an older home in the fall time of the year. The onset of cold weather may interfere with completing the exterior finish work, so they want to protect the exterior log surfaces until spring. A coat of Prelude will help keep the walls clean and prevent UV graying through the winter months. But since Prelude does not contain a surface mildewcide, the addition of Stay Clean I/E is recommended.

The only negative impact the addition of Stay Clean has to our Lifeline Advance Topcoats is that it reduces the transparency and reflectivity of Advance Gloss by about 30%.

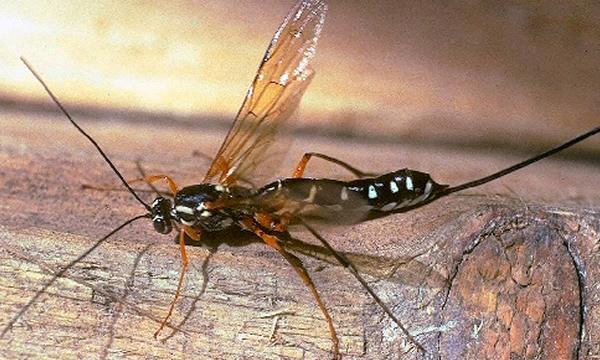
Every summer we receive calls about small flying insects making holes in the exterior surfaces of logs. They are usually described as tiny flies, bees or flying ants, but in fact these insects are small parasitic wasps that are about the size of a fruit fly or large gnat.

There are hundreds of species of parasitic wasps, many of which specialize in targeting beetle larvae, including wood‑boring beetles. They can often be seen entering and emerging from existing beetle exit holes as they search for live larvae on which to lay their eggs.

People assume that these insects are actually burrowing into the wood since they often see frass or sawdust being pushed out of the holes they’ve entered. In their search for live beetle larvae, the wasps clean out the tunnels by kicking the frass out of existing beetle emergence holes. Since the wasps can’t tell if the hole was made recently or many years ago, they tend to clean out every hole they can find.

Parasitic wasps do not consume wood; therefore, borate treatments are ineffective treatment against them. In this respect they are similar to carpenter bees.

Some people get excited when they see 20 or 30 of these wasps flying around their log walls, but they are harmless and do not sting. They cause no damage and are, in fact, beneficial insects since they reduce the population of wood boring beetles. Most of their activity occurs in the hot, summer months. Once the weather starts to cool a bit, they usually disappear. If you are really upset by these insects, you can spray your walls with Ortho Home Defense, Spectracide Bug Stop or similar products. Consequently, being somewhat adverse to the broadcast use of contact pesticides, we believe the best solution is to just to ignore them.

Three Examples of Parasitic Wasps

One of the best tools an applicator or homeowner can have in their possession is a moisture meter. In addition to finding trouble spots due to water infiltration, it can also help determine if the surface of logs are dry enough to seal or finish.

Following are some guidelines when using a moisture meter.

Decay and Insects

Untreated wood that contains a moisture content of 20% to 60% is subject to attack by decay fungi. It’s not a matter of if it will decay but when it will decay. That’s why it’s so important that a finish on green wood be able to breathe in order to allow the internal moisture to escape from the wood rather than be trapped inside.

Non-breathable or vapor barrier finishes like oil-based alkyds state on their instructions: “Do not apply when moisture content of the wood is greater than 18%.” When these types of finishes cover the surface of logs that contain a lot of moisture, the inside of the logs will begin to rot away and/or the finish will begin to peel off due to water vapor pressure.

Insects, too, prefer moist wood. Both carpenter ants and anobiid powderpost beetles typically infest wood members with moisture contents in excess of 30%.

Sealing or Finishing Logs

As we state in our literature, Perma-Chink products can be used on fairly green logs. But that does not mean that they can be applied when the surface of the wood is saturated with water. Even though the interior of the logs may contain 40% or more moisture content, the surface must be dry enough so that the sealant or finish adheres to the wood.

We would like to see the surface moisture content be 20% or less before applying any of our sealants or finishes. If the surface moisture content is too high, there is a chance that product adhesion will be compromised. This is also true after a home has been washed.

So how long do you have to wait for the wood to become dry enough to stain? It’s not so much a matter of time as it is surface moisture content. The objective is to allow enough time for the surface moisture to evaporate to a level of 20% or less. A moisture meter takes the guesswork out of the equation.

Moisture meters used to be high dollar items, but over the past few years they have dropped significantly in price. A quick search on eBay and Amazon.com produced a number of pin-type digital moisture meters for less than $25.00 plus shipping. For that price, a moisture meter is an excellent investment for both homeowners and professional applicators.

The following are guidelines to follow after performing a borate treatment to your log home.

1

PenaShield®Ready-to-Use Borate Wood Preservative

Washing – Avoid washing down a wall within five days of application. We recommend waiting at least seven days. In practice there are very few occasions when a wall treated with PenaShield® needs to be washed at all.

Provided the first coat of finish can be applied within seven days of application there is no need to wash it down. If for some reason there is a delay in applying the first coat of finish or discolorations or white residue is present, then washing with water or Log Wash™ may be appropriate but again wait at least five days after the PenaShield was applied. Otherwise, too much of the active borate will be washed away.


Staining – An application of PenaShield usually dries sufficient to stain the wall within one to three days. There is rarely a need to wait more than three days after a PenaShield application to apply the first coat of finish.

Occasionally, early morning dew may make the wall a bit damp to the touch but once the sun comes out and the wall dries the finish may be applied without affecting adhesion. If application of the first coat of finish is delayed for several weeks or even months, they will not leach out. Once the borate gets into the wood it is very difficult to remove, even if it gets rained on for several months. In this case even pressure washing won’t remove enough of the borate to matter.

2

Tim-Bor®Water-Soluble Borate Powder

Washing – Avoid washing down a wall within three days of application. Again, it’s best to wait at least seven days but in typical weather conditions most of the water accompanying the borate will have dried within three days and once the water dries the penetration of the borate into the wood ceases. If white deposits appear on the surface, start by lightly misting the area with water. If they remain visible after the surface dries, try washing the wall down.
Staining – Like PenaShield there is rarely an occasion that a Tim-Bor treatment is not dry enough to stain within one to three days.

3

Bora-Care®Borate Wood Preservative Concentrate

Washing – The use of Bora-Care has created much of the confusion relating to washing borate treated walls. If Bora-Care is used, it must be allowed to dry at least 48 hours then washed down with Log Wash™ before staining. The two weeks’ wait and washing is not optional as it is required. We used to say that if it was dry to the touch, it was ready for staining, but we found that it could appear dry one day and be damp enough the next morning to create stain adhesion problems.

In addition, we’ve found there are some types of molds that thrive on the glycols contained in the Bora-Care. If the treated surface is not thoroughly cleaned of these mold spores, there is a chance that mold spots can develop under the finish. Remember that although borates are great for eliminating and preventing wood decay fungi, they are not effective in killing or averting all types of surface molds.


Staining – The first coat of finish should not be applied over a Bora-Care treatment without first washing down the wall with a Log Wash™ solution. One of the glycol components in Bora-Care tends to stay on the surface and can create adhesion issues with the stain, Perma-Chink®, and even Energy Seal®.

Just remember to allow at least 48 hours after the Bora-Care application before washing the surface.

Ever since Perma-Chink Systems introduced borate treatments to the log home industry over 20 years ago, its products have been the preferred method of protecting log homes from wood-destroying insects and decay fungi. We are still the world’s largest supplier of borate-containing preservatives for log homes, and although there are other borate-based products now available, most are based on technology developed by Perma-Chink Systems back in the late 1980s.

Perma-Chink Systems Borate-Based Preservatives/Pesticides

PenaShield® – A borate/glycol formulation that requires no mixing and can be used directly out of the container. PenaShield® is a water-soluble treatment containing proprietary penetrants that all it to diffuse quickly and thoroughly into wood. A Lifeline™ finish may be applied after the treatment has dried which usually takes between 1-3 days..

Bora-Care® – A thick, viscous liquid borate/glycol that must be mixed with water for use. It requires a minimum of 48-72 hours of dry time and must be washed down with Log Wash solution (2 cups per gallon of water) before applying the first coat of Lifeline™ finish.

Tim-Bor® – A water-soluble borate powder that acts as a wood preservative, fungicide, and insecticide. It can also be dusted into termite galleries to kill termites in as little as 7 days. Since it contains no glycol, it does stay near the surface of treated materials. If the finish system is physically or chemically removed, we recommend re-applying.

Cobra Rods – Fused borate rods that are inserted into the wood, providing localized protection to high risk zones like log ends and the base of posts. In addition to the borate, Cobra Rods contain a small amount of copper oxide to increase their efficacy against some species of decay fungi.

Application Equipment

Any type of pump-up, compressed air sprayer is suitable for applying PenaShield®, diluted Bora-Care®, or solutions of Tim-Bor®. Either a cone or fan spray tip will work. Do not attempt to use an airless sprayer. Airless sprayers put out a fine liquid mist that can be carried away with even a slight breeze. In addition, the high surface area of the small droplets allows the water contained in the solution to rapidly evaporate leaving behind a high concentration of borate and in the case of PenaShield® and Bora-Care®, mixed glycols form a sticky film on the surface of the wood rather than penetrating the wood.

For treating small areas, you can use a brush or hand sprayer to apply borate solutions.

Application Information

Applications of PenaShield®, diluted Bora-Care®, and solutions of Tim-Bor® must be to bare wood. If the surface of the wood has any type of coating, finish or water-repellent on it, or if a mill glaze is present on the surface, the active borate ingredient will not penetrate the wood, and the wood will remain unprotected.

Product Preparation

PenaShield® – No preparation is required. PenaShield® is used “as is” right out of the container. Any unused solution may be poured back into the original container.

Bora-Care® – Pour Bora-Care® concentrate into a pail. Do not attempt to mix the concentration in a sprayer, you run the risk of the heavy concentrate blocking hoses and spray tips. Add an equal volume of warm water. Physically stir the mixture until the mixed solution is uniform and there is no thick concentration remaining at the bottom of the pail. Using a paint mixer in an electric drill will speed the mixing process. Once the diluted Bora-Care® is completely mixed and uniform pour the solution into the spray tank. Use 1:1, 2:1, and 3:1 Bora-Care® solutions within 24 hours after mixing; 5:1 solution will remain stable for up to 30 days. Do not leave diluted Bora-Care® in the sprayer overnight, it will block up the spray tip. Clean and/or flush equipment and lines with water after use.

Tim-Bor® – If preparing a 10% Tim-Bor® solution, add approximately 80% of the required volume of water to the mixing vessel. While stirring, gradually add one pound of Tim-Bor® powder per gallon of water. If preparing a 15% Tim-Bor® solution, you would gradually add 1.5 pounds of Tim-Bor® powder per gallon of water. Keep agitating until there are no visible lumps and the solution has dissolved. Do not leave any unused solution in your sprayer overnight. The borate will drop out of solution and block up the sprayer.

Borate Solution Applications

Step 1: Be sure the surface of the wood is clean and dry before starting. Never wet the wood right before applying a borate treatment. If you do, the wood cells will be saturated with water preventing the borate solution from absorbing into the wood.

Step 2: If you have an adjustable spray tip, set it to either a fan or cone relatively coarse spray. If set to a fine spray it will be more susceptible to wind drift and it will take longer to complete the job.

Step 3: Start spraying the solution at the bottom of the wall and work your way up. If the solution begins to run down the wall you are applying too much. You only need to wet the surface, not saturate it. However, on exposed log ends keep applying the borate solution until it no longer absorbs into the wood. Log ends are typically the most decay-prone areas of a log home and need the greatest protection. Be sure to get some borate into all upward-facing checks and fissures. It is not necessary to back-brush the borate solution. If you miss a small spot (less than an inch in diameter) here and there, do not worry. The solution will spread out in the top layer of wood.

Step 4: (PenaShield® and Tim-Bor®): In the case of treatment with PenaShield® or Tim-Bor® the surface will be ready for the first coat of finish within two to three days. If for some reason there is a delay in applying the finish, the borate treatment will typically not have to be reapplied unless there is a torrential downpour within three days after the application. However, do not purposely wash the surface for at least a week after treatment. You run the risk of removing some of the active ingredients.

Step 4: (Bora-Care®): After a treatment with diluted Bora-Care® you must wait at least two weeks for the active ingredient to make its way into the wood and for the glycol constituents to dry before applying any sealants or a finish. Even then, there may still be enough glycols remaining on the surface to interfere with the adhesion of the finish. We recommend washing any walls treated with diluted Bora-Care® with two cups per gallon Log Wash™ solution one or two days before the application of the first coat of Lifeline™ finish but no sooner than two weeks after the initial Bora-Care® application.

Step 5: Wash hands, clothing and equipment with soap and water.

Step 6: For long term protection exterior wood surfaces that have been treated with a borate solution should be coated with a Lifeline™ exterior finish. If the exterior surfaces are to remain bare a re-application should be made every six years regardless of which product is used. Interior borate treated surfaces do not require a water repellent coating.

Maintenance

PenaShield® and Bora-Care® treatments are permanent and should never need to be re-applied. In the case of a borate treatment using Tim-Bor®, if the home is subsequently stripped or media blasted, an additional treatment is recommended once the wood is bare.

Cobra Rods Installation Information

Cobra Rods may be used to help eliminate an existing localized decay problem or to prevent decay from talking hold in a high-risk area like the bottom of a support post. They may be installed into wood that is bare or have already been finished. Cobra Rods are two inches long and although are labeled as being 1/2” in diameter they are 7/16″ so they easily fit into a 1/2” diameter hole. A black plastic plug is supplied with each Cobra Rod.

Equipment

  • Electric drill with a 1/2” diameter bit
  • Screw driver
  • Trowel
  • Energy Seal™ or Woodsman™ sealant
  • Small amount of stain and topcoat (optional)

Installation

Step 1: Drill a 1/2” diameter hole in the wood to a depth of at least 3” deep. This depth leaves room for the rod and the plug. For large diameter round or rectangular logs, two rods may be inserted into the same hole but drill the hole at least 5” deep.

Step 2: Insert the Cobra Rod into the hole as far as it will go.

Step 3: Insert the plastic plug and use a screwdriver, twist it clockwise to set the plug into the hole.

Step 4: The plastic plug may be hidden from view by placing a layer of appropriately colored Energy Seal over the end. The Energy Seal may then be stained to match the surrounding wood. Seal over the end. The Energy Seal may then be stained to match the surrounding wood.

Step 5: Wash hands with soap and water.