Log homes rarely remain in the same condition year after year. Finishes age. Wood moves. Small maintenance issues can turn into tedious projects when neglect occurs.
Our archive grants access to practical information. Inside, you will find articles, videos, and technical resources. Each covers a wide range of maintenance and restoration topics.
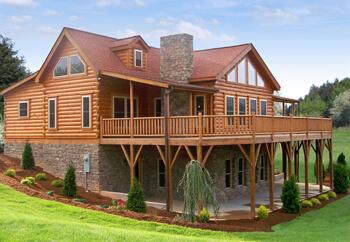
A custom log cabin is more than a house — it’s a foundational structure for a homesteading lifestyle built around land stewardship, self-reliance, and daily connection to your environment. For aspiring homesteaders, building a log home requires thoughtful planning long before the first log is set.
A Quick Snapshot Before You Break Ground
Building a custom log cabin for homesteading involves:
Choosing land that supports long-term food production and water access
Preparing a site that protects the structure from drainage and weather issues
Securing permits and working with experienced professionals
Designing interior and exterior spaces around real homestead workflows
Planning for construction timing, settling, and ongoing maintenance
When done intentionally, your cabin becomes an integrated part of your working landscape — not just a place to sleep.
Spend time walking the property in different weather conditions. Observe drainage patterns, wind exposure, and where snow accumulates. These observations will directly influence cabin placement.
Site Preparation Basics
Proper site preparation protects your investment:
Grade the land to direct water away from the foundation
An experienced log cabin contractor will account for settling by installing slip joints, adjustable posts, and proper window and door framing systems. This is not an area to improvise.
When interviewing contractors, ask to see previous builds. Talk to past clients. Clarify who handles subcontractors and inspections. A log cabin is a specialty build — choose someone who treats it that way.
Designing for Daily Homesteading Life
Your cabin should support how you actually live and work.
Functional Spaces to Prioritize
A mudroom for boots, tools, and wet clothing
A pantry sized for bulk storage and preserved food
A utility area for water filtration, solar equipment, or battery systems
Covered outdoor workspace for firewood processing or equipment repair
Think beyond aesthetics. For example, positioning the kitchen near garden access shortens harvest-to-prep time. Placing windows to monitor livestock saves steps during winter storms.
Design integration matters. Map your property layout — gardens, greenhouse, barn, workshop — and position the cabin as the central operational hub.
Managing the Paperwork Without Losing Your Mind
Permits, contracts, and design documents accumulate quickly during a custom build. You’ll likely juggle building permits, septic approvals, contractor agreements, engineering plans, and insurance paperwork.
Keep all documents organized and easily accessible throughout the process. Many homesteaders create a digital master file that includes every permit revision and contractor change order. Tools that let youmerge PDF files online can simplify this by combining scattered documents into one consolidated file. When inspectors call or contractors need clarification, having everything in one place reduces delays and stress.
A Resource for Learning Log Home Craft
If you want reliable, homeowner-focused information about building and maintaining a log cabin, the International Log Builders’ Association (ILBA) is an excellent resource. ILBA supports education and standards in handcrafted log construction, offering articles, training information, and technical insights into proper log building practices.
Reviewing guidance from organizations dedicated specifically to log construction can help you better understand craftsmanship standards, maintenance expectations, and what quality work should look like — whether you’re building yourself or hiring a contractor.
Ongoing Maintenance: What to Prioritize From Day One
A custom log cabin requires consistent care. Maintenance isn’t optional — it’s part of the lifestyle.
From the first year onward, prioritize:
Inspecting and maintaining sealants between logs
Monitoring moisture intrusion around windows, doors, and rooflines
Keeping gutters clear and directing water away from the foundation
Protecting wood surfaces from UV damage and pests
Regular inspections help catch small issues before they become structural problems. Specialty retailers like Perma-Chink Systems provide products and guidance specifically designed for log homes, including sealants, finishes, and repair materials. Their technical resources are especially helpful for new owners learning what to look for.
Consistent maintenance preserves not only the beauty of the logs but also the energy efficiency and structural integrity of your home.
Frequently Asked Questions
How much land do I need for a homesteading log cabin?
It depends on your goals. A few acres can support gardens and small livestock, while larger operations may require 10+ acres for pasture and crop rotation.
Do log cabins require more maintenance than standard homes?
Yes. Logs must be monitored for moisture, UV exposure, and settling-related gaps. However, routine inspection makes maintenance manageable.
How long does it take to build a custom log cabin?
From design to move-in, expect anywhere from 6 months to over a year depending on permitting timelines and project complexity.
Can I build a log cabin myself?
Some homesteaders do, especially with smaller kits. However, structural expertise and knowledge of settling systems are essential for long-term performance.
Step-by-Step Planning Checklist
Define your homesteading goals (livestock, crops, off-grid systems).
Evaluate land for water, soil, zoning, and access.
Develop a property layout map before finalizing cabin placement.
Secure permits and confirm code requirements.
Hire an experienced log cabin contractor.
Plan for settling adjustments in design.
Create a long-term maintenance schedule before move-in.
A custom log cabin built for homesteading is both shelter and system. Every decision — from land selection to maintenance habits — affects how well your home supports your self-sufficient goals. Plan carefully, build with experienced help, and treat ongoing maintenance as part of daily stewardship.
Seth Murphy is a guest contributor and can be reached at papadyi.com
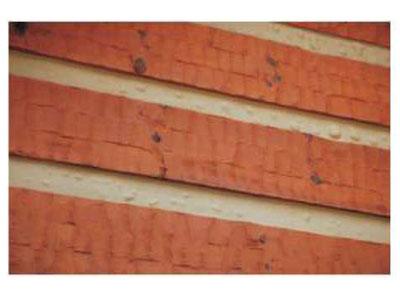
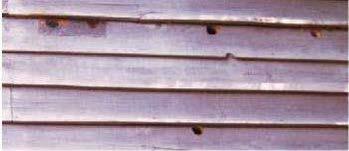
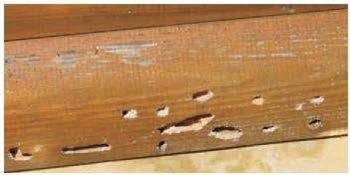
Woodpeckers cannot tell the difference between the wood in your home and dead trees in the forest, so they occasionally cause damage to logs, siding, or fascia boards. People attribute this damage to woodpeckers pecking for grubs in the wood, but that is not always the case. There are three main reasons that woodpeckers peck on wood; one, they are looking for something to eat, two, they are defining their territory and three, they are making a nest. It is usually the second reason that it creates the most damage.
Woodpeckers are very territorial. In order to let other woodpeckers know that this is his (or in some cases her) territory, it flies around the perimeter of its territory, usually in the morning, and initiates a series of raps on hollow trees or other wood members that have the “right” sound. This behavior is called “drumming” and consists of two or three long brrrrrrrrrrrps. The woodpecker will typically drum in one spot for a minute or so, day after day. It does not take long before a large, irregular hole appears at the drumming site. If the site is a log or siding of a home, it can become a real eye sore.
When a woodpecker pecks for grubs in wood it acts differently and makes smaller cone-shaped holes or a long gallery. If you have ever seen a woodpecker searching for grubs it will constantly turn its head as if looking for something on the wood. It is actuality listening for grubs feeding in the wood. All it needs to do is make a hole large enough for its tongue. A woodpecker’s tongue is long and thin and that is what it uses to catch a grub in a gallery. The holes woodpeckers make searching for grubs are usually no more than an inch or so in diameter. Occasionally a woodpecker will attempt to excavate out a round nesting hole in a log, but it is rare and if the wood is sound, it will usually give up after a few days. However, they will make a hole in synthetic chinking to establish a nesting site.
Solving the Problem
One thing you can try to discourage drumming woodpeckers is to put a piece of metal window screen over the area where the woodpecker drums. This often discourages it enough that it will go elsewhere. Fake owls, snakes, and other scare devices may work for a little while, but it does not take exceedingly long for the woodpecker to discover that if it just ignores it, nothing happens. Trapping and releasing woodpeckers aren’t highly effective either. They can fly and unless you release them miles away, they will return to their home territory within a few days.
For woodpeckers feeding on beetle grubs, the best solution is to kill the grubs in the wood and the way to do that is to treat the wood with a borate. This will kill the beetle larvae and if there are no grubs for the woodpecker to search for, it will move on to better feeding sites. However, borates are not effective for eliminating or preventing carpenter bees so other methods of control must be used.
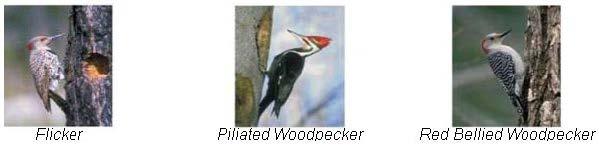
Three types of woodpeckers that occasionally damage log homes
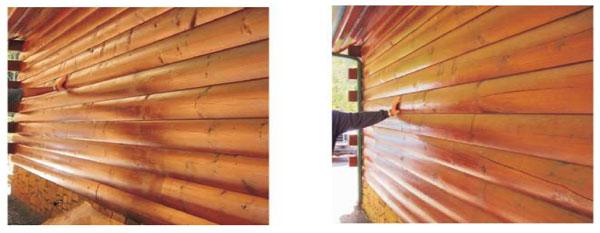
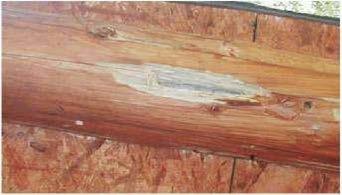
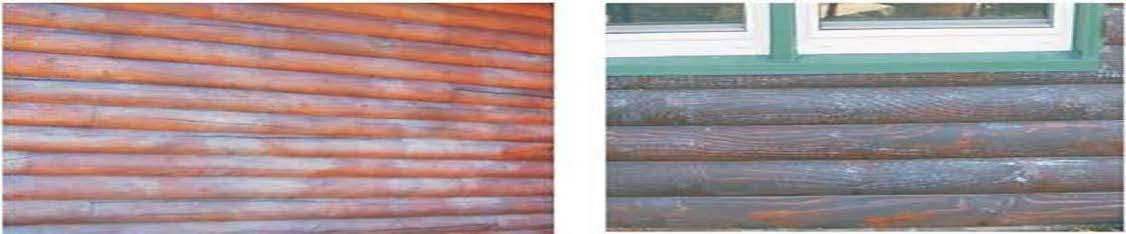
Through late fall to early spring, we occasionally receive calls about Lifeline Advance topcoat turning milky white after application, a condition called blushing. Before discussing blushing, the formulas for both Lifeline Advance Gloss and Satin have recently been modified to reduce the probability of blushing without altering any of their properties.
Blushing is mostly caused by atmospheric humidity, reduction in rate of solvent evaporation, and low temperatures. Any water that gets trapped or incorporated into the film may cause blushing. This is particularly noticeable on shaded walls, especially where Lifeline Advance has been applied too heavily. Once Lifeline Advance has a chance to dry and cure this whitening should disappear, but it may take several warm, dry days. There is not much anyone can do to help speed up the curing process. When the blushing occurs on a few logs, using a hairdryer on the area can sometimes help (do not use hot air). Often, the best thing is to do nothing. If blushing occurs in the fall, it may take until spring for the Advance to completely resolve and turn clear.
The best way to avoid blushing is to apply the Lifeline Advance when the conditions are most favorable for success. For example, avoid applying when the temperatures are low and relative humidity is high. Dew formation is more likely as well as an increased risk for blushing. Instead, apply it during warm and dry conditions when possible.
Blushing does not affect the durability or performance of the finish. It is, however, cosmetically unattractive until the arrival of warm, dry weather. Once the Lifeline Advance is clear, blushing should never re-occur.
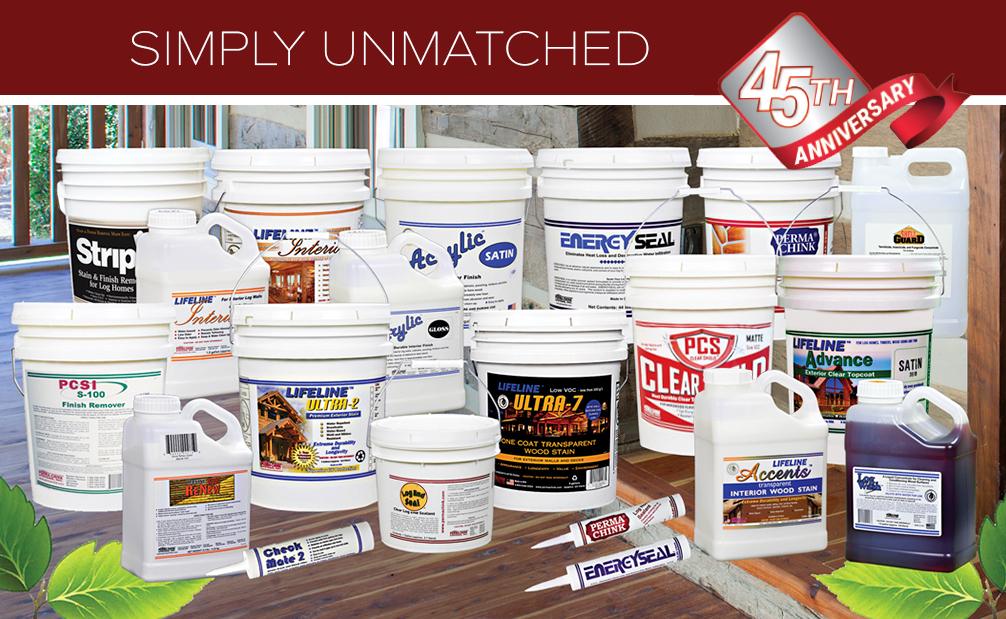
Perma-Chink Systems, Inc., a long-standing provider of wood care solutions for log and timber homes, is celebrating its 45th anniversary in 2026. Since its founding in 1981, the company has focused on helping homeowners, contractors, builders, and manufacturers protect and preserve wood structures through purpose-built products and practical expertise.
In its early years, Perma-Chink Systems introduced the industry’s first flexible chinking – an innovation that addressed long standing challenges in making log homes energy efficient. That early work helped establish a foundation for continued product development and long-term relationships throughout the log and timber home community.
Over the decades, the company has expanded its offerings to include a comprehensive range of specialty sealants, high-performance finishes, preservatives, and cleaners, all designed specifically for the unique demands of log and timber homes. Today, these products are used on a wide range of structures, from cozy cabins to expansive log and timber-frame residences.
Perma-Chink Systems’ progress has been shaped by the experience of its team, whose combined decades of hands-on work in log home care inform both product development and customer support. That practical knowledge continues to guide the company’s approach to research, technical assistance, and education.
“Reaching 45 years is a reflection of the relationships we’ve built and the trust our customers have placed in us through the years,” said Terry Knight, CEO of Perma-Chink Systems. “Our founder, Rich Dunstan, believed strongly in doing things the right way—listening to customers, standing behind our products, and acting with integrity. Those values continue to guide how we operate today.”
As the log and timber home industry has evolved, Perma-Chink Systems has remained focused on supporting those who build, maintain, and live in wood homes. The company’s emphasis on technical guidance, customer service, and thoughtfully engineered products has made it a consistent resource for professionals and homeowners alike.
Looking ahead, Perma-Chink Systems remains committed to building on its experience while continuing to improve how log and timber homes are cared for. Through ongoing product development, service, and education, the company aims to support the long-term durability and beauty of wood homes for years to come.
About Perma-Chink Systems, Inc.
Perma-Chink Systems, Inc. manufactures wood care products formulated specifically for log and timber homes, including chinking, sealants, stains, finishes, cleaners, and restoration systems. Founded in 1981, the company serves homeowners, builders, and contractors with specialized products and technical support grounded in decades of industry experience.
How should I go about making sure that I get started right when it comes to maintenance? How critical is it to begin proper maintenance when the home is new?
Research
Do your research in finding the right system. We provide a robust library of Tech Tips that provides information you need to take care of your log and timber home. New homes should not have issues, and we recommend homeowners perform inspections of their home to find any small issues and fix those now, before they become big issues.
The Right System
Chose a system of fully compatible log or timber frame home products to protect your home, such as Perma-Chink Systems. When doing your research ask for samples. This allows you to choose the best color combination you prefer. Our products cover all stages of log home finishing from insect and mold prevention to wood cleaners to sealants to finishes. Our “whole-home” approach results in all our products working together in preserving your log home.
The Right Amount
You’ll also want to determine how many linear feet you’ll get from a pail of sealant or log chinking to ensure you order the right amount. You can use the calculator on Energy Seal or Perma-Chink page to help.
Do you know the square footage of your log home exterior?
You’ll need to know that when ordering stains and topcoats. How many square feet of coverage will you get from a gallon of finish? Sometimes the more moderate or even higher priced products are a better value because they go further than the cheaper ones. This is worth considering, as labor rates keep increasing.
Proper Project Prep
Prep is always the number one thing when sealing or staining. Clean logs, proper log texture (not overly smooth), and compatible weather – avoid extremes and rainy weather.
Hiring a Contractor
If you hire a contractor, make sure that they have a solid background, check their references, make sure they are current with their insurance company, and get quotes from more than one contractor. Perma‑Chink Systems has a trusted network of Preferred Applicators who know exactly how to care for your log home, or timber home. And a quick pro tip: book them well ahead of time – these contractors often fill their schedules months in advance!
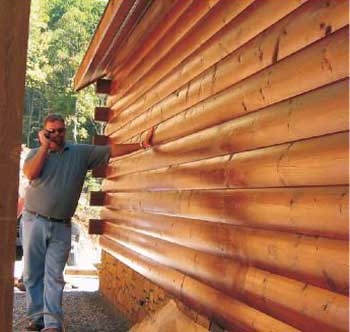
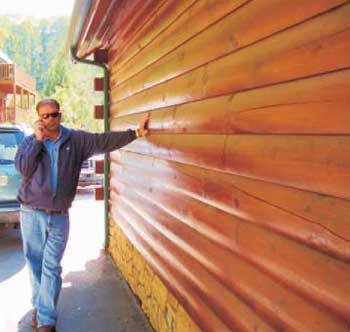
Often we get asked which performs better:Advance Gloss or Advance Satin? Overall, both topcoats protect the finish and your log home exceptionally well. While it mainly comes down to personal preference on which log home topcoat you choose, as the manufacturer of the topcoat, we’ve learned some things that can tip the scales if you’re undecided on which topcoat to select for your log or timber home. So the quick answer is we recommend Advance Gloss.
Reflectivity
When it comes to performance and longevity there is no doubt about it- a gloss topcoat will outperform a satin topcoat. Why? The most important factor is reflectivity. A smooth, glossy surface reflects more ultraviolet (UV) light than a less reflective one, like a Satin, or worse, a dull one. This is why a vast number of automotive finishes don’t come in satin versions, and why a shiny coat of wax helps retain a vehicle’s color.
Cleanliness
The next factor is cleanliness. The smooth, slick surface provided by Advance Gloss sheds dirt easier than the Satin. That’s because the flatting agent used in Satin results in microscopic roughness in the surface of the finish where airborne dust, pollen and pollutants can lodge. Although particulates can be removed with a good washing, it takes a bit more effort with the Satin finish than removing dirt from the Gloss surface.
Bee Deterrent
The last factor, at least in the Southeast, relates to how Advance Gloss reduces carpenter bee damage. A few years ago we did a survey of customers who used both our satin and gloss topcoats and the results clearly revealed that the gloss topcoat substantially reduced the number of carpenter bee holes. Although there was some reduction in carpenter bee activity using Advance Satin, it was not nearly as significant as the Gloss. Carpenter bees are searching for a wood space to create a chamber to lay their eggs. If this wood surface is coated and that coating is reflective, it creates a mechanical deterrent for carpenter activity.
Order Samples To Test
Whenever requesting exterior finish samples, include a sample of Advance Gloss and Advance Satin, even if you are only interested in one topcoat. By applying both on your wood, you will be able to see the difference for yourself. You may end up choosing the other topcoat because of the way it looks and how it highlights the color of the stain. Although there are other gloss topcoats on the market, none that we have tested retained their level of gloss for more than a few months. Advance Gloss, on the other hand, has been on homes and walls since 2003, and they continue to retain most of their initial gloss.
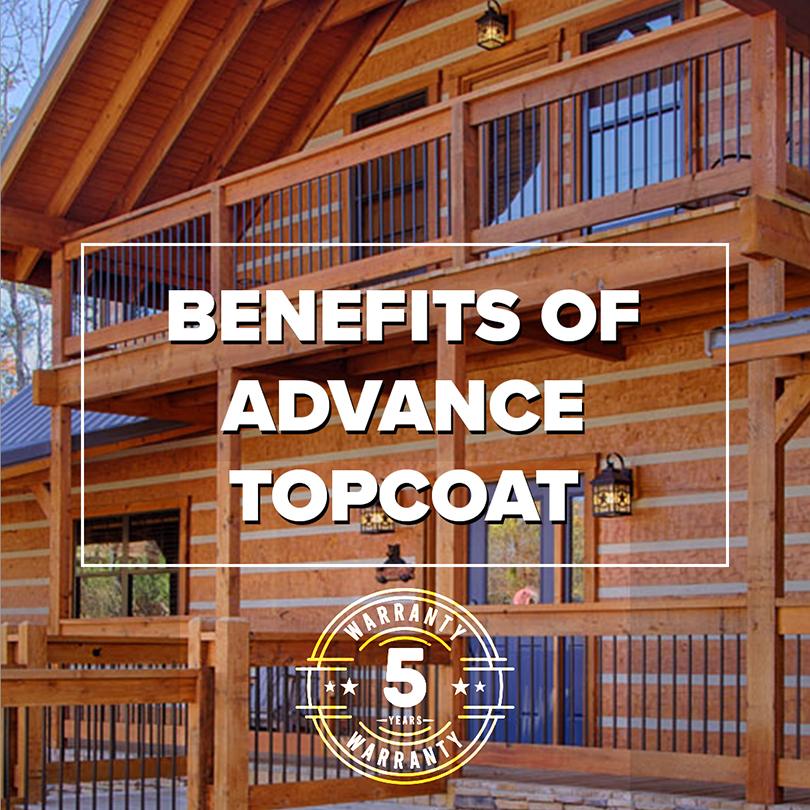
Just as clear coats are vital to the performance of today’s automotive finishes, our Lifeline Advance™ topcoats are an integral part of all exterior finish systems. Not only do they extend the life of the color coats, but they do much more to protect your log home.
The Benefits of Lifeline Advance
Advance Topcoat significantly improves the look of the finish by enhancing the color, clarity, and depth of the finish. In other words, they make our finishes the most beautiful log home finishes in the world. Second, they help keep the surface clean. The very nature of a pigmented stain makes it susceptible to dirt pick-up through adhesion or impregnation. Since we have designed Advance to form a smooth, strong film, it makes it much more resistant to dirt accumulation. In addition, the smooth surface makes it easy to clean off any dust or pollen that may accumulate on the surface of the logs. A simple application with Log Wash™ and a rinse with a garden hose will remove the dirt and grime that may be hiding the beauty of your home.
Another feature a smooth topcoat provides is greater mechanical resistance to the growth of mold, mildew, and algae. In addition to water, these organisms need something to grip onto. If the spores land on a tough, smooth surface that rapidly sheds water, they won’t have an opportunity to germinate and spread. The surface of your logs stays free of unsightly mold spots and patches of algae.
Of course, the best feature of Advance Topcoat is the protection it provides to the color-containing stain. Years ago, cars left the manufacturer with a coat of paint. More expensive cars may have had several coats of paint, but no matter how many coats were applied, after a few years on the road the paint turned dull and started to flake off. Then car coating experts discovered the benefits imparted by clear topcoats.
Today’s car finishes remain shiny and last longer than ever thought possible, all due to the application of clear topcoats.
How Advance Contributes to Stain Performance Improvement
What is there about topcoats that contributes to this performance improvement? The most performance-enhancing feature of a clear topcoat is that it reflects sunlight. Sunlight is composed of several components, including ultraviolet (UV) light. It’s the UV that is responsible for fading colors and, in the case of wood homes, damaging wood fibers through a process called photo-oxidation. The more UV light that’s reflected off the surface, the slower the color coats will fade. Wood fibers will be also be exposed to less photo-oxidation, thus extending the life of the entire finish system.
Although satin finishes reflect a significant amount of sunlight, gloss topcoats reflect more, which is why car finishes are shiny and not dull. The same holds true for our Lifeline™ exterior finish systems. Because Advance Gloss reflects more sunlight over Advance Satin is one of the reasons that log home gloss finishes are becoming more popular. Read more about the differences of Advance Gloss and Satin finishes here.
An additional beneficial feature of a clear topcoat is the protection it provides to the color coats against degradation by airborne contaminates like sulfur dioxide, ozone, and particulates. Even natural contaminants like tree pollen and bird droppings can damage or discolor the color coats by chemical reactions, or promote mold growth. Our Advance Topcoats provide a barrier that prevents these negative events from occurring.
These are some of the reasons why Lifeline Advance Topcoats play a key role in the performance of all of our exterior film-forming finish systems.
Order Your Advance Topcoat Today
Contact us at 1-800-548-3554 or your local Perma-Chink Store to place your order during business hours, or order online at Store.PermaChink.com. We’ll be glad to help you choose the right sheen of Advance, too, either gloss or satin. If you want to try each sheen on your logs, order free samples online.
Download the full Application Guide for Sealants here.
Application Surface Temperatures for Perma-Chink System products
Most of our labels list the recommended surface temperature range for the application of the product, but there are always situations when you may need to know a bit more detail about application temperatures in order to schedule or complete a job. This is a high-level recommendation for application temperatures. For more in-depth information, it’s recommended you please read the Application Temperatures article. In some cases, there are steps that can be taken to help cope with extreme hot or cold temperatures. Just remember that we are concerned with surface temperatures, not air temperatures. It is the temperature of the logs that must be considered, not the temperature on the thermometer hanging on the porch.
Occasionally rips and tears form in log home chinking, especially in new homes that have been constructed with fairly green wood. Most of the time these tears appear on the top edge of the chink joint. That’s because during the tooling process, most people tend to pull product from the top to the bottom of the chink joint, which results in a thinner than recommended layer of chinking along the top edge. In addition, people forget to “push” the chinking up against the top edge, resulting in inadequate adhesion. When the logs shrink, it puts a strain on the chinking and if it was not properly applied, it can pull away from the wood. So when working Perma-Chink®, it is important to keep pushing the product towards the top of the joint.
Before making any repairs, determine if the chinking was properly applied originally (see our Application Guide here for reference). If you find that the thickness along the top edge is consistently less than 1/8”, you may be faced with constant repairs as it will be better to cut it out and start over again. You won’t be able to apply another layer of Perma-Chink on top of what’s already there to bring it to the proper thickness. If you do, the added layer will probably develop blisters in it.
Our rule of thumb is that if a tear is less than one foot long, it can be repaired. If it is longer than one foot, the chinking should be cut out and replaced. The reason for this is that on long tears, the chinking tends to sag out, and there is no way to hold it in place while the repaired area cures.
Begin with making sure the area that you are repairing is good and clean. You don’t want any dirt to interfere with the adhesion of the chinking. It’s easier to make a repair using a tube of chinking or a bulk loading gun than it is to scoop some out of a pail.
Put a bead of chinking along the tear, making sure that you have good contact with the torn chinking and the wood. Once it’s applied, you can press it into place with a tool or your finger. Now use a small, inexpensive paintbrush with the bristles cut to about 2” long, dip it into some water to get the bristles wet, then work the chinking smooth with the brush. This will help match the texture of the chinking repair with the surrounding cured chinking.
In the cases of older chinking in need of repair, it will be necessary to apply Chink Paint over the repaired area to make the color uniform.
Typically, the Chink Paint painted areas will be cleaner and brighter than the old, existing chinking, so you’ll probably want to Chink Paint all of the chinking to renew the look of your entire home. If you want to change the color of your chinking, this would be a good time to take advantage of Chink Paint.
What Causes Blisters?
There are several causes of blisters forming in uncured chinking. The first is whenever chinking is applied in hot, direct sunlight. The surface quickly skins over, preventing the water vapor from escaping from the underlying material. This problem is usually easy to diagnose, since the blister will start to form in the middle of the product, and if the blister is cut away, you can still see chinking under the blister.
Another common cause of blisters is chinking over unsuitable backing materials. This includes blue board, pink board, and other colored EPS (expanded polystyrene) foam and bare wood. These materials out-gas and as they do, they can form blisters in the soft, uncured chinking.
Only those products recommended by Perma-Chink Systems should be used as backing materials for Perma-Chink Log Home Chinking. Some blisters can be directly attributed to the application process. If the chinking is “trowelled” in by hand, small pockets of air can become entrapped during the process. It is very important to “mash” out the chinking in order to work the air out.
Entrapped air also occurs when you apply very small beads of chinking with a tube or a bulk load gun if the tip cut too small, when compared to the size of the joint. Air can be trapped between the beads when it is smoothed out, leading to blistering.
It’s important to work the chinking, although most people are hesitant to do this as it tends to pull during the process. A light mist of water on the surface of the chinking will help prevent pulling, although some chinking professionals only wet the tool they are using, until they get ready to finalize the finish. It is never necessary to flood the surface of the chinking with water, a very light mist is all that you need.
There is no satisfactory way to repair a blister other than to completely cut out the blistered sections and re-chink the entire joint. If you try to cut out and fill in the blisters, you will end up with visible depressions along the chink joint. Once the blistered section is removed, be sure to check the backing material. If it’s the wrong material, replace it with the correct material; if it is bare wood, cover it with masking tape. If you don’t use the correct backing material, you run the risk of blisters reappearing in the repaired sections.
Read Our Application Guide
Read our Sealants Application Guide to learn the best practices, ensuring a beautiful log home for generations.
What makes Deck Defense™ better than other products?
Deck Defense is a true, penetrating water-borne product without any sort of emulsified oils or alkyds. The product penetrates the wood substrate and the forms lattices to strengthen and support the natural cellulosic fibers for protection from the inside out, not only on the surface.
How about water protection?
We have incorporated ingredients in the formula to serve as a deterrent to water intrusion. One must remember that waxes are sacrificial, and over time the beading on the surface will go away. This does not mean a re-coat is necessary. It is just an indication the waxes have worn away from the surface. The protection for the wood is still in place.
I already have a finish on my deck; does this have to be removed before I can apply the improved Deck Defense?
The old rule of thumb says for the best success with a coating, the best practice is to remove any old finish before applying a new product. However; if you are applying over an older, tired oil-based product, you can apply the new Deck Defense after a thorough cleaning with Wood ReNew™ or Log Wash™. If you have previous Deck Defense, you can also apply the newer product after cleaning. If there has been a film-forming product applied (Vista, Endure or “painted” surfaces), then it will need to be totally removed prior to application of the new Deck Defense.
Is there protection against UV damage in Deck Defense?
Yes, there are UV inhibitors within the product, plus, as transparent iron oxide pigments are also used to produce the desired color, they will enhance the UV protection through sun-blocking properties of the color itself.
Is Deck Defense safe for the user as well as the environment?
The product is considered non-toxic, but as with any product, certain precautions should be observed as they just make good sense. Wear gloves and eye protection when applying the product and avoid inhaling vapors (See precautions on the label). Shrubbery and plants should be rinsed before and after application (or covered). Covering adjacent surfaces like concrete or paver pathways is also a good practice.
Pre-Application steps needed?
First and foremost; the surface needs to be clean and dry. New treated wood needs to “season” prior to application. This process will vary with temperature and humidity and actual moisture content of the new wood. On older wood, a thorough cleaning with Wood Renew will help to restore the color of the wood and remove stains and dirt. Make sure to adequately rinse with water and check the pH of the run-off water to make sure all the surfaces have been rinsed well. Ph of run-off water should be around 6.5 to 7.5 (depending on the pH of the water source). Make sure to check fasteners and condition of wood prior to cleaning and replace any decayed or unstable wood.
Do I need to sand the wood first?
In an ideal world, sanding would be best. But most applicators and homeowners do not want to go through the effort or labor expense to do so. Sanding increases the mechanical adhesion of the surface and will also make the substrate color match better. The sanded surface also opens the substrate and promotes better penetration of the product. If a decision is made to sand, we recommend 60-grit or possibly even 40-grit paper. Media blasting may also be used but may be considered overkill unless the entire home is being media blasted. After sanding or blasting, wash with Log Wash, rinse well, and allow for complete drying prior to application.
How do I mix the product?
Prior to applying Deck Defense, mix well. The colorants used in Deck Defense do not settle hard and re-disperse easily. DO NOT USE POWERED MIXING EQUIPMENT, as this action can possibly shear the backbone of the product and cause possible product failures. As with any product, box the pails together if there are different batch numbers.
How do I apply Deck Defense?
Applying Deck Defense is very easy, and many methods or “tools” can be used. On surfaces such as decking or fencing, a low-pressure pump-up sprayer is the most economical. Deck Defense can also be applied with paint pads designed for deck application, or applied with a quality brush. Rollers can also be used, but due to the low viscosity of the product, there will be some excess “splatter” when rolling. An airless sprayer can be used, and we recommend the use of a 511 or 513 tip due to the low viscosity. Apply the product in a “flooding” method to completely cover the surface to allow good penetration.
Deck Defense should be back brushed when applied by a sprayer, or when using a pad, to make sure the product is spread evenly. Work in the same direction using broad strokes to alleviate “pooling” of product and promote even coverage for the best appearance. Do not allow “pooling” on surfaces. On vertical surfaces, work from the bottom up and back brush as you go. Do not apply in the hot sun as this can cause “flash drying” and interfere with the penetration of the product. Application temperatures are 40-90° F, and that is surface temperature, not air temperature. DO NOT APPLY DECK DEFENSE OVER FILM-FORMING FINISHES (Vista, Endure or “painted” surfaces) AS IT NEEDS TO PENETRATE THE SUBSTRATE FOR THE BEST PERFORMANCE.
How many coats are required?
Deck Defense is designed as a one-coat stain, although due to the deep penetrating properties of the product, it may appear lighter than expected. This is especially true on older surfaces that have been exposed for long periods of time. Also, as this is a semi-transparent product that allows the natural grain and texture of the surface to show through, colors may appear blotchy or uneven, and the user may want to apply another coat. If a second coat is to be applied it should be done in a “wet on wet” application, meaning the first coat needs to be wet when the second is to be applied. If a second coat is desired after the initial application has dried, allow one week for the first application to cure completely.
What is the dry time for Deck Defense?
Dry times will vary with application, airflow, temperature and humidity. Under ideal conditions – 60° F, and 50% humidity – Deck Defense will dry to the touch in about 20-30 minutes. Dry does not mean “cured”. Wait 4-6 hours before walking on surface and 24 hours before replacing heavy furniture.
What are the coverage rates for Deck Defense?
Coverage rates will vary considerably, based on type of substrate and methods of application. That’s why most folks buy a bit extra when they repaint, as they don’t want to go back and buy another gallon to finish. On rough sawn wood, like fences that really soak up product, it may be as low as 100-175 sqft per gallon. Older deck surfaces will also tend to soak up lots of product, so figure around 175-250 sqft per gallon. On new wood, expect around 250-300 sqft per gallon. A second coat application will require less product.
Is Deck Defense freeze-thaw stable?
Yes, this product is freeze-thaw stable. It’s not the freezing that could cause issues; it is the number of cycles a product is exposed to that causes damages.
What are the maintenance guidelines?
Good maintenance for decks, as well as other wood surfaces, will prolong the need for re-staining or removal. Deck Defense will not flake or peel when properly applied, so a general cleaning should be done every year with Log Wash. Maintenance requirements will vary with exposure and environmental conditions, and heavy traffic. Expect to see wear in high traffic areas such as steps and traffic patterns first. This does not mean protection is gone, but indicates for appearance purposes that it’s time for a light re-coat.
How do I clean up when I am finished?
If done right after application, tools and equipment are easily cleaned with soap and water. Warm water works best.
Due to the penetrating and adhesion properties of Deck Defense; keep overspray areas wet during application and rinsed promptly when finished. Removal after three hours will be difficult, but after three days it will be almost impossible without the use of strippers or solvents. Dispose of containers in accordance with local, state and federal guidelines (Do not reuse containers).
There is no shortage of information online. The hard part is knowing which advice actually applies to a log home. Perma-Chink Systems has worked exclusively with log and timber structures since 1981.
That focus shows up throughout this library. Articles can provide a strong starting point, but some projects require answers that are specific to the home, the condition of the wood, or the products being used.
That is why support remains a big part of the company. With seven locations across the country and customer service teams available across multiple time zones, help is available when a project raises questions that an article cannot answer.
More Than Product Information
Successful projects often depend on the details. That may or may not have anything to do with the product. Surface conditions, weather exposure, and application methods all influence the final result.
That is why the library covers a wide range of topics beyond product specifications. Visitors can browse Tech Tips, instructional videos, project features, and contractor resources developed specifically for log and timber structures.
Perma-Chink Systems has worked exclusively within the log home industry for over 40 years. The goal of these resources is simple. Provide practical information that homeowners and contractors need. Have questions concerning a DIY project? Call us for more information.
Manage Consent
To provide the best experiences, we use technologies like cookies to store and/or access device information. Consenting to these technologies will allow us to process data such as browsing behavior or unique IDs on this site. Not consenting or withdrawing consent, may adversely affect certain features and functions.
Functional
Always active
The technical storage or access is strictly necessary for the legitimate purpose of enabling the use of a specific service explicitly requested by the subscriber or user, or for the sole purpose of carrying out the transmission of a communication over an electronic communications network.
Preferences
The technical storage or access is necessary for the legitimate purpose of storing preferences that are not requested by the subscriber or user.
Statistics
The technical storage or access that is used exclusively for statistical purposes.The technical storage or access that is used exclusively for anonymous statistical purposes. Without a subpoena, voluntary compliance on the part of your Internet Service Provider, or additional records from a third party, information stored or retrieved for this purpose alone cannot usually be used to identify you.
Marketing
The technical storage or access is required to create user profiles to send advertising, or to track the user on a website or across several websites for similar marketing purposes.


 compared to same color coat with Advance")
 with same color coat with Advance, after 15 months of accelerated weathering")