Can Lifeline™ Interior stains be used to finish interior floors? Technically the answer to this question is yes, but we rarely recommend them unless whoever is going to be finishing the floor fully understands the characteristics of water-based, transparent stains and knows how to apply them.
Professional floor finishers have been using oil-based stains ever since it became fashionable to add some color to flooring. The application techniques and procedures used for applying an oil-based floor stain has not changed for many, many years, so most everyone selling or applying floor finishes will give a standard set of instructions to anyone planning to finish their own floors. However, if these directions are used when applying a water-based stain, the results will be unsatisfactory.
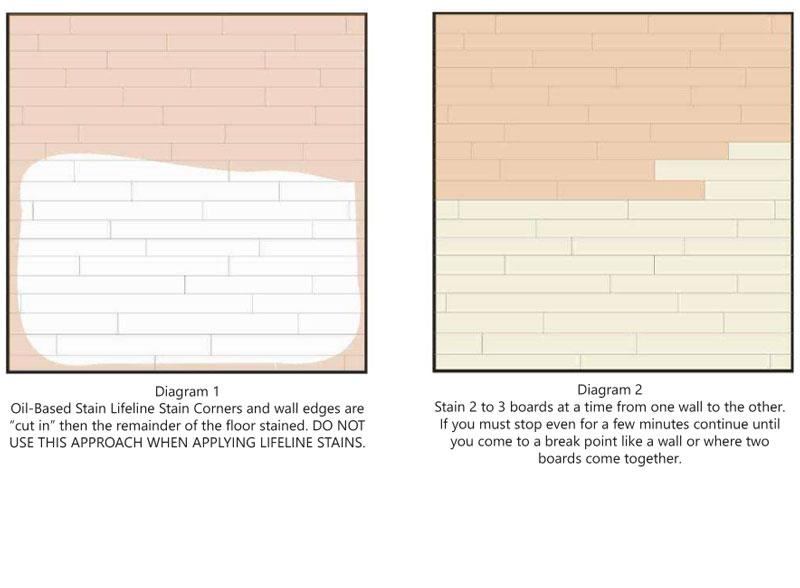
Once the floors are sanded and cleaned, a professional floor finisher using an oil-based stain will usually “cut in” around the baseboards and corners with a brush, rag, or pad, then apply the stain to the remainder of the floor [Diagram 1].
Since oil-based stains take a fairly long time to dry, the interface between the “cut in” areas and the center area can be feathered together, so that it becomes impossible to see any differences in color. Water-based stains dry very quickly, so it’s impossible to feather in any previously stained areas without creating lap marks. However, there are some distinct advantages for using a Lifeline water-based stain. These advantages include little or no odor, soap and water clean-up, quick dry time, and environmental friendliness.
If you choose to use a Lifeline Interior stain for your floor, here is the way to apply it.
1. Sand the floor as usual.
2. Vacuum then wipe the floor with a damp cloth. Keep rinsing the cloth so that it does not accumulate too much sanding dust. It will raise the grain a bit, but that’s okay. The water-based Lifeline will end up raising the grain anyway and the slight roughness will be dealt with later in the finishing process.
3. Once the floor is dry, apply one light coat of Lifeline Prelude™ clear wood primer with a brush or pad. This will seal the surface and help prevent any blotchiness due to varying porosity from the sanding process. Don’t worry about lap marks or surface roughness at this stage.
4. After the Lifeline Prelude dries, apply the first coat of Lifeline stain. This is where care must be taken to avoid lap marks. Start at one corner of the floor and work on two or three boards at a time all the way across the floor. If you must stop before you get to the other side, be sure to continue to where one board ends and another begins [Diagram 2]. Apply Lifeline in a thin coat and back-brush as you proceed.
5. When the floor dries you can decide if you want to apply another color coat. It’s not necessary and depends on how much color you want to obtain. Do not sand.
6. Once you have attained the desired color and the floor is dry you can begin applying PCS Clear Shield finish in gloss or matte to the floor. The technique for applying Clear Shield is different than applying the Lifeline Prelude or any Lifeline stain, so be sure to read the “Applying PCS Clear Shield” Technical Tip before you start.
7. Now that you have the first coat of PCS Clear Shield on the floor, and it’s good and dry, you can give the floor a light sanding using fine sandpaper (180 grit or higher) to remove any surface imperfections. Do not sand too hard or you’ll end up removing the finish. Once sanded, remove any dust with a damp cloth. Sanding between subsequent coats will not be necessary. Floors usually take two to four coats of PCS Clear Shield to assure maximum durability and desired uniform appearance.
8. Although you can usually walk on the finished floor within a few hours, it’s best to wait 72 hours before replacing any furniture or subjecting the floor to heavy traffic.
What about applying PCS Clear Shield over a newly applied oil-based stain? There is no problem with this as long as the oil-based stain is good and dry. Typically we recommend waiting a week or two, but it really depends on the temperature and humidity. It is best to check with the manufacturer of the oil-based stain to see what drying time they recommend before applying a water-based clear coat.