Applicator Program

There is a popular misconception that spraying the wood with water before applying a borate will aid the penetration of the borate into the wood. Wetting the surface does not increase the interior moisture content enough to matter. Pores of the wood get filled with water and less borate is absorbed into the wood, which lessens the effectiveness. When it comes to treating a log home with borates, the drier and more absorbent the surface is, the better the treatment.
What Can You Expect from Applying Borates to Logs and Timbers?
Borate wood preservatives come in two forms: borate/glycol formulations such as Bora-Care and pure soluble borate powders like Tim-Bor. The active ingredient in both is disodium octa borate tetrahydrate, a compound chemically similar to a combination of boric acid and borax, but with a higher concentration of boron responsible for the effectiveness.
Borates are toxic to rot and decay fungi, subterranean and drywood termites, carpenter ants, and wood boring beetles. It is also toxic to beetle eggs that may be in the wood at the time of treatment or deposited later. Tim-Bor will prevent beetle infestations, but is not as effective as Bora-Care for protecting larger logs and timbers or eliminating existing insect and decay infestations.
Applying Bora-Care should end powder-post beetle activity (small round holes) within a few months to a year after treatment. However, if there is an existing infestation of old house borers (oval holes), it may take up to a year before total control is achieved.
Tim-Bor and Bora-Care solutions are best applied using a compressed-air, garden-type sprayer. You can use either a fan or cone spray tip as long as you completely wet the surface.
BORA-CARE Borate/Glycol Formula
The amount of time it takes Bora-Care to dry depends on several factors: the previous finish, if any; the density and porosity of the wood; and the temperature and humidity. In warm, dry climates the drying time may be as little as a few days. Under humid conditions, it may take four to six weeks of drying time before a stain can be applied. You can check to see how drying is progressing by touching the treated wood, especially in the early morning. If the wood still feels damp, it is not ready for a topcoat.
There is a way to speed up the Bora-Care drying process, but it must be done carefully to avoid removing the active ingredient. One of the components of Bora-Care is a slow-drying glycol that helps the borate penetrate the wood. It is the glycol that interferes with the stain adhering to the wood. After a week or so, most of the borate has penetrated deep enough that it will not be removed by washing the glycol off the surface. If washing occurs in the morning, or soon after a rain when the wood is damp, you can lose a significant portion of the active borate ingredient.
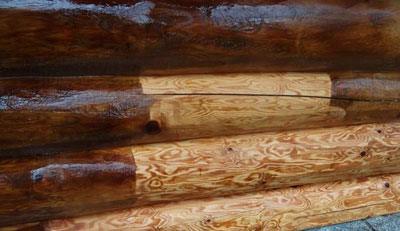
Once the Bora-Care is dry, inspect all of the treated surfaces before applying a stain. Occasionally, a white residue may appear over knots and other areas of the logs. These white deposits are created by a small amount of the borate crystalizing on the surface. Their appearance does not mean that the treatment will not work! Wipe this residue off with a damp sponge or rinse it off with a hose. If you stain over any white spots they will show through the stain.
TIM-BOR – Pure Soluble Borate Powder
Like Bora-Care, the solution of Tim-Bor may be applied with a brush or sprayed onto the surface of the wood using any type of compressed air (garden) sprayer. Since Tim-Bor does not penetrate the wood as quickly or completely as Bora-Care, it is important to not expose treated surfaces to rain or snow for at least a day or two after treatment. Tim-Bor solution dries rapidly so is not necessary to wait more than a couple of days before applying stains.
However, longer drying time may be necessary when the weather is humid or cool. Once the solution has dried, inspect all treated surfaces for any signs of white residue. Remove the residue with a damp sponge before applying stains since the white areas will show.
If you have allowed the Bora-Care or Tim-Bor to dry for three or more weeks, we suggest that you give the exterior log surfaces a light wash with Log Wash before applying finishes. This will help remove any pollen, dust, dirt, and mold spores that may have accumulated on the wood during the drying period.
Unused borate solutions should never be left in application equipment overnight. Clean and rinse your equipment after each use.
Deck Defense Deck Stain for Decks, Railings, and Fencing
Deck Defense™ deck stain was designed for better performance, longer life and easier application. We removed the oils and hazardous driers to produce a friendlier product. Although it is a totally waterborne product, it has the penetrating properties like oil. Unlike oil, Deck Defense hardens into a lattice, supporting and strengthening the natural cellulosic fibers to protect from the inside out, not just on the surface.
Additionally, powerful additives to Deck Defense inhibit the growth of mold, mildew and algae within the cured film. We also have incorporated a bit of wax to help repel surface water. Homeowners can feel secure in the knowledge that their investment is protected from the damaging effects of wind, sun and water.
Deck Defense is easily applied to dry surfaces with a pump-up sprayer, roller, brushes, pads or an airless sprayer. Designed for a one coat application, an additional coat may be applied using a “wet on wet” method in order to achieve a deeper and richer color. Wet product should be back-brushed to eliminate splotchy areas and reduce the chances of lap marks and eliminate pooling of product.
Normal maintenance has also been made easier as there will be no need to strip off the product prior to re-application, as it will not flake or peel when properly applied. Just clean the surface to remove any dirt or dried materials, allow drying before applying your maintenance coat. Clean up with soap and water before the product dries on application equipment.


Deck Defense is available in seven colors to match our most popular colors, but we’ve now added the ability to order custom colors! If you have a particular color in mind for your deck, contact your local Perma-Chink Systems store to discuss our custom color option.
Choose Deck Defense for your home’s deck, railings, and fencing and receive these benefits:
- Excellent weather resistance
- Excellent color retention
- Allows texture and grain to show through
- Low odor and VOC
- Contains Trans-Oxide pigments for enhanced UV protection
- Easy application
- Easy soap and water clean-up
- Coverage rate: 175-250 sq. ft. per gallon, depending on substrate condition and application methods
- See label directions for additional information
Deck Defense FAQs
Click the question to see the answer.
What makes Deck Defense better than other products?
Deck Defense is a true, penetrating water-borne product without any sort of emulsified oils or alkyds. The product penetrates the wood substrate and forms lattices to strengthen and support the natural cellulosic fibers for protection from the inside out, not only on the surface.
How about water protection?
We have incorporated ingredients in the formula to serve as a deterrent to water intrusion. One must remember that waxes are sacrificial, and the beading on the surface will go away over time. This does not mean a re-coat is necessary. It is just an indication the waxes have worn away from the surface. The protection for the wood is still in place.
I already have a finish on my deck; does this have to be removed before I can apply the improved Deck Defense?
The old rule of thumb says for the best success with a coating, the best practice is to remove any old finish before applying a new product. However, if you are applying over an older, tired oil-based product, you can apply the new Deck Defense after a thorough cleaning with Wood ReNew™ or Log Wash™. If you have previously applied Deck Defense, you can also apply the newer product after cleaning. If there has been a film-forming product applied (Vista, Endure, or “painted” surfaces), then it will need to be removed prior to the application of the new Deck Defense.
Is there protection against UV damage in Deck Defense?
Yes, there are UV inhibitors within the product, plus, as transparent iron oxide pigments are also used to produce the desired color, they will enhance the UV protection through the sun-blocking properties of the color itself.
Is Deck Defense safe for the user as well as the environment?
The product is considered non-toxic, but as with any product, certain precautions should be observed as they just make good sense. Wear gloves and eye protection when applying the product and avoid inhaling vapors (See precautions on the label). Shrubbery and plants should be rinsed before and after application (or covered). Covering adjacent surfaces like concrete or paver pathways is also a good practice.
Pre-Application steps needed?
First and foremost; the surface needs to be clean and dry. New treated wood needs to “season” before application. This process will vary with temperature and humidity and the actual moisture content of the new wood. On older wood, a thorough cleaning with Wood Renew will help to restore the color of the wood and remove stains and dirt. Make sure to adequately rinse with water and check the pH of the run-off water to make sure all the surfaces have been rinsed well. Ph of run-off water should be around 6.5 to 7.5 (depending on the pH of the water source). Make sure to check the fasteners and condition of the wood prior to cleaning, replacing any decayed or unstable wood.
Do I need to sand the wood first?
In an ideal world, sanding would be best. But most applicators and homeowners do not want to go through the effort or labor expense to do so. Sanding increases the mechanical adhesion of the surface and will also make the substrate color match better. The sanded surface also opens the substrate and promotes better penetration of the product. If a decision is made to sand, we recommend 60-grit or possibly even 40-grit paper. Media blasting may also be used but may be considered overkill unless the entire home is being media blasted. After sanding or blasting, wash with Log Wash, rinse well, and allow for complete drying prior to application.
How do I mix the product?
Before applying Deck Defense, mix well. The colorants used in Deck Defense do not settle hard and re-disperse easily. DO NOT USE POWERED MIXING EQUIPMENT, as this action can possibly shear the backbone of the product and cause product failures. As with any product, box the pails together if there are different batch numbers.
How do I apply Deck Defense?
Applying Deck Defense is very easy, and many methods or “tools” can be used. On surfaces such as decking or fencing, a low-pressure pump-up sprayer is the most economical. Deck Defense can also be applied with paint pads designed for deck application or with a quality brush. Rollers can also be used, but due to the low viscosity of the product, there will be some excess “splatter” when rolling. An airless sprayer can be used, and we recommend the use of a 511 or 513 tip due to the low viscosity. Apply the product in a “flooding” method to completely cover the surface to allow good penetration.
Deck Defense should be back brushed when applied by a sprayer, or when using a pad, to make sure the product is spread evenly. Work in the same direction using broad strokes to alleviate “pooling” of product, promoting even coverage for the best appearance. Do not allow “pooling” on surfaces. Work from the bottom up and back brush on vertical surfaces as you go. Do not apply in the hot sun as this can cause “flash drying” and interfere with the penetration of the product. Application temperatures are 40-90 degrees F, and that is surface temperature, not air temperature. DO NOT APPLY DECK DEFENSE OVER FILM-FORMING FINISHES (Vista, Endure, or “painted” surfaces) AS IT NEEDS TO PENETRATE THE SUBSTRATE FOR THE BEST PERFORMANCE.
How many coats are required?
Deck Defense is designed as a one-coat stain, although due to the deep penetrating properties of the product, it may appear lighter than expected. This is especially true on older surfaces that have been exposed for long periods of time. Also, as this is a semi-transparent product that allows the natural grain and texture of the surface to show through, colors may appear blotchy or uneven, and the user may want to apply another coat. If a second coat is to be applied it should be done in a “wet on wet” application, meaning the first coat needs to be wet when the second is to be applied. If a second coat is desired after the initial application has dried, allow one week for the first application to cure completely.
What is the dry time for Deck Defense?
Dry times will vary with application, airflow, temperature, and humidity. Under ideal conditions – 60 degrees F, and 50% humidity – Deck Defense will dry to the touch in about 20-30 minutes. Dry does not mean “cured”. Wait 4-6 hours before walking on the surface and 24 hours before replacing heavy furniture.
What are the coverage rates for Deck Defense?
Coverage rates will vary considerably, based on the type of substrate and methods of application. That’s why most folks buy a bit extra when they repaint, as they don’t want to go back and buy another gallon to finish. On rough-sawn wood, like fences that soak up product, it may be as low as 100-175 sq. ft. per gallon. Older deck surfaces will also tend to soak up lots of product, so figure around 175-250 sq. ft. per gallon. On new wood, expect around 250-300 sq. ft. per gallon. A second coat application will require less product.
Is Deck Defense freeze-thaw stable?
Yes, this product is freeze-thaw stable. It’s not the freezing that could cause issues; it is the number of cycles a product is exposed to that causes damage.
What are the maintenance guidelines?
Good maintenance for decks, as well as other wood surfaces, will prolong the need for re-staining or removal. Deck Defense will not flake or peel when properly applied, so a general cleaning should be done every year with Log Wash. Maintenance requirements will vary with exposure and environmental conditions, and heavy traffic. Expect to see wear in high-traffic areas such as steps and traffic patterns first. This does not mean protection is gone but indicates for appearance purposes that it’s time for a light re-coat.
How do I clean up when I am finished?
If done right after application, tools and equipment are easily cleaned with soap and water. Warm water works best.
Due to the penetrating and adhesion properties of Deck Defense; keep overspray areas wet during application and rinsed promptly when finished. Removal after three hours will be difficult, but after three days it will be almost impossible without the use of strippers or solvents. Dispose of containers in accordance with local, state, and federal guidelines (Do not reuse containers).
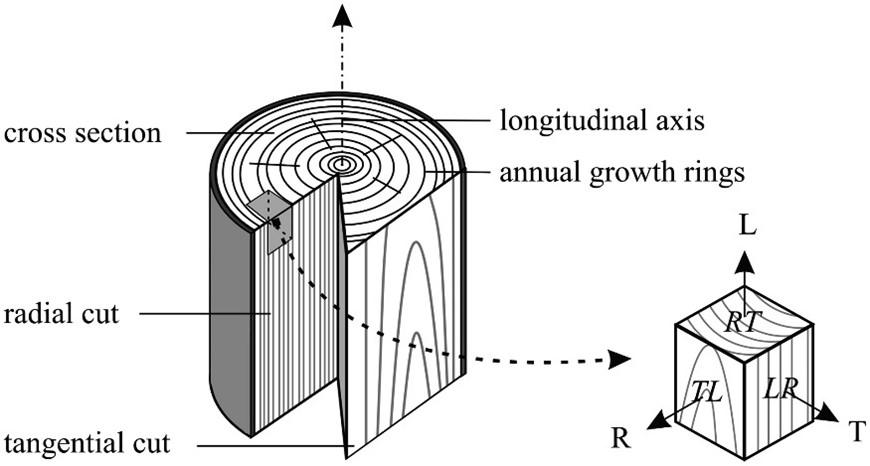
When it comes to using elastomeric sealants, considering the potential movement of your wood is almost always a smart move. Some important factors to consider that impact wood movement are moisture content, species type, type of cut (flat tangential cut or quarter sawn radial cut) and local environmental conditions. Not taking these into account has the potential to lead to costly repairs in the future.
Movement Threshold Related to Moisture Content
When a tree is first harvested the water content is usually extremely high. For example, depending on the wood species the moisture content can be 200% or higher in freshly cut green wood. However, it is not usually until the moisture content drops below approximately 30% that dimensional changes begin to occur. This is where bound water within the cell walls begins to leave resulting in dimensional shrinkage. These changes occur primarily in three different directions: tangential (T), radial (R) and longitudinal (L). See figure 1 below.
Log Cutting Method Impact on Movement
Wood does not move much in the longitudinal (L) direction. Therefore, a traditional house is framed with the two by fours placed in the longitudinal upright position and as a result the structure does not shrink or move very much. However, most wood cut for log siding falls somewhere in between radial and tangential cut and is not placed in a vertical position but rather a horizontal one. If the log siding is mostly the flat sawn tangential cut type a large amount of movement in the wood is possible. For example, depending on the pine species the percent shrinkage can range from 6.0 – 7.5% for a tangential cut board from green to oven dry. This translates to a twelve-inch-wide board shrinking by almost three quarters of an inch or more!
For round logs the movement component that causes the log home to shrink in size is the radial (R) movement. This is not nearly as much as the tangential movement but still can be quite large. In pine species the percent shrinkage can range from 2.0 – 5% from green to oven dry. Take for example a wall using ten-inch round logs and ten courses in height. The total wall shrinkage might be anywhere from two inches to as much as five inches.
One way to minimize all this potential movement is to use kiln dried wood. Doing so reduces the movement potential. In addition, using an inexpensive moisture meter can also be a great help in determining your woods moisture content at any point in time. Waiting for wood to equilibrate to its environment and reach a stable moisture reading is also very helpful. In general, we tell homeowners and applicators to be at least below 20% for the surface moisture content. However, being closer to 10% is ideal and is associated with lowest amount of risk for movement.
Joint Sizes to Minimize Effect of Movement
Another excellent way to minimize your risk is to pay careful attention to proper recommended joint designs for our sealants. We recommend the joint width for Perma-Chink chinking be a minimum of one inch for every six inches of log diameter or siding width (1:6 ratio). For example, a 15-inch log would have a chinking joint width of 2-1/2 inches wide minimum. For small gaps less than one inch we recommend using Energy Seal™, Woodsman™ or Check Mate 2 ™. The smaller gaps will have a much larger percent change in movement and need products specifically formulated to accommodate this large movement potential. Furthermore, following proper thickness as well as backing material recommendations is also very important to help reduce one’s risk.
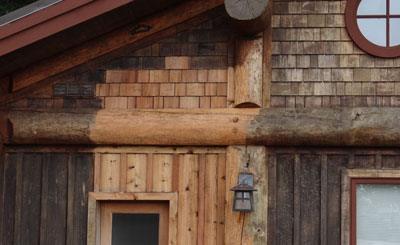
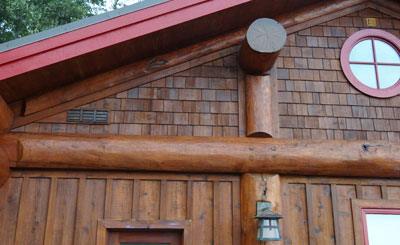
Failure to adhere to proper joint design coupled with large dimensional changes in wood can often lead to poor outcomes. In the example below green wood was used to maximize wood movement during curing. The chinking joint in (Figure 2) failed completely due to improper joint width and large wood movement. The starting width (1/4”) of this joint was nowhere near the 1:6 ratio recommended. The starting width for the joint below should have been three to four times as wide relative to the width of the wood.
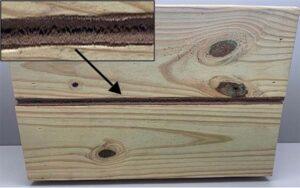
Chinking should never have been used in a joint this small; Energy Seal™ or Woodsman™ would have been much better options. The expansion in the joint due to shrinkage of the wood was very large, relative to the original starting width, resulting in cohesive failure across the entire joint length. Cohesive failure is where the sealant stays adhered to the top and bottom of a joint but fails by cracking down the middle of the joint. The box in figure two magnifies the crack so it is more visible.
Help Available Through Application Guide
To help aid in proper joint design, we provide our customers a Log Home Sealants Application Guide. This guide provides a great deal of helpful information regarding proper joint design. Our technical tips are additional sources of information on many topics of concern to the log homeowner. Don’t let wood movement be a source of failure for you. Instead anticipate the movement and come prepared with the right products, tools, and knowledge for success.

Why do my choices regarding surface prep, stain, and color matter?
When it comes to choosing a finish system for your log home exterior there are many factors to consider and depending on what choices you make it will have a significant impact on the longevity of the finish system. For example, some of these choices include surface preparation, type of stain, and color choice. Let us take a closer look at each one of these factors and discover how they each contribute to a systems performance.
Surface Preparation
First, surface preparation is often overlooked, not taken seriously, or even dismissed entirely. At Perma-Chink Systems we have learned through many years of testing and experience that this is an important step and forms the foundation for a successful finish system.
Does the surface of the wood have mold, dirt, discoloration, existing finishes, metal contaminants or greyed weathering? All these wood conditions will likely lead to problems with your finish system if left unaddressed. Perma-Chink Systems offers a full line of wood restoration and cleaning products and literature to deal effectively with each of these wood conditions.
Increased wood surface porosity is also important and to achieve best results, we recommend sanding your wood with 60 grit sandpaper. This allows for improved mechanical adhesion of the stain with the wood fibers and increases overall performance of the system as well as color uniformity. The overall color development will be much darker than on un-sanded wood. Nevertheless, the protection of the wood surface is increased substantially. Staining on smooth/un-sanded wood can look splotchy due to the reduced porosity and unevenness of the wood. As a result, not much stain goes on the wall and the performance is reduced accordingly.
If, however, surface preparation is skipped or done improperly prior to an application of stain, it will impact the appearance and longevity of the final system. Some of the likely outcomes such as peeling and early discoloration and unhappy homeowners are the usual result.
Choosing the Right Stain
The type of stain you choose also will impact performance. For all horizontal surfaces it is more advantageous to go with a penetrating type of stain such as our Deck Defense™. If you want to coat both horizontal and vertical surfaces another penetrating flat stain such as our Log and Timber Defense™ is an excellent choice. For all vertical surfaces film forming stains such as Lifeline Ultra 7™, Lifeline Ultra 2™ or Lifeline Exterior™ are your choices. For long lasting color fastness and protection on vertical surfaces the best option is our all-acrylic Lifeline Ultra 7.
Two broad categories for stain type are oil and water-based stains. What distinguishes these two types from each other? The advantages of oils are ease of application, extended drying time and initial high gloss appearance. The disadvantages of oil types are, more hazardous to work with due to dangerous flammable solvents as a primary ingredient, the gloss appearance dulls relativity quickly with exposure and due to its high solid content is less breathable and can chip and peel more easily than a water-based stain. Clean up of oils requires dangerous paint thinner solvents and is arguably more difficult. All our water-based stains are non-hazardous and easy soap and water cleanup as well as breathable making them less susceptible to peeling and chipping.
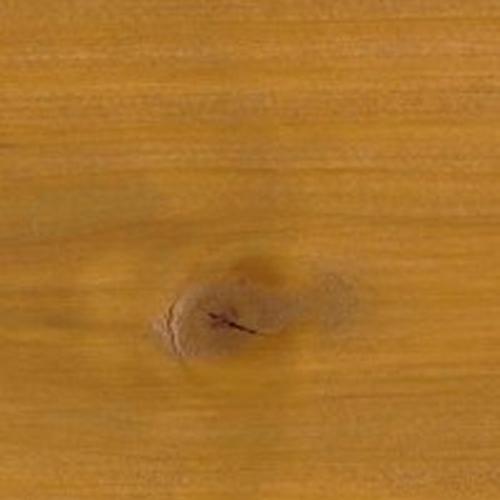
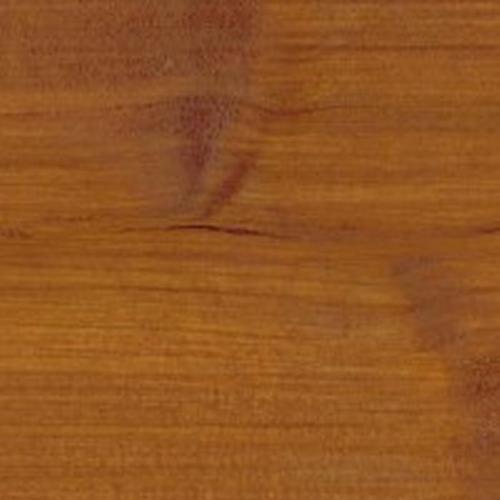
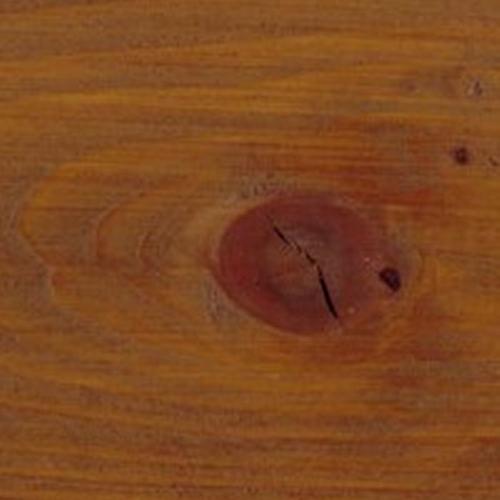
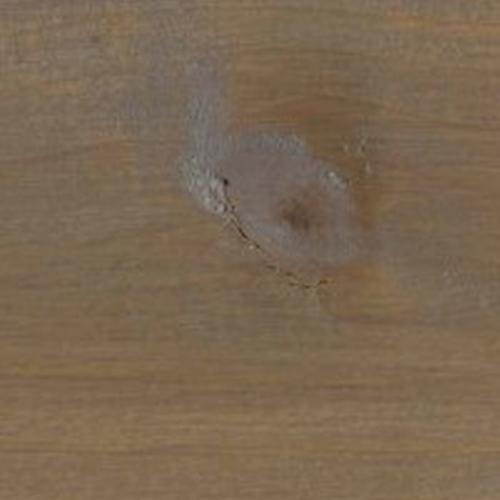
Choosing the Right Colors
Finally, color strongly influences the performance of any finish system. Our stains are designed to be semi-transparent. This allows the observer to more easily see the unique features of the wood such as grain and texture. However, by their very nature transparent type finishes do not offer the kind of protection afforded opaque systems such as paint. In many of our exterior formulations we use Transparent Oxide type pigments. These pigment types still allow light to pass through so that you can see the grain while at the same time providing a high level of protection from the sun. In addition, we avoid using organic type colorants that are not as colorfast as oxide-based colorants. In general, the darker tone colors will provide more protection and longevity for your home while lighter honey tone colors offer reduced protection. Nevertheless, at Perma-Chink we understand that color is a very personal preference and we all cannot agree on exactly what we would like our home to look like. Perma-Chink offers a broad range of color choices to meet our customers’ expectations and desires when it comes to color. Color formulation have been carefully evaluated for color longevity. Pigment loading levels have been formulated to give the greatest protection possible while at the same time providing color choices that meet our customers’ needs.
Some additional choices such as how many coats of stain, topcoat or no topcoat and surface porosity are also important factors. In general, two coats of Lifeline stain are better than one. It helps to even the color out and provides increased protection of the wood. Having a clear topcoat, such as our Lifeline Advance™, is also a great benefit. This helps keep the system sealed, dirt pickup is greatly reduced, performance of the system is increased, and it provides a great look to the final product.
Contact Us for Assistance
As a log homeowner you have many important decisions to make when it comes to the care and maintenance of your home. At Perma-Chink Systems we have spent the last 40 years developing solutions to help meet your needs. Your choices as well as ours do matter and will make a difference. Let us work together to keep your log home looking great well into the future. For more information about our products please give us a call at 1-800-548-3554 and tell us what your needs are. You can also visit our website at www.permachink.com where you can find more information and order our products directly.
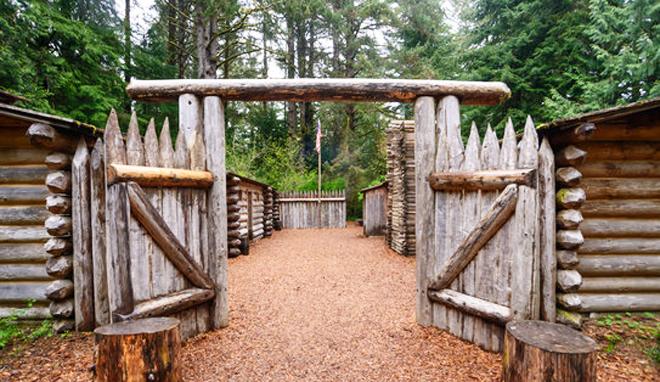
Designing a Fortress of Protection for Your Log Home
When I was growing up, I was fascinated with forts. I would often get together with friends from the neighborhood, and we would combine our resources and construct some rather elaborate fortresses. To test our handywork we would end our session with a great battle to decide whose fort was superior. Fast forward nearly forty years and I am still helping design forts! At Perma-Chink Systems the forts we are building are designed to protect your home against the forces of nature such as sunlight, wind, rain, dust, insects and microorganisms. Let us take a closer look at what our fort looks like.
Protection From The Start

We have advocated for many years that the protection of your log home starts with a smart design. For example, many modern log home builders use large overhangs and wide porches to help shield the home’s walls from dangerous radiation from the sun. Let your roof help protect your walls. Planting trees that can help shade your home not only reduces energy consumption, but also helps to prolong your finish system.
Protect From Insects and Ultraviolet Damage
Protecting your home from wood destroying insects is something we have also incorporated into our “fort” design. Bare wood logs or siding can be treated with anyone of our safe, borate-based wood preservatives such as Shell Guard™, Shell Guard RTU™ and Armor Guard™. These products are designed to provide a protective shell of defense for log homes. If a wood-ingesting insect such as a termite or Powder-Post beetle passes through this protective barrier, they are in for quite a nasty surprise. The borates work to interrupt the insects natural digestive cycle, making it difficult – if not impossible – for the organism to process food. These products, while destructive to wood-ingesting insects, pose little danger to humans.

Perma-Chink offers a full line of stains with numerous color choices and benefits. For example, our stains such as Lifeline Ultra 7™, Ultra 2™ and Exterior™ have ingredients designed to protect the wood surface from algae and fungi (mold). In addition, we also have ingredients that work to shield the lignin in your wood from photooxidation. Lignin provides structure and support for the cell walls in wood. If it is destroyed by harmful ultraviolet (UV) radiation, then your coating could delaminate from the wall more easily. Furthermore, our stains also contain UV absorbers designed to filter out harmful radiation. Our colorants also add another level of protection for your finish system. In general, darker tone stains provide a higher level of protection than lighter, honey-tone colors. Choosing a slightly darker tone will act as a shield to help protect your wood more completely and provide more longevity and less color shift.
Protect With Industry-Leading Sealants
Our business was founded forty years ago with a great solution to existing chinking. Back at that time, many folks used concrete between the logs to fill in the gaps. When the logs changed dimensionally this created cracks and open places for water to get in and damage wood structures. Perma-Chink™ seals between the logs and moves with your log home keeping a tight seal that keeps water and insects out. For smaller joints of less than one inch, we also sell Energy Seal™ and Woodsman™ which are great products for sealing around windows and doors.
Protect With The Finishing Touch
The next defensive layer in our “fort” is the topcoat. Our Lifeline Advance Satin™ or Gloss™ has several purposes. First, it provides a hard surface making it more difficult for dirt and debris to collect on the wood and sealant surfaces. Secondly, it contains both UV absorbers and UV stabilizers. Often when you UV light strikes a system it produces harmful free radicals that can be destructive to a coating system. The UV stabilizers are designed to terminate free radicals so they cannot continue their destruction. The UV absorbers act as a shield keeping the dangerous UV light from penetrating deeper into the system. Finally, it works to keep your coating system sealed. If water remains on surface for long periods of time, it can allow microorganisms to grow and multiply. Water will sheet and evaporate relatively quickly with the topcoat present.
Finally, regular cleaning of your home will help keep your home looking beautiful well into the future. Buildup of dirt and debris can provide a foothold for fungi and algae to grow, decreasing the longevity of your finish system. To aid in this annual cleaning, Perma-Chink provides a safe cleaner called Log Wash™ which does a fantastic job removing these unwanted contaminates from your log home.
Protect By Moving Forward
As you can see, we have many layers of defense built into our fortress. The forces of nature are powerful and unforgiving at times. Over the years we at Perma-Chink have gained tremendous respect for what it can do to damage your home. We have learned a great deal over these last forty years and have adjusted tactics where needed to counter our foe. Let us put our experience building forts to work for you. Please visit our website at www.permachink.com to learn more about our products and how they can help you protect your home.
By Jeff Kyger
Northwest Log Home Care
www.northwestloghomecare.com
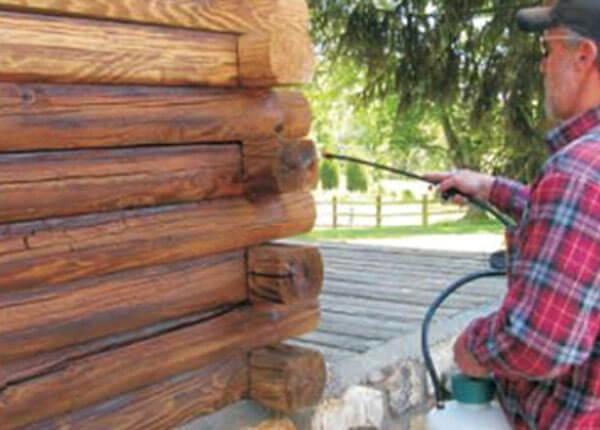
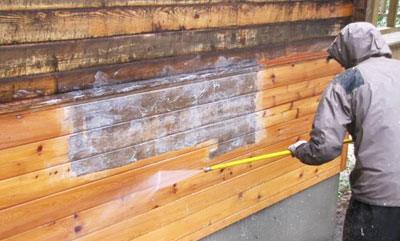
Pressure washing (also referred to power washing) is the function of using highly pressurized water to remove mildew, mold, dirt, pollen, UV graying, etc. You’ll hear different recommendations whether or not pressure washing your logs is the best cleaning method.
Generally speaking, pressure washing is the quickest and least expensive choice.
One fallacy is that you’re saturating and “damaging” your logs with water as a result of pressure washing. This simply isn’t true. On hard, sound, rot-free logs, you’re only introducing water into the top fibers of the wood.
The time it takes to pressure wash and the results generated are often directly associated with the type of finish being removed as well as how many coats have been applied. While some older, obsolete linseed based oil stains are more difficult to remove than newer products, practically everything can be removed with proper pressure washing techniques and good finish removers. Some of these older type products will often need S-100 or StripIt stripper applied first in order to soften the bond to the wood.
Condition of Wood Surface
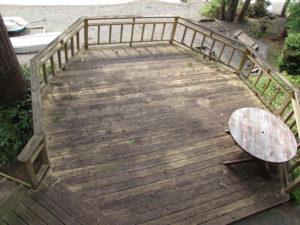
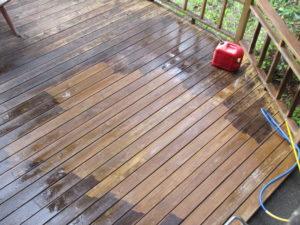
Traditionally, newer, recently peeled logs have a greater surface hardness and can withstand highly aggressive pressure washing (if needed) easier than a log wall which has been fully exposed to direct sun for 20 years. You might notice your upper and lower fascia boards have aged and darkened at an accelerated rate compared to your logs. Because these areas are often made from softer (i.e. pine) wood, they are more likely to absorb water leading to more prominent mildew growth. These areas can easily resemble new wood once cleaned.
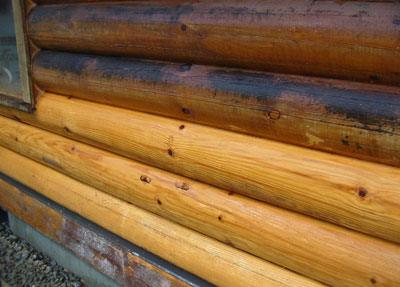
Pressure washing of new constructions can also easily remove the UV graying of the logs that can start occurring just weeks after the logs are stacked, particularly if exposed to direct sunlight.
In addition to log and wood sided structures, other areas where pressure washing can be utilized include driveways, stone walkways, pool decking, stone walls, fencing, gutters, downspouts, roofing and other areas. Concrete slowly builds up a browning/green appearance over time which usually consists of grease, dirt, mildew and algae which can easily be cleaned.

Pressure washing can be done in practically any temperature and weather conditions, although chemical strippers, which are often applied prior to cleaning, work much better in warmer weather.

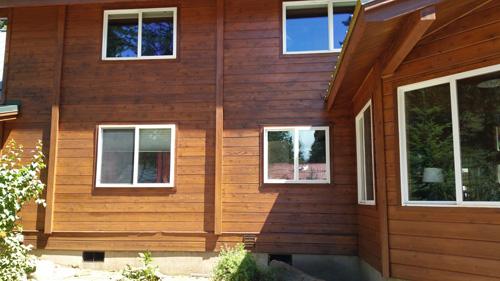
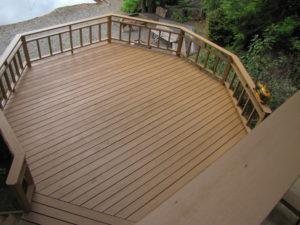
Whether you hire a professional or undertake the project yourself, pressure washing with wood cleaners from Perma-Chink Systems can bring back the beauty of your logs, preparing them for a fresh coat of stain and protective clear topcoat finish.
Applying and tooling Perma-Chink or Energy Seal sealant you need the right tools to make the job easier and quicker. Depending on the job and type of sealant needed, you have a few decisions to make regarding the tools and accessories you’ll need for the project.
Starting Out On The Right Foot
Having the right tools at hand is critical for a good chinking job. The most popular tool for applying Perma-Chink or Energy Seal is the bulk-loading gun. This tool is available in two sizes, the 20oz. and 30oz. capacity and operates by pulling sealant straight from the pail.
For contractors who have been applying sealants for years, the tools selected have been time tested. Contractors expanding work or new to the trade might want to know all the available options for the job. And since everyone has a different preference on tools, Perma-Chink Systems offers multiple products to get the job done.
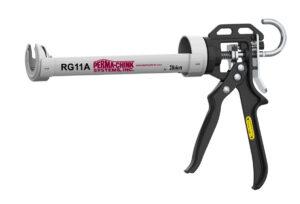
1. The Albion Bulk Loading Caulking Gun
This is our most popular tool for applying Perma-Chink or Energy Seal. It is built to meet the demands of serious professionals, utilizing rugged, heavy-duty all steel drives and lightweight aluminum barrels to reliably dispense a wide range of materials.
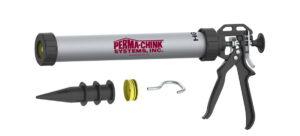
Available sizes 20oz. and 30oz.
- Professional Quality
- Efficient 12:1 Drive Ratio
- Lightweight Aluminum Barrel
- Double Grip Plates for Long Life
- No Spanner Wrench Needed!
- Barrel Rotates for no-stop application
- Kit includes 3 nozzles, one spare piston and a steel ladder hook-pull
2. Smooth Rod Style Caulking Guns for applying Perma-Chink, Energy Seal, Check Mate 2 and Woodsman
Great for professional use where bead consistency, control and clean up save time and money. A simple push of the recoil releases all pressure on the plunger and instantly stops the flow of sealant. To remove the tube, press the lever and pull back on the rod to expose the entire tube and slip it out of the gun.
Available in sizes for 11oz. tubes and 30oz. tubes
- Professional Quality
- Smooth Rod for reliable dispensing
- Efficient 12:1 Mechanical Advantage Drive
- Convenient Thumb-Release for no run-on caulking
- Full size handle for comfortable dispensing
3. Cordless Guns with a State-of-the-Art Performance, Portability and Control
How Fast is Fast! A Cordless Gun can dramatically decrease the amount of time on a chinking job.
Available in sizes for 11oz. tubes and 30oz. tubes AND 20oz. bulk
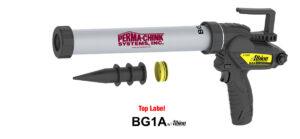
- Powerful – 400 lbs. of Dispensing Force
- Fast – Dispense 11oz. Cartridge in 16 seconds
- Lightweight Aluminum Barrel
- Long Lasting – 12 V Lithium-Ion Battery
- Control – Variable Speed Trigger with Maximum Speed Dial
- Auto Reverse for No-Drip Dispensing
- Comfortable rubber over molded handle. Swivel barrel
- Fast 30-minute recharge. Battery Fuel Gauge
- Ladder pull hook
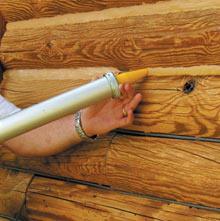
How Bulk Loading Guns Operate
Simply insert the 2-inch wide cylinder into the pail and fill the gun by pulling back the plunger, which draws the product from the pail into the body of the gun. After wiping the threads clean and screwing on the end cap with plastic cone nozzle, you’re ready to apply the product. To make your job easier, quicker and much cleaner with less product waste, the gun-compatible follow plate can be used (highly recommended). This 9.5” round metal plate has a 1” rubber gasket which allows for the tapered shape of the pails.
Basic Instructions on how to Tool Perma-Chink Sealants
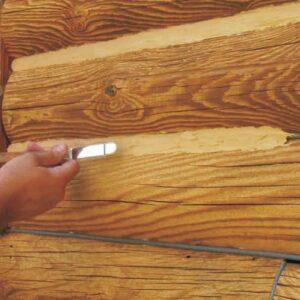
Smoothing your sealant you have just applied from the gun is not nearly as important as making sure you have really good contact to the top and bottom log, with no air trapped under the sealant.
To move the sealant into position for proper adhesion and to smooth out bumps is what we refer to as “tool” or “tooling.” The best tool we recommend is a bent trowel that’s about the width of the chink joint. The bent trowel makes it much easier to avoid trowel marks in the sealant as it dries and cures. Along with a trowel, you’ll want to have a plant mister or squirt bottle filled with plain water. Perma-Chink Systems offers a variety of stainless-steel trowels ranging from ¾” to 4-inch wide with both rounded and squared off tips in our Tools & Dry-In section.
Anytime you tool the chinking, spray a little water on it first. You want enough water to allow a smooth motion with the trowel, but not so much it pools and runs all down the logs. The water prevents the chinking from sticking to your trowel and gives a nice, smooth surface free of bumps and edges. Make more smoothing passes after you have created good adhesion to those logs to remove any tooling marks. All of these passes are a very light pressure, with ½” to ¾” of the tip of the knife being used. Depending on the appearance you are looking for, you may leave your sealant line as smooth or as rough as you would like.
Recommended Videos


Hope this helps! Check our Tools and Dry-In section on the website to find all the items needed to get you started on your project! And if you need more information, our professional sales representative is standing by at 800-548-3554 or send us an e-mail to techservice@permachink.com
Click here to view the Log Home Sealants Application Guide
While adequate air exchange is essential for health and safety, many older log homes have a far higher rate of air exchange than is necessary. This is often due to poor design and/or construction which allow air leakage from the inside or outside of the building, but log homes are additionally prone to settling, seasonal expansion and contraction of the logs, and other factors that can cause log joints to move over time.
Given that the typical 30 x 40 log home can easily have more than a linear half mile of log-on-log surface area, determining leakage pathways is often complex and extremely difficult to visualize; leaving log homeowners no other choice than to apply a sealant to all log joints in hopes of locating and correcting the problem areas.
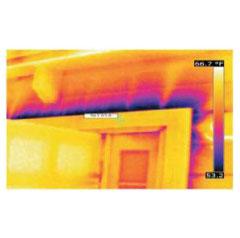
To identify areas of energy waste, infrared thermal imaging has quickly become a valued tool in identifying problems related to energy loss, water and insect infiltration, inefficient HVAC systems and much more. A thermal imaging camera identifies patterns of heat loss that are invisible to the naked eye and quickly indicates the air leaks within the log home with measurement data that can easily be compiled into a written report.
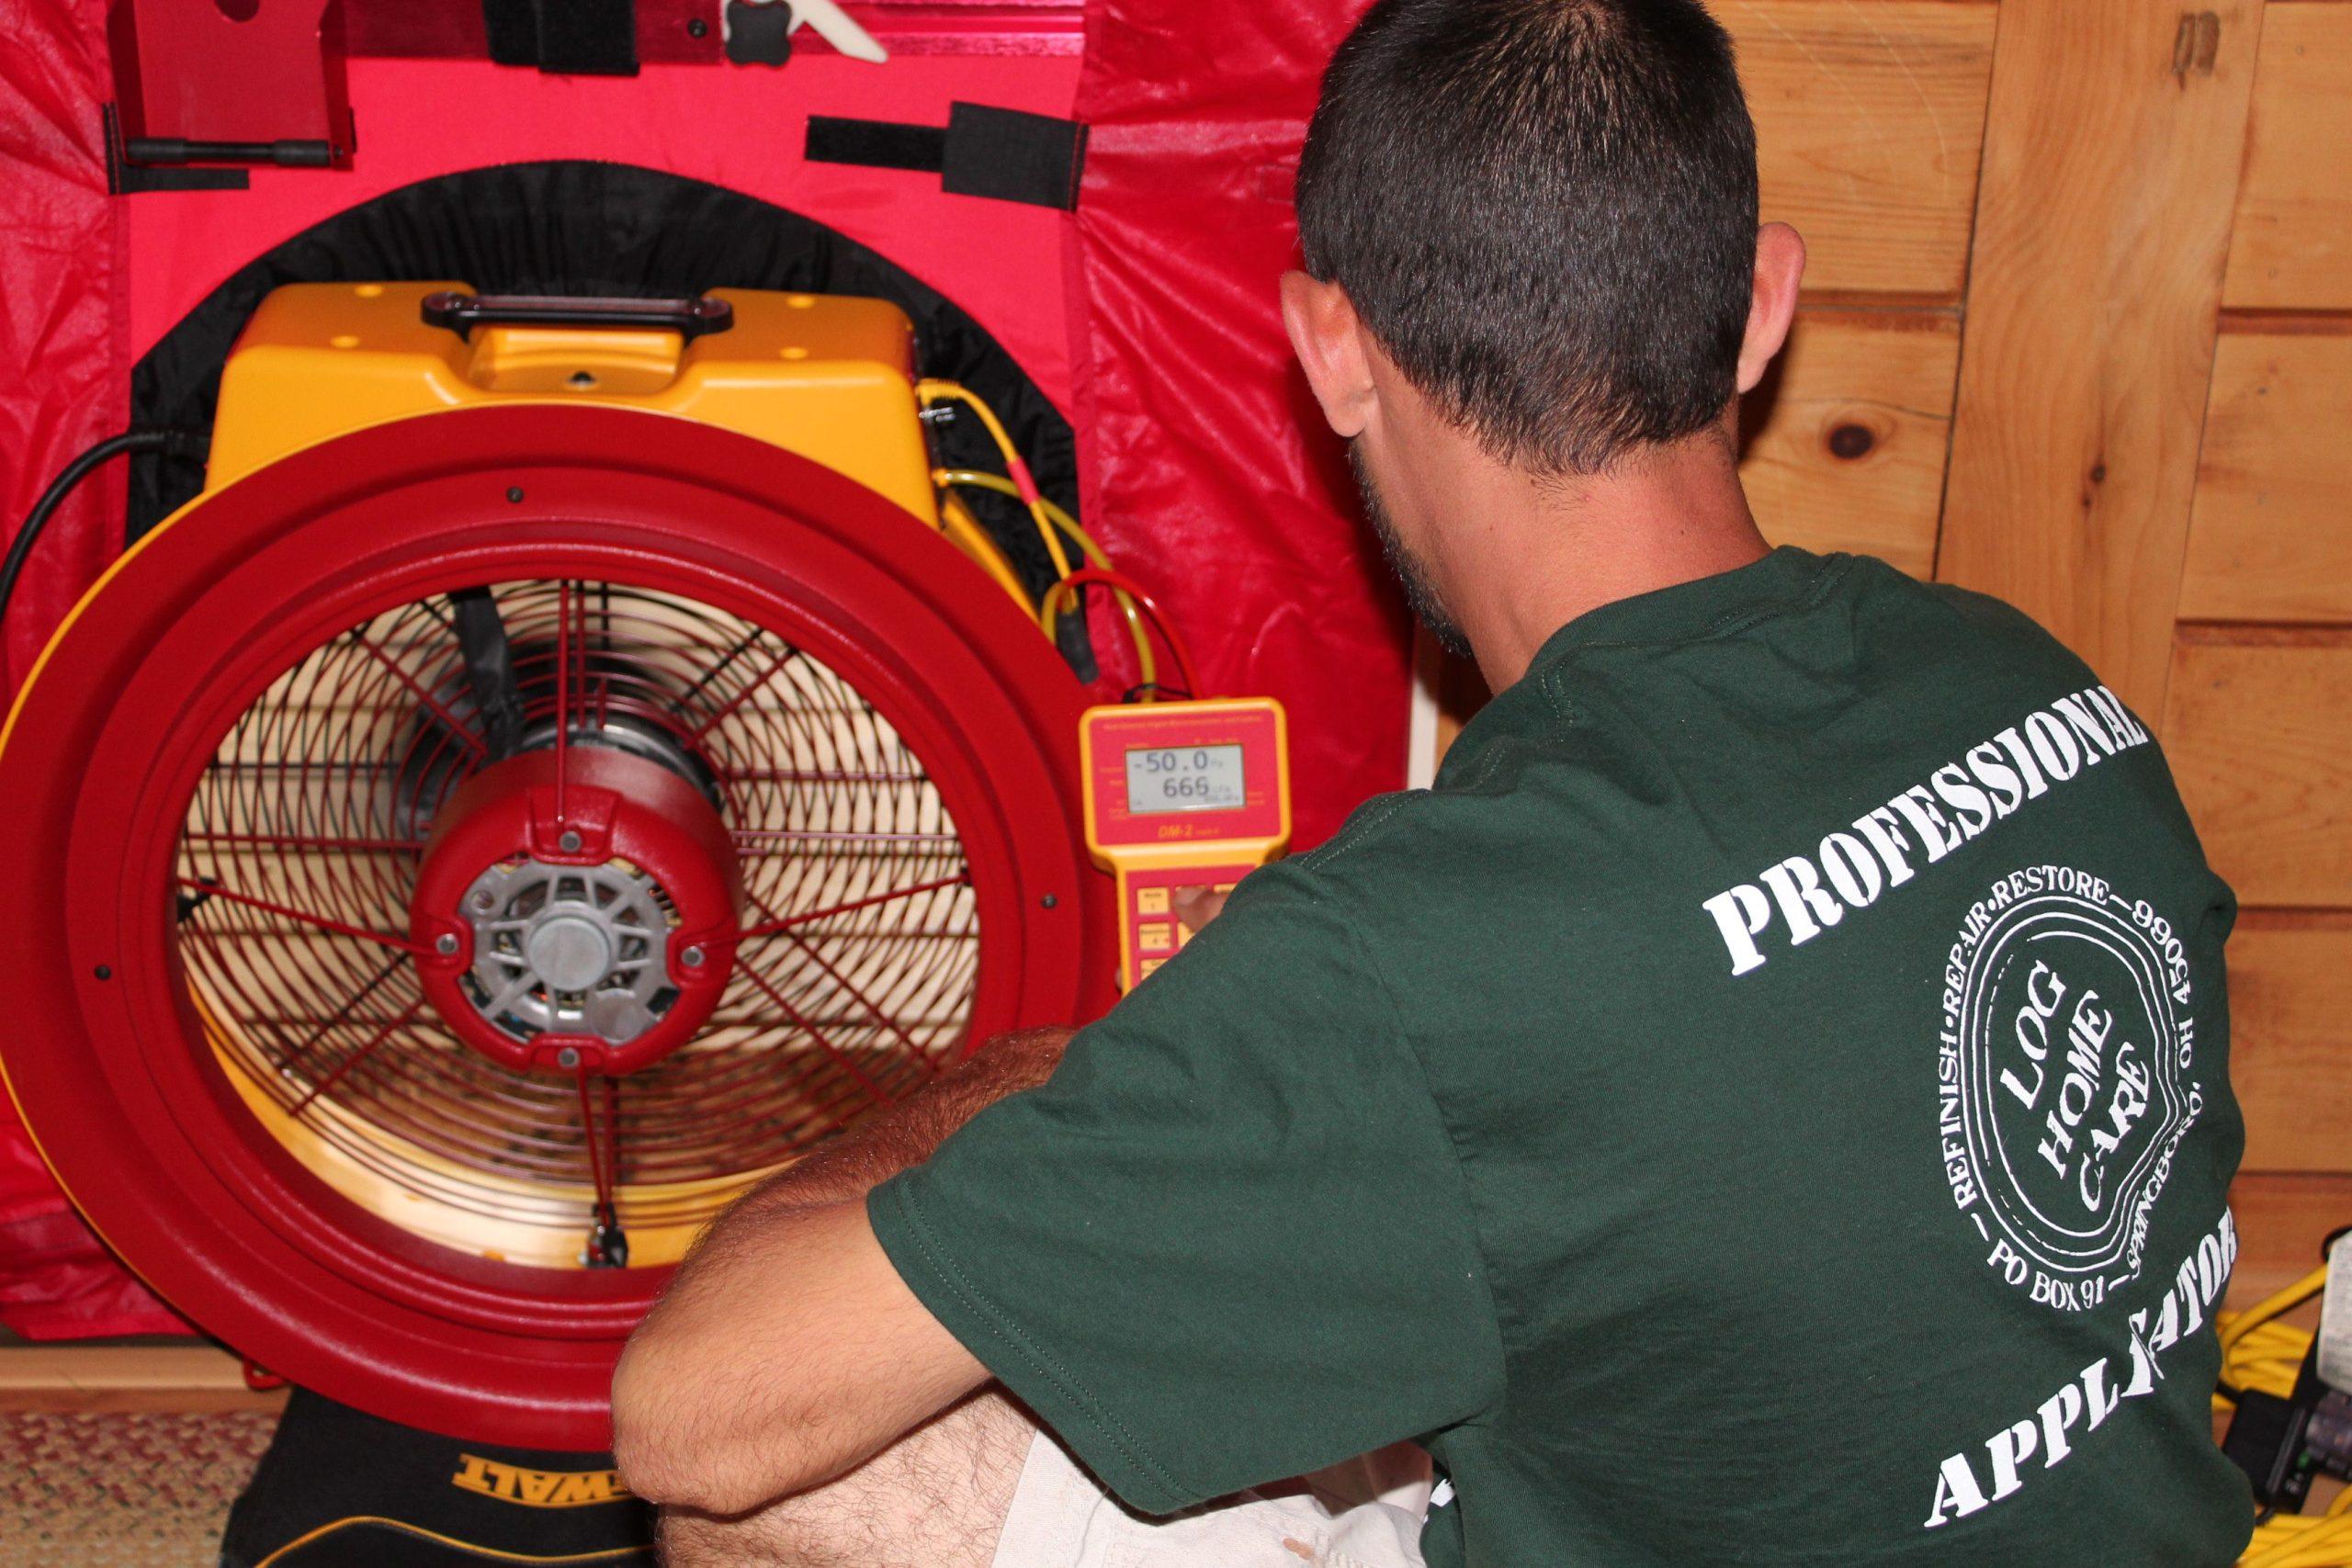
Professional log home applicators are using leading-edge infrared technology coupled with a computer controlled blower door to depressurize the home to an industry standard of -50 pascals, which simulates a 20 mph wind blowing on all four sides of the structure simultaneously. As air is drawn through failed log joints the temperature of the log surfaces changes, producing a thermal image that can be recorded. This allows the applicator to accurately identify and repair the problem areas to stop the energy loss immediately.
Wayne Bell, owner of Log Home Care, uses this technology and reports: Thermal imaging provides both an immediate cost benefit from the reduction in labor required to seal the home and future savings on energy costs. The computerized blower door provides information about air exchange within the structure, expressed in square inches, which can easily be understood when expressed in terms of an open door or window.
“Don’t confuse this equipment with the inexpensive infrared thermometers sold at home improvement stores,” Wayne clarifies. “Advances in technology have reduced the prices of this equipment but it still represents a major financial investment for the applicator. Prices vary by applicator, but homeowners can expect to spend several hundred dollars for blower door testing and thermal imaging services, but a portion of that charge is rebated back as a credit to the homeowner if our firm does the sealant work”, says Wayne.
“Whether we simply provide a printed report that illustrates what needs to be done or we handle the entire process of applying sealant to the home, our company couldn’t be happier with Perma-Chink Systems products. When dealing with log joints that may allow for both air and water infiltration, we use Energy Seal and backer rod on the outside of the structure. If the joint is leaking air but there is little risk of water infiltration, we can alternately use Check Mate 2 (often the clear color) in the interior if needed, but our preference is to do our sealant work on the exterior surfaces. By reducing air leakage, the homeowner obtains a better level of comfort in their log home and Perma-Chink Systems provides the products to make that possible.”
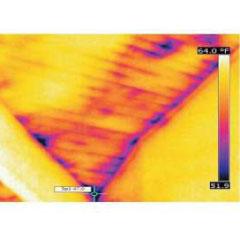
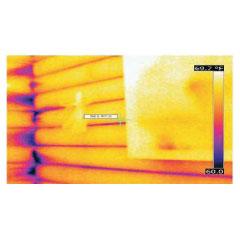
The home featured in these photos indicated an open surface area of 66.5 square inches which equates to a 24” wide window being left open nearly 3” but many log homes exhibit air exchange rates several times higher.

Bora-Care®, PenaShield®, and Tim-Bor® are all used as solutions that contain water. Since time and cold temperatures affect each of these products somewhat differently, we’ll address each product individually.
For proper use, Bora-Care can be mixed in three different ratios, which are 1:1, 2:1, and 5:1. Unmixed Bora-Care concentrate can remain stable for many years. Bora-Care needs to be stored in a cool, dry storage area inaccessible to children and pets. Do not allow Bora-Care to freeze. If Bora-Care is allowed to freeze, then it can make it ineffective.
For example, if you are making a 1:1 ratio, you will use equal parts of Bora-Care and water. Using warm water makes it easier to mix, but it’s not necessary to use warm water. Once the 1:1 and 1:2 solutions are mixed with water they must be used within 24 hours. The 5:1 solution will remain stable for up to 30 days. The reason for this is after 24 hours or so borate salts will begin to drop out of solution forming white crystals on the sides and bottom of the container. If left in the spray equipment for too long these crystals will block up the spray tip and/or filter screen and once crystalized, they are very difficult to dissolve. The colder it is, the faster the borates will drop out of the solution.
If you have mixed Bora-Care that you want to keep, you need to get it out of your sprayer ASAP and into a plastic container. Thoroughly rinse out your sprayer as soon as possible. Although borate crystals will form in the container, if the mixed solution is heated to about 95°F there is a good chance that the crystals will re-dissolve. Furthermore, if the solution is not used within 24 hours the borate crystals will start forming again.
One common assumption about PenaShield is that it is simply Bora-Care that has already been mixed with water. This is not the case. PenaShield is an entirely different formulation than mixed Bora-Care. Although the chemical components are the same as those in Bora-Care they are present in entirely different ratios that help keep the borate salts in solution. If PenaShield is subjected to cold temperatures (less than 40°F) for extended periods of time, there is a chance that some of the borate salts will begin to coat the inside walls of the container. This is not a sign that the PenaShield is freezing, it’s just that the temperature has reached a point where the solubility of the borate salts has dropped below 10%. Like most salt solutions, the lower the temperature, the less salt will remain dissolved in water. Once this occurs the solution needs to be warmed up to 80 to 90°F for the borate salts to re-dissolve.
The best way to warm it up is to fill a bucket with hot water, put the container of PenaShield into it, then after an hour or so take it out and shake it until the crystals disappear. With 2.5-gallon containers it’s a bit more difficult to do this unless you can find a large bucket. However, you can fill a bathtub or kitchen sink with hot water and do the same thing. Just placing the containers in a warm room will not heat the solution up enough to dissolve the borate salts. You will want to ensure that you store PenaShield away from areas children and pets may gain access to. PenaShield should also be protected from freezing.
Tim-Bor is typically used as either a 10% solution by dissolving one pound of dry borate powder in one gallon of water or a 15% solution by dissolving one and a half pounds of dry borate powder in one gallon of water. Using warm water speeds up the process. It should be mixed up in a bucket, not in a pump-up sprayer. Once the solution in the bucket is clear and there are no clumps of undissolved Tim-Bor, then it can be transferred to a garden sprayer. Tim-Bor solution must be used as soon as possible and should not be stored for an extended length of time.
Just like Bora-Care and PenaShield, Tim-Bor needs to be stored in a dry place where children and pets cannot gain access to.
Solutions of Tim-Bor can and will freeze if the temperature drops below 20°F. However, it is not worth trying to save or salvage Tim-Bor solutions that remain unused.