Library

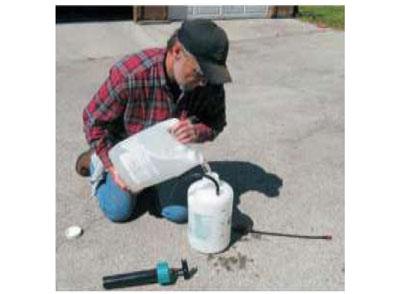
One of the best tools an applicator or homeowner can have in their possession is a moisture meter. In addition to finding trouble spots due to water infiltration, it can also help determine if the surface of logs are dry enough to seal or finish.
Following are some guidelines when using a moisture meter.
Decay and insects
Untreated wood that contains a moisture content of 20% to 60% is subject to attack by decay fungi. It’s not a matter of if it will decay but when it will decay. That’s why it’s so important that a finish on green wood be able to breathe in order to allow the internal moisture to escape from the wood rather than be trapped inside.
Non-breathable or vapor barrier finishes like oil-based alkyds state on their instructions: “Do not apply when moisture content of the wood is greater than 18%.” When these types of finishes cover the surface of logs that contain a lot of moisture, the inside of the logs will begin to rot away and/or the finish will begin to peel off due to water vapor pressure.
Insects, too, prefer moist wood. Both carpenter ants and anobiid powderpost beetles typically infest wood members with moisture contents in excess of 30%.
Sealing or finishing logs
As we state in our literature, Perma-Chink products can be used on fairly green logs. But that does not mean that they can be applied when the surface of the wood is saturated with water. Even though the interior of the logs may contain 40% or more moisture content, the surface must be dry enough so that the sealant or finish adheres to the wood.
We would like to see the surface moisture content be 20% or less before applying any of our sealants or finishes. If the surface moisture content is too high, there is a chance that product adhesion will be compromised. This is also true after a home has been washed.
So how long do you have to wait for the wood to become dry enough to stain? It’s not so much a matter of time as it is surface moisture content. The objective is to allow enough time for the surface moisture to evaporate to a level of 20% or less. A moisture meter takes the guesswork out of the equation.
Moisture meters used to be high dollar items, but over the past few years they have dropped significantly in price. A quick search on eBay and Amazon.com produced a number of pin-type digital moisture meters for less than $25.00 plus shipping. For that price, a moisture meter is an excellent investment for both homeowners and professional applicators.
The following are guidelines to follow after performing a borate treatment to your log home.
PenaShield®Ready-to-Use Borate Wood Preservative
Washing – Avoid washing down a wall within five days of application. We recommend waiting at least seven days. In practice there are very few occasions when a wall treated with PenaShield® needs to be washed at all.
Provided the first coat of finish can be applied within seven days of application there is no need to wash it down. If for some reason there is a delay in applying the first coat of finish or discolorations or white residue is present, then washing with water or Log Wash™ may be appropriate but again wait at least five days after the PenaShield was applied. Otherwise, too much of the active borate will be washed away.
Staining – An application of PenaShield usually dries sufficient to stain the wall within one to three days. There is rarely a need to wait more than three days after a PenaShield application to apply the first coat of finish.
Occasionally early morning dew may make the wall a bit damp to the touch but once the sun comes out and the wall dries the finish may be applied without affecting adhesion. If application of the first coat of finish is delayed for several weeks or even months, they will not leach out. Once the borate gets into the wood it is very difficult to remove, even if it gets rained on for several months. In this case even pressure washing won’t remove enough of the borate to matter.
Tim-Bor®Water-Soluble Borate Powder
Washing – Avoid washing down a wall within three days of application. Again, it’s best to wait at least seven days but in typical weather conditions most of the water accompanying the borate will have dried within three days and once the water dries the penetration of the borate into the wood ceases. If white deposits appear on the surface, start by lightly misting the area with water. If they remain visible after the surface dries, try washing the wall down.
Staining – Like PenaShield there is rarely an occasion that a Tim-Bor treatment is not dry enough to stain within one to three days.
Bora-Care®Borate Wood Preservative Concentrate
Washing – The use of Bora-Care has created much of the confusion relating to washing borate treated walls. If Bora-Care is used, it must be allowed to dry at least 48 hours then washed down with Log Wash™ before staining. The two weeks’ wait and washing is not optional as it is required. We used to say that if it was dry to the touch, it was ready for staining, but we found that it could appear dry one day and be damp enough the next morning to create stain adhesion problems.
In addition, we’ve found there are some types of molds that thrive on the glycols contained in the Bora-Care. If the treated surface is not thoroughly cleaned of these mold spores, there is a chance that mold spots can develop under the finish. Remember that although borates are great for eliminating and preventing wood decay fungi, they are not effective in killing or averting all types of surface molds.
Staining – The first coat of finish should not be applied over a Bora-Care treatment without first washing down the wall with a Log Wash™ solution. One of the glycol components in Bora-Care tends to stay on the surface and can create adhesion issues with the stain, Perma-Chink®, and even Energy Seal®.
Just remember to allow at least 48 hours after the Bora-Care application before washing the surface.

Ever since Perma-Chink Systems introduced borate treatments to the log home industry over 20 years ago, its products have been the preferred method of protecting log homes from wood-destroying insects and decay fungi. We are still the world’s largest supplier of borate-containing preservatives for log homes, and although there are other borate-based products now available, most are based on technology developed by Perma-Chink Systems back in the late 1980s.
Perma-Chink Systems Borate-Based Preservatives/Pesticides
PenaShield® – A borate/glycol formulation that requires no mixing and can be used directly out of the container. PenaShield® is a water-soluble treatment containing proprietary penetrants that all it to diffuse quickly and thoroughly into wood. A Lifeline™ finish may be applied after the treatment has dried which usually takes between 1-3 days..
Bora-Care® – A thick, viscous liquid borate/glycol that must be mixed with water for use. It requires a minimum of 48-72 hours of dry time and must be washed down with Log Wash solution (2 cups per gallon of water) before applying the first coat of Lifeline™ finish.
Tim-Bor® – A water-soluble borate powder that acts as a wood preservative, fungicide, and insecticide. It can also be dusted into termite galleries to kill termites in as little as 7 days. Since it contains no glycol, it does stay near the surface of treated materials. If the finish system is physically or chemically removed, we recommend re-applying.
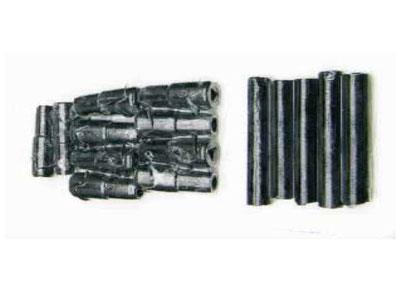
Cobra Rods – Fused borate rods that are inserted into the wood, providing localized protection to high risk zones like log ends and the base of posts. In addition to the borate, Cobra Rods contain a small amount of copper oxide to increase their efficacy against some species of decay fungi.

Application Equipment
Any type of pump-up, compressed air sprayer is suitable for applying PenaShield®, diluted Bora-Care®, or solutions of Tim-Bor®. Either a cone or fan spray tip will work. Do not attempt to use an airless sprayer. Airless sprayers put out a fine liquid mist that can be carried away with even a slight breeze. In addition, the high surface area of the small droplets allows the water contained in the solution to rapidly evaporate leaving behind a high concentration of borate and in the case of PenaShield® and Bora-Care®, mixed glycols form a sticky film on the surface of the wood rather than penetrating the wood.
For treating small areas, you can use a brush or hand sprayer to apply borate solutions.
Application Information
Applications of PenaShield®, diluted Bora-Care®, and solutions of Tim-Bor® must be to bare wood. If the surface of the wood has any type of coating, finish or water-repellent on it, or if a mill glaze is present on the surface, the active borate ingredient will not penetrate the wood, and the wood will remain unprotected.

Product Preparation
PenaShield® – No preparation is required. PenaShield® is used “as is” right out of the container. Any unused solution may be poured back into the original container.
Bora-Care® – Pour Bora-Care® concentrate into a pail. Do not attempt to mix the concentration in a sprayer, you run the risk of the heavy concentrate blocking hoses and spray tips. Add an equal volume of warm water. Physically stir the mixture until the mixed solution is uniform and there is no thick concentration remaining at the bottom of the pail. Using a paint mixer in an electric drill will speed the mixing process. Once the diluted Bora-Care® is completely mixed and uniform pour the solution into the spray tank. Use 1:1, 2:1, and 3:1 Bora-Care® solutions within 24 hours after mixing; 5:1 solution will remain stable for up to 30 days. Do not leave diluted Bora-Care® in the sprayer overnight, it will block up the spray tip. Clean and/or flush equipment and lines with water after use.
Tim-Bor® – If preparing a 10% Tim-Bor® solution, add approximately 80% of the required volume of water to the mixing vessel. While stirring, gradually add one pound of Tim-Bor® powder per gallon of water. If preparing a 15% Tim-Bor® solution, you would gradually add 1.5 pounds of Tim-Bor® powder per gallon of water. Keep agitating until there are no visible lumps and the solution has dissolved. Do not leave any unused solution in your sprayer overnight. The borate will drop out of solution and block up the sprayer.
Borate Solution Applications
Step 1: Be sure the surface of the wood is clean and dry before starting. Never wet the wood right before applying a borate treatment. If you do, the wood cells will be saturated with water preventing the borate solution from absorbing into the wood.
Step 2: If you have an adjustable spray tip, set it to either a fan or cone relatively coarse spray. If set to a fine spray it will be more susceptible to wind drift and it will take longer to complete the job.
Step 3: Start spraying the solution at the bottom of the wall and work your way up. If the solution begins to run down the wall you are applying too much. You only need to wet the surface, not saturate it. However, on exposed log ends keep applying the borate solution until it no longer absorbs into the wood. Log ends are typically the most decay-prone areas of a log home and need the greatest protection. Be sure to get some borate into all upward-facing checks and fissures. It is not necessary to back-brush the borate solution. If you miss a small spot (less than an inch in diameter) here and there, do not worry. The solution will spread out in the top layer of wood.
Step 4: (PenaShield® and Tim-Bor®): In the case of treatment with PenaShield® or Tim-Bor® the surface will be ready for the first coat of finish within two to three days. If for some reason there is a delay in applying the finish, the borate treatment will typically not have to be reapplied unless there is a torrential downpour within three days after the application. However, do not purposely wash the surface for at least a week after treatment. You run the risk of removing some of the active ingredients.
Step 4: (Bora-Care®): After a treatment with diluted Bora-Care® you must wait at least two weeks for the active ingredient to make its way into the wood and for the glycol constituents to dry before applying any sealants or a finish. Even then, there may still be enough glycols remaining on the surface to interfere with the adhesion of the finish. We recommend washing any walls treated with diluted Bora-Care® with two cups per gallon Log Wash™ solution one or two days before the application of the first coat of Lifeline™ finish but no sooner than two weeks after the initial Bora-Care® application.
Step 5: Wash hands, clothing and equipment with soap and water.
Step 6: For long term protection exterior wood surfaces that have been treated with a borate solution should be coated with a Lifeline™ exterior finish. If the exterior surfaces are to remain bare a re-application should be made every six years regardless of which product is used. Interior borate treated surfaces do not require a water repellent coating.
Maintenance
PenaShield® and Bora-Care® treatments are permanent and should never need to be re-applied. In the case of a borate treatment using Tim-Bor®, if the home is subsequently stripped or media blasted, an additional treatment is recommended once the wood is bare.
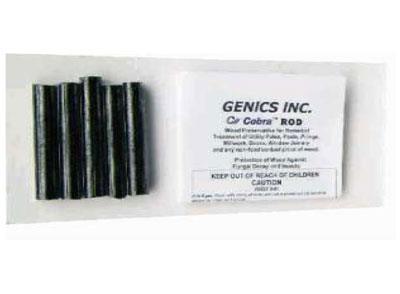
Cobra Rods Installation Information
Cobra™ Rods may be used to help eliminate an existing localized decay problem or to prevent decay from talking hold in a high-risk area like the bottom of a support post. They may be installed into wood that is bare or have already been finished. Cobra™ Rods are two inches long and although are labeled as being 1/2” in diameter they are 7/16″ so they easily fit into a 1/2” diameter hole. A black plastic plug is supplied with each Cobra™ Rod.
Equipment
Electric drill with a 1/2” diameter bit
Screw driver
Trowel
Energy Seal™ or Woodsman™ sealant
Small amount of stain and topcoat (optional)
Installation
Step 1: Drill a 1/2” diameter hole in the wood to a depth of at least 3” deep. This depth leaves room for the rod and the plug. For large diameter round or rectangular logs, two rods may be inserted into the same hole but drill the hole at least 5” deep.
Step 2: Insert the Cobra™ Rod into the hole as far as it will go.
Step 3: Insert the plastic plug and use a screwdriver, twist it clockwise to set the plug into the hole.
Step 4: The plastic plug may be hidden from view by placing a layer of appropriately colored Energy Seal™ over the end. The Energy Seal™ may then be stained to match the surrounding wood. Seal over the end. The Energy Seal may then be stained to match the surrounding wood.
Step 5: Wash hands with soap and water.

Can Lifeline™ Interior stains be used to finish interior floors? Technically the answer to this question is yes, but we rarely recommend them unless whoever is going to be finishing the floor fully understands the characteristics of water-based, transparent stains and knows how to apply them.
Professional floor finishers have been using oil-based stains ever since it became fashionable to add some color to flooring. The application techniques and procedures used for applying an oil-based floor stain has not changed for many, many years, so most everyone selling or applying floor finishes will give a standard set of instructions to anyone planning to finish their own floors. However, if these directions are used when applying a water-based stain, the results will be unsatisfactory.
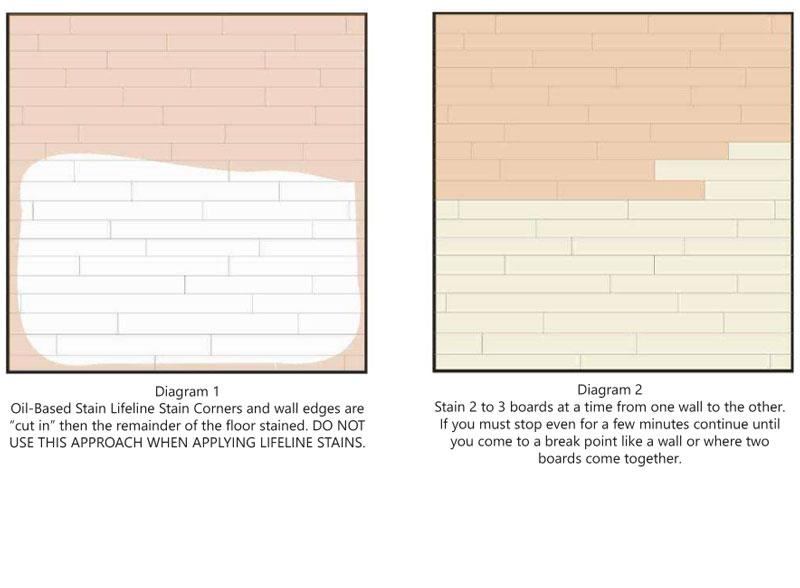
Once the floors are sanded and cleaned, a professional floor finisher using an oil-based stain will usually “cut in” around the baseboards and corners with a brush, rag, or pad, then apply the stain to the remainder of the floor [Diagram 1].
Since oil-based stains take a fairly long time to dry, the interface between the “cut in” areas and the center area can be feathered together, so that it becomes impossible to see any differences in color. Water-based stains dry very quickly, so it’s impossible to feather in any previously stained areas without creating lap marks. However, there are some distinct advantages for using a Lifeline water-based stain. These advantages include little or no odor, soap and water clean-up, quick dry time, and environmental friendliness.
If you choose to use a Lifeline Interior stain for your floor, here is the way to apply it.
1. Sand the floor as usual.
2. Vacuum then wipe the floor with a damp cloth. Keep rinsing the cloth so that it does not accumulate too much sanding dust. It will raise the grain a bit, but that’s okay. The water-based Lifeline will end up raising the grain anyway and the slight roughness will be dealt with later in the finishing process.
3. Once the floor is dry, apply one light coat of Lifeline Prelude™ clear wood primer with a brush or pad. This will seal the surface and help prevent any blotchiness due to varying porosity from the sanding process. Don’t worry about lap marks or surface roughness at this stage.
4. After the Lifeline Prelude dries, apply the first coat of Lifeline stain. This is where care must be taken to avoid lap marks. Start at one corner of the floor and work on two or three boards at a time all the way across the floor. If you must stop before you get to the other side, be sure to continue to where one board ends and another begins [Diagram 2]. Apply Lifeline in a thin coat and back-brush as you proceed.
5. When the floor dries you can decide if you want to apply another color coat. It’s not necessary and depends on how much color you want to obtain. Do not sand.
6. Once you have attained the desired color and the floor is dry you can begin applying PCS Clear Shield finish in gloss or matte to the floor. The technique for applying Clear Shield is different than applying the Lifeline Prelude or any Lifeline stain, so be sure to read the “Applying PCS Clear Shield” Technical Tip before you start.
7. Now that you have the first coat of PCS Clear Shield on the floor, and it’s good and dry, you can give the floor a light sanding using fine sandpaper (180 grit or higher) to remove any surface imperfections. Do not sand too hard or you’ll end up removing the finish. Once sanded, remove any dust with a damp cloth. Sanding between subsequent coats will not be necessary. Floors usually take two to four coats of PCS Clear Shield to assure maximum durability and desired uniform appearance.
8. Although you can usually walk on the finished floor within a few hours, it’s best to wait 72 hours before replacing any furniture or subjecting the floor to heavy traffic.
What about applying PCS Clear Shield over a newly applied oil-based stain? There is no problem with this as long as the oil-based stain is good and dry. Typically we recommend waiting a week or two, but it really depends on the temperature and humidity. It is best to check with the manufacturer of the oil-based stain to see what drying time they recommend before applying a water-based clear coat.
Do you think your utility bills are too high for the size of your home? Is your home drafty or uncomfortable? Does water condense on the inside of your windows? Have spiders, ladybugs and other insects invaded your living areas? The first step in resolving all of these issues – and more – is an energy audit conducted by a trained professional with the proper tools and equipment. But is it worth it?
Let’s just look at the potential savings in energy costs. One gauge of energy efficiency is to compare your total yearly cost of gas and electricity divided by your home’s square footage of living area. An energy efficient home will operate on about $0.60 per square foot a year. Energy inefficient homes may cost two or three times that amount. You can figure out for yourself how much that equates in energy cost savings per year for your own home.
What does an energy audit do? As previously stated, an energy audit is the first step in the process. Simply put, an energy audit finds the source of any air leaks and determines how bad those air leaks are. The next step is to eliminate the air leaks by replacing faulty weather stripping, door sweeps, etc., and by using an appropriate sealant like Energy Seal® or Woodsman™. Since that subject is covered in “How to Apply Energy Seal™ and Woodsman” for now we’ll just concentrate on the energy audit.
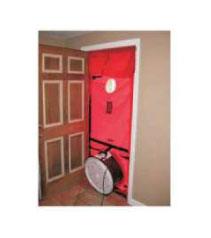
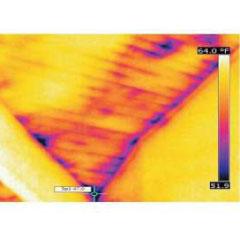
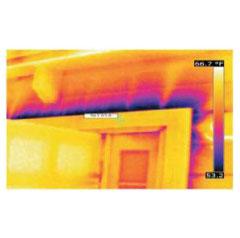
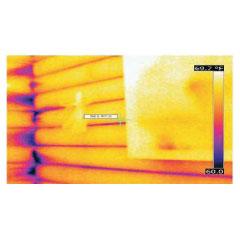
The three basic tools used for an energy audit are a blower door, a thermal imaging camera and a computer loaded with the appropriate software. The blower door in conjunction with the computer measures the cumulative air leakage within the home and provides a negative internal air pressure, so the thermal imaging camera can better locate air leaks. The thermal imaging camera takes actual pictures of the air leaks, so you’ll have a record of exactly where they are located.

There are many utility companies around the nation that offer free energy evaluations and incentives for increasing the energy efficiency of your home. It’s always worth checking with your local energy provider to see what programs are available in your area.
There are a whole host of web sites devoted to providing information about Energy Audits and what they can do to identify problem situations and reduce your energy costs. Probably the best place to start is www.energystar.gov. Besides offering some do-it-yourself advice, you can also find a list of certified professional energy auditors located in your area.
Remember that the Energy Audit is just the first step. Next you have to decide if you want to attempt to correct the problems yourself or use a professional contractor. For log home owners here’s where things can get a bit tricky. Most painters and contractors are familiar with sealing and caulking conventional homes but as you probably already know, logs homes are different and it takes someone with log structure experience and expertise to do the job correctly. Plus general purpose caulks and sealants found at local hardware stores and DIY outlets just don’t offer the performance that’s required for the unique parameters associated with log homes. If you need help finding someone in your area who has experience doing this type of work, give us a call and we’ll try to provide you with some referrals.
So let’s assume you have had an energy audit and corrected all of the air leaks into to your home. In addition to significantly reduced utility bills, what other benefits will you see?
Comfort – Your home will be less drafty and it will be much easier to maintain a constant temperature throughout your entire home.
Water Leaks – In addition to eliminating air infiltration into your home, you will also eliminate water leaks that can discolor or rot your logs and trim.
Less Dust – Since eliminating air leaks stops a continuous flow of outside air coming into your home, it also reduces the amount of dust that accumulates within your home.
Fewer Bugs – Sealing air leaks closes openings used by ladybugs, ants and other insects to enter the living area of your home. Sealing these openings is much more effective and a lot safer than the use of any broadcast pesticides.
The bottom line is that an energy audit is well worth the price and the energy savings alone will typically cover the cost of the audit plus the cost of repairs within the first two years.

Before we get started, let’s look at the difference between shakes and shingles. In many cases the terms are used interchangeably but regional differences do exist. Nationally you will find shake roofs and shingle-sided homes as well as vice-versa. It’s more a matter of semantics than definition.
By far, the best advice that we can offer regarding coating shakes and shingles is to use whatever your shake and shingle manufacturer or supplier recommends. Often shakes and shingles are pre-treated with a flame retardant or other chemical prior to installation, and it may not be compatible with all types of coating systems.
Shakes and shingles present a different set of dynamics to a coating than logs, siding, decks or dimensional lumber.
First, other than hand-split shakes, they are typically sawn or rough cut, making them quite porous. Second, once installed it is impossible to coat them on all six sides and edges. And third, since they overlap each other, you can’t seal them to prevent water from getting in behind them.
This presents a real challenge to any coating that’s applied after the shakes or shingles have been installed. Since the back and top are impossible to reach with a coating, they remain bare and water absorbent. When water is absorbed, the wood will swell. If a coating has been applied to only the exposed surfaces the outer surface will remain dry and the shake or shingle will have a tendency to cup.
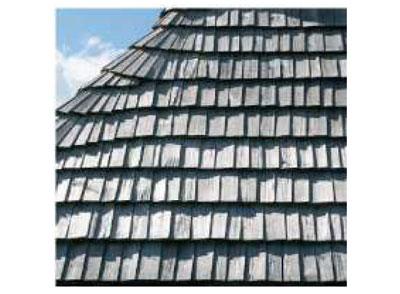
Roofs
We do not approve the use of any of our finishes on roofs of any type, including shakes or shingle roofs. Check with the supplier of your shakes or shingles to find out what they recommend.
Shake or Shingle Siding
If you do want to apply a Lifeline™ coating to shake or shingle vertical siding, the time to start the process is before they are installed – but check with the manufacturer first. You can try brushing a coat of Lifeline stain over the entire shake or shingle, but an easier method may be by dipping them.

Rather than using a stain, our Prelude™ Clear Primer is a good option. Besides adding water repellency to all surfaces, it will prevent over absorption of the pigmented stain and result in better, and more uniform, color generation on rough or porous surfaces.
When the stain or Prelude has dried, the shakes or shingles can be installed. Once in place, they can then be stained and topcoated with a brush or airless sprayer. Back-brushing will also be necessary to get the Lifeline into all of the nooks and crannies.
Just remember – thin coats. You don’t want to flood the surface. Even then, it will still be a challenge avoiding drips and runs when applying Lifeline finishes to shakes or shingles with a brush.
Much of our technical literature and many of our articles refer to pH as it relates to its impact on bare wood and finished surfaces. Everyone should have a basic understanding of what pH means and how it is measured.
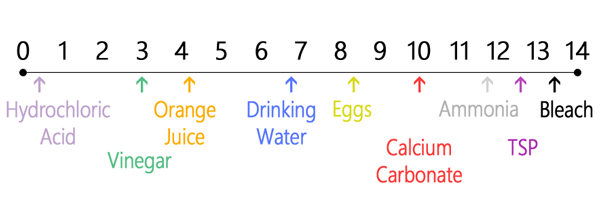
Technically, pH is the negative logarithm of the effective hydrogen-ion concentration in gram equivalents per liter of solution. But for those of us whose high school chemistry falls into the category of ancient history, pH is a measure of alkalinity and acidity on a scale of 1 to 14, where 7 represents neutrality and numbers below 7 indicate acidic solutions and those above 7 are alkaline.
The first thing to recognize when dealing with pH is that pH can only be determined in aqueous solutions; that is solutions containing water. It is impossible to directly measure the pH of any solid substance such as salt, concrete or wood. The way the pH of solid materials is measured is by grinding up a sample and soaking the ground sample in distilled water for a period of time. Any component that is water soluble will dissolve in the water thus affecting the pH. The pH of those materials that are totally insoluble in water such as plastic, glass, or oil cannot be measured, and by definition, do not have a pH.
On the pH scale, each unit of change represents a tenfold change in acidity or alkalinity. So a solution that measures a pH of 11 is ten times more alkaline than one that measures 10, and one hundred times more alkaline than one that measures 9. Following is a representation of the pH scale with the pH of some common substances.
Now that we know a bit about pH, how does it relate to log homes? Most wood has a natural pH of around 4 to 6 (measured by grinding up a sample, soaking it in water then measuring the pH of the water solution). We know that anytime an alkaline solution contacts something that’s acidic, some type of chemical reaction occurs. From the pictured scale you can see that both bleach and TSP (trisodium phosphate) have a fairly high pH. It turns out that most stripping and cleaning products like dishwashing soap and laundry detergent also have a high pH. Basic chemistry tells us that solutions of any of these products are going to have some type of impact on bare wood, and the higher the pH the more impact it will have. Of course, solutions having a very low pH like Oxcon™ will have an impact, too, whereas the pH of Log Wash™ is balanced to match the natural pH of wood.
Here is a list of Perma-Chink’s cleaning and stripping products along with their relative pH values:
Product | pH
S-100™ 12 – 13
Wood ReNew (in solution)™ 10 – 11
StripIt® 7.0
Log Wash (diluted) 4 – 5
Cedar Wash™ (RTU) 10 – 11
Oxcon (diluted) 1.5 – 2.5
Occasionally we get a call from someone with an older log home who wants to “seal and protect” their logs but does not wish to remove the gray patina that has built up over the years.
Typically they think that some type of clear finish can be applied to their home which will keep water from penetrating into the wood and help retard wood erosion due to sun, wind, and rain. The truth is that there is no clear exterior product that will meet their expectations.
First and foremost, we NEVER recommend the application of Advance or any other Lifeline™ product on bare, grayed wood. The grayness is an indication that the surface fibers have oxidized and lost their integrity. They are like the rust particles on an old steel plate. If you paint over the rust with a latex paint, it will not adhere properly and soon peel off. The same thing happens when a coat of acrylic latex finish is applied onto grayed wood. Since it does not have an opportunity to bond to intact wood fibers, it too, can peel off.
On the other hand, penetrating oil or solvent products don’t rely on surface adhesion so they can be applied to grayed wood without the risk of peeling off. The trouble is that these types of clear products last only a few months – at best.
For example, many clear water repellent products consist of paraffin wax dissolved in petroleum solvents. When first applied they may look like they are doing a great job repelling water since water beads up on the surface. However, within a few months the solvents evaporate and the wax gets weathered off. So unless you are willing to treat your home every six months to a year, they won’t do much good protecting the substrate.
So what’s the best advice we have for anyone who is not willing to remove the gray patina on their home? Our answer is to do nothing. Just like rust helps protect the underlying steel plate from further corrosion, a layer of grayed wood helps protect the wood beneath it from additional damage.
Is this the best way to protect your home? Of course, not; if you want your home gray you should use one of our gray colored stains. But if you are unwilling to do it correctly by removing all of the gray oxidized wood, applying any type of clear coat is a waste of your time and money. Sometimes less is best.
Before we get started, let’s look at the difference between shakes and shingles. In many cases the terms are used interchangeably but regional differences do exist. Nationally you will find shake roofs and shingle-sided homes as well as vice-versa. It’s more a matter of semantics than definition.
By far, the best advice that we can offer regarding coating shakes and shingles is to use whatever your shake and shingle manufacturer or supplier recommends. Often shakes and shingles are pre-treated with a flame retardant or other chemical prior to installation, and it may not be compatible with all types of coating systems.
Shakes and shingles present a different set of dynamics to a coating than logs, siding, decks or dimensional lumber.
First, other than hand-split shakes, they are typically sawn or rough cut, making them quite porous. Second, once installed it is impossible to coat them on all six sides and edges. And third, since they overlap each other, you can’t seal them to prevent water from getting in behind them.
This presents a real challenge to any coating that’s applied after the shakes or shingles have been installed. Since the back and top are impossible to reach with a coating, they remain bare and water absorbent. When water is absorbed, the wood will swell. If a coating has been applied to only the exposed surfaces the outer surface will remain dry and the shake or shingle will have a tendency to cup.
Roofs
We do not approve the use of any of our finishes on roofs of any type, including shakes or shingle roofs. Check with the supplier of your shakes or shingles to find out what they recommend.
Shake or Shingle Siding
If you do want to apply a Lifeline™ coating to shake or shingle vertical siding, the time to start the process is before they are installed – but check with the manufacturer first. You can try brushing a coat of Lifeline stain over the entire shake or shingle, but an easier method may be by dipping them.
Rather than using a stain, our Prelude™ Clear Primer is a good option. Besides adding water repellency to all surfaces, it will prevent over absorption of the pigmented stain and result in better, and more uniform, color generation on rough or porous surfaces.
When the stain or Prelude has dried, the shakes or shingles can be installed. Once in place, they can then be stained and topcoated with a brush or airless sprayer. Back-brushing will also be necessary to get the Lifeline into all of the nooks and crannies.
Just remember – thin coats. You don’t want to flood the surface. Even then, it will still be a challenge avoiding drips and runs when applying Lifeline finishes to shakes or shingles with a brush.

One of the greatest mistakes you can make when applying a new finish to your home is to use inexpensive paint or stain brushes. You will be putting a lot of time, money, and effort into your project and saving a few dollars by using cheap brushes can compromise the beauty and performance of your new finish!
When applying water-based finishes like Lifeline™, use brushes made from synthetic nylon/polyester, or blends of bristle and polyester. Ever since the industry started moving away from oil-based coatings, brush manufacturers have designed brushes specifically made for the application of water-based stains and clear coats. These brushes are durable, so they’re great for staining rough surfaces. They maintain their stiffness when exposed to water and are easy to clean. You don’t want to use a 100% natural bristle brush for applying a water-based coating, as natural bristles absorb water. You’ll end up with a limp brush that won’t work very well. Also, rough surfaces will quickly wear out a pure bristle brush. Since transparent stains are typically much less viscous than paints, if you use a normal paint brush, the brush won’t hold much product and you’ll end up having to constantly dip the brush after just a few strokes.
Some Features of Quality Brushes
Bristle Quality – As previously stated, choose brushes with bristles made specifically for applying water-based stains. Using less expensive all-purpose brushes will result in drips, runs, and other defects in the finish.
Bristle Retention – There is probably nothing more exasperating than trying to pick loose bristles off of a surface that you just finished. If the finish has dried, it becomes virtually impossible to remove them without removing some of the finish also.
Ergonomics – The brush will be in your hand for several hours at a time. An ill-designed handle will quickly become uncomfortable to hold and work with.
Threaded Handle – Some high quality brushes come with a removable threaded handle that can be removed and replaced with an extension pole. This comes in handy when working on high, hard-to-reach areas.
Choose the Correct Brush for the Job
Use the largest brush suitable for the surface you are coating. You’ll probably need small brushes for narrow surfaces like frames and trim, but when coating logs and siding, larger brushes carry more finish; there will be less dipping to refill the brush, and fewer strokes to cover the surface. Larger brushes also do a better job when back-brushing a surface that has had a finish applied with an airless sprayer.
Properly Using Your Brush
Never press too hard on your brush. Stains and topcoats should be applied with the tips of the brush, not the sides. Don’t try to load too much finish on your brush. A heavily loaded brush will result in more drips and runs. If your brush becomes messy, don’t be afraid to stop and occasionally wash it out. One of the advantages of using quality brushes is that they can be repeatedly washed without harming the brush. One tool that you may want to consider purchasing is a brush and roller spinner/dryer. It will quickly spin most of the water out of a brush after washing.
Care and Maintenance
If properly cleaned and maintained, a good quality brush will give you many years of good service. If you take a break even for just a few minutes, rinse your brush out with clean water and shake out the water. If you are through for the day, thoroughly wash your brush with a mild soap or detergent, shake or spin the water out and return the brush back into its original storage sleeve. Don’t just throw it into your tool box. You don’t want to pick up any contamination like small particles of steel and the sleeve will help retain the brush’s shape while it dries.
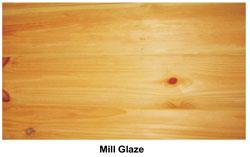
Although there is some controversy regarding its cause, the most commonly held theory about the formation of mill glaze is that it is created on logs, siding and trim by heat and mechanical compression generated during a high speed milling process. The combination of compressed wood fibers and high temperatures that melt the sugars, cellulose, and other water-soluble extractives present in the wood end up forming a surface glaze.
If not removed, this glaze can interfere with the adhesion of both water and oil-based coatings since the wood’s cellular surface is not in direct contact with the coating. The best way to remove mill glaze from exterior wood surfaces is by using Wood ReNew, a percarbonate cleaner, and pressure washing. We highly recommend this procedure whenever a finish is going to be applied to new exterior siding. For interior surfaces a light sanding (120 grit) followed by a light washing with a Log Wash solution (1/2 cup Log Wash concentrate per gallon of clean water) and wiping the wall with warm water to rinse and remove the detergent from the wood. This action will also help swell and decompress the wood fibers while dissolving the glaze. This assures the adhesion of our finishes to the surface of the wood.
Over the past few years there has been a lot of talk about volatile organic compounds (VOCs) and how they are concerned with products used on log homes. Here are some frequently asked questions about VOCs as they relate to log home finishes and sealants.
What are VOCs, and what are the risks posed by VOCs to the environment?
VOCs are Volatile Organic Compounds, typically petroleum-based solvents and other liquids contained in coatings, sealants, cleaners, fuels, and other products that evaporate into the atmosphere. Once in their vapor state, they have been implicated in the increase of the ground level ozone concentration. In addition, many of these compounds are designated as health hazards. VOCs are typically measured in terms of grams per liter (g/L). The higher the number, the more VOCs are contained in the product.
What are some of the VOC restrictions placed on stains?
Stains are classified as architectural coatings and both state and federal agencies have limited the amount of VOCs allowed in coatings. Some states, like California, Virginia, Pennsylvania, New Jersey and others, have placed VOC limits lower than those mandated by the federal government. This is why many of the oil-based stains sold in these states are not the same products they were five years ago. Within the next few years it is expected that both state and federal allowable VOC limits will continue to decrease.
What kind of challenges have the VOC restrictions posed to Perma-Chink Systems?
Since Perma-Chink Systems manufactures and sells only water-based coatings, VOC restrictions have not had much of an impact on us, other than increasing the demand for our products. However, there is one method of measuring VOCs that has a minor impact.
Back when VOCs first became an issue, the solvent-based coating manufacturers lobbied that it was unfair to compare a water-based coating with a solvent-based product. The result was a method of determining the VOC content of water-based products by first removing all of the water. Even if a product contains 80% water, this method only looks at the remaining 20% of the components. Although this method of determining VOCs in water-based coatings has fallen out of favor by many coating organizations, it is still used by the states under the direction of the EPA.
Although all of our stains, topcoats, and sealants currently meet or are significantly lower than the VOC requirements for all 50 states plus Canada, we continue to investigate formulations that contain even lower amounts of volatile organic compounds, while maintaining or increasing the performance in terms of longevity and durability of our product lines.
Is there any difference in the quality, color, and durability of low VOC water-based stains versus oil-based stains?
Over the past few years almost all new innovations in coating technology have been in low VOC water-based systems. This new technology has allowed the development of high quality products like our Lifeline™ brand stains and Advance™ Topcoats that not only look great, but meet all of the requirements of a log home. Recent advances in polymers, UV light inhibitors, and mildewcides have significantly improved the look, longevity, and performance of water-based coating systems.
For those manufacturers like Perma-Chink Systems willing to make the investment, this new technology has allowed us to develop water-based products that look better, last longer, and outperform the best oil-based product ever made. On the other hand, one way that high VOC oil-based coating manufacturers have lowered their VOC content is to add fillers such as pigments or extenders to their coatings. The subsequent reduction in solvent content has, in most cases, decreased the attractiveness and longevity of these products.
Why is it important for Perma-Chink Systems to offer low-VOC products to our customers?
Since our inception back in 1982, Perma-Chink Systems has always had a concern for our environment, and we have always taken the environmental impact of a product into consideration during its development. In retrospect, this was and is a very wise decision which has resulted in our considerable growth over the years as people become more aware of the effect products have on the quality of our environment.
Aside from the environmental impact, are water-based products safer to use and apply?
Most water-based coatings have little, if any, odor and can be applied both inside and outside a home without concern. In addition, water-based coatings can be cleaned from brushes and spray equipment with just soap and water. On the other hand, oil-based coatings must be cleaned with mineral spirits which releases even more VOCs into the atmosphere.
Besides low-VOC water-based stains are Perma-Chink Systems’ sealants also earth and people friendly?
Perma-Chink Systems offers a wide range of caulks and sealants including Perma-Chink®, Energy Seal™, Woodsman™, and Check Mate 2®. All of our sealants are low VOC water-based products. We do not make any petroleum solvent-based sealants, nor do any of our sealants outgas xylene, toluene, formaldehyde, or other toxic or carcinogenic components.