Library
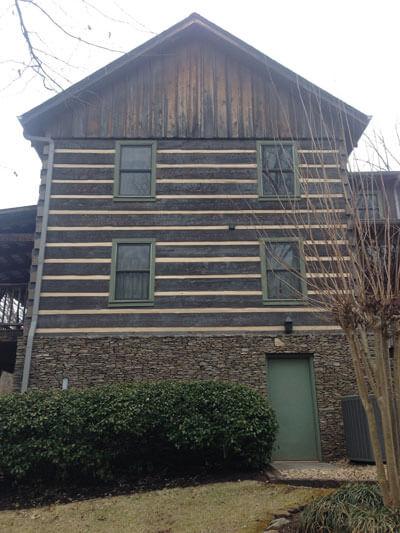
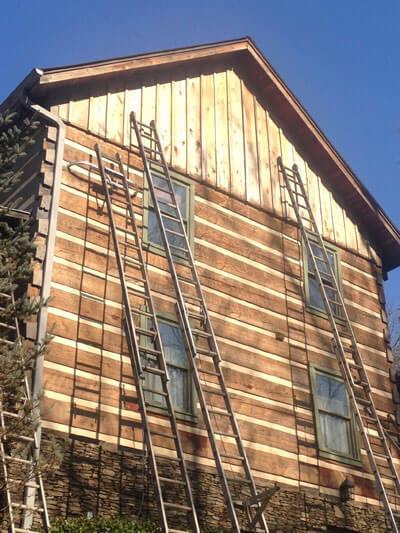
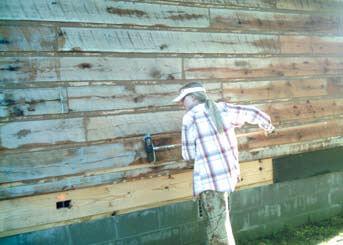
When preparing a home for a new finish, one tool we typically recommend is a pressure washer. However, all pressure washers are not created equal. Choosing the right pressure washer for the job is critical for the proper performance of our cleaning and finish removal products.
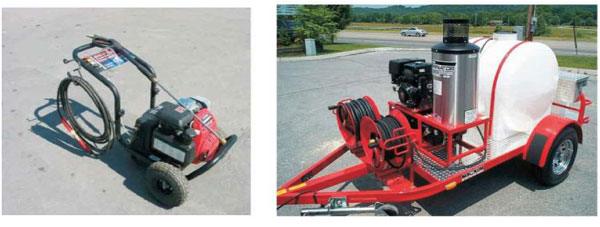
When selecting a pressure washer, there are some things to look for. One of the most important features is water output volume. It should be able to put out at least two to three gallons of water per minute (2-3 gpm). A lower output tends to move the degraded stain and wood fibers down the wall, but does not necessarily wash them off of the wall. For example, electric pressure washes may generate enough pressure to clean, but since they only put out about 1/2 gallon of water per minute, they really are not suitable for cleaning a wall down to bare wood.
Although a good pressure washer typically generates 2500 to 3000 pounds of pressure (psi), it does not mean that you need that much pressure to clean the surface. You want to hit the surface of wood with no more than 600 psi in order to avoid excessive feathering. However, the higher pressure allows you to stand back from the wall and clean off a wider swath with each pass of the wand tip. For removing old finishes we recommend using a 25-degree fan tip or an adjustable nozzle, if it’s available.
One more thing about pressure washers: we don’t recommend running any of our cleaners or strippers through the pressure washer. Our products should be applied separately, allowed to work on the surface for the labeled amount of time, then you should use the pressure washer to wash it off. To avoid streaks and runs, clean from the bottom up and rinse from the top down.
A pressure washer will definitely test the sealant system of a home. Water will undoubtedly enter the home, so have someone inside with some towels and to mark water entry points for later inspection and sealing. Lastly, the wood must be allowed to dry at least a day and be dry to the touch before applying a caulk, stain, or a wood preservative.

For many years oxalic acid has been one of the most commonly used products for brightening and preparing wood surfaces for a coat of stain. Why? Prior to the introduction of organic solvent finish removers in the late 1990s, the most popular paint and stain removal products were caustic chemical strippers which contain sodium or potassium hydroxide. They are still sold at most paint stores, and although quite caustic and somewhat hazardous, they have been used for over 100 years and are relatively inexpensive.
One negative feature of using any hydroxide stripper is that it’s extremely high pH turns the wood dark. After a hydroxide stripper is used, it is standard procedure to apply a solution containing oxalic acid to the wood to bring the wood back to its original color prior to the application of a stain. That’s how Oxcon attained its original description as a “Blonding Agent.” There is also a belief that since it is an acid, it helps “neutralize” any hydroxide residue remaining in the wood, thus preventing wood fiber degradation due to the presence of highly alkaline chemical residue.
Since oxalic acid does do a good job restoring the color of the wood after the use of sodium or potassium hydroxide, as well as removing metallic tannate discolorations, over the years it gained a reputation as being a “cure-all” for other types of wood discolorations as well. One reason is because many discolorations that were attributed to mold were in fact not mold, but metallic tannate or inorganic stains. Somehow oxalic acid also got a reputation for helping remove grayed or photooxidized surface wood fibers. In reality, it does not do a very good job and there are other products, like our Wood ReNew™, that are much more effective.
If not properly applied, oxalic acid can do more harm than good when it comes to preparing the surface for a water-based film forming finish like Lifeline™. Film-forming water-based finishes rely on the integrity of the surface fibers to assure adhesion to the wood. If the surface fibers are damaged and the film does not have intact fibers to bond to, peeling of the applied finish can result.
We have found in our testing that the use of concentrated oxalic acid, or even a small amount of residual oxalic acid left on the wood, can seriously affect the adhesion properties of water-based finish systems.
Like chlorine bleach, oxalic acid is subject to being easily misused. For example, even when properly diluted to our labeled instructions, if left on the wood too long, especially in hot dry conditions, the water will begin to evaporate and the concentration of the acid solution increases proportionally, eventually reaching a point where damage to the wood fibers can occur. Another potential problem with oxalic acid solutions is that when they react with alkaline compounds, they form oxalate salts which are quite insoluble and almost impossible to rinse off with water. They, too, can interfere with the adhesion of water-based finishes.
Most finish removers that are used today contain organic solvents that don’t darken the wood. Since oxalic acid does not remove grayed wood fibers or organic discolorations like brown stain, blue stain, or mold and mildew stains, what are the valid uses for Oxcon oxalic acid?
1. Oxcon oxalic acid is the only product that removes inorganic discolorations of metal tannates and rust. If, after stripping and cleaning the surface, there are still dark colored streaks or blotches, there is a chance that a solution of Oxcon will remove them. This includes some types of “water marks.”
2. If the stripping and cleaning process has turned the wood dark, a solution of Oxcon may help lighten it up.
To properly use Oxcon here are some guidelines that must be followed:
1. Make sure that any product that was previously applied to the wall has been thoroughly rinsed off prior to the application of the Oxcon solution.
2. Oxcon is a concentrate and MUST be diluted with four parts water. That’s one gallon of Oxcon mixed with four gallons of water. The use of a more concentrated solution won’t work any better and will damage the wood.
3. Don’t leave it on the wood for more than 15 minutes. If it’s a hot, dry day, wet the wall down before applying Oxcon and keep misting it with water to keep the acid concentration from getting too high. Never, ever allow Oxcon to dry on the wood. If oxalic acid crystals form from evaporation, they will be almost impossible to remove by rinsing with cold water.
4. After using Oxcon, adequate rinsing is mandatory. While rinsing, pay particular attention to any cracks or crevices where the Oxcon solution may have puddled. No one should ever use Oxcon without having pH strips at hand. Just a trace of oxalic acid left on the wood will seriously affect the adhesion of the finish.
After reviewing a number of past adhesion issues, we found that many of them were attributed to the use, or more accurately misuse, of oxalic acid. There is no reason to routinely use oxalic acid in a stripping and cleaning process just because it has been done it for years. Only use oxalic acid when it’s absolutely necessary. Sometime less is definitely best.
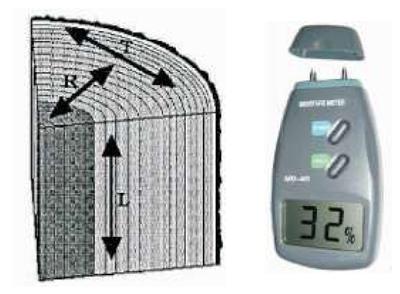
Moisture content of logs can dramatically affect the application of some of Perma-Chink Systems’ products. We recommend that moisture content is below 35% for maximum adhesion of our finishes.
The moisture content of a log is defined as the weight of the contained water divided by the dry wood weight times 100. For example, let’s say a green log weighs 100 pounds and we place it in a drying kiln until all of the water is removed. If the dry log now weighs 65 pounds, the original moisture content was approximately 54% (35 pounds water ÷ 65 pounds dry wood = 0.538 x 100).
Using this method of calculation you can see that it is not at all unusual for a recently cut log to contain well over 100% moisture content. In the field, moisture content is typically measured using a pin-type moisture meter that converts the electrical conductivity between the pins into approximate moisture content.
Once a tree is cut and the bark removed, it will begin to dry out. The water contained in the wood is in basically two forms: free water and water that is bound in the cell walls. The free water evaporates from the log first, and although there is some shrinkage during this process, it’s not until the wood reaches its fiber saturation point (FSP) of about 28% and begins to lose its bound water that significant shrinkage occurs. That’s why whenever a log home is built using very green logs, checks may not begin to open for several months, or even years, after the home was constructed.
Although shrinkage affects all dimensions of a log, some wood species are more prone to checking than others because their rate of radial shrinkage (R) is not as great as their tangential shrinkage (T). Shrinkage along the length of the log (L) is usually negligible. Radial cross section shrinkage can be quite significant and although it varies from species to species, shrinkage of 5-6% is not unusual. Thus a 10-inch round log with a radial shrinkage of 6% can lose more than 1/2 inch of its diameter as it dries.
Once logs have dried below their fiber saturation point, they will continue to shrink until they reach a moisture level that is in equilibrium with the relative humidity of their environment. In warm, humid areas like Florida or Louisiana, logs may never get below 18% moisture content, whereas in the Southwest, they may hold steady at 9-10% moisture content. In most areas of the country, the relative humidity of the air changes with the seasons. For example, in the Northeast air during the winter months is much drier (low relative humidity) than in summer. On the other hand, in the Pacific Northwest the highest relative humidity occurs during the winter months.
So how does all of this affect the application and performance of our sealants and finishes? Although it’s true that our products can be applied to green logs, if the surface of the logs are above the fiber saturation point, there may be so much free water in the surface cellular structure that both sealants and finishes will not be able to adhere properly to the wood fibers, compromising the adhesion. To be on the safe side, the surface moisture content should be 20% or less, as measured by a moisture meter. This is not the same as requiring that the entire log be less than 20% moisture content. We are only concerned with the surface, not the interior of the log – which may still contain 40-50% moisture, even though the surface may read 18% moisture content.
As previously stated, most of a green log’s shrinkage occurs after it has reached the fiber saturation point. Since log checking is associated with shrinkage, most checks will open up several months after the home is constructed, and continue opening until the logs reach an equilibrium with their environment. It is not unusual for large checks to open up two to three years after a home is constructed. If our finish system is applied before the logs reach the fiber saturation point, checks and fissures that later appear may allow rain water to get into the wood behind the finish. When the sun hits the water, saturated wood heat converts the liquid water to so much water vapor that it can overload the ability of the finish to breathe. This is one of the leading contributors to peeling.
Sealing checks before the logs reach their moisture equilibrium point can be an exercise in frustration for a homeowner. What may start out as a small fissure can easily turn into an inch-wide check within a few months. If sealed too soon with Check Mate 2®, the enlargement of the check can exceed the elongation capability of the Check Mate 2 and may eventually provide an entry point for water.
In the homeowner’s eyes, the Check Mate 2 failed since he or she may not remember how narrow the check was when it was originally sealed. There is no perfect solution to the challenges presented by constructing a home using very green logs. Most new log home owners are in a rush to get their home finished and sealed as soon as possible. However, allowing the logs to air dry a few months will improve the performance of both the sealant and finish systems, and help reduce the maintenance required for the first three to four years.
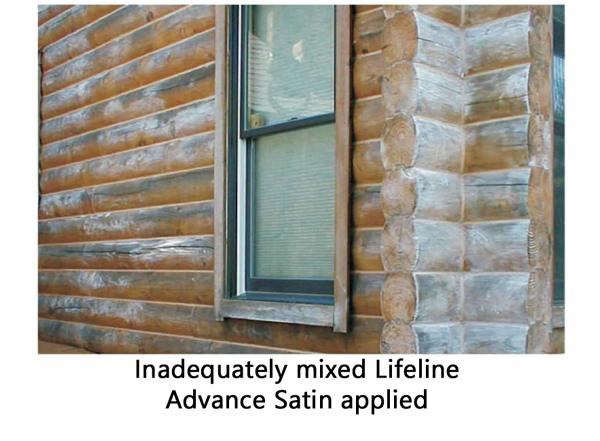
Although there is not much difference in the formulation between Lifeline Advance™ Satin and Advance Gloss, Advance Satin contains a flatting agent for the purpose of reducing its reflectivity, or “gloss.” This raw material can settle to the bottom of the container over time.
It’s important to mix ALL of our finishes before and during use, including Advance. Since it does contain a flatting agent, be sure to shake or mix Advance Satin until none of the flatting agent remains at the bottom of the pail or gallon container. Secondly, the container should be mixed or shaken during use every 20 to 30 minutes to assure a uniform dispersion. This will avoid areas of a wall or home looking “flatter” than others.
If inadequately mixed Advance Satin is applied to a wall, the only way to remove the white residue is to strip the entire finish off and start over again.
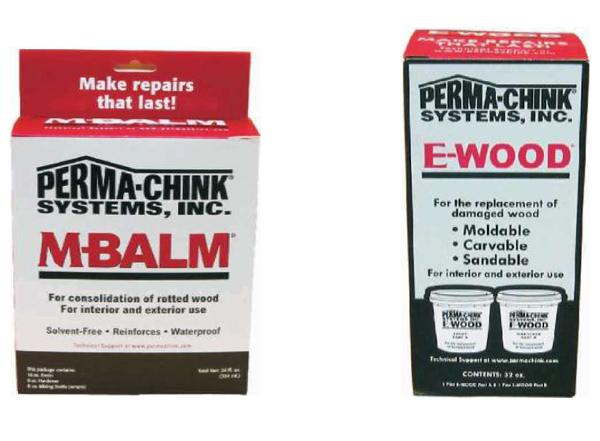
Perma-Chink Systems sells two epoxy products, M-Balm®, a wood consolidator that hardens loose, friable wood fibers, and E-Wood®, a putty used to fill voids or cavities in logs and timbers. Both M-Balm and E-Wood are two component epoxies. Like all epoxy products, they consist of a resin and a hardener and rely on a chemical reaction between the two components to become hard. As they react they often become warm, or even hot. M-Balm, in particular, can become quite hot about 15 to 20 minutes after the two components are mixed together.
Tip: Mix M-Balm in a disposable aluminum bread pan. This allows mixed component to release heat (exothermic) and cool while preventing you from melting your mix container or bottle.
There is one thing about epoxies that you should understand: as epoxies age they lose their chemical reactivity. The older they get, the longer it may take for the combined components to become hard. If unused epoxy has been in your garage for a couple of years or more, it’s not unusual for the hardening process to take three or four times longer than when using fresh product. It’s not that it won’t eventually harden, it’s just reacts slower and takes longer.
Never change the ratio of hardener to resin to try and speed things up. Unlike other types of resin and catalyst mixtures, M-Balm MUST be mixed together at a ratio of two parts of Part A to one part of Part B by volume. For E-Wood, equal volumetric parts of Part A and Part B MUST be kneaded together for these products to work.
Tip: Mix only the amount necessary to complete each step of a small job.
Here’s one more tip: M-Balm does NOT have to be cured before applying E-Wood. Epoxies do not “dry” in the sense that they must be in contact with air. They rely on chemical reactions to harden and cure, so M-Balm will harden just as rapidly under E-Wood as it will if left exposed. In fact, applying E-Wood before the M-Balm cures results in an even stronger bond to the wood.
Whenever the outside temperature is at least 20 degrees lower than the temperature within a home, it’s a good time to find any gaps that may be leaking air. All you’ll need is a small pail of warm water, a piece of chalk, and a perhaps a ladder depending on how high the ceilings are. If you dip your hand in the water then run your wet hand over the interior walls, keeping it about 6”-12” away from the surface, you will easily feel any cold air leaks that are coming through the walls or around the windows. As you move your wet hand closer to the wall you can pinpoint where the leak is located. Be sure to mark those leaking areas with the chalk.
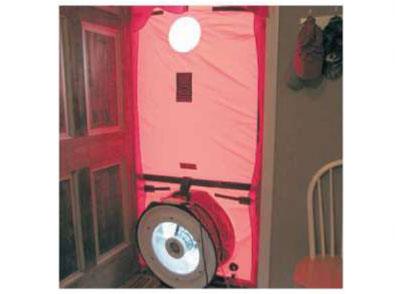
If you have a box fan and want an even more efficient method of locating leaks, place the fan in a window or door blowing outward and cover the remaining opening with plastic sheeting. This will help draw cold air into the home through the leaks making them easier to find. A more accurate and sophisticated method of locating air leaks is with the use of an infrared camera. They are somewhat expensive, but there are people who specialize in doing energy evaluations of homes using this type of equipment.
The best way to attack air leaks is from exterior surfaces. Interior walls can be caulked, but if a crack or crevice is leaking air it may also leak water. Sealing the leak from the outside prevents water penetration along with air infiltration. Sealing with Energy Seal™ or Woodsman™ can be accomplished in cold weather as long as the temperature is above 40°F, and the wood is not wet or frozen. However, the pails or tubes of sealant should be stored in a heated area until they are used.

Maintenance caulking is really a two person job, one outside doing the sealing and one inside feeling for the leaks. Finding the outside source of the leak may not be as easy as it sounds, especially around window and door frames. The opening source of the leak may be several inches from the spot where it is felt inside the home. It’s just a matter of continuing to seal the area until the person on the inside no longer detects the air leak.
The most important step in finishing wood – whether it is a log wall, a piece of log siding, or even a piece of wood furniture – is the surface preparation prior to applying a finish system to the wood surface. This important message has been communicated by Perma-Chink Systems for many years. The reason this topic is so important is that this step, or process, has an impact on the longevity and durability of the system. More specifically, an unclean wood surface and the presence of foreign substances interfere with the direct surface contact of the coating with the wood substrate; furthermore, it will impact the adhesion properties of the finish in a negative manner as well as present a good possibility that wood discoloration will be a topic to deal with in the future.
Wood is a unique, natural substrate that appeals to us due to its beauty and natural characteristics. The application of a semi-transparent or transparent stain allows us to highlight the natural grain, bringing out and exposing its true beauty while adding color. So, are all wood species the same in composition, and therefore can be prepared in the same way, using the same cleaning products? The obvious answer to this question is no. We can simply tell this by looking at two different wood species and notice the differences in wood color and grain structure. These simple differences are an indication that not all wood species are created the same and their compositions are quite different. Although all wood species contains many of the same components including cellulose, hemicellulose, it is the wood extractives that differentiate wood species from one another.
Wood extractives are compounds present in bark, softwood, and heartwood of a tree that contribute to such properties of wood as color, odor, and decay and insect resistance. Consequently, these extractives can also discolor paint and finishes (water soluble extractives), as well as create adhesion issues (oil soluble extractives) for many coating types.
Extractives can be characterized as volatile oils (i.e. turpentine), wood resins (i.e. pitch or sap), fats and waxes, lignans (dimer molecules of lignin), tannins and carbohydrates (i.e. food reserves). All wood species contain wood extractives; however, there are a handful of wood species that are characterized as extractive rich woods. This group includes Redwood, Western Red Cedar, Walnut, and Mahogany. The second group of wood species also contain higher levels of wood extractives (but not as high as the extractive-rich woods) include Southern Pine, Douglas Fir, Spruce, and Cypress.
Cedar Wash™ was developed by Perma-Chink Systems as a Ready-to-Use cleaner specifically formulated for preparing the surface of wood species that contain high levels of wood extractives and resin oils. Cedar Wash is designed to remove surface resin oils and high concentrations of water-soluble wood extractives in addition to dirt, grease, grime, pollen, and surface mold and mildew without harming the wood.
- Designed specifically for Western Red Cedar and Redwood (Softwoods), Walnut and Mahogany (Hardwoods).
- Highly recommended cleaner for Southern Pine, Douglas Fir, Spruce, and Cypress.
- Removes resin oils and wood extractives from the surface of the wood that may interfere with adhesion of Lifeline™ exterior stains or Prelude™ to the wood surface.
- Removes dirt, dust, pollen and other foreign substances from log surfaces.
- Not recommended as a maintenance cleaner; refer to Log Wash™ for this task.
- Contains an aggressive detergent package for efficient cleaning of the wood surface.
- Safe to use on chinking and sealants.
- Easy to use, Ready-to-Use formula.
- Low environmental impact
Application Instructions
Since Cedar Wash is a Ready-to-Use material, no dilutions are required. Cedar Wash is most easily applied using a pump-up garden type sprayer although a mop and bucket works, too. If you are going to use a pressure washer (not recommended), adding Cedar Wash directly to the pressure washer does not give the cleaner enough contact time with the wood to be very effective.
- Plan on cleaning small areas at a time, since Cedar Wash needs to stay wet in order to work well and do its job.
- Apply the Cedar Wash solution starting at the bottom of the wall and work your way up.
- Work only an area big enough so that the Cedar Wash is on the wall for about 10 to 15 minutes.
- Gently scrub the wall with a soft bristled brush to remove stubborn stains and heavily soiled areas.
- DO NOT ALLOW CEDAR WASH SOLUTION TO DRY ON THE SURFACE OF THE WOOD.
- Lightly mist with water if applied Cedar Wash solution is drying too fast and adjust working area.
- Rinse Cedar Wash solution with clean water using a garden hose or low pressure washer thoroughly from the top down.
Remember; apply Cedar Wash from the bottom up, rinse from the top down. This will help prevent the potential for streaks and drip marks on the wood surface. The use of pH strips is highly recommended as a tool to identify if, and when, all Cedar Wash residue is thoroughly rinsed off the surface of the wood (Note: If you have any questions concerning the proper use of pH strips, please contact a representative at Perma-Chink Systems for assistance).
Coverage
Five gallons of Cedar Wash Ready-to-Use cleaning solution will clean approximately 1000 square feet of wood surface area. Each gallon of Cedar Wash, as applied, will clean approximately 175 to 225 square feet of wood surface depending on the wood porosity.
Clean-up
Use just water to clean-up any spilled Cedar Wash. Dispose of materials in accordance with all applicable Federal, State, and Local regulations.
First Aid
Perma-Chink Systems is concerned about your safety and highly encourages you to wear personal protective equipment (PPE) to protect yourself from chemical exposure when using Cedar Wash. Wear safety glasses or goggles and rubber gloves during use. Wash hands and any exposed skin with soap and water after job is completed. Remove saturated clothing and launder in cool or warm water.
Precautionary
Although Cedar Wash should not harm plants or shrubs, it is best to pre-wet or cover plants and shrubs prior to application and rinse down any plants, grass, or bushes that may have been exposed to the Cedar Wash solution as soon as possible. Lightly wet adjacent walls with water to minimize direct contact with bare wood and potential streaking or discoloration. If overspray does occur, quickly rinse with clean water to thoroughly remove cleaner overspray.
Storage
Store Cedar Wash out of direct sunlight and protect from freezing. Although Cedar Wash is freeze-thaw stable, if the product is accidentally frozen, allow to thaw and check for suitability of use before applying.
Packaging
Cedar Wash is available in 5 gallon or 2.5-gallon containers.
A NOTE ABOUT RINSING
No matter what product you use to clean bare wood, nothing is more important than making sure you have adequately rinsed the surface. Any chemical residue remaining on the surface can have serious consequences later on. We always recommend using pH strips to make sure that the surface of the wood has been sufficiently rinsed, preferably to a pH of between 6.5 and 7.5. PH Strips are available at most pool supply dealers, aquarium supply shops, and Perma-Chink Systems, Inc. They are not expensive, are very easy to use, and a great tool to ensure adequate rinsing.

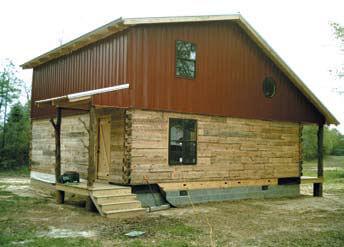
After graduating from college, the normal progression for most women is marriage. But, what is great, or even fun, about being normal? This neo-Laura Ingalls-Wilder, this Backwoods Barbie, embarked upon an adventure. I decided to build a log cabin!
I have had the pleasure of being around log cabins nearly my whole life. I grew up in my parents’ pine, D-shaped log cabin. They had a “turn-key” package; but we, mainly my father, ended up doing a lot of the work. Despite three children, pets, and fluctuating Alabama weather, their home has weathered nicely with little maintenance. Therefore, my parents are supportive of my log cabin, although they enjoy ribbing me about some comments I made when I was about ten years old.
I was ticked at my mother because she did not think that a black and silver waterbed (completed, of course) with a zebra bedspread was suitable décor for a ten year-old girl’s log bedroom. Thus, I declared that I would never have a house of wood. I vowed to have only wallpaper and paint in my house one day. (Never say never!)
Anyway, my adventure started when I found an ad for oak log cabin kits in a classified newspaper. Not wanting to be saddled with a large debt and realizing that I would be responsible for cleaning and maintaining the house, I decided to purchase the approximately 1,500 square-foot kit. The logs arrived safely and beautifully – Missouri oak heartwood dovetail logs.(Say that ten times fast!)

Since my kit consisted of only the perimeter wall logs, I drew the interior plans one Sunday afternoon; and Mom and I devised a plan that would allow me to “pay-as-I-go” and have the cabin completed and paid-off in three years. However, I did not realize how much I was going to be involved with the “hands-on” construction, and I never imagined how much I would learn to do and end up doing myself.
I hired an experienced carpenter to oversee my project (I later hired some helpers for a few days). My brother Tubby and the carpenter laid the block, and I started helping with the setting of the logs. Tubby would sing “John Henry” as he swung the sledge hammer! Our carpenter joked, saying he felt like he was building a pyramid. Dad, Mom, and I cut cedars for the porch posts (Mom and I caught poison oak to prove it) and hemlocks for the supporting interior posts. I wanted some octagon windows, but I could not justify the special order price. However, I found new ones (although the wrong color but paint corrected that) at a flea market for 1/10th the special order store price. Mom and I shopped ‘round and ‘round for the additional lumber at the best prices.
Before Mom and I started preserving the logs and additional lumber, Mom and I attended a Perma-Chink Systems workshop in Rome, Georgia. We learned countless tips and acquired useful information that has saved me both valuable time and money. (My father was very impressed when I informed him of what pressure-washing tip, at what pressure, and at what angle I had to wash the logs.) Mom and I painstakingly followed all the Perma-Chink products’ directions. The Energy Seal far surpassed any other similar product in both ease of application and appearance during the sealing of the dovetail corners and joints. This very time-consuming task made me feel like the “Human Dirt Dauber,” and I lost track of how many hours I spent on this job. However, my leaks during pressure-washing were mostly confined to around the windows and doors that had not been trimmed at that time. The Log Wash, Wood ReNew, Armor-Guard, Log End Seal, Lifeline Ultra-2 exterior stain, Lifeline Advance clear topcoat and Cobra Rods were quickly and very easily applied or utilized.
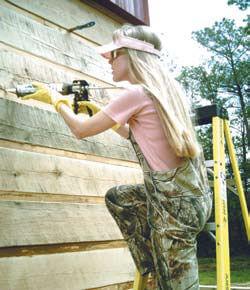
Painting the 2X4’s with Chink-Paint was another time-consuming task. I completed this step fully by myself. If stacking the logs felt like building a pyramid, this step could be compared to engraving the hieroglyphics onto the stone pyramid walls. (One thing I quickly learned during chink painting is that it is much better to paint slowly and clean-up less than to paint quickly and clean-up more!) Mom and I were both surprised and impressed with the Lifeline Advance Exterior Gloss topcoat. When we cleaned out the containers from which we were applying, the dried Lifeline Advance peeled out like plastic wrap. I feel as if my cabin is securely plastic-wrapped from the elements.
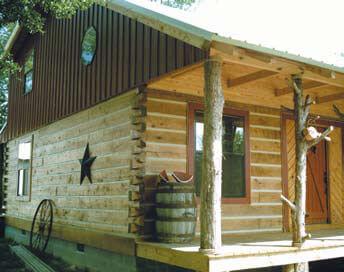
The interior Perma-Chink Systems products worked as well as and look as great as the exterior products. Prelude beautifully prepared the interior logs for the Lifeline Interior stain. The Lifeline Interior stain and the Sure Shine Gloss look fantastic on the many different types of interior wood – oak, pine, spruce, hemlock, and hickory. The Chink Paint also looks nice on the interior walls.
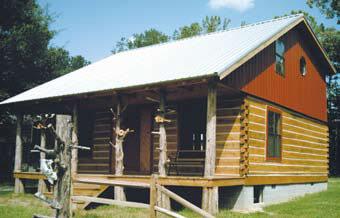
With the assistance of good helpers and the employment of recycling, creativity, gifts from generous friends, and affordable Perma-Chink Systems products, the exterior of my cabin is already completed and much of the interior is completed in only six months. My cabin is debt-free and is more beautiful than I ever dreamed that it would be. Before preserving the logs, I was concerned that by doing anything to the logs, I was going to destroy their natural beauty. (Boy, was I mistaken!) The Perma-Chink products are not only protecting, but also enhancing my logs’ natural beauty. Before using some of the products, I doubted the necessity of using them. (Boy, was I mistaken again.) Each easily applied Perma-Chink Systems product is necessary for a beautiful, protective complete finish.
My adventure has changed me both mentally and physically. I am stronger, wiser, more grateful, and more selfsufficient. It has given me a strong sense of accomplishment. When someone asks me about my home, I am able to show them my hands and say that I’ve built my cabin with these two hands (despite the nail polish) and with the help of some good folks and great Perma-Chink Systems products.
“The Wise Woman Builds Her House” PROVERBS 14:1
By Mala Patterson,
Bluegrass Musician
Cedar Wash™- Ready-to-Use Cleaner for Redwoods, Western Red Cedar, Walnut and Mahogany
The most important step of finishing wood whether it is a log wall, a piece of log siding or a piece of wood furniture is the surface preparation prior to applying a finish system to the wood surface. The reason this topic is so important is that this step or process has an impact on the longevity and durability of the system…
Cedar Wash is designed to remove surface resin oils and high concentrations of water-soluble wood extractives in addition to dirt, grease, grime, pollen, and surface mold and mildew without harming the wood. Wood extractives are compounds present in bark, softwood and heartwood of a tree that contribute to such properties of wood as color, odor, decay and insect resistance. Consequently, these extractives can also discolor paint and finishes (water soluble extractives) as well as create adhesion issues (oil soluble extractives) for many coating types. All wood species contain wood extractives; however, there are a handful of wood species that are characterized as extractive rich woods. This group includes Redwood, Western Red Cedar, Walnut and Mahogany. The second group of wood species that also contains higher levels of wood extractives but not as high as the extractive rich woods include Southern Pine, Douglas Fir, Spruce and Cypress.
- Designed specifically for Western Red Cedar and Redwood (Softwoods) and Walnut and Mahogany (Hardwoods).
- Highly recommended cleaner for Southern Pine, Douglas Fir, Spruce and Cypress.
- Removes resin oils and wood extractives from the surface of the wood that may interfere with adhesion of LIFELINE™ exterior stains or Prelude™ to the wood surface.
- Removes dirt, dust, pollen and other foreign substances from log surfaces.
- Will not harm finishes that are in good condition.
- Contains an aggressive detergent package for efficient cleaning of the wood surface.
- Safe to use on chinking and sealants.
- Easy to use, Ready-to-Use formula.
- Low environmental impact.