Blog & News

Lifeline Interior™ is a natural looking, transparent wood finish. It forms a breathable, protective layer for your walls and ceilings while highlighting the beauty and grain of the wood. Our unique breathable formula allows natural wood moisture to escape from the wood, yet provides a tough film surface that can easily be cleaned and dusted, especially when top coated with our Lifeline Acrylic Gloss or Satin clear finish.
If you use one of our Lifeline Interior color stains, the colorants in the finish help stabilize color of the wood and slow down, or even prevent, the fading that you may notice when removing pictures or furniture from against the wall. If using Lifeline Interior Clear, we recommend the addition of UV Boost to the first coat to help prevent this “picture frame” effect due to UV light exposure. The addition of UV Boost should also be considered when using lightly tinted stains like Light Honey and Light Natural. Since interior surfaces are not subjected to the adverse effects of weather, two coats of Lifeline Interior are not necessary. However, you can apply multiple coats of Lifeline Interior in order to achieve the appearance you desire.
Lifeline Interior is easy to apply. It can be applied by brush, spray or pad. Lifeline Interior dries to the touch in as little as one hour and clean-up is easy- just use soap and water.

One of the best reasons to use Lifeline Interior is that it reduces the absorption of pet, fireplace, and cooking odors into the wood of the home.
Lifeline Interior resists yellowing and is non-flammable and virtually odorless. Like all of our premium finishes, it allows the natural look and beauty of all species of wood to come through. Lifeline Interior can be used on new or existing log homes, as long as the surfaces are clean and dry.
Now you can order Lifeline Interior in any color you desire in addition to our 13 standard colors plus Clear. For a custom color or color matching, please call 1-800-548-3554. You can request wet samples to try on your logs by calling 1-800-548-3554 or by visiting our online store.
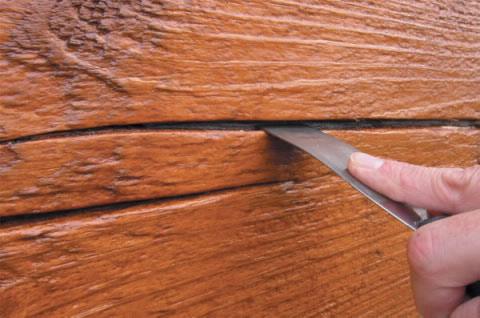
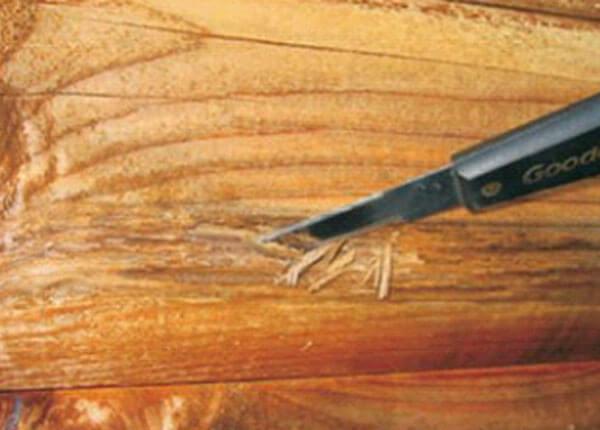
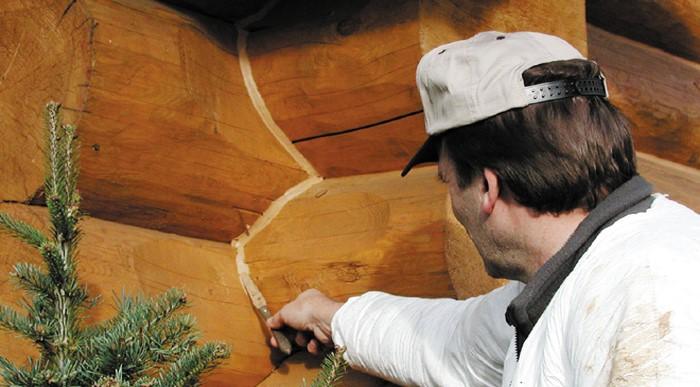
Every homeowner has found checks in the logs at one time or another. Checks are those longitudinal splits that appear as logs lose their moisture. While you may like or dislike checks, they are a part of the character of wood. Some species of wood are more susceptible to checking than others. This susceptibility comes from the different rate at which wood shrinks in its own geometry. Because wood dries out from the surface, the wood at the surface shrinks faster than the wood further down in the core.
Additionally, researchers have found that wood shrinks faster in the tangent direction (around the perimeter) than it does radial direction (toward the center). The ratio between these shrinkage rates tells you which species of wood are more likely to check. The greater the ratio the more the wood is likely to check as the logs dry.
Late summer or early fall is the best time to seal up your checks.
Should you always seal up checks?
The answer is partly a matter of practicality. If your checks are protected from any source of water or the opening is downward and they do not allow air drafts to enter the interior of the house, then it is really not necessary to seal them up. However, if the checks face upward to that they can collect blown rainwater, then weather conditions can introduce water into the heart of your logs – a very undesirable condition that can result in wood rot in the log.
What should you use to seal up checks and how do you do it?
Because seasonal weather variation cause checks to open and close slightly, you must use material that tolerates the movement. By the way, this movement is reduced when you have a good water-repellent and flexible coating on your logs such as Lifeline stain and Advance topcoat.
When you are sealing checks up, do not fill the check completely up with the sealant. On wider checks you should able to push some backer rod into the check so that you have about ¼ inch depth remaining for your sealant.
How big should the checks be before you seal them?
Ideally, you would seal all upward facing, weather-exposed checks. However, checks get small enough that it is very difficult to apply a sealant to them. Seal whatever you can, but don’t try to fill hairline checks. We always advise filling side facing or upward facing checks that go into windows or doors to prevent water intrusions into the frames. Spiral checks that twist into the interior of the house should also be sealed up.
What do you use for sealing up your checks?
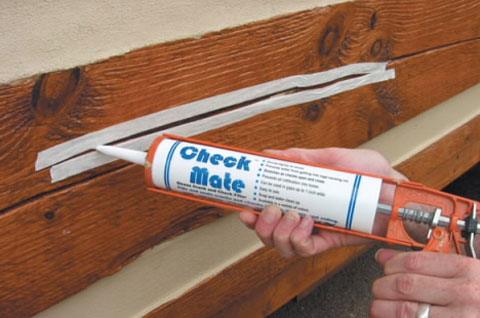
Regular caulking is generally not a good choice to seal checks. Our Check Mate 2 specifically developed for this purpose. It is colored to match our exterior stains and available in tubes to make an application easy.
Even though Check Mate 2 is our preferred sealer, some customers use Energy Seal for the purpose. When you are sealing checks, use a line of masking tape along the edge of the check to keep the sealer off the surface of the log. This works whether or not you already have stained the logs.
If the wood within the check is dump from cleaning, rain or borate treatment (it is important to treat an existing check with Shell-Guard RTU before sealing it), make sure the check has time to dry before applying Check Mate 2.
Want to Learn More?
Watch our video that teaches how to seal checks here.
Remember to use a backer material to keep the sealant thickness between 1/4 and 3/8 inch along the check. Also, fill the check completely up and a little beyond the log surface to allow for some shrinkage for the sealant as it dries.
A wood treatment with patented glycol penetrants that kills and prevents termites, carpenter ants, wood boring beetles and decay fungi. It can also be used to kill and prevent termites and wood boring beetles in existing construction.
Bora-Care® or PenaShield® are your best choice for protecting larger logs and timbers, and eliminating existing bug infestations.
You will be happy to know that you don’t need to use water to pre-wet wood to apply borate treatment against wood decay and bug infestation. When it comes to treating a log home, the drier and more absorbent the surface is, the better the treatment will be. If you haven’t done it already, this could be your perfect interior or exterior project.
Remember, the borates will not work when applied over any finish, as this prevents the product from penetrating. It works only on the bare wood.
WHAT CAN YOU EXPECT FROM APPLYING BORATES TO YOUR INTERIOR WOOD SURFACES?
PenaShield® Borate wood preservative comes in borate/glycol formulations. The active ingredient is borate salt and proprietary penetrants that allow it to diffuse quickly and thoroughly into wood.
The borate is toxic to fungi that cause rot and decay, subterranean and drywood termites, carpenter ants and wood boring beetles. It is also toxic to beetle eggs that may be in the wood at the time of treatment or eggs deposited sometime later.
Applying PenaShield
An application of PenaShield should end powder post beetle activity (small round holes) within a few months to a year after treatment. However, if there is an existing infestation of old house borers (oval holes), it may take time, sometimes a year before total control is achieved.
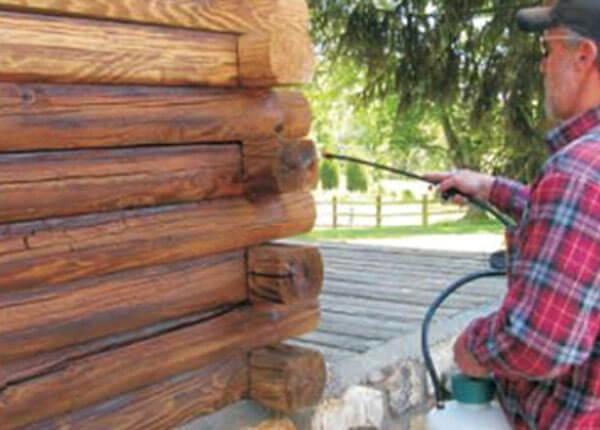
PenaShield is best applied using a compressed air, garden-type sprayer. You can use either a fan or cone spray tip, it really does not matter as long as you completely wet the log surface with the solution.
The amount of time it takes PenaShield to dry depends on the density and porosity of the wood, and temperature and humidity. In warm, dry temperatures the drying time may be as little as a few days. Under humid conditions it may take weeks of drying time before a stain can be applied. You can check to see how drying is progressing by touching the treated wood. If the wood still feels damp, it is not ready for a topcoat.
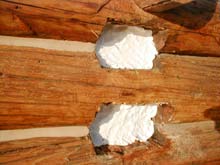
Once the PenaSheild has dried, you need to inspect all the treated surfaces before applying a stain. Occasionally a white residue may appear over knots and other areas of the logs. These white deposits are created by a small amount of the borate crystalizing on the surface. Their appearance does not mean that the treatment will not work! Wipe this residue off with a damp sponge. If you stain over any white spots they will show through the stain.
Unused solution should never be left in application equipment overnight. Clean and rinse your equipment after each use.
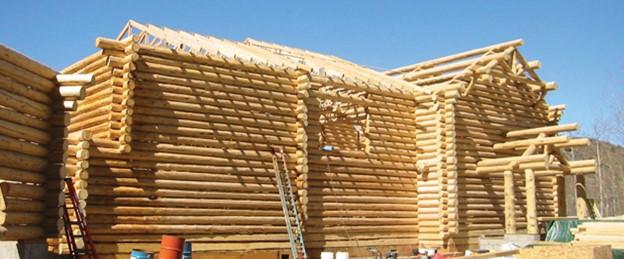
New Log Home? Apply Bora-Care®
If you just built a new home and the borate treatment was not included in the package from the manufacturer, Bora-Care will be your cheapest insurance against wood decay and bug infestation. If the weather prevents from applying it outside, the interior application as effective as an exterior due to the penetrating properties of the Bora-Care product.
And how toxic are borates? They’re less toxic than table salt, making them a safer choice for wood protection.
PenaShield is great for treating decks, fencing, wood-working projects, wooden play structures, sheds, and more. It can also be applied to roofs after old shingles have been removed. Apply PenaShield to pressure treated and/or to older wood after it has been cleaned. PenaShield should always be applied before sealing or painting. PenaShield can be used to treat any bare wood you want to last when used according to label instructions.
More wood is replaced each year because of decay damage than all other factors combined! Commonly called rot, wood destroying fungi need three things to survive: air, water, and food. Since we can’t eliminate air and their food is the wood in our homes, the only mechanical control mechanism available to us is the elimination of water. Water is the enemy of wood! Although we’ve all heard the term “dry rot,” dry wood will not rot!
There are three basic categories of wood-destroying fungi: soft rot, brown rot and white rot. Soft rot fungi are typically found in wet wood showing the first signs of decay. Wood infected with soft rot can become quite soft and spongy. Other than the softness of the wood and perhaps discoloration of the surface, there may be no apparent signs of a soft rot infestation.
Brown rot fungi commonly attack softwoods like pine, spruce and fir thus turning the wood dark brown. In advanced stages of decay, wood attacked by brown rot becomes friable and splits appear across the grain giving the wood a “checkerboard” appearance. Infested wood may be structurally weakened in a relatively short period of time.
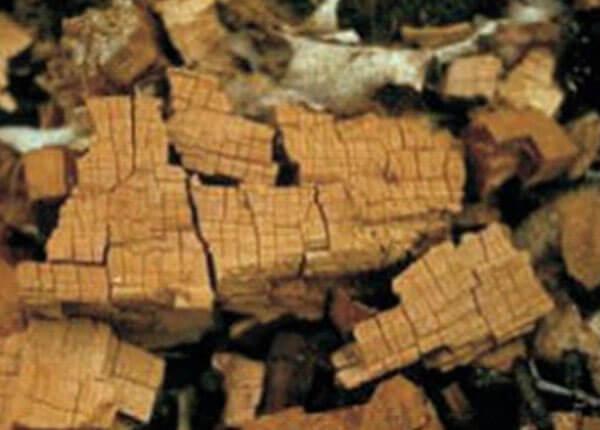
Once brown rot has extracted all of the nutrients from the wood, the wood may become dry and powdery. This gives the impression that dry wood has rotted (dry rot) but in reality it is the result of an old infestation of brown rot. One of the most destructive types of brown rot fungi is poria (meruliporia) incrassata, otherwise known as the water-conducting fungus. One indication of a poria infestation is the presence of rot in wood with no visible source of water. This type of fungus actually transports water through root-like structures known as rhizomorphs. Infestations of poria can progress quite rapidly destroying portions of flooring and wood members in a year or two. Thankfully, infestations of poria incrassata are fairly rare.
White rot fungi attack the cellulose and lignin in wood, eventually giving the wood an off-white appearance. In the later stages the wood may become spongy to the touch. Wood attacked by white rot lacks the cubical checking appearance of brown-rotted wood. Shelf fungi, bracket fungi, and mushrooms are all forms of white rot fungi.

Preventing Decay – 7 Rules
Moisture control should be an integral part of any program designed for preventing wood decay. The following 7 rules are a good place to start:
- Wood should never be in contact with the ground. Wood posts, piers, supports, etc. should rest on metal plates imbedded into concrete footers raised above the level of the surrounding soil.
- Basements should be waterproof and equipped with a floor drain. If the relative humidity in the basement exceeds 50%, a dehumidifier should be installed.
- Crawlspaces should be adequately ventilated with at least one square foot of free vent area for every 500 square feet of crawl space floor area along with a moisture barrier covering at least 80% of floor. One vent should be placed within three feet of each corner to prevent “dead air” spaces. In high humidity environments additional vents should be considered.
- Plumbing leaks should be repaired as soon as they are noticed.
- Rain gutters need to be clear of debris and roof leaks fixed.
- All exterior wood surfaces should be coated with a long lasting, water repellent finish system. This is especially important on log homes. Water-based, breathable film-formers like LIFELINE stains and topcoats work best since they allow water vapor to escape while preventing liquid water from penetrating into the wood. Log ends should be provided an extra measure of protection with Log End Seal.
- Upward facing checks should be sealed with Check Mate 2 to prevent water from entering the interior of the logs.
Borate Preservatives
There are four borate products designed for the control and prevention of decay fungi. Bora Care® and PenaShield® are borate-glycol liquids that kill wood decay fungi and when properly applied to bare wood and protected with our finish system, provide permanent protection against decay.
Tim-Bor® is a pure borate powder that is dissolved in water and applied to the wood. Since it does not exhibit the depth of penetration of the Bora-Care borate-glycol products, Tim-Bor should only be used to protect new, un-infested wood. Any time the surface is stripped of its finish, another application of Tim-Bor should be made.
Cobra™ Rods are two-inch-long, borate glass rods that can be used to spot treat decay prone areas such as log ends that are already coated with a finish. Once inserted into damp or wet wood, the borate/copper complex in Cobra Rods dissolves, spreading the active ingredients into areas surrounding the rod. Cobra Rods eliminate active decay fungi and help prevent rot for eight to ten years.
If you have any questions about controlling decay fungi or repairing decayed wood, give Perma-Chink Systems a call at 1-800-548-3554. We have number of products that are designed for repairing damaged wood and preventing future problems from occurring.
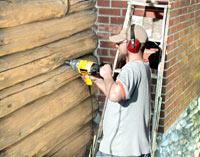
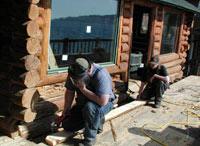
Log Home Restoration with Major Log Repair
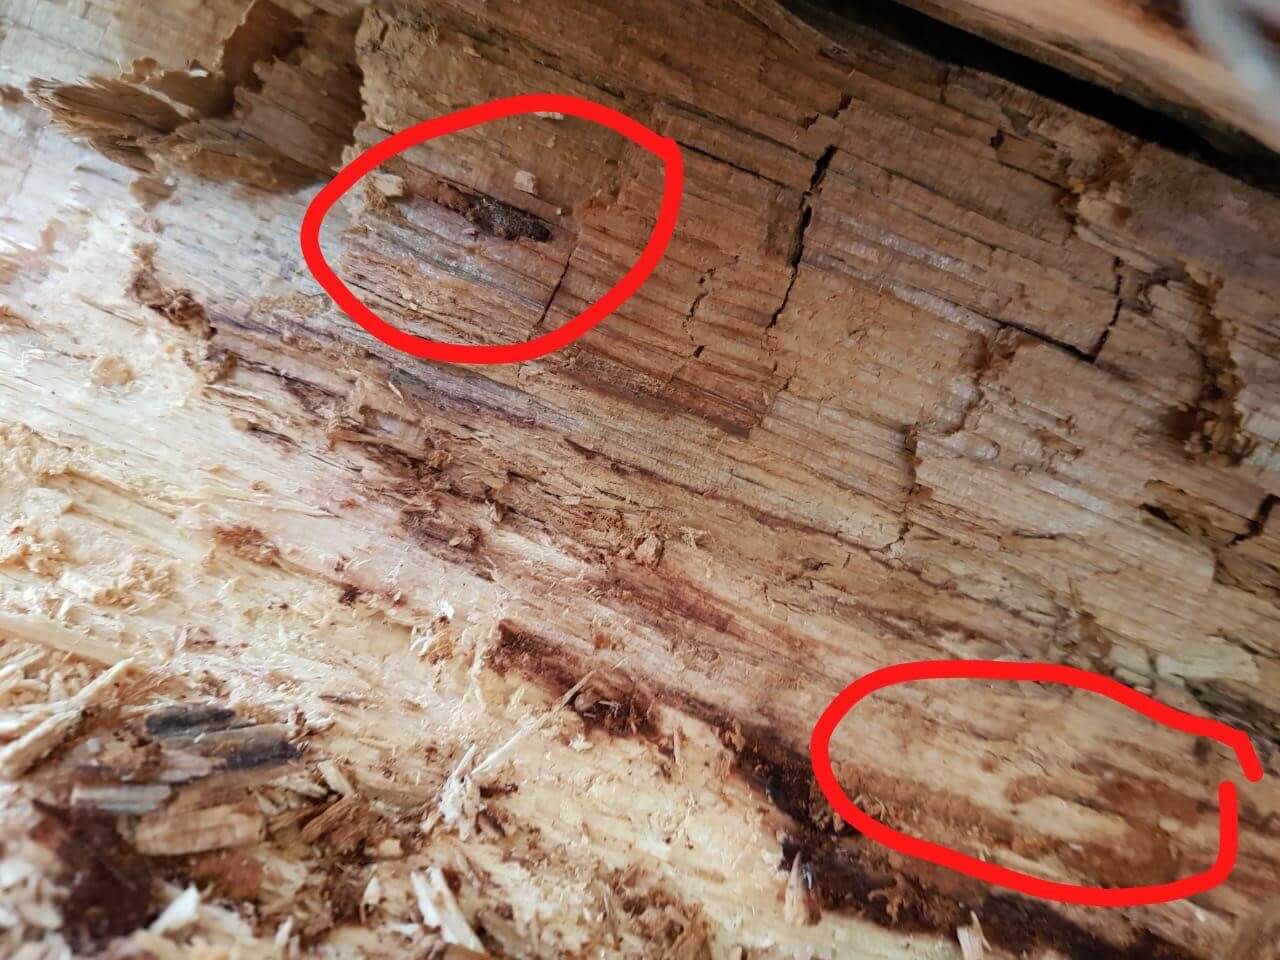
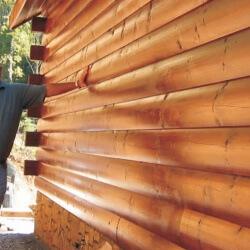
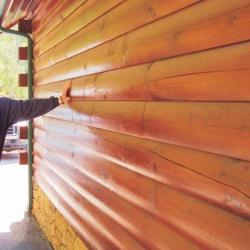
When you look at these pictures, you probably think to yourself: how is it possible to repair these logs?
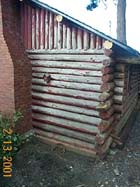
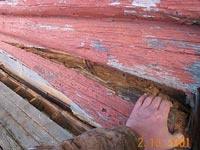
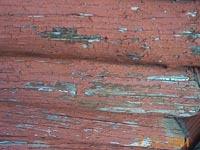
Chris Hastings, the second generation of log home restorers knew the answers. The major problem was in the design of the house. The house was designed improperly for the building site. The extensive damage on the lower third of the wall on the exposed side of the house was due to the insufficient overhangs and water damage.
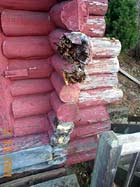
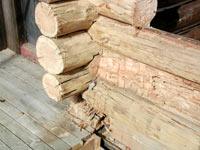
What kind of work will bring this house back to life? The first step for this project is exterior media blasting, followed by log repairs, washing and brightening the exterior wood surface, applying borates to preserve the logs and interior and exterior chinking. Exterior visible water damage prompted Chris to cut away the outer half of this log which shows major water damage in the log’s core.

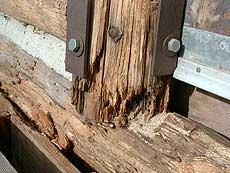
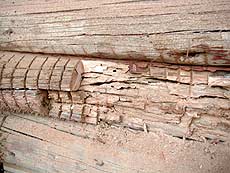
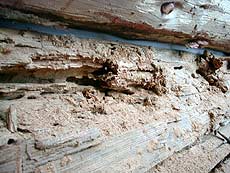
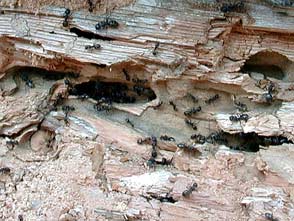
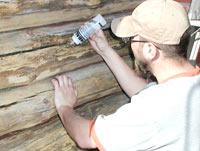
You can see how carpenter ants ( which are attracted to high moisture content in wood) have the ability to destroy logs in your log home, often in a short period of time, and in this case, causing major structural damage. Prevention of water intrusion by using a high quality log home finish (Lifeline Ultra–7 with Lifeline Advance) and sealants (Perma-Chink and/or Check Mate 2) would have helped eliminate this costly problem.
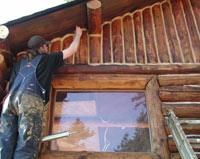
Following the use of the finish removal system, that stripped off previously applied paint and UV discoloration, you can see (below) how a treatment of Oxcon further brightens the logs without damaging wood fibers. Following a rinsing of the logs with water, your home is now ready for the borate treatment.
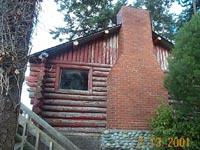
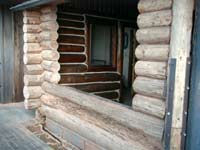
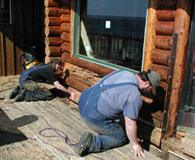
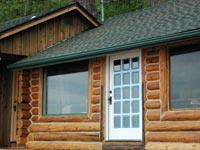
After a borate treatment was completed, M-Balm was injected (squeeze bottle) within the log cavity. M-Balm not only hardens the wood, but also stops any further spreading of wood rot. Following the borate treatment and Oxcon to brighten the wood, Chris installed one window to the left for better appearance of this home. Now that house is protected against wood-destroying insects, an application of stain and topcoat will not only enhance your home’s aesthetic appeal, but will offer protection as well.
The semi-transparent stain will protect your wood from the damaging effects of UV exposure. We recommend one coat of Lifeline Advance (clear coat finish, similar technology used in the automobile industry) over the stain color for protection and extending the life of the pigments in the stain. It also will give a maximum protection against water penetration.
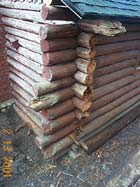
The repair of water-damaged log ends will bring us to the final step: applying Perma-Chink between all logs to further protect against air and water intrusion. Prior to the last step of chinking the featured structure, Chris Hastings and his crew replace the outer half of the structurally damaged lower log with a fresh, sound log section.
The final step in the restoration process is to chink all seams (both vertical and horizontal). Perma-Chink chinking that permanently bonds to wood will retain its elastic features in all climates and will provide year round energy efficient comfort.

By Jared Turner
Folks have been trapped inside their homes for lengthy periods of time this winter. Whether it was to escape the cold or shelter from Covid, you are ready for a change. So, as you emerge from your long winter hibernation, take time to stretch, rub the sleepy out of your eyes and put the coffee on. Once you have all of that out of the way, it is time to open your door to Spring and consider the benefits of Forest Living.
For most folks, exposure to forests and trees has wonderful health benefits. For example, both of my parents happen to live in a densely populated urban area. However, each spring and fall they take the time to travel hundreds of miles to dive deep into the forests of Appalachia. They, as well as millions of others, have found these trips to be beneficial to their overall health and wellbeing.
So, what is it about the forests that make them so wonderful for our health? In recent years there is evidence that link people’s exposure to forest with a strengthened immune system, lower blood pressure, reduced stress, improved mood, increased energy level and improved sleep. What is not to like about this list? I believe many of us would be thrilled with improvements in these areas.
Are there other benefits that forests bring to our lives? Absolutely! They help to remove harmful pollution from our air by behaving like giant environmental filters removing harmful toxins from the air we breathe. In addition, forested watersheds provide quality drinking water for over 180 million Americans. Not only do trees filter through the air they also filter through the ground. With temperatures on the rise in most places, forests also help to lower air temperatures by 20-45 ֯F. The evaporation of water from trees has a wonderful cooling influence! Trees absorb carbon dioxide, a harmful greenhouse gas, and store it as carbon while releasing beneficial oxygen back into the air. In addition, trees, properly placed around your home, can help reduce your energy consumption by lowering the cost to cool your home. Finally, trees provide a wildlife habitat for animals to live and thrive.
Densely populated urban areas are just now catching on to all these benefits and are working hard to transform their cities by planting more trees and providing more green space for their citizens. They rightly understand that this approach is part of a more sustainable future. However, living this close to nature does bring with it challenges. At Perma-Chink Systems® we have been helping homeowners live in harmony with nature for over 40 years and as more folks transition to Forest Living, they are going to need a partner who knows how to integrate the two successfully.
Perma-Chink Systems happens to be a one-stop shop for forest living. We supply knowledge, experience, and quality products to help meet the needs of homeowners living in the forest. For example, with spring comes trees blooming and plants flowering, bringing with it pollen and dust. All this dirt, dust and pollen collecting on your home creates challenges for the longevity of your finish system. Once or twice a year we recommend giving your home a good washing. To help with this need we have developed Log Wash™, a highly effective, low pH cleaner designed not to damage your logs or your finish. By removing these contaminates, it will cut down on mold growth and damage caused by absorption of water and sunlight on your finish.
Spring is also a wonderful time to conduct an inspection of your home. Look for damage that needs repaired, cracks or openings that need to be sealed, and observe the overall condition of your finish system. Depending on what you discover, Perma-Chink Systems has products designed to solve most of your needs. We at PCS are actively helping to transition folks to a healthier way of life through a more sustainable Forest Living lifestyle. Please take some time to visit our website for more information.
Just as clear coats are vital to the performance of today’s automotive finishes our Advance Topcoats are an integral part of all of our exterior finish systems.
Not only do they extend the life of the color coats but they do much more. They significantly improve the look of the finish by enhancing the color, clarity and depth of the finish. In other words, they make our finishes the most beautiful log home finishes in the world. Second, they help keep the surface clean. The very nature of a pigmented stain makes it susceptible to dirt pick-up through adhesion or impregnation.
Since we have designed Advance to form a smooth, strong film it makes it much more resistant to dirt. In addition, the smooth surface makes it easy to clean off any dust or pollen that may accumulate on the surface of the logs. A simple wash down with Log Wash and a garden hose will remove the dirt and grime that may be hiding the beauty of your home.
Another feature a smooth topcoat provides is greater resistance to the growth of mold, mildew and algae. In addition to water these organisms need something to grip onto. If the spores land on a tough smooth surface that rapidly sheds water they won’t have an opportunity to germinate and spread. So the surface of your logs stays free of unsightly mold spots and patches of algae.
Of course the best feature of Advance Topcoat is the protection it provides to the color containing stain. Years ago cars left the manufacturer with a coat of paint. More expensive cars may have had several coats of paint but no matter how many coats were applied after a few years on the road the paint turned dull and started to flake off. Then car coating experts discovered the benefits imparted by clear topcoats. Today’s car finishes remain shiny and last longer than ever thought possible all due to the application of clear topcoats.
What is it about topcoats that contributes to this improvement? The most performance enhancing feature of a clear topcoat is that it reflects sunlight. Sunlight is composed of several components including ultraviolet (UV) light. It’s the UV that is responsible for fading colors and, in the case of wood homes, damaging wood fibers through a process called photo-oxidation. The more UV light that’s reflected off the surface the slower the color coats will fade and the less the wood fibers will be exposed to photo-oxidation thus extending the life of the entire finish system. Although satin finishes reflect a significant amount of sunlight, gloss topcoats reflect more which is why car finishes are shiny and not dull. The same holds true for our Lifeline exterior finish systems. Advance Satin does reflect much of the sunlight but Advance Gloss reflects even more, which is one of the reasons that log home gloss finishes are becoming more popular.
An additional beneficial feature of a clear topcoat is the protection it provides to the color coats against degradation by airborne contaminates like sulfur dioxide, ozone and particulates. Even natural contaminates like tree pollen and bird droppings can damage or discolor the color coats by chemical reactions or supporting mold growth. Our Advance Topcoats provide a barrier that prevents this from occurring.
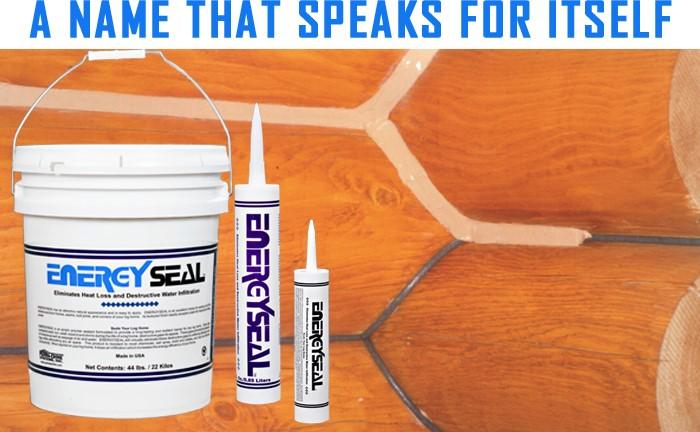
Start saving on your heating and air‑conditioning bills now!
Energy Seal™ is a textured acrylic polymer sealant that provides a long-lasting and resilient seal for any style of log home. Since logs constantly twist, turn, swell, expand and shrink, gaps may appear between logs or between the logs and window and door frames or other areas of the home. These gaps retain moisture and allow the seepage of air and water into the home. Energy Seal eliminates these gaps by forming an air and watertight barrier over them.
So why do people use textured sealant Energy Seal?
First and foremost, to keep water, air and bugs out of places where they don’t belong; second, for its attractive appearance; and third, for the reputation of lasting longer and performing better than competitive products. It should not come as a surprise that log homes are a bit difficult to seal up. When you stack logs on top of one another to make a wall, the logs do not naturally fit tightly to one another so there are usually gaps that must be sealed to prevent air and water from getting inside. That’s what Energy Seal is designed to do.
Most people call log sealants “caulk” but we try to refer to them as “sealants” to help differentiate high quality products from cheap caulks that can be bought at any hardware store. Plus, several of our sealants do not fit the conception most people have of a typical caulk.
There are two reasons that Energy Seal is textured. First, it allows the surface of cured Energy Seal to remain looking “flat.” It does not have that shiny look common to most types of caulk. This allows Energy Seal to blend in with the surrounding stained wood. Second, the texture allows Energy Seal to better accept a stain so that it can virtually disappear on a wall.
Here is a TIP; if you plan to stain over Energy Seal, select a color that’s just a bit lighter than the stain you plan to use. It’s much easier to cover light-colored Energy Seal with a darker color stain than it is to cover dark-colored Energy Seal with a light-colored stain.
Applying Energy Seal
Before Energy Seal is applied, the surface must be clean, dry, and free of oil, wax, or anything else that will interfere with the adhesion of the sealant.
Wherever possible, Energy Seal should be used along with Backer Rod or Grip Strip™. If backing material is not used, there may not be enough room for the Energy Seal to expand and a crack may appear across the joint. Backer Rod should be used even if the joint is narrow. The width of the band of Energy Seal may end up a bit wider than you expected but the integrity of the seal will be maintained.
Applying Energy Seal over old caulk is never a good idea even if it looks like the caulk is still adhering to the wood.
Although it can be time consuming and somewhat difficult, old caulk should be removed for several reasons. If a caulk no longer adheres to the wood, it may be due to moisture getting under the caulk creating rot. The old caulk must be removed to properly treat and seal the wood, so the new sealant does not fail.
Once in place, Energy Seal may be tooled smooth with a trowel or putty knife. Spraying a light mist of water on the surface will make tooling a lot easier and will result in a smoother surface.
If masking tape is used to protect the surrounding wood be sure to remove the tape while the Energy Seal is still wet.
To protect recently applied Energy Seal from the weather, a loose covering of plastic film will prevent it from being washed out of the joint until it cures enough to withstand a heavy rain. Typically, a week or so is sufficient.
For more information about Energy Seal, give us a call 1-800-548-3554 or check out our Log Home Sealant Application Guide
HOW TO SEAL AROUND WINDOW AND DOOR FRAMES
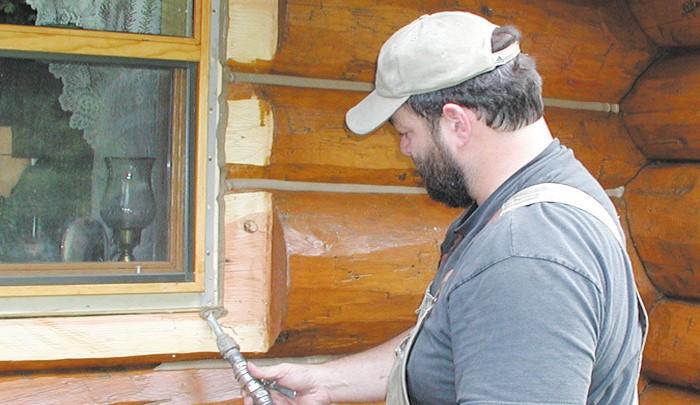
We have an excellent tutorial on sealing around windows and doors using Energy Seal and Log Gap Caps.
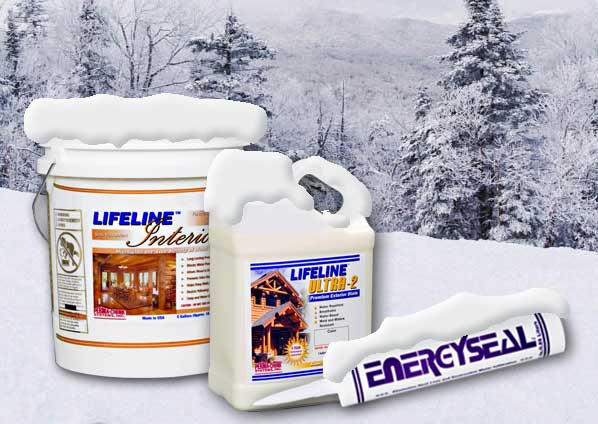
During the winter months it’s important to be aware of the freeze-thaw stability of Perma-Chink Systems’ products. The reason may involve shipping conditions or whether it is okay to store a product or products in an unheated shed. In any case you need to be aware of the consequences of allowing any of our products to freeze.
Without a doubt it is always best to prevent any of our finishes and sealants from freezing. They all contain water and the formation of ice crystals within the products can separate the water from the other components. In some products once this occurs it becomes impossible to regain the properties of the original formulation even after thawing and vigorous mixing.
With a few exceptions most of our products are freeze-thaw stable, however, if a product becomes frozen it needs to be thawed slowly, preferably at room temperature. Speeding up the thawing process by heating the container can seriously damage the product making it unusable. If the product is in pails or containers, once it has completely thawed it will require a thorough mixing.
If a product is subjected to multiple freeze-thaw cycles each cycle will contribute to the degradation process until it is no longer suitable for use. If a product becomes frozen it is better to allow it to stay frozen than it is to bring it inside to thaw and then store it where it may freeze again.
It’s the succession of freeze, thaw, freeze, thaw sequences that really destroys the integrity of a product. Before applying any product that’s been frozen be sure to test a small amount to see if it is still usable.
To reiterate:
- It’s best to protect all of our products from freezing.
- If it does get frozen, thaw it slowly at room temperature then thoroughly mix it.
- It’s better to keep it frozen than to subject it to multiple freeze-thaw cycles.
- Before applying any product that’s been frozen be sure to test a small amount to see if it is still usable.
Perma-Chink Systems’ products that are NOT freeze-thaw stable:
- Chink Paint™ Textured & Smooth
- Log End Seal™
- Oxcon™
- StripIt™
For information about cold weather storage of Bora-Care® and PenaShield® see “Storing Borate Solutions.”
If you need cold-weather storage guidance for a product not shown, just give us a call at 800-548-3554 – we’re happy to help!
Every spring we get lots of calls about carpenter bees drilling into logs, fascia boards, eaves, decks and other unpainted wood surfaces. Carpenter bees are big black solitary bees that look similar to bumblebees but have bare, shiny backs whereas a bumblebee’s back is hairy. Unlike honey bees that reproduce in hives, carpenter bees drill into wood in order to lay their eggs. Their holes are perfectly round and about 1/4 inch in diameter.
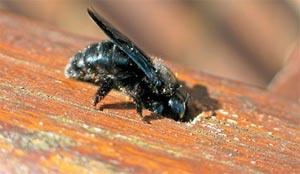
Although carpenter bees prefer hardwoods such as cedar, redwood, or cypress, they happily attack pine and most other species of wood. Even pressure treated wood is not immune from carpenter bee attack. As the bee drills into the wood, coarse sawdust may be seen coming out of the hole and piling up beneath the hole. Since it only takes a couple of hours for a carpenter bee to drill a hole a few inches deep, lots of holes can appear over a fairly short period of time.
Most carpenter bee activity occurs in early spring when male and female bees emerge after spending the winter in old nest tunnels. Once they have paired and mated the female bee drills into a suitable site while the male stays nearby to ward off intruders. Male carpenter bees often frighten people with their aggressive behavior but since they have no stinger they are essentially harmless. Females have a stinger but only use it if molested.
Once the initial hole is drilled through the surface, the bee will make a turn and excavate a tunnel along the grain of the wood. This tunnel, which may run for several inches, becomes the cavity where the female deposits her eggs. Several eggs are laid in individual chambers separated by plugs of pollen on which the larvae feed until they emerge as adults during the summer months. In addition to making new holes, carpenter bees also enlarge old tunnels. If left unattended for several years, serious damage to a wood member may result.
In late fall activity may again be seen as both male and female carpenter bees clean out old nest cavities where they stay over winter. Since carpenter bees tend to migrate back to the same area from which they emerged, it is important to implement some control measures in order to prevent logs and wood members from becoming riddled by these bees.
Prevention
Although carpenter bees prefer bare wood or distressed wood, they will attack wood that is stained. Painted wood surfaces, on the other hand, are rarely attacked since the bees must see or feel the grain of the wood in order to recognize it as wood. One of the most effective measures for preventing extensive carpenter bee damage is to fill old or empty holes with Energy Seal. Carpenter bees are attracted to existing holes. Be sure to treat the hole before you fill it since live adult bees will drill right through the caulk on their way out.
One way to keep carpenter bees from drilling into wood is by spraying pesticides that contain either cypermethrin, deltamethrin, or bifenthrin (Ortho Home Defense Max) onto wood surfaces. When it comes to carpenter bees, these products act more as repellants than contact poisons. However, the effectiveness of these applications is only about three to four weeks, so the treatment will have to be repeated every so often. Pesticides should only be used during the periods of peak activity in the spring and perhaps again in late fall. Be sure to follow label directions and read and understand any precautions that must be taken when using these products.
A few years ago we requested information about the effect of our gloss topcoat on reducing carpenter bee activity via survey. Out of over 20 responses by letter, phone and e-mail, only two reported any penetration of the gloss topcoat by carpenter bees. One home went from 20 to 30 holes the previous year down to 2 this past year and the other went from over 20 holes to 4 holes. This confirms our suspicion that the Lifeline Advance Gloss exterior topcoat appears to provide a finish to the wood that carpenter bees do not find very attractive. That is not saying that the gloss finish repels carpenter bees. It does not. Although bees would occasionally land on the gloss topcoat, they just did not drill through it. So why is that? Well, let’s be clear that the Lifeline Advance Gloss topcoat is not a pesticide nor does it have any pesticide properties. It appears to form a coating on the surface of the wood that carpenter bees are reluctant to drill through. Why? It could be the glossy look or that the hard, slick finish does not appeal to them, so the bees will search for another target. Many other online “How-To” documents related to carpenter bees describe the actions of carpenter bees on bare or distressed wood. That stands to reason that well-maintained log homes with stain and a solid topcoat should dissuade most carpenter bees from nesting inside logs.
Another possible solution, with hit-and-miss results, is a bee trap specifically for carpenter bees. Much like a minature bird house, the bee trap invites the carpenter bees inside, and they get trapped in a glass jar. In the past we offered these types of traps, and the results weren’t 100% positive. You can find bee traps online, both DIY plans and for purchase.
Treating Carpenter Bee Holes
Any carpenter bee holes you can reach should be treated and plugged since existing holes attract more carpenter bees. The way to treat an existing hole and tunnel depends on the time of year, and if bees are present at the time of treatment. If the female is drilling away when you find a hole (you can see sawdust coming out or hear her working inside) spray a contact pesticide like wasp and hornet spray into the hole. She will quickly back out and die. Immediately fill the hole with wood putty or Energy Seal. You need to treat the hole even if it appears empty since the bee may be resting and, if left alive, will drill back through the plug you’ve just inserted.
If you find carpenter bee holes in late spring or early summer it’s difficult to tell if there are bee larvae developing in the tunnels. The best thing to do is to run a length of flexible wire into the tunnels in order to break through the pollen plugs separating the chambers. Then spray a pesticide into the hole and seal it up. The same thing should be done on holes found in the fall or winter to kill any bees that may be over-wintering in the holes. Just remember to plug the holes since they will attract more carpenter bees come spring.
Several people told us that although they sprayed a pesticide into the holes, carpenter bees later emerged, in some cases even after the holes were plugged. How can this happen?
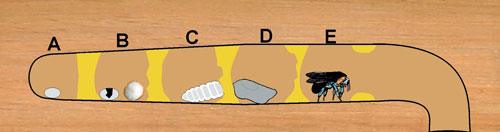
If we take a look at a cross section diagram of a carpenter bee gallery we can see how. After drilling out a four to five inch long gallery, the female carpenter bee lays an egg in back of the gallery then places a plug of pollen she has gathered to form a chamber (A). She continues doing this until there are four to six egg chambers in place. After a few days the egg hatches and a small white grub emerges (B). The grub feeds on the pollen plug for a few weeks (C) until it is ready to pupate (D) and change into an adult bee (E).
If you look at the way the gallery is constructed, you can see why spraying a pesticide in the hole may not kill all of the developing bee larvae. The pollen plugs prevent the pesticide from getting to the rear chambers. So, before you spray any pesticide into a carpenter bee hole be sure to run a stiff wire all the way to the back of the gallery to break through any pollen plugs. That way all of the larval chambers will be exposed to the pesticide.

How To Create Dust-Free Log Homes
We decorate our log and timber homes for not only holidays, but seasons, too. And after Thanksgiving and Christmas, putting away all those decorations revealed one of the most annoying things about homes: dust.
Dust gets everywhere. It’s never-ending. We have terms for giant amounts of dust called dust bunnies. It makes us sneeze – constantly. It’s ridiculous! No matter what it used to clean the dust, it returns!
Minimizing Dust Tips
The good news is there are ways to lessen the amount of dust. BobVila.com compiled 20 easy ways to keep the dust level in your house to a minimum. And in addition to the usual advice of keeping furnace/HVAC filters clean, vacuuming with HEPA filters, air purifiers, and wiping down surfaces, there are some other cleaning methods and ideas to keep the dust at bay. One of my favorites is limiting the number of textiles in your home. Like throw pillows. If your spouse or partner love a lot of pillows, that’s not the best thing to limit dust (approach this topic with caution! Ha!).
While the list of dust-limiting methods are quite useful, most only address the issue after the dust is inside the home. What about preventing dust from entering the home to begin with? For instance, having open windows may help bring in fresh air, it also allows dust in the form of pollen, spores, pollutants, etc., to enter the home.
Preventing Dust
One key to limiting dust in a log home is making sure your home is completely sealed. We know the amount of sealing a log home needs, based on the number of logs, sizes of log gaps, amount of windows and door frames and so on. However, there exists the chance that some nooks and crannies might get missed or damaged throughout time.
The quickest method to find where dust can enter the home is performing an energy audit. Infrared cameras can locate and identify areas where outside air can penetrate. Learn more about energy audits here.
The most likely areas of air gaps are the nooks and crannies of joints and building material transitions. For instance, doors and windows. Sometimes the seal isn’t as solid as one would hope. That’s where our Log Gap Cap pre-cut foam comes into play. Paired with Energy Seal or Perma-Chink sealant that matches your current sealant, this combo effectively closes up your home around doors and windows. Read more about Log Gap Caps here.
And finally, make sure vents and the foundation seams are sealed and properly finished. Not only will this help keep your home sealed from outside dust, but also keeps bugs and pests from infiltrating your home.
Dust will always be around, but there are ways to mitigate how much, which should give you more time to enjoy your home.
Lifeline Ultra-7 turns ten in 2021!
Introduced ten years ago, Lifeline Ultra-7 quickly became the premier finish for log and timber homes. Upon introduction, Ultra-7 improved coverage rates and added even more color options for the Lifeline family. Today, the best-selling Ultra-7 remains the go-to finish for exceptional longevity and color retention for log and timber homes. Paired with Lifeline Advance topcoat, Ultra-7 keeps your log home looking beautiful for years and years.
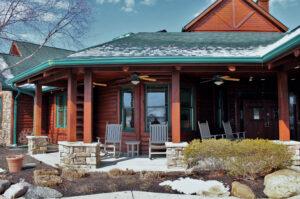
Wayne Bell of Log Home Care finished this project ten years ago in Avon, Ohio.
Before:
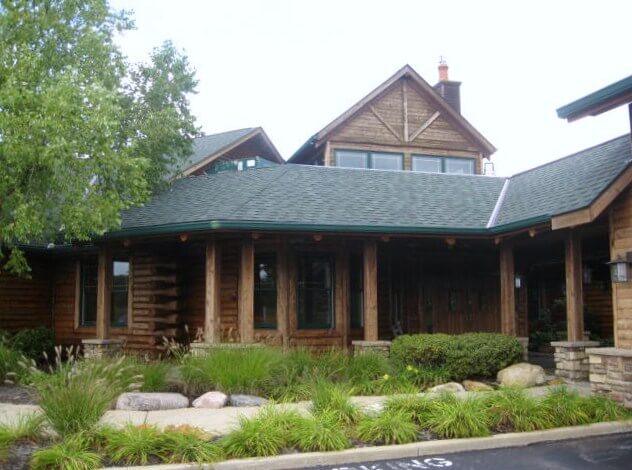
After, Front Porch:

After, Front Porch Up Close:
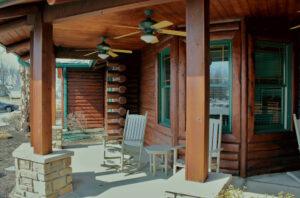
After, Wide Shot of Wrap-Around: