Library

Perma-Chink Systems has a full line of wood cleaners designed to clean, restore, and prepare your home for maintenance. We cover the basic cleaning, as well as how to handle known wood issues like resin bleed.
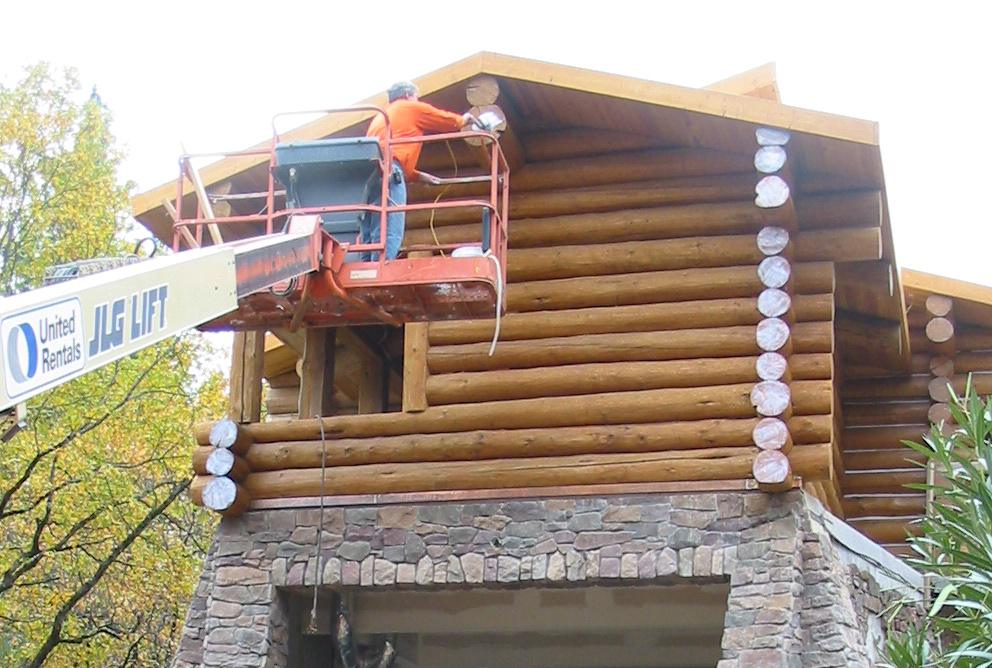
Some of the most vulnerable areas of a log home are the corner log ends. This is because the cross section end grain is exposed and the ends often stick out beyond the walls, allowing sunlight, wind, rain, snow, and ice to wear away the stain and expose bare wood. Logs can safely absorb large quantities of water before reaching moisture content levels that will be inviting for decay fungi.
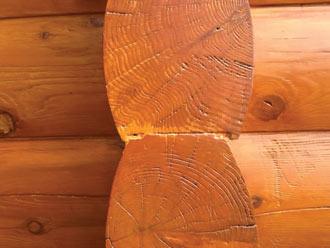
The exposed end grain acts like small straws sucking water into the log, giving rot and decay an opportunity to start eating away the wood. In addition, wood cracks and checks are prone to start at the ends. If left unprotected long enough, log or log corner replacement may eventually be required.
Being aware of the susceptibility of log ends to weathering, rot and decay, we developed Log End Seal™, a clear polymer finish that prevents water from penetrating into log ends and provides a layer of protection against log end damage. Although it is a sealer, Log End Seal is designed to allow moisture already in the wood to slowly escape. This helps reduce those large checks that often form on log ends.
To prevent excessive moisture absorption, Perma-Chink Systems developed Log End Seal, a product unique and specially formulated to protect log ends. Although Log End Seal is a fairly simple and easy product to use, there are some tips that can help you avoid problems especially in the fall when cooler temperatures slow down the curing process.
The basic steps of applying Log End Seal:
- Sand log ends with 60-grit sanding disc or paper
- Apply Lifeline finish
- Apply Log End Seal
- Apply Advance Topcoat
Let’s take a more detailed look at the individual application steps.
Step 1: Sand log ends with a sanding disc or sandpaper (60-grit). Log End Seal requires application in one (1) thin coat. In order to attain a thin coat, the log ends need to be sanded fairly smooth. If the ends are not smooth, the rough surface texture will prevent a thin coat application. This will result in thicker film, and will take longer to cure.
Step 2: Apply the Lifeline finish on the sanded ends, ensuring complete coverage. Allow time for the finish to dry before applying Log End Seal.
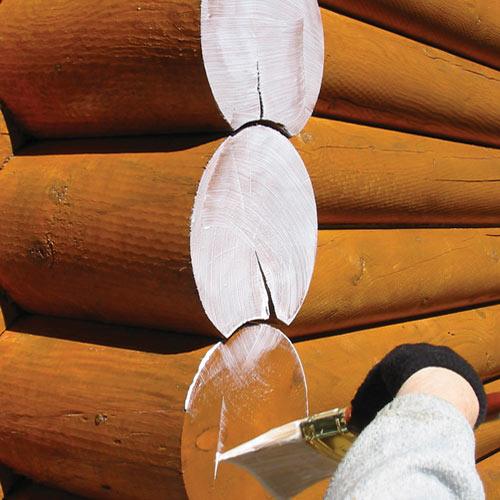
Step 3: Apply one thin coat of Log End Seal to the log ends, after the Lifeline finish has dried. Log End Seal white until it is fully cured, and if it gets wet during the curing process, the white color can last for several weeks. If Log End Seal is applied in a thick coat and gets wet, it may take several weeks or months for it to become completely clear and transparent. This is the most frequent cause of complaint from our customers. Eventually it will cure and become clear, but in the meantime, the log ends on your home will have a white haze.
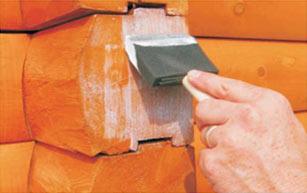
Tip: Choosing the right application tool can help prevent applying too thick a film. Rather than using a standard paintbrush, a paint pad or sponge brush works best. Since Log End Seal is thick and viscous, some people prefer to apply Log End Seal with a wide-blade trowel. Any of these tools will work as long as the Log End Seal is applied in a thin coat.
Step 4: Finally, apply a single coat of Lifeline Advance™ to help protect the Log End Seal surface to remain clean and dry.
Coverage Rate: When applied correctly, one gallon of Log End Seal goes a long way. One gallon covers 30 to 40 square feet, which equates to 100 eight-inch diameter log ends, or 180 six-inch diameter log ends.

Both M-Balm® and E-Wood® are two component epoxies that are used for repairing soft spots, rot pockets and other types of defects in logs and timbers. Although they can be used individually, they are typically applied as a pair with each product playing a specific role.
M-Balm
When the A and B components of M-Balm are mixed together, they form a low viscosity liquid. In other words, it is not much thicker than water. The purpose for this low viscosity is to allow the product to soak into wood fibers. After about 15 to 20 minutes, the liquid M-Balm will begin to harden and once hard, any loose, friable wood fibers will be consolidated into a solid mass.
One limitation of M-Balm is that the wood must be very dry, 15% moisture content or less, for the M-Balm to be able to soak into the wood. This presents a challenge when attempting to repair areas that have been damaged by decay, since typically these areas are quite damp. The best thing to do in these cases is to remove the source of the moisture by eliminating any leaks or draping a plastic film over the area to prevent rainwater from saturating the wood. You must wait until the wood is dry before attempting to repair it.
Note: When repairing wood that has been damaged by decay fungi, we recommend that the area first be treated with PenaShield® borate wood preservative to eradicate any decay fungi that may still be alive and to prevent any future infestations from reoccurring. PenaShield solution may be applied while the area is still wet or moist but it is still important that the wood be allowed to dry before applying M-Balm.
The easiest way to apply M-Balm is with some type of plastic squeeze bottle like a clean, empty mustard container. Just be sure to mix the two components together before you pour them into the container. You need to be aware that within a few minutes after being mixed together the liquid gets hot- very hot! The greater the volume, the hotter it will get.
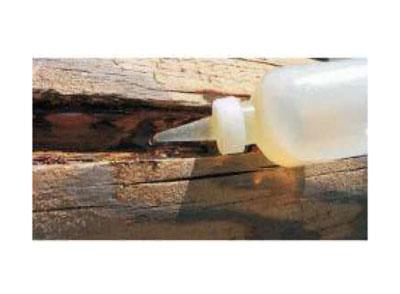
The heat is the result of an exothermic chemical reaction that takes place between the A and B components. It’s best to mix small quantities of M-Balm at a time, not only for this reason but once mixed, M-Balm hardens in just 15 minutes. Any product that’s not applied within that time will end up being unusable. M-Balm can be applied with a brush, but once it begins to cure the brush will become hard and will have to be discarded.
Whichever application method you use, try to avoid getting any M-Balm on the surface of the wood. It’s impossible to cover cured M-Balm with a paint or stain, and any spots of M-Balm that get onto the visible surface will always stick out from the rest of the wall.
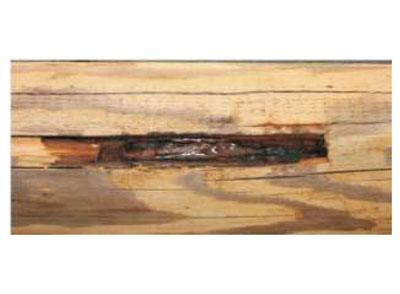
Whenever you are planning to fill a pocket or void using E-Wood, or any other type of wood filler, it’s important to first use M-Balm to consolidate any loose wood fibers present on the inside surfaces of the void. Wood fillers and putties, like E-Wood, will not adhere to loose fibers, and if you don’t consolidate them first with M-Balm, you run the risk that the patch will fall out of the void sometime in the future.
It is not necessary to wait until the M-Balm cures before filling the void. Being an epoxy it will cure even in the absence of air.
E-Wood
E-Wood is a two-component epoxy putty that can be used to fill holes or voids in wood. It should not be used to fill checks or gaps between logs since once it cures, it has no flexibility; any movement will cause it to pull away from the wood. E-Wood is somewhat challenging to mix together, since both components are thick and putty-like. Equal amounts of both A and B components must be kneaded together by hand until the color is uniform throughout the mass.
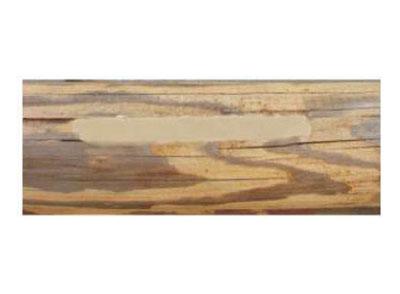
Up to two (2) ounces of Lifeline™ stains can be added to 24 ounces (12 ounces of component A and 12 ounces of component B) of blended E-Wood to aid in the hiding of the repair.
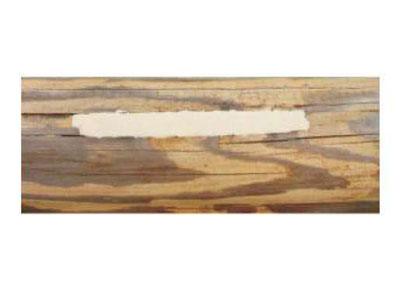
Once it is thoroughly mixed, it can then be pressed into the void and shaped to match the contour of the surface. If desired a texture or pattern may be worked into the surface of the uncured E-Wood to help it blend in with the surrounding wood.
Stain can be applied to the surface of the E-Wood either before or after it has cured. E-Wood will begin to harden in about an hour or two, so you have more time to work with it than you do with M-Balm. Being an epoxy, no shrinkage will occur once the E-Wood is in place.
For additional information about M-Balm and E-Wood see: “M-Balm & E-Wood” and “How to Repair Large Voids” technical tips.
Energy efficiency is a subject that most people are aware of, including log home owners and those people contemplating the purchase of a log home. Energy costs are on the rise, and energy efficiency is a key consideration well before the first log is ever laid down on-site.
With this in mind, we occasionally get asked about the R-value of our chinking and/or backing materials, since many people assume that they provide some insulation value to the exterior walls. In point of fact, neither the Perma-Chink® nor the backing material contributes any significant insulation value to a wall. What they do impact is the elimination of outside air infiltration into the home. This has a much greater impact on the overall energy efficiency of a home than adding a minor amount of insulation to a wall.
The R-Value of Wood
When trying to compare R-value of log homes and stick-built homes, it’s not quite an effective comparison. Not only do the types of wood (softwood or hardwood) affect the R-Value, but so does the climate where the log home will be located. While energy-related organizations have a hard time acknowledging the effectiveness of log homes, the Department of Energy recognizes the ability of logs of being “thermal batteries.”
A material’s thermal resistance or resistance to heat flow is measured by its R-value. In a solid log wall, the logs provide both structure and insulation. The R-value for wood ranges between 1.41 per inch (2.54 cm) for most softwoods and 0.71 for most hardwoods. Ignoring the benefits of the thermal mass, a 6-inch (15.24 cm) softwood log wall has a clear-wall (a wall without windows or doors) R-value of just over 8.
Logs act like “thermal batteries” and can, under the right circumstances, store heat during the day and gradually release it at night. This generally increases the apparent R-value of a log by 0.1 per inch of thickness in mild, sunny climates that have a substantial temperature swing from day to night. Such climates generally exist in the Earth’s temperate zones between the 15th and 40th parallels.
What If We Want to Improve Thermal Efficiency?
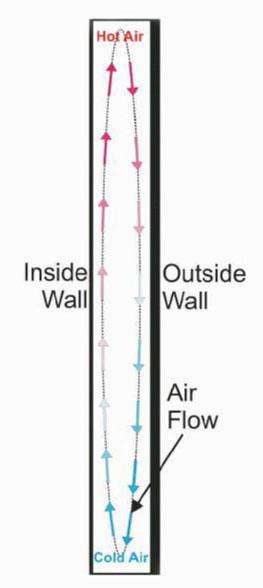
The next question is what can be used in the void between the exterior and interior chink joints to increase thermal efficiency? Surprisingly, the answer for many situations is nothing. Look at Diagram 1; it is a cross section of a typical stud bay without any insulation in a stick-built home.
During the winter, the outside wall gets cold while the inside wall stays warm. The air next to the inside wall heats up and rises to the top of the bay.
This sets up an air circulation flow where the heat from inside the home ends up warming the outside wall thus increasing the energy usage within the home.
During the summer the circulation flow is reversed and the hot air next to the outside wall ends up warming the inside wall. The objective of placing insulation between the studs is to eliminate this air circulation flow. But what in insulation reduces the conductivity of heat from one side to the other? Surprisingly, the answer is air.
Air is a very poor thermal conductor. The prime objective in most types of insulation is to entrap air in small cavities, so that it can’t circulate. However, the matrix that holds these small air cavities does conduct heat. Since some insulation matrixes conduct heat better than others, it’s what differentiates the R-value of the various types of insulation like fiberglass, cellulose, styrene foam, etc. But it’s the dead air spaces that do the work.

When we take a look at the cross section of a chink joint, Diagram 2, what do we see between the exterior and interior backing materials? Dead air space. For chink joints less than three inches wide, trying to gain thermal efficiency by filling the void between the outer and inner log surfaces is futile and may even be self-defeating.
Perhaps if you have a six-inch chink joint and live in Alaska, it may be worthwhile to insulate this space, since it is large enough and the temperature difference between the exterior and interior surfaces great enough to start an air circulation flow pattern. But if you live in a moderate climate zone and have a two- to three-inch chink joint, it’s probably not worth the cost and effort.
The best method to improve thermal efficiency is to ensure the home is properly and completely sealed. You can evaluate your log home’s efficiency with an Energy Audit, which may identify areas of energy loss.
When it comes to ordering sealants like our Perma-Chink® or Energy Seal™, there are two dimensions that you need to know in order to determine how much product you will need: the width and the cumulative length (linear feet) of the gaps or joints that you want to seal.
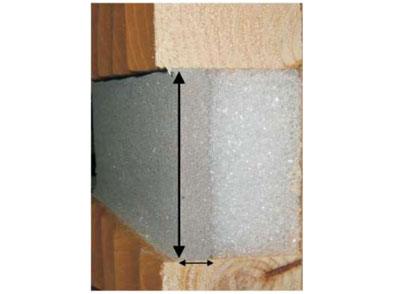
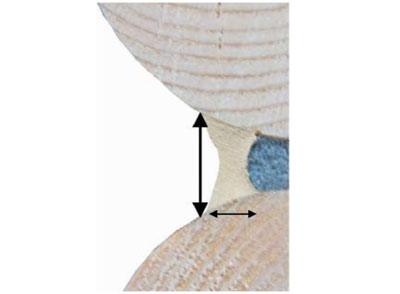
The width is fairly easy to determine. If it is a chink joint on a squared log, it’s the average distance between upper and lower log surfaces (Figure 1). If it is round log chink joint, you first have to insert a length of proper size Grip Strip™ and then measure the distance between the top and bottom logs about 3/8 of an inch in front of the surface of the Grip Strip (Figure 2).

In the case of Energy Seal, it’s the width of the gap and size of the backer rod that determines the width of the Energy Seal (Figure 3).
When estimating your purchase requirements for an entire log home, the task of determining how many linear feet of sealant you will need can be somewhat overwhelming. However, if you break it down to one wall at a time, then add all of the walls together, it becomes much simpler.
Calculating the number of linear feet of chink joints or sealant gaps in a log wall is fairly easy. Start by measuring the length of the wall with a tape measure. Then count the number of joints you need to seal. Usually it is the number of log courses minus one. When you multiply these two numbers together you have the linear feet of sealant required for that wall. Don’t worry about subtracting the windows or doors unless they take up a substantial portion of the wall area. You will need to seal around them anyway.
If you are planning to run a bead of sealant in the corners or other vertical seams of round logs, you need to know the height of the wall then multiply the height by a factor of 1.25 to compensate for the increased surface area created by the curvature of the logs.
Once you have determined both the width of the sealant joint and total number of linear feet you will be sealing, we have an online calculator on the Perma-Chink or Energy Seal web pages. The calculator will tell you the number of pails required to complete your project. If you were thinking about using tubes of either product consider this: the price difference between two pails of Perma-Chink or Energy Seal and an equal amount of material in tubes more than covers the cost of a bulk loading gun and follow plate.
Calculator Links
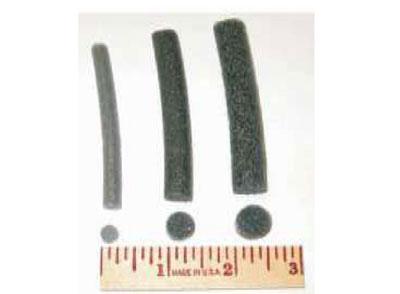
Homeowners often ask why we specify the use of backing materials on the application instructions for all our sealants. Is there something special about our sealants that require backing material?
Many general-purpose caulks never mention the use of backing materials on their labels. When applied to wood, any type of sealant, be it a high-quality Perma-Chink Systems’ sealant or an inexpensive construction caulk, will perform better if a backing material is used in joints that are 1/4” or greater wide. We want our customers to know the proper and best way to seal a joint so that it does not fail.
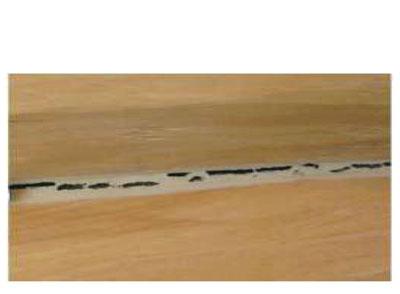
The use of backing material behind a sealant serves two purposes; First, to assure the proper thickness of the sealant so that it can stretch and contract without breaking; and second, to provide a surface that the sealant will not bond to so that it can stretch without tearing away from the wood. The dynamics of sealing an exterior joint or crack in wood is the same regardless of the width of the gap or the product being used. If the wood is unseasoned at the time a sealant is applied, the wood will shrink with time.
To compensate for the shrinkage the sealant must be applied in a manner that will allow it to stretch. When a sealant is applied too thick, once it cures it will not be able to stretch to compensate for the wood’s shrinkage and may fail. When applied too thin, it becomes too weak to stretch without breaking. Think of it like a rubber band. A thick rubber band cannot stretch as far as a thin one. However, if the rubber band is too thin, it will break when it is stretched. If applied too thick they can not stretch without tearing and if too thin they will be weak and will tear when pulled apart. In the case of sealants manufactured by Perma-Chink Systems, the magic number is an applied wet thickness of 3/8”. This results in a cured sealant with excellent elongation and maximum strength.
Backing Materials
Backing materials serve to provide a suitable sealant thickness and surface for the proper application and performance of the sealant. A variety of materials can be successfully used. Some important features of a good backing material include:
- It must be inert, not outgas, or react with the sealant.
- The sealant should not adhere strongly to it.
- It should not wrinkle or deform when the sealant is applied over it.
- It needs to be able to withstand temperatures of at least 190 degrees Fahrenheit
There are several products specifically designed for use as backing materials for sealants. For smaller gaps, joints and cracks the most commonly used material is round backer rod. It comes in a range of sizes and is relatively inexpensive. Since it is flexible it can be pushed into a crevice without needing to be nailed or stapled. Grip Strip is designed for sealing larger gaps. Similar in composition to backer rod, but shaped like a trapezoid so it can be squeezed in between round logs. It can be used for a variety of situations to provide a flat surface for chinking or sealing.
For wide chink joints between squared logs, we typically recommend the use of polyisocyanurate board (polyiso or R Max) or expanded polystyrene (EPS) beadboard. When cured, the sealant should release from the backing material. If the sealant stays adhered to the backing material, this places much more demand on the sealant at the top and bottom of the joint. Failure is often the result of improper backing materials being used.
Materials that should never be used as backing include Blueboard or any other colored beadboard (they outgas and create blisters in the sealant), open cell foams (they absorb water), foil-faced extruded polystyrene (XPS) (causes blisters) or anything that you are not sure about.
Avoid foil-faced materials as the chinking will adhere tightly to the foil. This will interfere with joint movement across the entire joint placing more stress on the top and bottom of the joint. If you are unsure or need assistance with selecting the proper backing material, give us a call, and one of our technical representatives will assist you in determining the proper backing material.
What about joints that are too narrow to insert even the smallest diameter backer rod? In these situations, a narrow strip of water-resistant masking tape works quite well. You do not want to use regular masking tape that wrinkles when it gets wet. The wrinkles may show through the sealant. An excellent option is to use pinstripe tape available at most automotive supply stores. The tape is vinyl, so it is waterproof and our sealants will not adhere to it. Pinstripe tape is available in widths down to 1/8”.


We often get asked this very question. To help answer this we must look to our experience both past and present. For 40 years now Perma-Chink Systems® has been working to develop products that meet both the demands of Nature and our Customers. The result of this experience has been a wide range of products that help solve specific needs. Our wood finishes can be split into four main categories: exterior film forming, exterior penetrating, interior film forming and specialty. Let us take a closer look at these products and discover what makes each one unique.
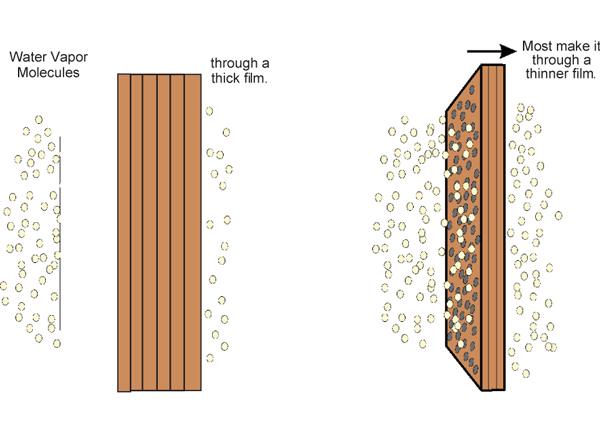
A Breathable Finish
First, our exterior film forming stains carry the Lifeline designation and are all breathable. Therefore, they allow water vapor to pass through while stopping liquid water from getting through. These types of finishes bond well to vertical wood surfaces but do not penetrate deeply into the wood. The protection is primarily on the surface. However, our Lifeline Ultra-7™, Lifeline Ultra-2™ and Lifeline Accents do contain special additives that help protect specifically the lignin in wood at the interface where the stain and wood meet one another.
Lignin acts as the structural framework for wood much like steel beams in commercial buildings. When lignin breaks down due to UV exposure, the interface between the coating and wood is compromised and delamination of the coating often results.
Lifeline Ultra-7
Lifeline Ultra 7 is our premier all-acrylic wood finish system containing special high-performance additives that reduce UV degradation and biological attack. It is designed for a one coat application however two coats can be applied to provide more protection and color uniformity.
Lifeline Ultra-2
Lifeline Ultra 2 is designed to be a two-coat application of finish. This finish system is very flexible, has inhibitors for ultraviolet light as well as biological growth, giving it an advanced level of protection.
Lifeline Accents
Lifeline Accents is designed to provide our customers with exciting colors and features and an affordable price point.
Lifeline Exterior
Finally, Lifeline Exterior, another two-coat system similar to Lifeline Ultra 2, is also very flexible, has additives designed to provide protection from UV and biological attack and is economical. All three of these wood finish systems have differing levels of protection designed to meet the needs of our customers.
Each of these finish systems should be sealed with our Lifeline Advance™ clear topcoat. This breathable topcoat helps keep the surface clean and relatively dry, reduces biological growth and helps reduce UV degradation which greatly extends the life of your finish system.
Our New Defensive Additions
Log and Timber Defense™ and Deck Defense™ are our two exterior penetrating products designed for both horizontal and vertical surfaces. These two wood finishes dive into the wood and seal the wood from the inside out. While reapplication of product may be necessary more often than our film forming stains, you don’t have to worry about chipping and peeling of the coating with these products. Both products work best on unsealed surfaces allowing for better penetration of each product. Decks are often difficult due to the intense UV exposure and abrasion they receive over time. Protection of these surfaces with Deck Defense is a smart move. However, because these products penetrate, application of a topcoat such as Lifeline Advance or our wood primer Prelude is strongly discouraged.
The Right Choice
Each of our wood finishes helps meet specific needs of your home exterior. Whether it be function, longevity, ease of application, quality, fashion, performance, or economics – Perma-Chink Systems֯ has a wood finish solution suited just for your home.
Applications of all Perma-Chink exterior finish removers, cleaners, stains, topcoats and sealants can be a bit of a challenge in extremely hot weather, which we consider over 90°F. However, if you know what to expect and avoid you can easily cope with applications during the hot summer months. We’ll address each of our product lines individually. And for all our products, we recommend keeping the product pails out of the direct sun on hot days to minimize the heat build-up.
Finish Removers
Although finish removers work better at higher temperatures than cold ones, in order for them to continue doing their job they must remain damp. If you allow them to dry out they will no longer work. In the case of S-100®, if it is a very hot, dry day you should mist the wall with water prior to applying the S-100. This will help cool the wall down and extend the time before it starts to dry out. If you see it beginning to dry, lightly mist it with water. Just be sure not to apply so much water that it starts to run down the wall.
StripIt® is a bit more resistant to drying out than S-100. However, when exposed to direct sunlight it will start to dry out, stop working, and turn into a white, powdery coating. If it does appear that it’s drying, apply an additional application of StripIt to keep it wet, or cover it with plastic film. Do not mist StripIt with water.
If S-100 or StripIt completely dries on the chinking, sealants or wood, reapply some chemical stripper to aid in solubilizing the dried residue and remove with a pressure washer.
Cleaners
Like the finish removers, cleaners also stop working if they dry out. Keep Wood ReNew™ and Log Wash™ damp with a light mist of water until it’s time to wash them off. The same thing applies to Oxcon™ if it’s used. It’s especially important to keep Oxcon wet. If it dries and crystallizes on the wood the resultant oxalic crystals become very difficult to rinse off.
Stains and Topcoats
It is the surface temperature of the wall that has the largest impact on the application of a Lifeline stain or topcoat in hot weather. The hotter the surface temperature, the faster the water will evaporate and the finish will dry. It is not unusual for log surface temperatures to exceed 170°F when exposed to hot sunlight. At these temperatures, drying times can be reduced to a matter of seconds, too fast for adequate back-brushing and proper film formation. Once the finish is on the wall, it does not really matter if it gets hit by hot, direct sunlight. It’s the surface temperature during the application process that’s critical. On the south and west walls it may be best to start early in the morning while the walls are still cool. Later in the afternoon, even if the sun is no longer hitting the wall, the surface temperature may still be well over 100°F.
Sealants (Perma-Chink®, Energy Seal™, Woodsman™, Check Mate 2®)
Sealants are more sensitive to direct sunlight even in cooler temperatures than they are to heat, in general. That’s because direct sunlight accelerates the “skinning over” of the sealant, trapping the water contained within the product. When this water converts to water vapor and tries to escape from the product, it can create bubbles or blisters on the surface of the sealant. High ambient temperatures do influence the viscosity of sealants; they become more fluid, but for the most part they can still be successfully applied even when the temperature exceeds 90°F as long as the freshly applied product is protected from direct sunlight.
While we call our pigmented finishes “stains,” in reality they behave more like water-based paints than traditional oil-based stains. The word stain itself implies that the wood fibers become stained with the pigments contained in the product, whereas water-based finishes form a film that covers the wood fibers without actually coloring or “staining” them.
If water gets behind the film there is a chance for the finish to blister, lose its adhesion and peel off. Most people seem to understand and accept the consequences of water getting behind paint, but they have a difficult time accepting that a stain can behave in the same manner. This not only applies to water-based products like LIFELINE™, but can also happen with oil-based finishes if the surface is not properly prepared or the finish is not correctly applied.
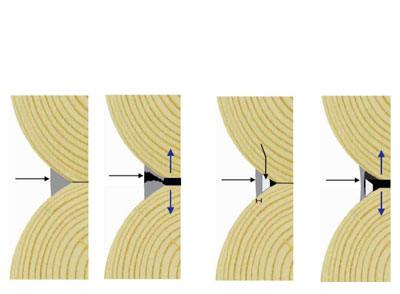
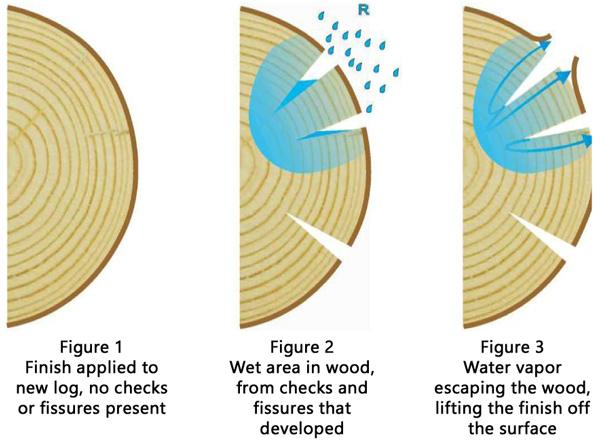
Most peeling issues are associated with finishes on new logs or new log siding. When the finish is first applied, the surface of the logs or siding is intact [Figure 1]. Later on, fissures and checks may develop, especially on the sunny walls, which allow rain water to seep behind the finish and into the wood [Figure 2]. Gravity plays a role in this, since most peeling occurs below the checks and fissures. When the sun comes out and beats on the wall, the water turns to water vapor and pushes the finish right off the surface [Figure 3].
Two additional factors play a role in the susceptibility of a finish to peeling. The first is vapor permeability. The more vapor permeable a finish is, the less likely it will peel. However, even vapor permeable finishes like LIFELINE can peel when applied too thickly, or if too many coats of finish are applied. That’s why we recommend thin coats of finish and maintenance coats of LIFELINE Advance™ topcoat only as needed! It is much more important to keep the surface clean than it is to apply an additional coat of topcoat every two to three years. Every coat that is applied will further reduce the vapor permeability to the point where water vapor can no longer escape from the wood without the risk of pushing some of the finish off.
The second factor is surface preparation. Peeling issues can occur if cleaner residue remains on the surface of the wood after cleaning, an inappropriate cleaner like bleach was used to clean the wood without thoroughly rinsing and neutralizing it, or the surface was sanded too smooth before application. The presence of mill glaze, dirt, sanding dust or other contaminates may also prevent adequate adhesion of the finish to the wood. Proper adhesion of the first coat of finish will not be attained if the application is made to wet or damp wood.
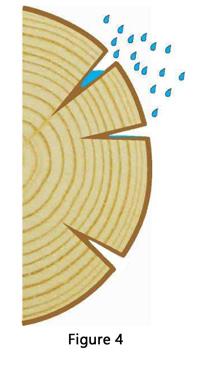
Once the checks and fissures have opened, and a new coat of finish is applied, peeling rarely becomes an issue. That’s because during the application process the finish now has an opportunity to get into them, forming a water resistant barrier between the surface of the cracks and the bare wood [Figure 4].
One of the reasons for back-brushing is to work the finish into the cracks and fissures, thus preventing water penetration into the wood. But if the wall has been recently washed, make sure that there is no water remaining in the checks and fissures and the wood around them is absolutely dry before you apply the first coat of finish.
Some factors that can contribute to peeling include:
1. Surface improperly prepared
a. Contaminates like oil or wax
b. Mill glaze
c. Sanding dust
d. Sanded too smooth
2. Inappropriate products used
a. Bleach solutions
b. Caustic strippers
c. High pH cleaners
3. Inadequate rinsing
4. Application errors
a. Spraying without back-brushing
b. Product applied too thick
c. Application at too high or too low a temperature
d. Product applied to wet or damp wood
5. Freshly opened fissures/checks
a. Exposed to rain and direct sunlight
For information about repairs, see “Repairing Peeled Spots.”
Over the past years we have discovered many things about cleaning wood. First and foremost is that chlorine bleach should never be used to clean your wood. In addition to its potential for damaging wood fibers, its use and misuse contributes to a number of problems including the loss of film adhesion, discolorations due to tannin extraction, and the formation of iron tannates, streaks, blotches, and premature failures of the finish system.
We have also discovered that a number of wood and deck cleaners available at paint and hardware stores, home improvement centers, and Do-It-Yourself outlets contain components that can interfere with the proper performance of water-based finish systems.
With this in mind, the ONLY cleaning products we recommend for use with our finishes are those products supplied or specifically approved by Perma-Chink Systems, Inc. We have tested our cleaning products with our finish systems and have confidence that when properly used and applied, their use will result in the best possible appearance and performance of a Lifeline™ finish. We cannot say the same about the use of other types and brands of wood cleaners or brighteners, and strongly discourage their use before applying any of our Lifeline finish systems.
Perma-Chink Systems Wood Cleaning Products
Log Wash™ – A general purpose, low-pH cleaner concentrate for removing dirt, grime, pollen, stains from surface mold and mildew from bare wood surfaces and existing finishes. Log Wash will also remove some types of brown stains and lighten the color of bare wood. Log Wash is not effective for removing grayed, oxidized wood fibers. Whenever bare wood surfaces are left exposed to the elements for more than seven days, the surfaces should be cleaned with a solution of Log Wash before the first coat of finish is applied.
For wood species that contain high levels of wood extractives and resin oils, such as red cedar, southern pine, spruce and cypress logs, we highly recommended Cedar Wash™ as a cleaner.
Wood ReNew™ – A concentrated powder that is dissolved in water and applied to bare wood. When used with a pressure washer, it will remove gray, oxidized surface wood as well as dirt, pollen, mold and mildew. Although Wood ReNew usually lightens the color, it can occasionally darken the wood depending on the wood species and the types of chemicals previously applied. Wood ReNew is the product of choice for removing mill glaze from new wood surfaces.
Cleaning Exterior Bare Wood Surfaces
New Log Homes
Step 1: If the wood has not grayed, wash the surface with a two cups per gallon Log Wash solution and a pressure washer no more than seven days prior to staining. Apply and clean from the bottom up and rinse from the top down. Rinse well and allow the wood to dry.
Step 2: If there are signs of gray weathered wood, use Wood ReNew according to the application instructions along with a pressure washer.
Step 3: If after Steps 1 or 2 there are still dark streaks or discolorations on the surface, use a solution of Oxcon™ oxalic acid on the entire wall according to the directions for use. Be sure to dilute the Oxcon concentrate with four parts water. Apply the solution from the bottom up, begin washing it off starting at the bottom then rinse thoroughly from the top down. Be sure to completely rinse the Oxcon solution off the wall and allow the wood to dry before staining. Never use Oxcon unless it is absolutely necessary.
New Log Siding
New log siding must always be cleaned, since it presents an especially difficult challenge to a finish system. Typically used in high exposure locations such as dormers and gable ends, siding is often manufactured from lower quality wood than logs, and frequently green wood. This makes siding more susceptible to twisting, warping, and cracking.
Since siding does not have the high thermal mass of full logs, during the summer months its temperature can range from 70ºF to 160ºF or higher during the course of one day. This puts a lot of mechanical stress on the siding and its finish, resulting in small fissures forming on the surface. Rainwater can then enter these fissures and get into the wood, behind the finish. Log siding is typically milled quite smooth and often has a mill glaze on the surface, which if not removed, prevents the proper adhesion of the finish.
Step 1: To remove mill glaze and prepare siding for the first coat of finish, clean and pressure wash the surface of the siding using Wood ReNew no more than seven days prior to staining. Apply the solution of Wood ReNew and pressure wash from the bottom up, and rinse from the top down. Allow the siding to dry before staining.
Homes that Have Been Sanded or Media Blasted
Step 1: If the surface of the wood has been sanded or media blasted, it is not considered clean. Wash the surface with a two cups per gallon Log Wash solution and a garden hose (pressure washing is not required) no more than four days prior to staining. Apply and clean from the bottom up, and rinse from the top down. Allow the wood to dry before applying the first coat of Lifeline pigmented stain or Prelude™ Clear Wood Primer.
Homes that Have Had a Finish Removed Using a Chemical Finish Remover
Step 1: If a finish has been removed using a chemical stripper, there may still be some types of discolorations present on the wood. Cleaning with a two cups per gallon Log Wash solution and garden hose, or pressure washer, will remove many types of tannin (brown) stains and even out the color of the bare wood surfaces. If the surface feathered during the finish removal process, and the feathers were removed by sanding, or with an Osborn brush, it will be necessary to clean the surface again with Log Wash. Use a two cups per gallon solution and apply and clean from the bottom up, then rinse with a garden hose from the top down. Allow the wood to dry before applying the first coat of pigmented stain.
Step 2: If, after the finish has been removed, there are areas of grayed wood fibers, apply Wood ReNew according to the directions and clean the surface with a pressure washer. Rinse well and allow the wood to dry before applying the first coat of pigmented stain.
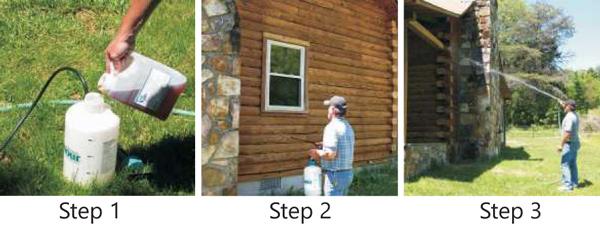
Application of Log Wash
Step 1: Add 1 gallon of water to your sprayer then add approximately 2 cups of Log Wash. If you add the Log Wash first, the sprayer will fill with foam. Be sure solution is mixed well.
Step 2: Spray the surface with the mixed Log Wash solution. Start at the bottom and work up. Allow 10 to 15 minutes contact time. Do not allow the surface to dry.
Step 3: If necessary, scrub the wall starting at the bottom and work up then rinse from the top down until you see no more foam running down the wall.
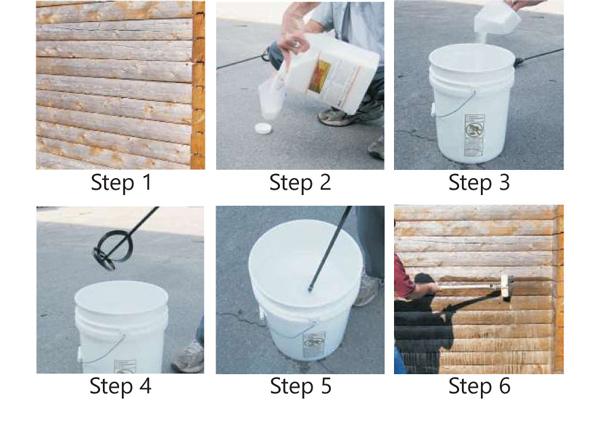
Application of Wood ReNew
Step 1: Use Wood ReNew to remove grayed surface wood.
Step 2: Only measure out enough Wood ReNew to add to a few gallons of water (0.8 cups per gallon) at a time. You need to use whatever you mix up within 1 to 2 hours.
Step 3: Pour the Wood ReNew into a pail that contains the water. Do not mix Wood ReNew in a sprayer.
Step 4: Mix the Wood ReNew with the water using a paint mixer and an electric drill.
Step 5: Stir for about five minutes or until no undissolved granules are visible. Allow the solution to thicken for 10 minutes before using.
Step 6: Apply the Wood ReNew solution to the wall with a mop, broom, or car wash brush. Start at the bottom of the wall and work up. Allow the solution to remain on the wall for 10 minutes.
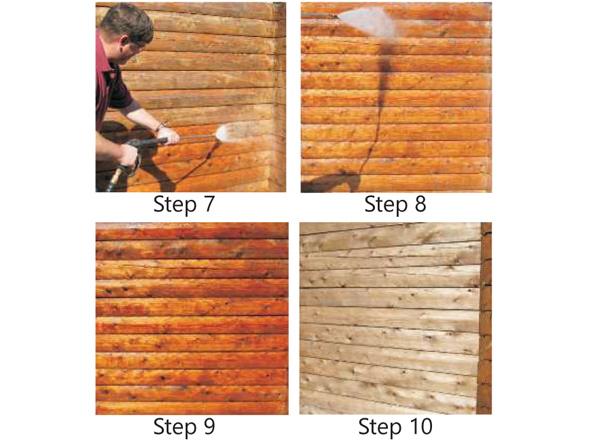
Step 7: Pressure wash starting at the bottom of the wall. Work on 2 or 3 courses of logs at a time. Hold the wand at a 30 to 45 degree angle to avoid feathering the wood.
Step 8: Once the entire wall is pressure washed, rinse the wall starting at the top and work down. At this stage water volume is more important than pressure.
Step 9: Never judge the effectiveness of Wood ReNew or any other cleaner while the wood is still wet.
Step 10: Once the wood dries, many of the dark discolorations will disappear. This is the same wall that appears in the previous step after drying for three hours.
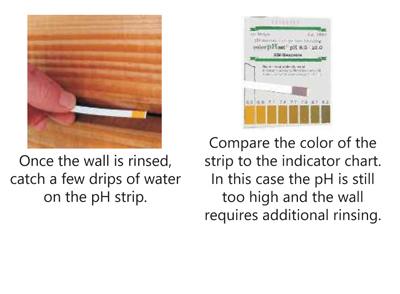
*A NOTE ABOUT RINSING*
No matter what product you use to clean bare wood, nothing is more important than making sure you have adequately rinsed the surface. Any chemical residue remaining on the wood can have serious consequences later on. We always recommend using pH strips to make sure that the surface of the wood has been sufficiently rinsed, preferably to a pH of between 6.5 and 7.5. pH strips are available at most pool supply dealers, aquarium supply shops, and Perma-Chink Systems, Inc. They are not expensive and are very easy to use.
Cleaning Interior Bare Wood Surfaces
Interior walls and ceilings must be cleaned prior to finishing. If your home is completed, you are somewhat limited in the available cleaning methods since the use of a pressure washer is typically not an option. If you want your interior walls smooth, sanding may be your best and only choice. As opposed to exterior surfaces, you can sand interior wood surfaces using 120 grit sandpaper or Osborn brush.
Although your interior wood surfaces may appear to be clean, they are never clean enough to apply a finish to them without first washing them with an appropriate cleaning solution like Log Wash.
Step 1: Mix one half or one cup of Log Wash Concentrate with one gallon of warm water, if available, in a pail.
Step 2: Apply the Log Wash solution to the wall with a rag or sponge starting at the bottom and work up. Allow the solution to remain on the wall for at least 10 minutes.
Step 3: Using a clean rag or sponge and a pail of clean water, wipe the Log Wash solution off of the surface. Frequently rinse the sponge or rag in the pail of water and occasionally exchange the water in the pail with clean water.
Step 4: Allow the surface to completely dry before applying the first coat of finish.

All our finish labels and application instructions emphasize the necessity for back-brushing during the application process. What exactly is “back-brushing,” and why is it so important? Back-brushing is the term we use to describe the process of working the finish into the wood and obtaining an intact, uniform film over the entire surface.
Back-brushing is typically used when applying stain with an airless sprayer; however, back-brushing is just as important if the product is manually applied with a brush. Although the directions for most log home stains call for a liberal first coat or flood coat, Lifeline™ finishes are designed to go on in thin coats, including the first coat. If applied too thick, the long-term performance of Lifeline finishes can be diminished. In other words, more is not necessarily better when it comes to applying Lifeline to your log home.
The first step in the process is to obtain a high-quality brush. A cheap, three-dollar brush from Walmart will not give you satisfactory results. You need a good quality brush like a Purdy or Wooster. For back-brushing logs, use brush preferably three to four inches wide. Using a narrow brush takes longer and may result in visible brush marks. If you plan to hand apply the finish with a brush and pail, you will use the same brush for both the application and the back-brushing.
The objective is to carry the finish to the surface with the brush and then to spread the finish out as far as it will go, making sure to work it into all cracks and crevices, and to uniformly distribute it over the area you are coating. This entails some vigorous back-brushing over the area that has finish applied to it. Lifeline finishes dry fairly quickly, so it’s important to back-brush as you go along and not wait more than a couple of minutes before you back-brush the coat.
We have formulated our Lifeline finishes to be most easily applied using airless spray equipment. There are two methods typically used to apply finishes with an airless sprayer.
The first method is to step back from a wall and use the sprayer to cover a larger area. This works well for a contractor with a crew since a large wall can be coated in a short period of time. This method requires at least two people, one spraying and at least one person back-brushing. When using this technique, back-brushing becomes important since the sprayer puts out lots of small droplets, which result in a lot of small dots of finish, not a uniform film. It takes back-brushing to convert these dots into an intact film, as well as to work the product into any cracks and fissures that are present on the surface.
The other method is to use the airless sprayer to carry the finish to the wall where it can be brushed out. The trick is to work on small areas at a time. Although it takes longer than spraying large areas at a time, a single person can use this technique to finish their entire home. The objective is to apply some finish on a one- to two-foot section of one or two courses of logs, and then brush out what you have applied as far as it will go. You don’t want to apply too much finish, and you need to be quick with the back-brushing to prevent stain from running down the wall. Just remember – A THIN, EVEN COAT is the key.
The most important thing that you can do to help maintain the finish of your log or timber home is to keep it clean. An annual washing with Log Wash™ will help prevent airborne contaminates, dirt, bird droppings, and sunlight from degrading the finish. While nothing can withstand the effects of the environment forever, keeping wood clean and maintained can protect it better and longer. How can keeping the surface clean prevent sunlight from injuring the finish? One of the features of our Lifeline Advance clear topcoats is that they reflect UV radiation.
If the surface is dirty and dull, it reflects less sunlight, and the absorbed UV light will eventually fade the color and gray the wood. So just like automotive finishes, the cleaner you keep your home, the longer the finish will last.
That being said, there will come a time when it may become necessary to do some touch-up work to the topcoat and perhaps the color coat, especially on the south and west walls. The question is, when and where should maintenance coats of finish be applied? The first thing to understand is more is not necessarily better. In other words, if the wall does not need another coat of stain or topcoat, leave it alone.
Advanced Breathability
One of the features of Lifeline finishes is the ability to breathe. This allows water vapor to escape from the wood while preventing liquid water from penetrating through the finish. Technically, we call this vapor permeability. If applied at the recommended application rates, one or two coats of stain, depending on the color system chosen from Perma-Chink Systems, and one coats of topcoat maintains enough vapor permeability to allow water that may enter the wood through cracks, checks and fissures to evaporate through the finish. However, each coat of finish that’s applied reduces the vapor permeability of the entire finish system by some percentage. The thicker that a coat is applied, the more it will reduce the vapor permeability. That’s one reason why we always recommend applying thin coats.
How Many Coats Of Stain Are Needed?
Multiple coats of finish can have the same effect as applying coats that are too thick; they can reduce the vapor permeability to the point where the finish can no longer breathe. The consequence of reducing the ability of a breathable finish is the risk of the finish peeling if water gets behind it (see technical tip Peeling Issues). Although occasional maintenance is an important factor in keeping your finish system in good shape, only apply additional coats where they are needed.
So what’s the best way to care for your home and extend the life of your finish system? If, after a washing with Log Wash, you see that the surface has dulled, apply a single coat of Lifeline Advance Gloss or Satin. A dull surface is a sign that the finish has eroded. If it shows signs of weathering or fading color, feel free to apply another coat of Lifeline stain to restore the color and a coat of Advance topcoat.
One or two additional coats will not adversely affect the vapor permeability. But while you are at it, you may be tempted to apply another coat of topcoat on those walls that still look good. Additional coats applied to unweathered walls are not necessary and can eventually lead to problems. If applied correctly, the film thickness of the unweathered walls is still optimal and the application of additional coats can decrease the vapor permeability to a point where peeling could become an issue. In other words, leave it alone.
Ongoing Finish Maintenance
As opposed to other manufactures’ finishes, we do not recommend applying additional coats of stain or topcoat on a yearly schedule. If two coats of stain and one coat of topcoat have already been applied, we recommend applying additional coats only on an “as needed” basis. But we strongly recommend a good cleaning with Log Wash at least once a year to keep your home looking great and extending the longevity of your finish system.