Library

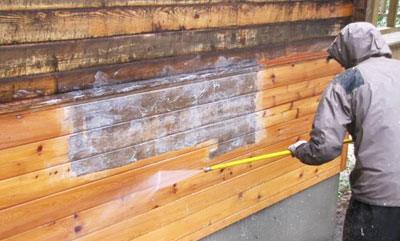
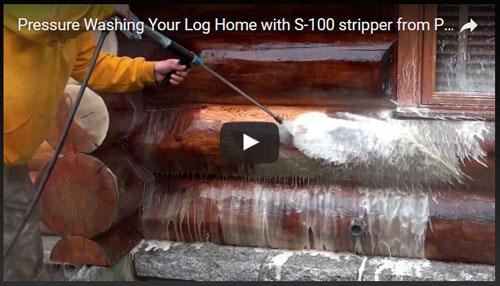
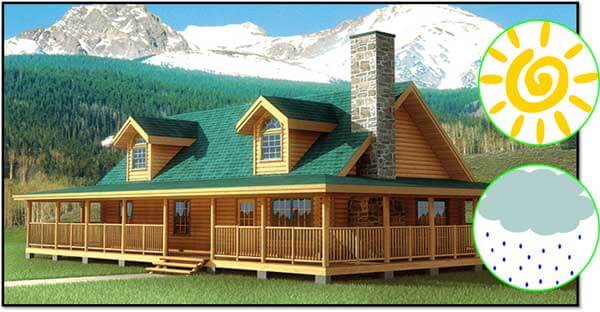
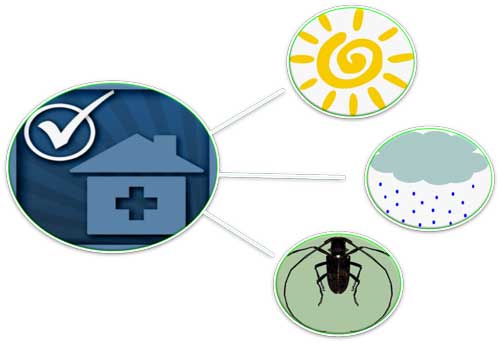
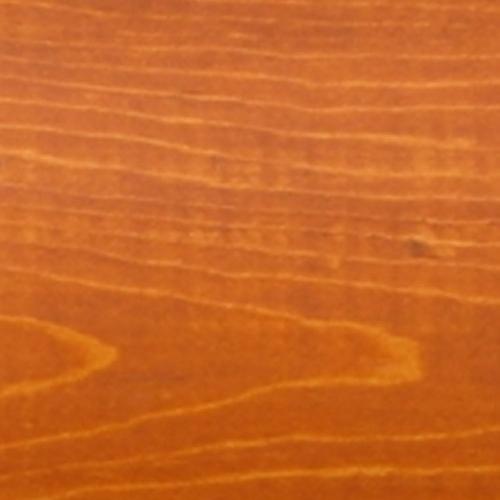
Pressure washing (also referred to power washing) is the function of using highly pressurized water to remove mildew, mold, dirt, pollen, UV graying, etc. You’ll hear different recommendations whether or not pressure washing your logs is the best cleaning method.
Generally speaking, pressure washing is the quickest and least expensive choice.
One fallacy is that you’re saturating and “damaging” your logs with water as a result of pressure washing. This simply isn’t true. On hard, sound, rot-free logs, you’re only introducing water into the top fibers of the wood.
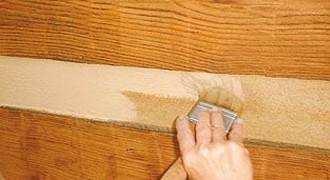
The time it takes to pressure wash and the results generated are often directly associated with the type of finish being removed as well as how many coats have been applied. While some older, obsolete linseed based oil stains are more difficult to remove than newer products, practically everything can be removed with proper pressure washing techniques and good finish removers. Some of these older type products will often need S-100 or StripIt stripper applied first in order to soften the bond to the wood.
Condition of Wood Surface
Traditionally, newer, recently peeled logs have a greater surface hardness and can withstand highly aggressive pressure washing (if needed) easier than a log wall which has been fully exposed to direct sun for 20 years. You might notice your upper and lower fascia boards have aged and darkened at an accelerated rate compared to your logs. Because these areas are often made from softer (i.e. pine) wood, they are more likely to absorb water leading to more prominent mildew growth. These areas can easily resemble new wood once cleaned.
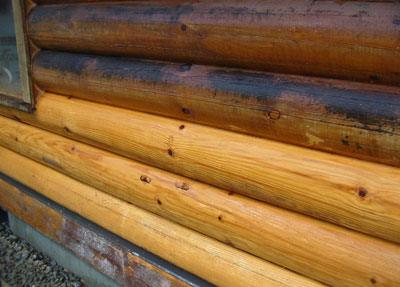
Pressure washing of new constructions can also easily remove the UV graying of the logs that can start occurring just weeks after the logs are stacked, particularly if exposed to direct sunlight.
In addition to log and wood sided structures, other areas where pressure washing can be utilized include driveways, stone walkways, pool decking, stone walls, fencing, gutters, downspouts, roofing and other areas. Concrete slowly builds up a browning/green appearance over time which usually consists of grease, dirt, mildew and algae which can easily be cleaned.

Pressure washing can be done in practically any temperature and weather conditions, although chemical strippers, which are often applied prior to cleaning, work much better in warmer weather.

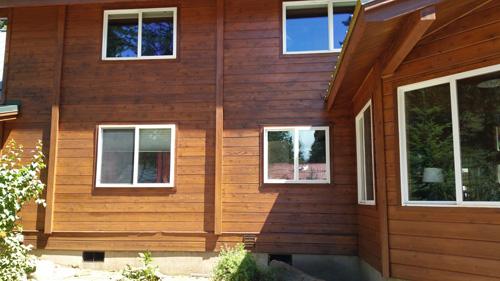
Whether you hire a professional or undertake the project yourself, pressure washing with wood cleaners from Perma-Chink Systems can bring back the beauty of your logs, preparing them for a fresh coat of stain and protective clear topcoat finish.
By Jeff Kyger
Northwest Log Home Care
www.northwestloghomecare.com
Pressure washing (also referred to power washing) is the function of using highly pressurized water to remove mildew, mold, dirt, pollen, UV graying, etc. You’ll hear different recommendations whether or not pressure washing your logs is the best cleaning method.
Generally speaking, pressure washing is the quickest and least expensive choice.
One fallacy is that you’re saturating and “damaging” your logs with water as a result of pressure washing. This simply isn’t true. On hard, sound, rot-free logs, you’re only introducing water into the top fibers of the wood.
The time it takes to pressure wash and the results generated are often directly associated with the type of finish being removed as well as how many coats have been applied. While some older, obsolete linseed based oil stains are more difficult to remove than newer products, practically everything can be removed with proper pressure washing techniques and good finish removers. Some of these older type products will often need S-100 or StripIt stripper applied first in order to soften the bond to the wood.
Condition of Wood Surface
Traditionally, newer, recently peeled logs have a greater surface hardness and can withstand highly aggressive pressure washing (if needed) easier than a log wall which has been fully exposed to direct sun for 20 years. You might notice your upper and lower fascia boards have aged and darkened at an accelerated rate compared to your logs. Because these areas are often made from softer (i.e. pine) wood, they are more likely to absorb water leading to more prominent mildew growth. These areas can easily resemble new wood once cleaned.
Pressure washing of new constructions can also easily remove the UV graying of the logs that can start occurring just weeks after the logs are stacked, particularly if exposed to direct sunlight.
In addition to log and wood sided structures, other areas where pressure washing can be utilized include driveways, stone walkways, pool decking, stone walls, fencing, gutters, downspouts, roofing and other areas. Concrete slowly builds up a browning/green appearance over time which usually consists of grease, dirt, mildew and algae which can easily be cleaned.
Pressure washing can be done in practically any temperature and weather conditions, although chemical strippers, which are often applied prior to cleaning, work much better in warmer weather.
Whether you hire a professional or undertake the project yourself, pressure washing with wood cleaners from Perma-Chink Systems can bring back the beauty of your logs, preparing them for a fresh coat of stain and protective clear topcoat finish.
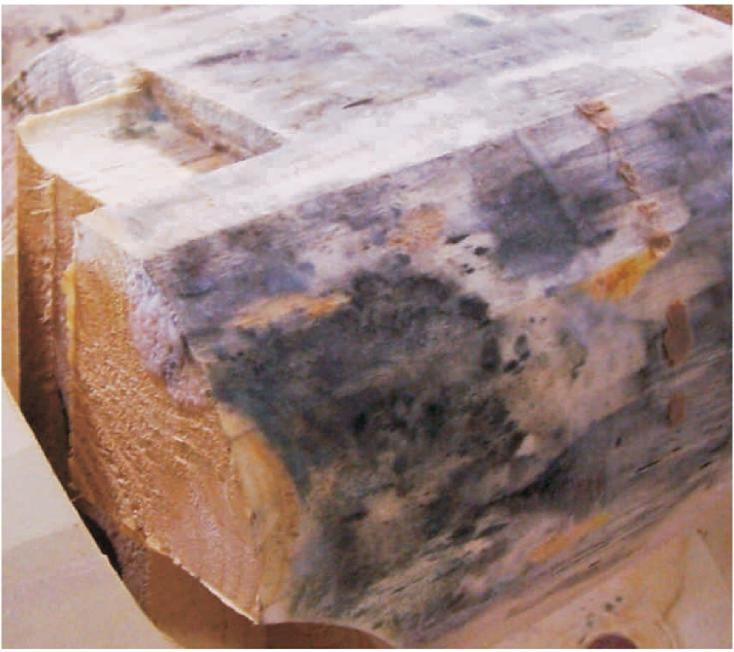
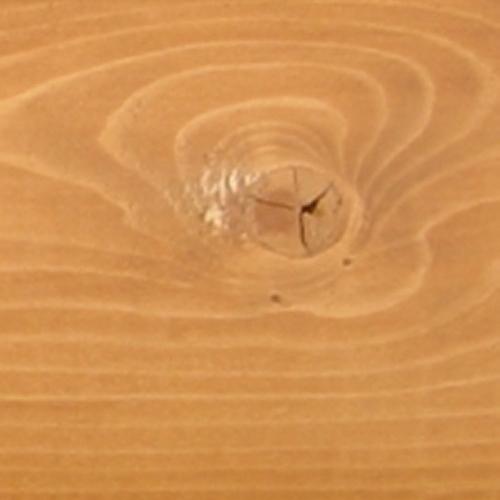
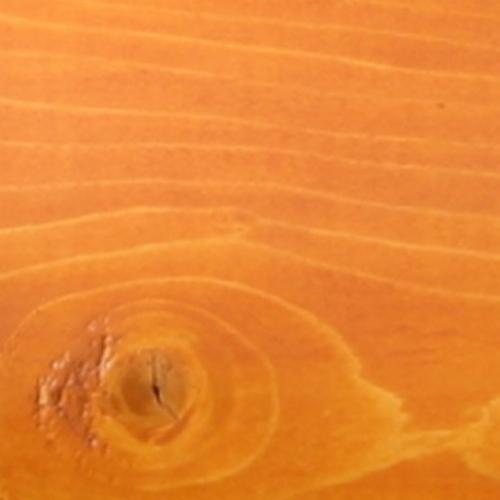
Mold and mildew (actually another name for mold) are colonies of living organisms that can grow on the surface of many materials including wood. Their color may range from white to black with just about every color in between. If the discoloration is green, it is most probably algae, a plant, since molds and mildews do not contain green chlorophyll. Like most living organisms, molds require air, water and a food source for survival. Bare wood is quite susceptible to mold growth since the porous surface provides lots of places for spores to germinate and many of wood’s nutrients are available as food. This is especially true for newly harvested wood that still contains a high sugar content. In addition, bare wood absorbs water, thus supplying the moisture these organisms require.
Combating Different Molds
Although it is fairly easy to remove mold from bare wood surfaces (Wood ReNew does an excellent job), preventing its growth on green logs in particular can be somewhat of a challenge. Thanks to the internet, one popular misconception is that borate treatments will prevent the growth of surface molds on wood. This is NOT TRUE! Although the presence of borates will inhibit the growth of some types of surface molds, there are other types that actually thrive on borate treated wood. Borates are quite effective against wood decay fungi, but surface molds are very different from decay fungi and it takes other methods of control to prevent their growth.
Best Methods to Prevent Molds
When it comes to preventing the development of mold on wood, the best and most effective approach is to provide a dry environment. Molds cannot survive in dry conditions so if the logs are stored under cover with lots of air flow around them chances are that mold will not grow on them. But as we all know there are occasions when ideal storage conditions may not be practical so in those cases how can the formation of mold be prevented. There are some chemical treatments that can be applied to bare wood that will kill existing mold colonies and prevent the growth of mold for several months. One of the more commonly used products is didecyl dimethyl ammonium chloride, commonly referred to as DDAC. It works well and several years ago we used to sell a brand of it named Britewood XL. However, one downside of DDAC is that it is corrosive to skin.
Another chemical used for killing and preventing mold growth is chlorothalonil. At low concentrations it is commonly used for preventing fungal growth on peanuts and potatoes as well as being a fungicidal additive to paints and stains. Sostram Corporation makes a chlorothalonil product named CLORTRAM that inhibits surface mold and stain causing fungi growth. Neat chlorothalonil is very toxic to aquatic life.
Mildew-X
Although there are several other products available for controlling mold, the last one we will cover is Mildew-X. Mildew-X is a dry film preservative that prevents mold and mildew growth on interior and exterior surfaces naturally. Mildew-X is exempt from FIFRA registration.
So, is there a role that a Perma-Chink Systems product can play to prevent the growth of mold on bare wood other than one of our complete finish systems? If a manufacturer or contractor wants to protect their logs at the mill or on the job site during construction, they can apply a coat of Prelude that has been dosed with Mildew-X or an equivalent product that is labeled for adding to water-based paints or stains. This will help prevent the growth of mold on top of the Prelude film. The limitation of this combination is that it must be applied to a fairly clean surface since it may not kill all of the mold colonies that are already present. However, it offers some definite advantages over those products that just eliminate and prevent mold. First, since Prelude contains UV Boost, it will help prevent surface graying due to sun exposure. Second, the Prelude film will keep the surface cleaner during transport and construction. And third, it will help regulate the drying process which to some degree should lessen initial checking and fissuring. We already have some manufacturers using this system and they are quite pleased with the results.
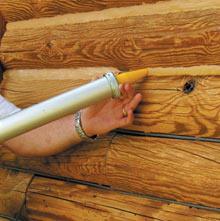
Applying and tooling Perma-Chink or Energy Seal sealant you need the right tools to make the job easier and quicker. Depending on the job and type of sealant needed, you have a few decisions to make regarding the tools and accessories you’ll need for the project.
Starting Out On The Right Foot
Having the right tools at hand is critical for a good chinking job. The most popular tool for applying Perma-Chink or Energy Seal is the bulk-loading gun. This tool is available in two sizes, the 20oz. and 30oz. capacity and operates by pulling sealant straight from the pail.
For contractors who have been applying sealants for years, the tools selected have been time tested. Contractors expanding work or new to the trade might want to know all the available options for the job. And since everyone has a different preference on tools, Perma-Chink Systems offers multiple products to get the job done.
1. The Albion Bulk Loading Caulking Gun
This is our most popular tool for applying Perma-Chink or Energy Seal. It is built to meet the demands of serious professionals, utilizing rugged, heavy-duty all steel drives and lightweight aluminum barrels to reliably dispense a wide range of materials.
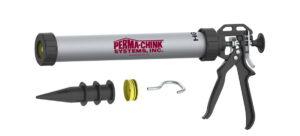
Available sizes 20oz. and 30oz.
- Professional Quality
- Efficient 12:1 Drive Ratio
- Lightweight Aluminum Barrel
- Double Grip Plates for Long Life
- No Spanner Wrench Needed!
- Barrel Rotates for no-stop application
- Kit includes 3 nozzles, one spare piston and a steel ladder hook-pull
2. Smooth Rod Style Caulking Guns for applying Perma-Chink, Energy Seal, Check Mate 2 and Woodsman
Great for professional use where bead consistency, control and clean up save time and money. A simple push of the recoil releases all pressure on the plunger and instantly stops the flow of sealant. To remove the tube, press the lever and pull back on the rod to expose the entire tube and slip it out of the gun.
Available in sizes for 11oz. tubes and 30oz. tubes
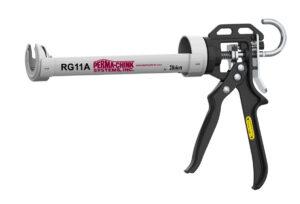
- Professional Quality
- Smooth Rod for reliable dispensing
- Efficient 12:1 Mechanical Advantage Drive
- Convenient Thumb-Release for no run-on caulking
- Full size handle for comfortable dispensing
3. Cordless Guns with a State-of-the-Art Performance, Portability and Control
How Fast is Fast! A Cordless Gun can dramatically decrease the amount of time on a chinking job.
Available in sizes for 11oz. tubes and 30oz. tubes AND 20oz. bulk
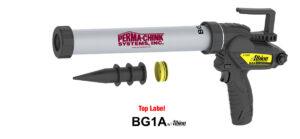
- Powerful – 400 lbs. of Dispensing Force
- Fast – Dispense 11oz. Cartridge in 16 seconds
- Lightweight Aluminum Barrel
- Long Lasting – 12 V Lithium-Ion Battery
- Control – Variable Speed Trigger with Maximum Speed Dial
- Auto Reverse for No-Drip Dispensing
- Comfortable rubber over molded handle. Swivel barrel
- Fast 30-minute recharge. Battery Fuel Gauge
- Ladder pull hook
How Bulk Loading Guns Operate
Simply insert the 2-inch wide cylinder into the pail and fill the gun by pulling back the plunger, which draws the product from the pail into the body of the gun. After wiping the threads clean and screwing on the end cap with plastic cone nozzle, you’re ready to apply the product. To make your job easier, quicker and much cleaner with less product waste, the gun-compatible follow plate can be used (highly recommended). This 9.5” round metal plate has a 1” rubber gasket which allows for the tapered shape of the pails.
Basic Instructions on how to Tool Perma-Chink Sealants
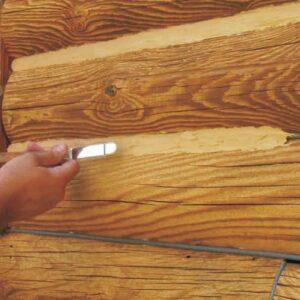
Smoothing your sealant you have just applied from the gun is not nearly as important as making sure you have really good contact to the top and bottom log, with no air trapped under the sealant.
To move the sealant into position for proper adhesion and to smooth out bumps is what we refer to as “tool” or “tooling.” The best tool we recommend is a bent trowel that’s about the width of the chink joint. The bent trowel makes it much easier to avoid trowel marks in the sealant as it dries and cures. Along with a trowel, you’ll want to have a plant mister or squirt bottle filled with plain water. Perma-Chink Systems offers a variety of stainless-steel trowels ranging from ¾” to 4-inch wide with both rounded and squared off tips in our Tools & Dry-In section.
Anytime you tool the chinking, spray a little water on it first. You want enough water to allow a smooth motion with the trowel, but not so much it pools and runs all down the logs. The water prevents the chinking from sticking to your trowel and gives a nice, smooth surface free of bumps and edges. Make more smoothing passes after you have created good adhesion to those logs to remove any tooling marks. All of these passes are a very light pressure, with ½” to ¾” of the tip of the knife being used. Depending on the appearance you are looking for, you may leave your sealant line as smooth or as rough as you would like.
Recommended Videos


Hope this helps! Check our Tools and Dry-In section on the website to find all the items needed to get you started on your project! And if you need more information, our professional sales representative is standing by at 800-548-3554 or send us an e-mail to techservice@permachink.com
Click here to view the Log Home Sealants Application Guide

We often get asked whether Perma-Chink’s LIFELINE™ finishes can be applied over an existing stain. Since the answer to this question is somewhat complex we’ll look at the various types of stains individually. First and foremost, for the best look and performance of a LIFELINE finish it’s always best to remove any existing old finish unless it already is a LIFELINE finish. Even then, the existing LIFELINE finish needs to be in pretty good shape before we recommend applying another coat on top of it.
That pretty well covers what should be done. However the question is “can a LIFELINE finish be applied over other brands of existing finishes?” If the existing finish is water-based and there are no signs of grayed wood and the color on all of the walls is fairly uniform the answer is typically yes with some reservations. For example, if the existing water-based finish contains wax there may be a problem with adhesion or “fish eyes” forming during application. But you have to be careful, not all water-based finishes are created equal. Water/oil emulsion stains claim to be water-based but in fact contain enough oil that adhesion may become an issue.
In general LIFELINE should never be applied over film-forming oil stains like Sikkens Cetol Log & Siding, Sashco’s Transformation, or other alkyd oil-based stains. These types of finishes should always be removed before applying LIFELINE. But what about penetrating oil stains like WOODguard, Outlast Q8 Log Oil, TWP, Olympic and others? It really depends on the individual situation. Since one-coat oil stains usually don’t last more than a couple of years, we rarely encounter a situation where the condition of the surface is good enough to apply one of our LIFELINE transparent stains without first removing the remaining stain residue. By the time someone typically decides that the existing finish is in need of repair there is usually enough grayed wood or dark mold growth present to require getting back down to a clean bare wood surface.
A more challenging question is when someone decides that he or she wants to apply LIFELINE over a penetrating oil stain that’s less than a couple of years old. The best and safest way to proceed is to remove the existing finish. Attempting to apply LIFELINE directly over an oil-based finish is risky and the last thing any of us want is for you to be disappointed with the results.
So what’s the best way to remove an existing oil finish? If at all possible, chemical stripping is the way to go. The components in most chemical finish removers like our S-100™ and StripIt® not only soften the finish but they also help remove any residual oil that may present in the top layer of wood. Media blasting on the other hand may remove the alkyd film or the oil-based pigments but does not remove any oils that may have penetrated into the wood. If LIFELINE is immediately applied to the blasted surface, there is a chance that the remaining oil residue will come to the surface creating an adhesion problem or blisters in the LIFELINE film, especially on sunny walls. A good washing with Log Wash will help remove some of these residual oils, but it’s best to give a bare blasted surface three months exposure for the oils to evaporate before cleaning with Log Wash and applying the first coat of LIFELINE finish.
Some Rules of Thumb
- If you do not know what specific finish is on your home, remove it.
- If there are black streaks, mold spots or any other discolorations that you do not want to see through the final finish, clean the surface down to bare wood and remove them.
- If there are signs of grayed wood or if the existing finish has areas that have peeled, clean the surface down to bare wood.
- Never apply a LIFELINE finish over oil-based, alkyd film forming finishes.
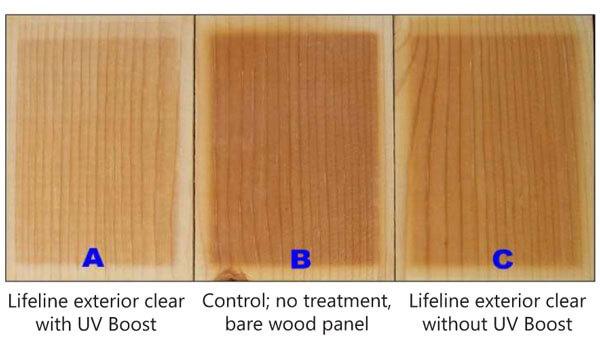
UV Boost™ is a concentrated water-based, liquid stain additive that contains a hindered amine light stabilizer specifically designed for wood protection.
Some regions of the country such as the southeast, southwest, and higher altitude areas are subject to high intensity sunlight. Over time, the ultraviolet light in sunlight photo-oxidizes the lignin component of wood. When added to the first coat of any of our Lifeline™ water-based stains, UV Boost interacts with the lignin thus slowing the photo-oxidative rate that results in wood darkening and eventually wood graying beneath the stain.
Application Tips
1. UV Boost is only effective when used in the first coat of stain or finish applied to bare wood. UV Boost must be in direct contact with the wood for it to work. It is not effective when added to topcoats or stains applied over an existing finish.
2. UV Boost may be used in both interior and exterior applications. When used inside it will help prevent the “picture frame” or “carpet frame” effect.
3. UV Boost is designed to be used in any Lifeline water-based stain as well as Acrylic Gloss/Satin and Sure Shine™ Gloss/Satin. It is not suitable for use in oil-based finishes or stains produced by manufacturers other than Perma-Chink Systems, Inc.
4. Lifeline Ultra-2™, Lifeline Ultra-7™, and Prelude™ are already formulated with the maximum recommended concentration of UV Boost; therefore, it is not necessary to purchase or add additional UV Boost to these products.
5. UV Boost is available in two sizes, one for the addition to one gallon containers and one for addition to five gallon containers.
Application
1. Shake container of UV Boost.
2. Add entire contents to the appropriately sized full container of stain or finish.
3. Shake or stir the container of stain or finish until the contents are thoroughly mixed.
4. Apply stain or finish according to the labeled directions.
5. Any stain containing UV Boost that is left over once the initial coat is applied may be used for subsequent coats. Just be sure to “box” the remaining stain to assure a uniform color.
Cleanup
UV Boost that has been spilled may be cleaned with soap and water.
Storage/Shelf Life
1. Keep container tightly sealed until ready for use.
2. Do not freeze.
3. UV Boost has a shelf life of three years from date of manufacturing.
Packaging
UV Boost is available in both 120 mL for adding to one gallon of stain or finish and 240 mL for adding to five gallons of stain or finish. Since the concentration of the active components differ, be sure to use the appropriate size for the amount of stain or finish you are using.
Results from panels exposed in an accelerated weathering tester for 1200 hours.

Have you ever seen the exterior of a home that has turned black? Almost without fail it’s the result of using a stain that contained linseed oil. Linseed oil is a yellowish oil derived from the dried seeds of flax plants, which is the reason it is also called flax seed oil.
Linseed oil is used as a carrier in many brands of paints and stains. Since linseed oil is organic, many varieties of mold fungi thrive on it and over time they can proliferate to point where the coated surface can turn dark brown to black. One way to tell if the darkening is due to mold rather than UV damage is that those exposed areas protected from direct sunlight under eaves and overhangs will be the same dark color as the rest of the wall.
When this occurs, washing with Log Wash™ alone will not be enough to remove all of the discoloration due to mold growth. We recommend to first use Wood ReNew™ along with some scrubbing in order to remove the visible mold. Once the surface is cleaned with Wood ReNew, use Log Wash to help remove any residual linseed oil that may still present.
Media blasting alone is not a satisfactory method of removing a heavy growth of mold. Linseed oil penetrates into the wood and although blasting may remove most of the surface discoloration, there may be enough residual linseed oil remaining in the wood to support mold growth underneath the finish. If the home has been blasted, it will be necessary to give the home a good washing with a Log Wash solution (2 cups per gallon of clean water) before applying Prelude™.
The best way to prevent this problem from reoccurring is to avoid the use of any product that contains linseed oil. None of our Lifeline™ finishes contain linseed or other types of organic, naturally derived oils.
Protecting wood surfaces in a beach or water front environment is a challenging task. You are faced with numerous variables that contribute to erosion and degradation of the substrate including sunlight, wind, moisture, salt, and sand. The two most destructive environmental variables to an exterior coating system and wood are sunlight and water.
Sunlight is the major cause of damage to a number of materials, including plastics, textile, wood, coatings, and other organic materials. The type of damage, such as loss of gloss, chalking, elasticity, adhesion, and color change, varies depending on the material sensitivity and the spectrum of sunlight. Spectral sensitivity varies from material to material.
One component of sunlight is ultraviolet light, commonly referred to as UV. UV light is responsible for most damage to exposed wood because it changes or destroys the wood’s lignin, a component of wood that hardens and strengthens the cell walls. In more scientific terms this process is called photo-oxidation. The colorants contained in the color coats are responsible for absorbing UV light. The more colorant a finish contains the less UV light will get through to the wood itself.
Opaque finishes like paint and solid body stains are very efficient in blocking all of UV light from hitting the wood. That’s why when they peel off the freshly exposed wood may still look bright. On the other hand the objective of transparent stains is to allow the character of the wood to show through the finish.
In order to accomplish this transparency the pigment loading is significantly less than that contained in opaque finishes. Although some of the UV is blocked by the colorants, enough of it gets through to eventually photo-oxidize the wood. Since darker colors typically contain more colorant than lighter ones they tend to last longer. However, some lighter colors that contain titanium white, or KX colorant, also contain a high colorant loading which extends their life but they do give up some degree of transparency in return.
Lighter colored stains that contain titanium white (KX) will also absorb less heat; therefore, there will be less overall stress (day surface temperature versus night surface temperature) that the finish system and wood substrate is exposed to over the course of a 24-hour period.
Squared logs, timbers, and vertical flat siding are easier to maintain since the sun hits these wood pieces at the same angle and the UV light is evenly distributed over the entire surface. In addition, the flat vertical surfaces cannot accumulate snow and ice and even upward facing checks are not as prone to rainwater entering the logs. Squared wood pieces are subject to the same weathering parameters as round surfaces, but the weathering is mostly uniform over the entire exposed surface.
The second challenging variable for wood in a coastal environment is moisture. Coastal areas are notorious for their high relative humidity and pop-up thunderstorms. Keeping wood dry is the goal to protecting its long term integrity. If wood remains wet for long periods of time without drying out, conditions are favorable for the formation of wood decay fungi, the precursor to wood rot. Four conditions are necessary for the development of wood decay producing fungi. Eliminate any one of these and decay fungi cannot survive: oxygen, temperature (40° – 90°F), moisture content in excess of the fiber saturation point (> 25-30%), and a suitable source of energy and nutrients (that is, the wood).
Recommendations:
- There are two basic ways to combat the effects of weathering. By far the most effective method is to keep wood surfaces in the shade as much as possible by extending roof overhangs or constructing roofed porches around the home.
- Keep all vegetation at least 24 inches away from wood surfaces to allow for adequate ventilation and drying out of these surfaces.
- Clean the wood surfaces to remove all foreign materials from the wood prior to the application of an exterior finish system. The overall performance of even the best finish system is dependent upon proper surface preparation and application technique.
- Select and apply a highly durable exterior semi-transparent stain, like Lifeline™ Ultra-7 or Ultra-2 to protect the wood and enjoy the beauty of the wood grain. Select Lifeline™ Accents to highlight wood timbers and trim if more opacity is desired.
- Select a color that contains shades of brown, red, or gray. Consider colors that contain titanium white (KX) for lower surface temperature swings as well as good UV protection. (colors: Butternut, Wheat, Driftwood, Stone Gray or Gentry Gray).
- Apply an exterior clear topcoat, like Lifeline™ Advance Gloss or Satin, to protect the color coat and add additional UV and mold and mildew protection. Consider the Gloss for additional reflection of UV light.
- Fill all upward facing checks, cracks in wood, with a specialized acrylic sealant, like Check Mate 2™
- Clean the finish systems at least once a year with Log Wash™, a liquid concentrate for bare wood and maintenance cleaning, to remove all foreign debris for the surface of the finish system and extend its longevity.
- Perform an annual inspection of the coating system as a proactive maintenance approach.
- Darkening of the wood or finish when water is applied, is an indication of water getting through the coating and wetting the wood
- Checks or micro-fissures in the wood, especially upward-facing
- Cracks in the finish
- Color fading
- Pay close attention to the south- and west-facing surfaces
- Keep metal surface clean and freshly painted. Salt spray is highly corrosive.
You can’t completely stop or reverse the weathering of exterior wood, but you can slow the process dramatically by using the right type of finish system and a proactive game plan to combat the environmental elements.

Chink Paint™ is a high quality, elastomeric latex paint used to refresh or change the color of your log home chinking. Chink Paint is available in all eight standard colors of Perma-Chink® in either a textured or smooth finish (with or without aggregate, respectively). This difference provides the customer a choice as to whether or not they would like to add additional texture to the appearance of the chink joint.
Chink Paint can be used in several situations. Some log homes have cosmetic chink joints that serve no purpose other than giving the home the appearance of a chink-style structure. These false chink joints are typically quite shallow and do not allow enough room in the joint for both backing material and the proper recommended thickness of chink. It is much easier to paint the joint with Chink Paint Textured than it is to apply a thin layer (less than 3/8 inch) of Perma-Chink and be more susceptible to negative performance qualities like tears and blistering.
When staining a home that is already chinked, it takes less effort to paint the existing chinking with Chink Paint than it does to try to protect the chinking with masking tape during the staining process. It is virtually impossible to prevent some stain from getting on the chinking and once stained, it is extremely difficult to clean or paint the discolored areas and blend with the surrounding chinking.
If you are applying a new finish to your home, you may as well refresh or even change the color of your existing chinking. This really gives the home a new, clean look. Since Chink Paint has a texture identical to Perma-Chink, it’s impossible to tell if the surface is original Perma-Chink or Chink Paint.
When applying Chink Paint, the first step is to make sure the product is well mixed. Chink Paint, both Textured and Smooth, contain a blend of raw material ingredients that need to be uniformly dispersed to ensure proper color, adhesion and long-term performance. Furthermore, Chink Paint Textured contains an aggregate to give it the similar textured appearance to Perma-Chink. Over time this aggregate may settle to the bottom of the pail, so it’s important to stir it well to make sure the contents of the container are uniform before beginning.
Chink Paint is best applied using a paint brush with about two to three inches of fairly stiff bristles. An expensive brush is not needed, and can be disposed of once the job is completed. A chip brush works just fine, especially for the textured version. Keep a wet rag handy to wipe off any Chink Paint that may get on stained surfaces and clean-up with soap and water.


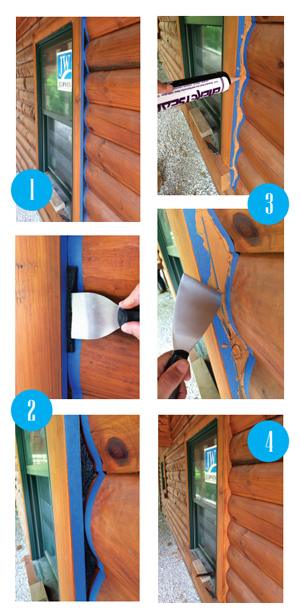
A lot of wasted energy is released through poor sealing of windows and doors. Luckily, we at Perma-Chink Systems have a solution to solve these air leaks. Energy Seal and Log Gap Cap work together to seal the windows and doors.
How to Seal Step-by-Step:
1. Use masking tape around the window or door seam.
2. Insert Log Gap Cap into the crevice using trowel. Log Gap Cap provides an even surface for sealant application and makes it easier to apply a uniform thickness across the gap.
3. Apply Energy Seal™ and tool smooth.
4. Remove masking tape as soon as tooling is complete.
We occasionally get calls about repairing spots of finish that have peeled from logs, handrails, etc. In most cases, the peeling is associated with checks or small fissures that have opened up after the finish was first applied. When this occurs, rain water soaks into the bare wood on either side of the check, and when the sun beats on the area the wood turns to water vapor and expands with enough force to push the finish right off of the surface. If the peeling is limited to a few small areas, touching them up is not very difficult.
Before we get started on the best way to perform the repairs, there is one thing we need to cover. If you have leftover product that’s more than two years old, you need to obtain enough fresh stain and topcoat to accomplish the repairs. Using old product is risky and unnecessary. Give us a call, and we’ll see if there is anything we can do to help.
Following are the recommended procedures for touching up peeled areas:
Step 1: Sand the peeled areas with 60 to 80 grit sandpaper. Do not use a finer grit. We want the stain to have something to grab onto. Be sure to sand off any surrounding stain film that looks like it may have lost its adhesion.
Step 2: If it’s just a few small areas wipe down the sanded spots with a damp rag. For larger spots or multiple areas on a wall, it’s best to wash the entire wall with a two cups per gallon Log Wash™ solution. Allow the wall to dry.
Step 3: If the peeling is associated with checks that are 1/4” or more wide, seal them with Check Mate 2® after sanding and cleaning, but before staining. This will help make the Check Mate 2 less visible.

Step 4: Using a rag, not a brush, apply one or two coats of stain to the bare wood. You want to apply enough stain to match the color of the surrounding wood. Since the coarse sanded area may be more absorbent than the original surface, one coat of stain may be sufficient to match what’s already there. Using a rag helps avoid lap marks and gets some stain down into any unsealed checks, as well as small cracks and fissures.
Once the stain has been applied and the color matches the surrounding wood, one coat of Advance™ Topcoat can be applied with a brush or rag. Lap marks are not much of a concern since the Advance is clear and colorless.
While adequate air exchange is essential for health and safety, many older log homes have a far higher rate of air exchange than is necessary. This is often due to poor design and/or construction which allow air leakage from the inside or outside of the building, but log homes are additionally prone to settling, seasonal expansion and contraction of the logs, and other factors that can cause log joints to move over time.
Given that the typical 30 x 40 log home can easily have more than a linear half mile of log-on-log surface area, determining leakage pathways is often complex and extremely difficult to visualize; leaving log homeowners no other choice than to apply a sealant to all log joints in hopes of locating and correcting the problem areas.
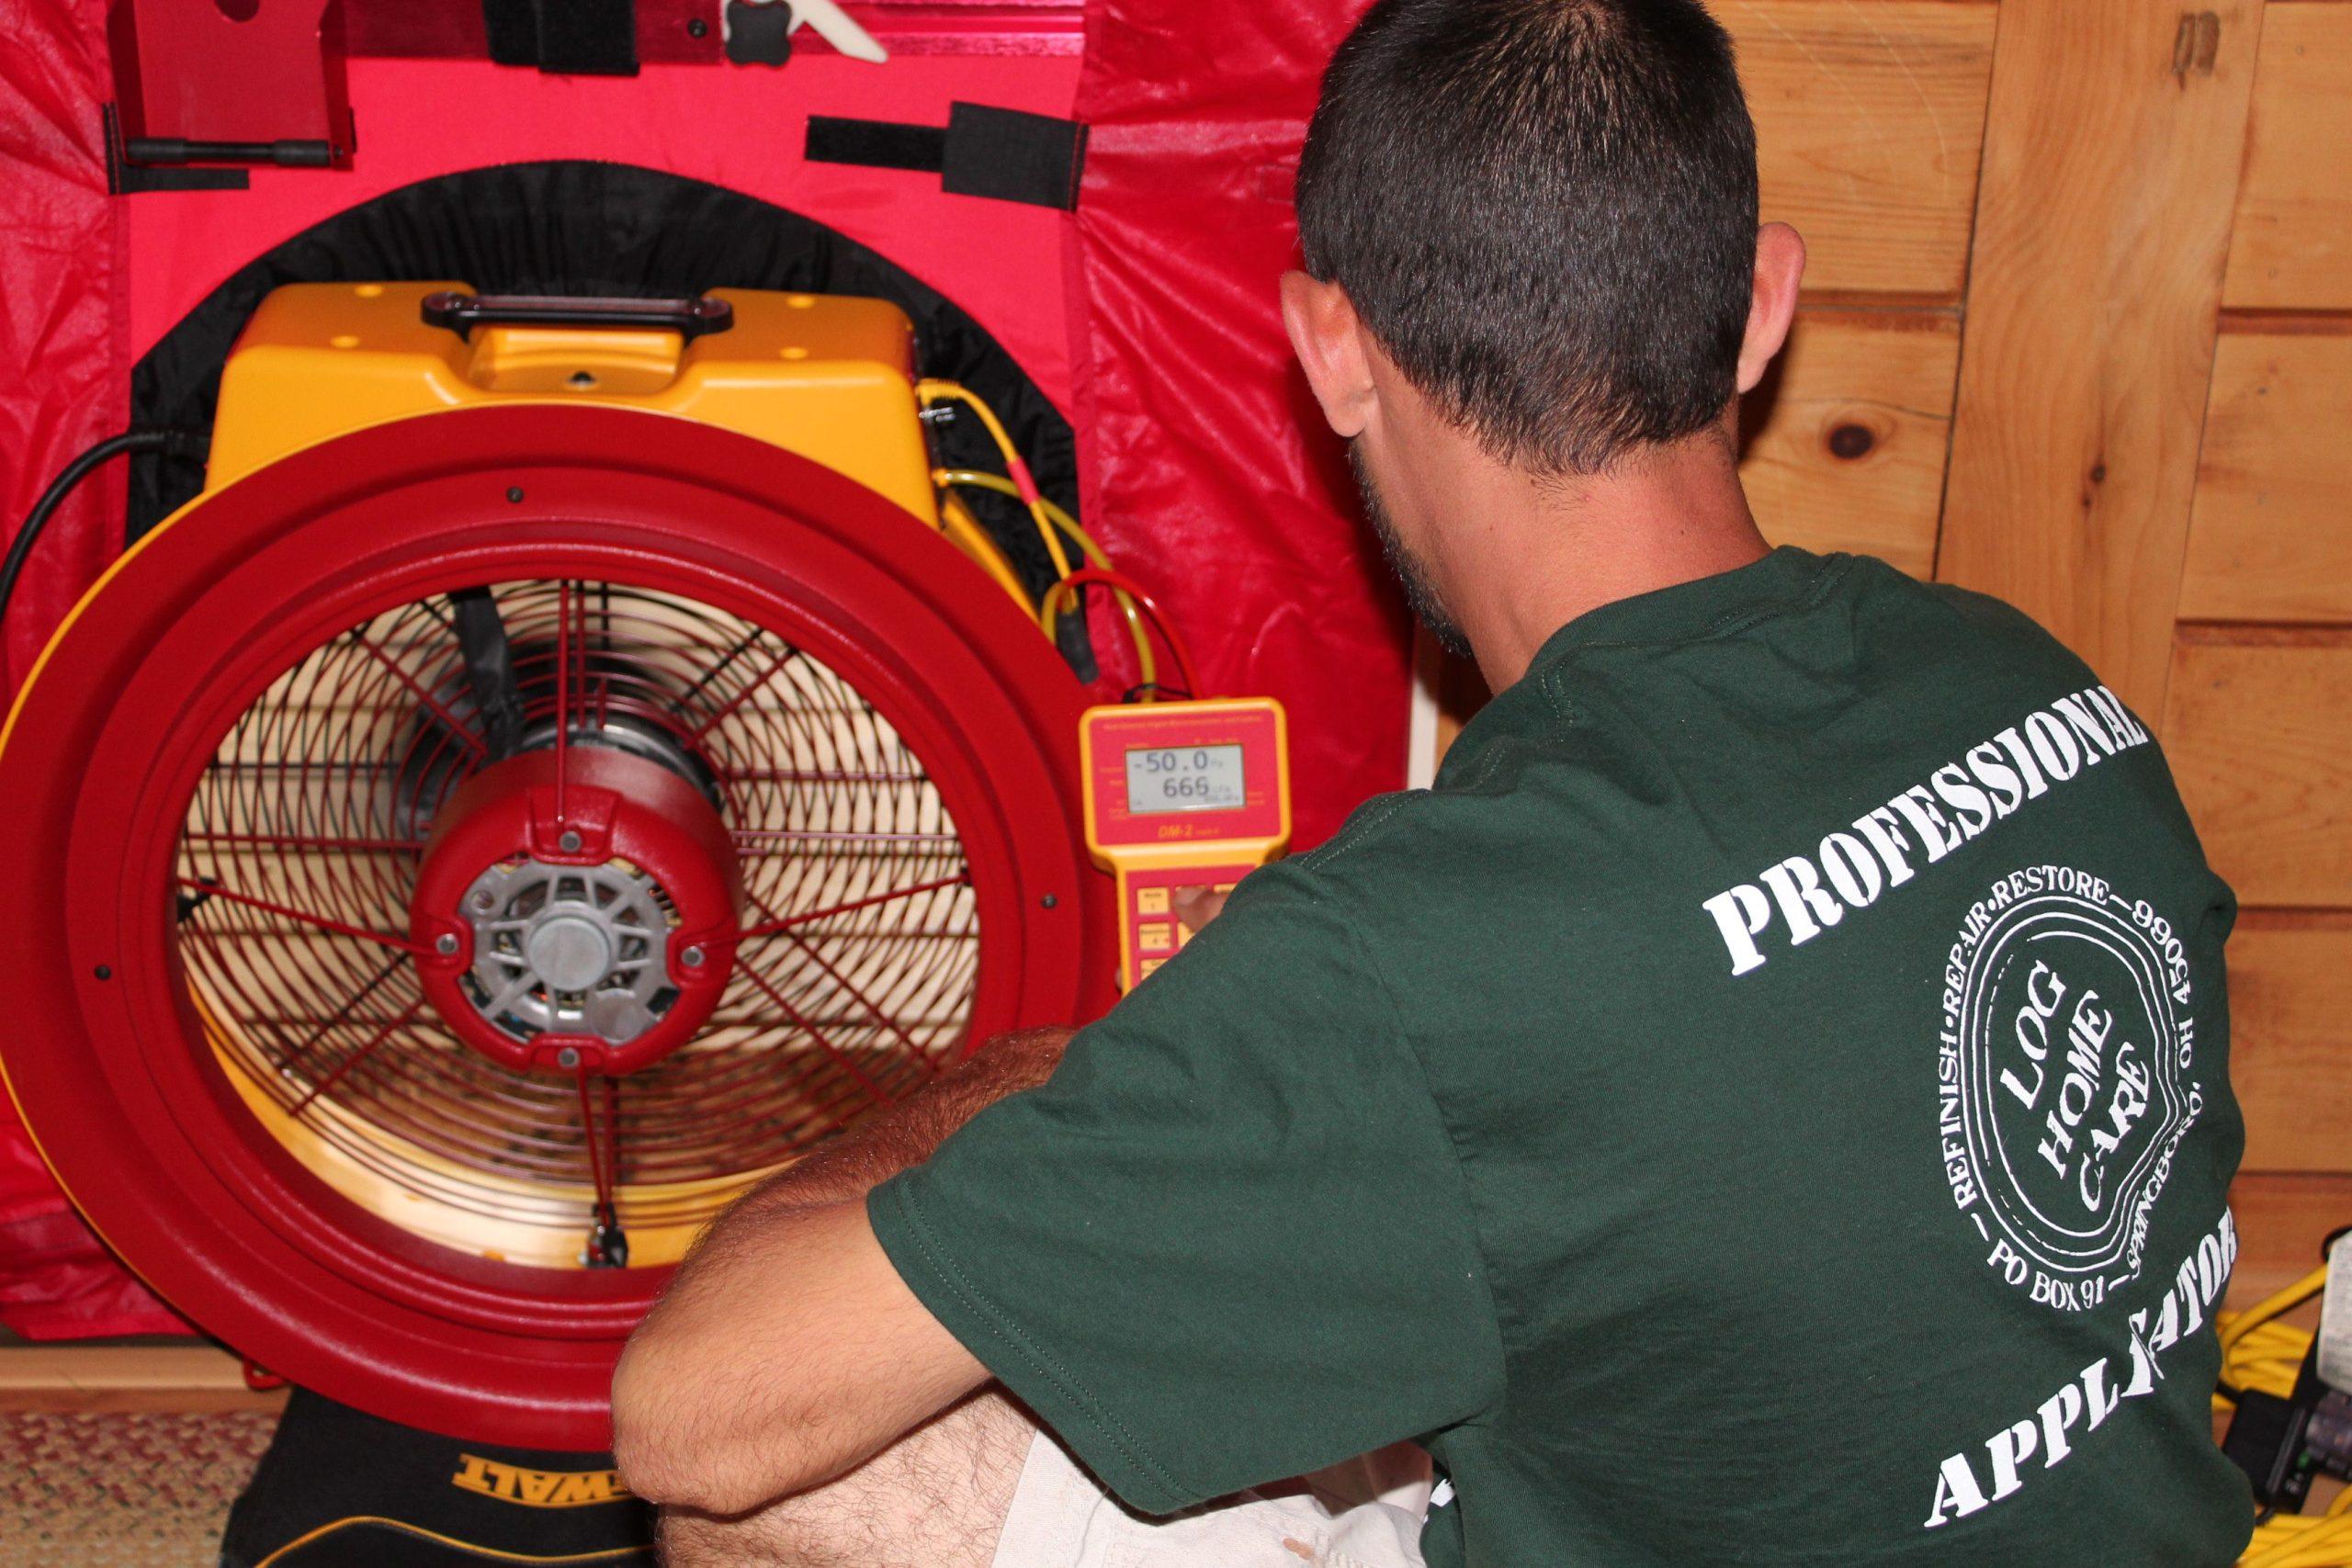
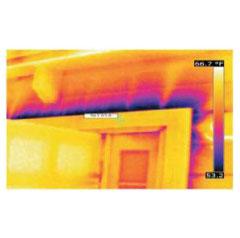
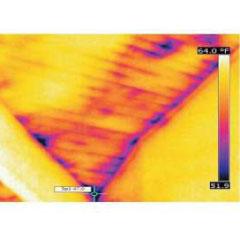
To identify areas of energy waste, infrared thermal imaging has quickly become a valued tool in identifying problems related to energy loss, water and insect infiltration, inefficient HVAC systems and much more. A thermal imaging camera identifies patterns of heat loss that are invisible to the naked eye and quickly indicates the air leaks within the log home with measurement data that can easily be compiled into a written report.
Professional log home applicators are using leading-edge infrared technology coupled with a computer controlled blower door to depressurize the home to an industry standard of -50 pascals, which simulates a 20 mph wind blowing on all four sides of the structure simultaneously. As air is drawn through failed log joints the temperature of the log surfaces changes, producing a thermal image that can be recorded. This allows the applicator to accurately identify and repair the problem areas to stop the energy loss immediately.
Wayne Bell, owner of Log Home Care, uses this technology and reports: Thermal imaging provides both an immediate cost benefit from the reduction in labor required to seal the home and future savings on energy costs. The computerized blower door provides information about air exchange within the structure, expressed in square inches, which can easily be understood when expressed in terms of an open door or window.
“Don’t confuse this equipment with the inexpensive infrared thermometers sold at home improvement stores,” Wayne clarifies. “Advances in technology have reduced the prices of this equipment but it still represents a major financial investment for the applicator. Prices vary by applicator, but homeowners can expect to spend several hundred dollars for blower door testing and thermal imaging services, but a portion of that charge is rebated back as a credit to the homeowner if our firm does the sealant work”, says Wayne.
“Whether we simply provide a printed report that illustrates what needs to be done or we handle the entire process of applying sealant to the home, our company couldn’t be happier with Perma-Chink Systems products. When dealing with log joints that may allow for both air and water infiltration, we use Energy Seal and backer rod on the outside of the structure. If the joint is leaking air but there is little risk of water infiltration, we can alternately use Check Mate 2 (often the clear color) in the interior if needed, but our preference is to do our sealant work on the exterior surfaces. By reducing air leakage, the homeowner obtains a better level of comfort in their log home and Perma-Chink Systems provides the products to make that possible.”
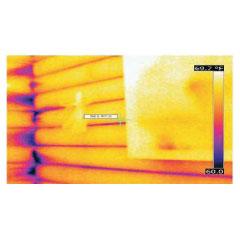
The home featured in these photos indicated an open surface area of 66.5 square inches which equates to a 24” wide window being left open nearly 3” but many log homes exhibit air exchange rates several times higher.