Blog
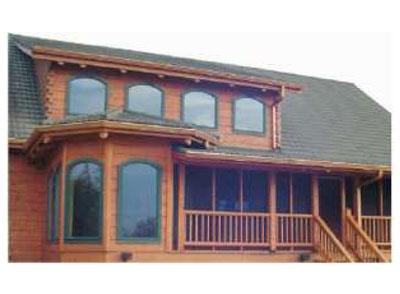
Perma-Chink Systems has recently added another beautiful wood finish option for our customers. Unlike our traditional Lifeline film-forming wood finishes, Log & Timber Defense™ penetrates your wood. As it absorbs into the wood surface, it forms a strong lattice network within the wood, reinforcing and strengthening the entire system from the inside out. Due to its elastomeric nature and penetration, it greatly reduces the chances of peeling and flaking by leaving the system breathable to water vapor. Many penetrating oil-based finishes can also form a network but unfortunately often contain harmful flammable solvents that make working with them both dangerous for you and our environment. In contrast our Log & Timber Defense is water-based making it both easier and safer to work with.
Log and Timber Defense is designed to be applied to bare wood in one or two coats. However, if applied to wood that already has an existing coating this can interfere with adhesion and could lead to premature failure of the finish. For best results we recommend application of Log & Timber Defense to bare wood that has been cleaned with Wood Renew™.
For all our Lifeline™ wood finishes, we recommend application of a topcoat, however, not so with Log & Timber Defense. The reason for advising against this is because when a maintenance coat is needed in the future there will be difficulty with penetration into the wood because the topcoat forms a barrier to penetration leaving a film on surface. Additionally, this could lead to undesirable surface defects as well as an uneven appearance.
Texture is another property that distinguishes Log and Timber Defense from our Lifeline Stains. Due to its penetrating nature, Log and Timber Defense leaves the surface with a more naturalistic rustic beauty. In general, it will appear flatter than our Lifeline finishes. However, if slightly more gloss is desired, a second coat of Log & Timber Defense may be applied. The second coat will also increase color intensity and provide an increased level of overall protection for the system.
Finally, Log and Timber Defense is formulated with ingredients that inhibit the growth of mold and mildew. Log and Timber Defense is both a stain and sealant in one package. It helps to keep liquid water out, which reduces biological growth that can attack and destroy your wood. In contrast, traditional natural oils – such as Linseed Oil – can easily promote growth of mold and mildew. Log & Timber Defense is waterborne, low in odor, has easy soap and water cleanup, and is non-flammable. Log & Timber Defense offers unique properties designed to give your home the very best protection possible.
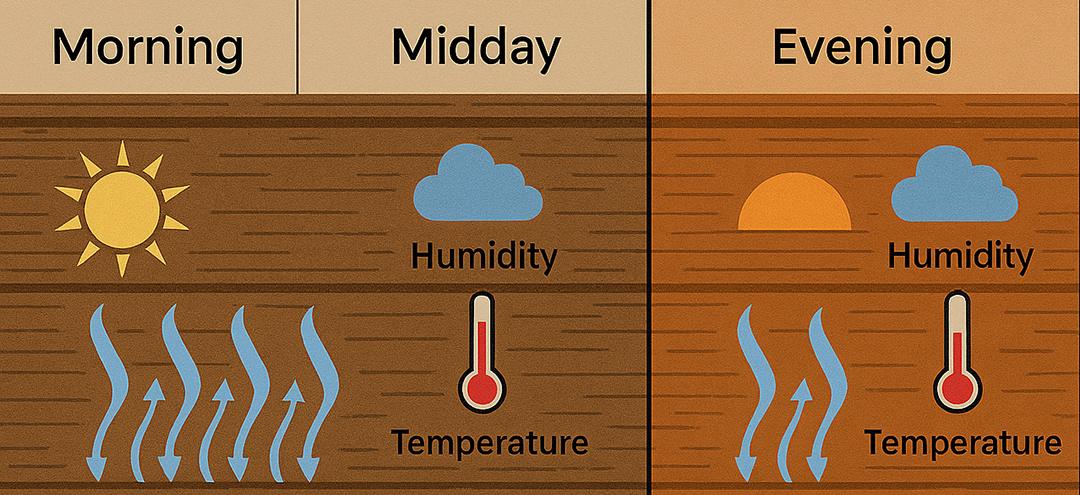
Drying times and curing times relate to two entirely different processes that occur in water-based polymer systems. All water-based products, be it stains, paints, or sealants, contain a percentage of free water, hence their description as water-based.
When applied and exposed to air, the free water begins to evaporate. The rate of evaporation is dependent on the humidity as well as the temperature. The higher the temperature and lower the humidity, the faster the rate of evaporation.
Once most of the water has evaporated from the surface, it feels dry – thus the term “dry to the touch.” The time a product takes to become dry to the touch is its “drying time,” although in the case of sealants, we typically talk about the time it takes a product to “skin over.”
Once a material has dried or skinned over, it does gain some strength in that it becomes impossible to brush out or tool smooth, but to achieve its maximum strength and durability it must be allowed to cure.
Curing time relates to the time it takes for a product to gain enough strength to withstand the parameters for which it was designed. As opposed to drying, curing is more of a chemical reaction that takes place on a molecular level. During the curing process environmental factors such as rain, snow, or high humidity can have a significant impact on the look or performance of a product. For example, in our Advance Topcoats, blushing is caused by water molecules becoming trapped within the polymer matrix during the curing process. Once trapped, it may take a long time for this water to escape from the film as long as environmental conditions remain cool and damp.
In addition to temperature and humidity, the time it takes sealants like Perma-Chink®, Energy Seal™, Woodsman™, and Check Mate 2® to cure depends on the thickness of their application. Once a sealant skins over, it inhibits the evaporation of water from the material under the skin. This prolongs the curing process, so although we may state that the curing time for Perma-Chink is two to eight weeks for a thinner or standard application, it may take several months for a 5/16” thick layer of Perma-Chink to attain its maximum strength.
Although we have never identified exactly what it is, there is a magical ingredient in Perma-Chink that acts as a magnet to human fingers. Put an adult or juvenile male anywhere close to a wall with a fresh application of Perma-Chink, and the first thing that happens is one hand comes out of their pocket with one or more fingers magnetically attracted to the chink joint.
Usually with enough force to determine the strength or pliability of the chinking, fingers leave evidence of attraction in the form of small depressions. Occasionally female fingers are magnetically attracted to Perma-Chink. In their case, the amount of applied pressure is usually considerably less since it is more a matter of feeling the texture. In either case, if the Perma-Chink has been freshly applied, evidence of their chinking inspection will be permanently imparted into the chink joint.
So what is the best way to protect freshly applied chinking until it cures? You can always try a “DO NOT TOUCH” sign, but from our experience it appears that most chinking inspectors can not read or it is taken as an invitation to touch. This means that you need to place some type of physical barrier, i.e. plastic or cardboard, between the finger pokers and the chinking. Just be sure that there is enough space between the barrier and chinking so that air can flow to facilitate the drying of the chinking.
The length of time you will need to leave the barrier in place depends on the weather. If it is warm and dry, the chinking will probably be cured enough in three to four weeks to resist finger poking. However, if it is cool and damp, it may take two to three months before it is safe to remove the barrier. In any case, the effort spent in protecting the chinking is worth the time in preserving the aesthetics of a great looking chinking job for many years.
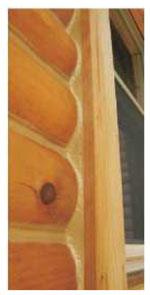
It is virtually impossible to prevent logs from developing cracks and checks as they age and dry. That is because as wood seasons, mechanical stresses build up until the surface stress becomes so great that the wood cracks. We call these stress cracks “checks.”
Do checks need to be sealed? Yes, especially upward facing checks that collect water increasing the interior moisture content of the log. If they continue to collect water and the wood remains damp, they will eventually result in internal wood decay as well as provide nesting sites for carpenter ants and other insects. It is not necessary to seal checks on the bottom half of round logs since they do not collect water, but for a uniform appearance you may want to seal them. It is not usually necessary to seal checks or fissures that are less than 1/4” wide since they can not accumulate that much water.
If your home is new and the logs or siding are green, it may be best to wait a year before addressing the checks. This allows the wood to reach an equilibrium with its environment and by then most of the larger checks will have opened. With seasoned wood or an older home that is in the process of being refinished you can seal the checks either before or after applying a stain.
Check Mate 2
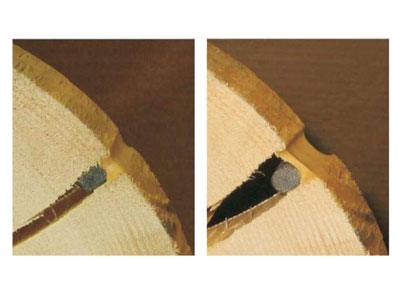
Checks and splits in logs present a different set of dynamics than those addressed by a typical caulk. Checks/splits open and close as the log’s moisture content varies throughout the year. The opening width of a check may change as much as 50% from summer to winter. Check Mate 2 is specifically formulated to meet the requirements for sealing checks that appear in logs and log siding.
When initially applied in a 3/8” thick check, Check Mate 2 bonds to the sides of the check (Figure 1). As the check opens, Check Mate 2 stretches to maintain a water-tight seal (Figure 2). The role the Backer Rod is to maintain a Check Mate 2 thickness of 3/8” during the application and two-point contact with the wood. Two-point adhesion enables Check Mate 2 to elongate and contract.
APPLICATION DIRECTIONS
Step 1: Begin by cleaning any dust, dirt, oil, solvent or previous sealer out of the check. Previously applied caulks can usually be easily pulled or scraped out with a hook knife. If the check is upward-facing and has allowed water penetration, pour some Shell-Guard RTU into it. This will kill any decay fungi present and prevent further deterioration of the log due to rot. If the wood within the check is damp from cleaning, rain, or a borate treatment, make sure the check has time to dry before applying Check Mate 2. You can speed up the drying process by blowing the water out of the check with a leaf blower. The last thing you want to do is to trap any water within the check.
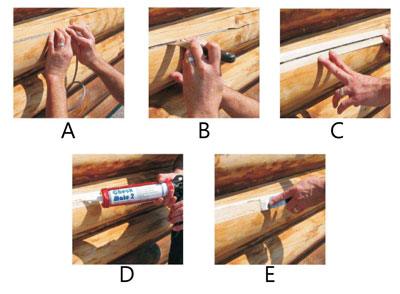
Step 2: For sealing checks 1/4” wide or larger, Check Mate 2 should be always used in conjunction with Backer Rod. Insert the Backer Rod into the check and use a trowel or other implement to push the Backer Rod about 3/8” to 1/2” deep (Pictures A & B). If you push it deeper than 1/2”, the cured Check Mate 2 will be too thick and may rip away from the sides of the check. If the Backer Rod is placed too close to the surface the Check Mate 2 may end up too thin and split.
Step 3: For a neat, clean appearance you can use masking tape to mask off the wood on either side of the check (Picture C). Be sure to remove the masking tape right after you tool the Check Mate 2 smooth. If you remove the masking tape after the Check Mate 2 has begun to dry, you will pull the top layer of Check Mate 2 off along with the masking tape.
Step 4: Cut the tip of the Check Mate 2 tube to about the same diameter as the checks you plan to fill (a little smaller diameter is better than one too large). Fill the space between the Backer Rod and log surface with Check Mate 2 using a standard caulk gun. Check Mate 2 must have good contact with wood on either side of the check and be sure the crack or check is completely sealed from end to end (Picture D).
Step 5: Tool the surface smooth with a trowel, spatula or wet finger and remove overflow immediately with a damp cloth (Picture E). Don’t forget that the masking tape must be removed while the Check Mate 2 is still wet.
Step 6: Check Mate 2 will dry to the touch in about one hour, but complete curing may take several days, depending on application thickness, temperature, and weather conditions. The color of Check Mate 2 as it comes out of the tube is always lighter than the final cured color.
Note: Newly applied Check Mate 2 Clear is white but turns clear when cured.
Step 7: Clean tools and hands with soap and water.

Hi there, sports fans! Can you believe it is November? Seems to me I was just getting used to summer! Cold weather is coming and it pays to get serious about closing those last few orders and thinking about comfort and home protection over the winter.
You can assure customers by suggesting they’ve spent their last winter with drafts, cool air, and high energy costs with a properly sealed home. They will be much more comfortable, increase their home value, and protect their log home investment by chinking now, before the winter cold sets in.
If the logs themselves could use some additional protection, suggest LIFELINE natural wood finish, which is specifically designed for log homes. LIFELINE is easy to apply, enhances the natural beauty of the logs, and provides premium protection against the ravages of the coming winter.
And for sure note that if you apply LIFELINE finishes to the home now, we assure compatibility with Perma-Chink chinking for later applications. Works great the other way around, too – chink now with Perma-Chink or Energy Seal and follow up with LIFELINE for a dynamite sealant system.
Q: I am always pressed for time, how soon after LIFELINE application can I apply Perma-Chink?
A: LIFELINE will dry to the touch in an hour or so, and Perma-Chink can easily be applied the following day.
Q: Do we put Bora-Care wood preservative on the inside or outside of the home?
A: To protect the log completely against the target organism, you must get the required amount of active ingredient into the log surface. To do this you should treat the entire surface of the log per the label instructions. The simplest way is to apply Bora-Care to both sides of the logs before chinking or staining. Don’t worry about overspray on the floor or interior framing- in fact, it’s a good idea to spray Bora-Care two feet in from the walls on all floor members during this phase of construction.
Q: Does LIFELINE Stain have Mildewcide?
A: Yes, LIFELINE stains for exterior wood surfaces have an effective mildewcide, however in conditions conductive to the growth of mildew, even the most effective mildewcide can be overwhelmed. Mildewcide in LIFELINE finishes helps prevent mildew from growing in or on the stain film only. So, mildew or fungus should be removed completely before application of the LIFELINE stain.
Q: How dry should logs be before they are ready to stain?
A: Wet logs pose the most serious problems to oil-based stains that do not adequately penetrate wet wood surfaces, and to any film-forming stains that prohibit evaporation, thereby trapping moisture inside logs. LIFELINE stains and finishes let logs breathe to allow moisture to evaporate from wet logs. Extremely wet logs might reduce the life of the first application of stain, but there are good reasons to stain as soon as is possible. Exposure to the weather causes fading of the natural wood color, which can affect the final home color. The longer bare wood is exposed to the elements, the more mold and mildew spores settle on the surface.
Cleaning the logs, then immediately applying LIFELINE and a topcoat of LIFELINE Advance stabilizes the color, adds a water repellant film, and provides a protective film containing mildewcides and UV inhibitors. If you are in a geographic location where mold and mildew are prevalent, we advise you to include additional mildewcide additives in your first coat of LIFELINE finish.
Q: Will Perma-Chink stick to oil or solvent based stains?
A: Yes. Oils in conventional stains have a tendency to evaporate fairly quickly, leaving loosely bound tint on the surface of the logs. Remove any loose material and try the water drop test. If Perma-Chink doesn’t have to fight its way through a layer of goop or oil, it will bond to the wood tighter than any material.
Q: Can Perma-Chink be applied to a milled log home?
A: Yes. Perma-Chink log chinking can be applied to any style log home. But we recommend our specialty sealant for milled log homes – Energy Seal. It will seal out damaging water and virtually eliminate air infiltration, making your home much more livable and protected in the winter months to come.
Q: Can I apply Deck Defense to treated wood?
A: Yes, Deck Defense can be applied to treated wood, cedar and redwood, etc. It is designed for any horizontal surface, particularly if abrasion and traffic patterns are a concern.

The Beginning of A Dream
Judy MacKnight retired as a school teacher and was pursuing an active interest in hiking and backpacking when she discovered the timeless link to our past represented by the Appalachian style log structures located in Cade’s Cove of the Tennessee Smoky Mountains National Park. Later her adventures would take her to the western United States where she observed that log homes and the people who lived in them was representative of the enduring American values of independence and self-sufficiency. Those qualities struck a resolute tone and she began to dream of living in a log home.
Stuart Baurichter left a pre-med career path to spend 30 years working as a self-employed home remodeler and met Judy over a shared interest in motorcycles. It soon became evident that her passion for log homes coupled with Stu’s experience in the various trades were a perfect fit and they began planning to build on 11.5 quiet country acres, east of Cincinnati, Ohio.
Planning the Dream
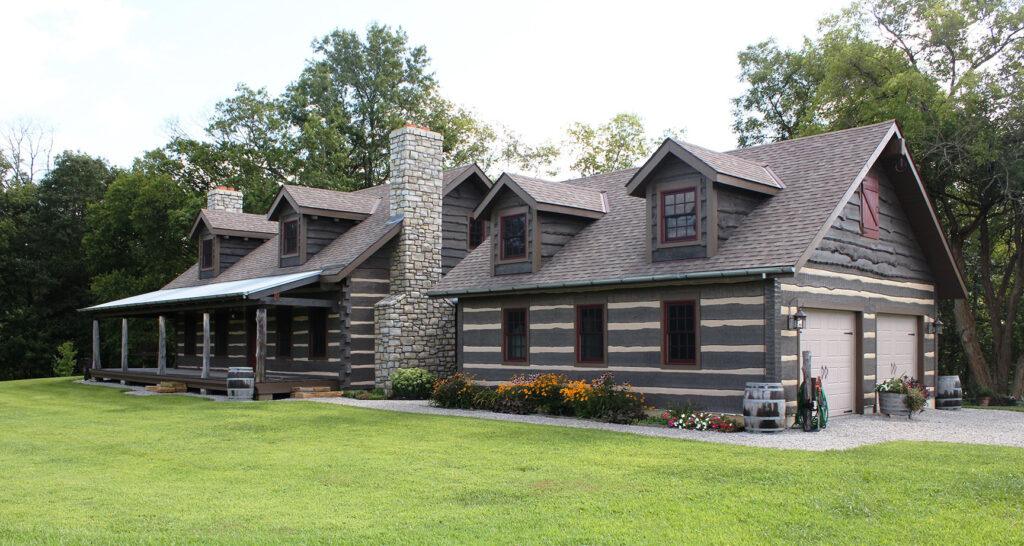
Judy and Stu extensively researched log home manufacturers and settled on a Hearthstone log home. Hearthstone Homes company describes: “Judy worked with our local Distributor to modify a standard Greenbriar floor plan that has a connector and garage, resulting in 1920 square feet of heated space plus an unfinished basement. A wrap-around porch was added with Eastern Red Cedar tree trunks used for porch posts. To get that 200-year-old “look”, the logs selected were our Timberlake profile, 6″ thick x 14″ to 22″ wide and tapered, with dovetail corners and chinking. Wavy-edged White Pine siding was used on the dormers and gable ends to complement the log style. The home delivered in the spring of 2009 and Hearthstone’s package included our log installation and dry-in service.”
Stu adds, “Hearthstone was very responsive and supportive during the building process. The shell was erected by a 4 man crew in 10 days. What impressed me most was their service after the sale.” Judy and Stu spent a total of 18 months working 7 days a week, most days 7am to 8pm, to complete their homestead. During this time they took off only two days “…for a wedding and a funeral.”
Becoming Independent and Resourceful
Reminiscent of those values of independence and self-sufficiency, Judy and Stu remained determined to reuse, repurpose and adapt materials in the building of their log home and an Amish milled post-and-beam barn, fashioned primarily of recycled and repurposed materials. Windows were purchased from a local used building material store for $5 per pane, and nearly all the doors (23 in total) were reclaimed from one old log home they dismantled. Wood flooring was pulled up, the nails ground off, and reinstalled in their new home. Interior partition walls were finished with reclaimed weathered cedar fencing, installed over black painted plywood backing so that the walls remain finished looking regardless of the seasonal movement of individual boards.
Stu reports, “Auction websites were a real help. A bathtub, still in the box, had been returned due to a sizing issue. In a log home you simply design around what you find.” Judy’s artistic side is evident throughout the home: kitchen appliances remain fully functional while carefully hidden from sight and bathroom sinks are fashioned from repurposed jelly cooking pots. Even the light switch and outlet covers reflect the owners’ resourcefulness: industrial steel plates were ordered directly from the manufacturer, treated to a solution of muriatic acid, and the resultant patina fits wonderfully into the home’s interior.
Choosing the Right Materials & Right People
Judy chinked the entire home herself, both inside and out, and speaks favorably of her interaction with Perma-Chink. “We attended the Perma-Chink workshop and learned so much that we returned for a second session. This training coupled with the advice and encouragement of Bill and Kevin Huff, our Perma-Chink Distributors at Log Home Center and Supply, gave us the ability to tackle the chinking project with confidence. There was always someone to help anytime we had any questions.” Judy and Stu also selected Perma-Chink stains and finishes to be used throughout the interior and exterior of the home.
Wayne Bell of Log Home Care, an Ohio based log home refinishing, repair and restoration company reports that the finish is performing exactly as expected. “With minimal upkeep, which consists of regular cleaning with Perma-Chink Log Wash, this finish is easily maintained. As a preventative measure we’ve touched up the stain and topcoat in a few surfaces subjected to heavy weathering or UV radiation but overall this finish is as attractive and functional as the day it was initially applied.”
What’s next for Judy and Stu? They are currently finishing their 1200 sq. ft. basement and consistent with their philosophy, much of the building materials are repurposed. The home showcases Judy’s collection of handcrafted baskets and serves as a gathering point for frequent bluegrass music gatherings.
Judy and Stu both agree that the process of building their own home has been fun, yet they warn that serving as General Contractor (as Stu did at a savings of $40,000) is not for the faint of heart. Nevertheless, they enthusiastically say they would do it all again.
Resources
Hearthstone Homes
800-247-4442
https://www.hearthstonehomes.com
Bill and Kevin Huff
Log Home Center and Supply
(800) 773-6223
Wayne Bell
Log Home Care
(800) 932-1275
Do you wonder about how to seal those drafts in your home? Or how to stop some bugs from continually getting inside?
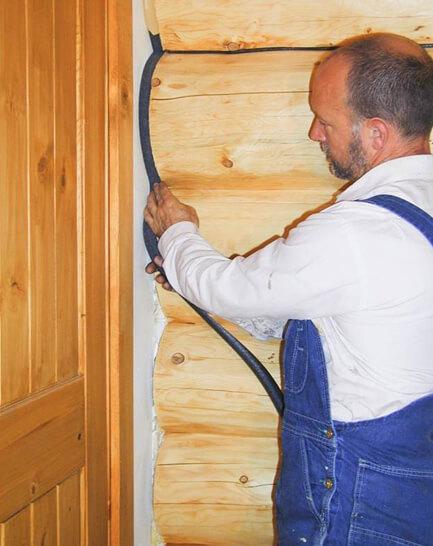
It very well could be a break in the interior seal of your home. Perma-Chink Systems’ sealants are not exclusively for exterior work, and you can benefit from properly sealing the interior of your log or timber home. Fully sealing the interior of your home with Perma-Chink will also prevent energy waste from escaping heat in the winter and cool air in the summer.
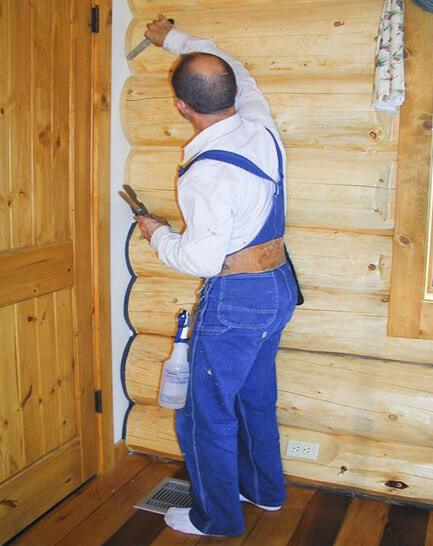
Gaps exist not only between your home’s logs, but also around framed walls and many other home features. Features like chimneys and fireplaces, stairs, doors, and windows are all trouble spots for areas of intrusion and gaps to develop. For these gaps, we recommend backer rod and Perma-Chink for it’s texture and available color options. It’s easy to apply with simple tools. With a tube of Perma-Chink, a small metal spatula, and a spray bottle, it’s very easy for a homeowner to get professional-looking results sealing your home interior.

Chimneys and fireplaces can be overlooked as a cause for drafts. As homes settle and logs shift with the seasons and time, masonry work can separate from logs, opening up gaps. Utilizing Perma-Chink and backer rod, these gaps can be resealed and look natural with the right color. Interior masory has the distinction of being a focal point in many large homes, so keeping gaps closed helps keep the aesthetic beauty of your home intact, and also eliminates hiding spaces for bugs.
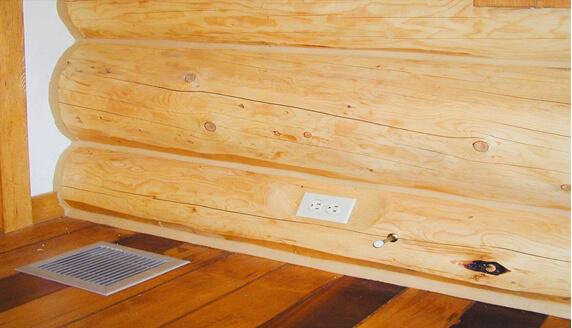
One last area that can be a nusiance area are the unsealed seams at floor level. For hardwood floors, applying Perma-Chink between the floor and bottom log can provide a flexible seal that should withstand the expansion and contraction of the floor.
For more detailed application tips and techniques, check out our Sealant Application Guide. If you have any questions, call us at 1-800-548-3554. To order Perma-Chink or Energy Seal, visit Store.PermaChink.com for all your home sealing needs.
When talking about wood stains one question that is frequently put to our customer service representatives is “Is a topcoat really necessary?” Actually a more accurate question would be, “Is a topcoat worth the extra cost and effort to apply?”
Rather than giving a simple answer we will discuss the benefits of topcoats and let you decide after you read this.
When we examine a wood stain there are certain parameters that govern its formulation:
- It must hold the pigments in suspension and form a thick enough film for proper color generation and ultraviolet.
- It must have UV protection.
- It must be able to withstand all types of weather conditions from arctic freezing temperatures to broiling desert heat.
- It must breathe to allow water vapor to escape from the wood yet prevent liquid water from getting in.
- It must remain elastic so that it can expand and contract along with the log movement.
- It must be able to retain its color for several years.
- And most importantly, it must adhere tightly to both bare wood and/or a previously applied coat of stain or, in some cases, a topcoat.
That’s a lot to ask of a single coating. In order to satisfy all of these tasks certain trade-offs inevitably must be made. Each affects the ultimate performance of the stain.
Topcoats
Clear topcoats, on the other hand, must meet some of the same parameters such as being breathable, maintaining flexibility and withstanding extreme weather conditions. But they don’t have to hold pigments, retain their color or adhere to bare wood.
This enables us to impart a different set of characteristics to topcoats such as film hardness, surface smoothness and a different UV protection system that is not possible in the stain itself.
We used to say that topcoats extend the life of the stain. That is still true, and our LIFELINE Advance topcoats (Gloss or Satin finish) extend stain life longer than we ever thought possible. And they do much, much more.
First of all they significantly improve the look of the finish. In the past we thought that topcoats should essentially disappear from view. However in the process of formulating our LIFELINE Advance topcoat we discovered that we could actually enhance the color, clarity and depth of the underlying stain finish.
The second thing we found with our new LIFELINE Advance was its ability to keep the surface clean.
Since we can design the topcoat to form a slightly harder film than the color coat, it is much more resistant to dirt. This film retains the flexibility and elasticity required of a high-performance log home finish. In addition, the hard smooth surface makes it quite easy to clean off any dust or pollen that may accumulate on the surface of the logs. A simple wash down with Log Wash and a garden hose will remove any grime that may hide the beauty of your home.
Another feature a smooth topcoat provides is greater resistance to mold, mildew and algae. In addition to water, these organisms need something to grip onto. If the spores land on a hard smooth surface that rapidly sheds water, they won’t have an opportunity to germinate and spread. So the surface of the logs stays free of unsightly mold spots and patches of algae.
Of course the best feature of a topcoat is the protection it provides to the underlying stain color coat.
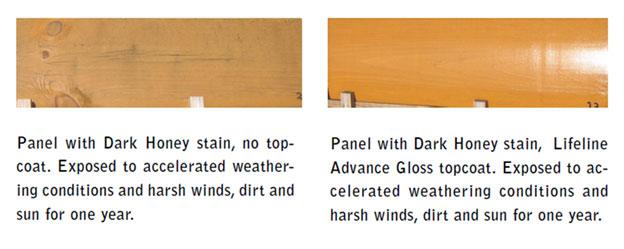
Years ago cars left the manufacturer with a coat of paint. More expensive cars may have had several coats of paint but no matter how many coats were applied after a few years the paint job still turned dull and started to fleck off. Then car coating experts discovered the benefits of clear topcoats.
Today’s car finishes remain shiny and last longer than ever thought possible all due to the application of a clear topcoat over a color base coat.
We used this same concept and technology for designing our new clear log home topcoat. LIFELINE Advance helps prevent the color base stain from degrading by protecting the entire finish system from dirt, wind, water and sunlight. So, is a topcoat worth the cost and effort? You bet it is. In fact, we’re so sure of the benefits of our Advance Topcoat we extend the warranty of Ultra-7 and Ultra-2 exterior stains to five years when a fresh topcoat is applied in year three.
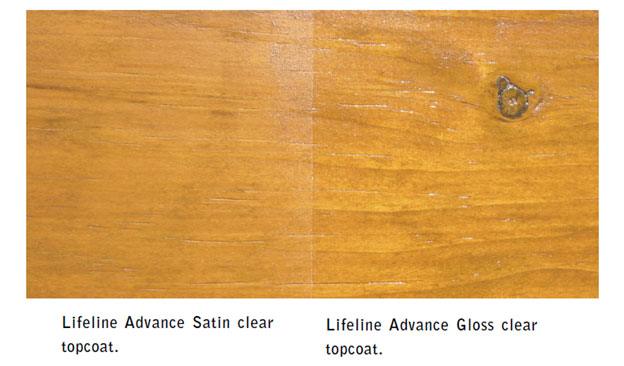
LIFELINE Advance is available in Satin and Gloss finish.
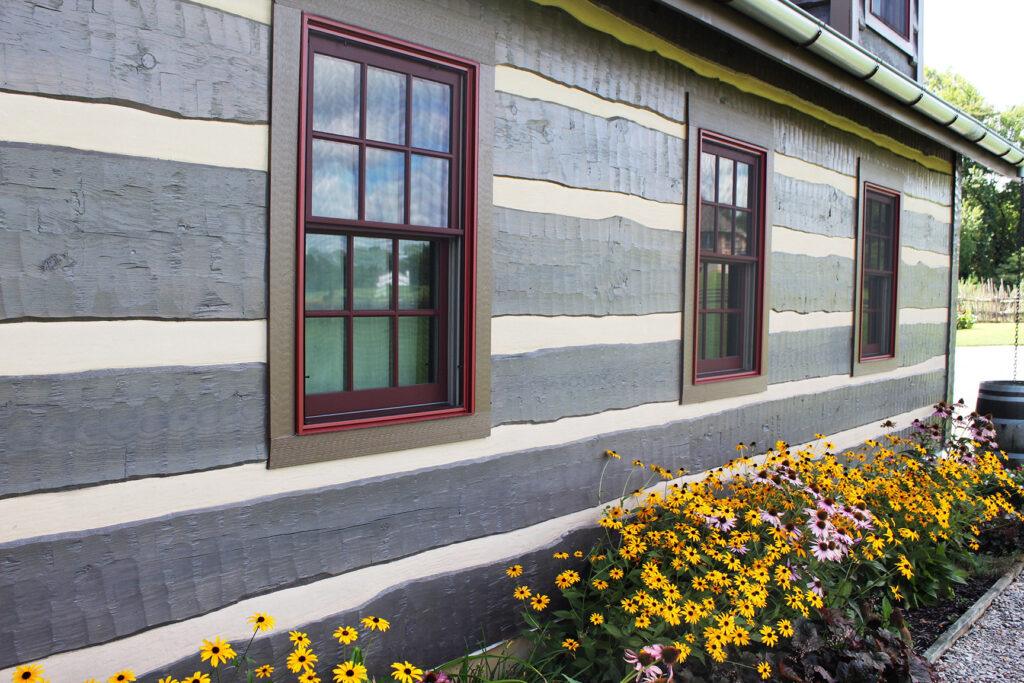
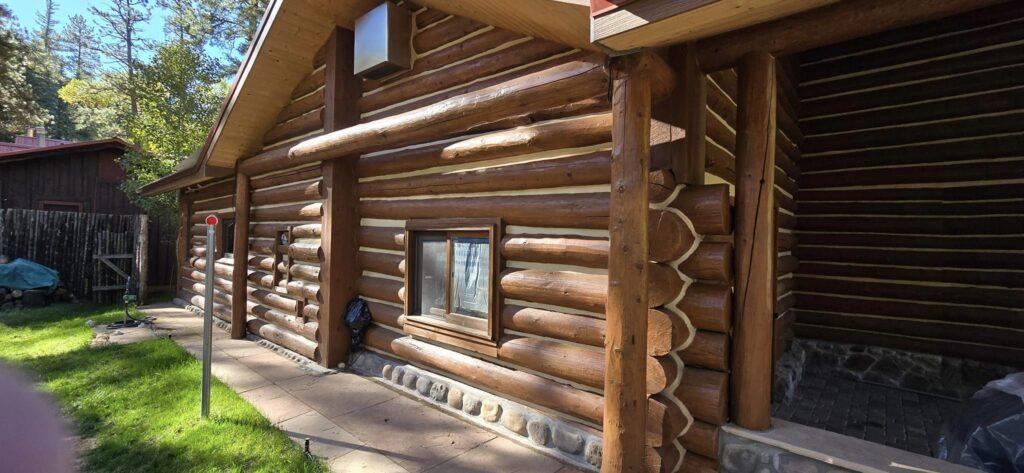
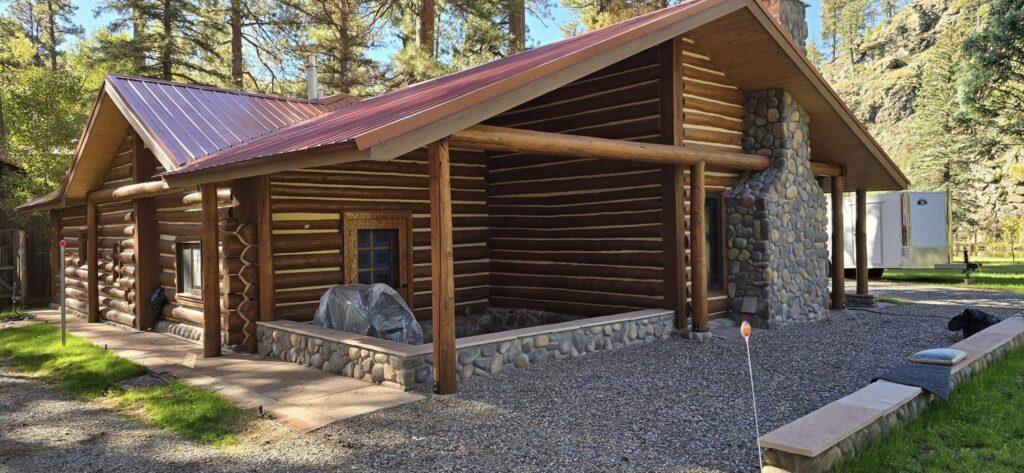
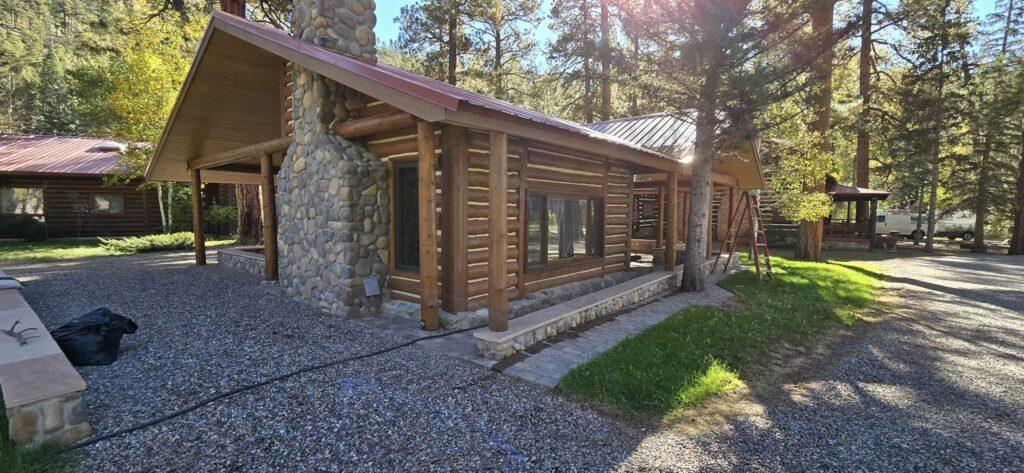
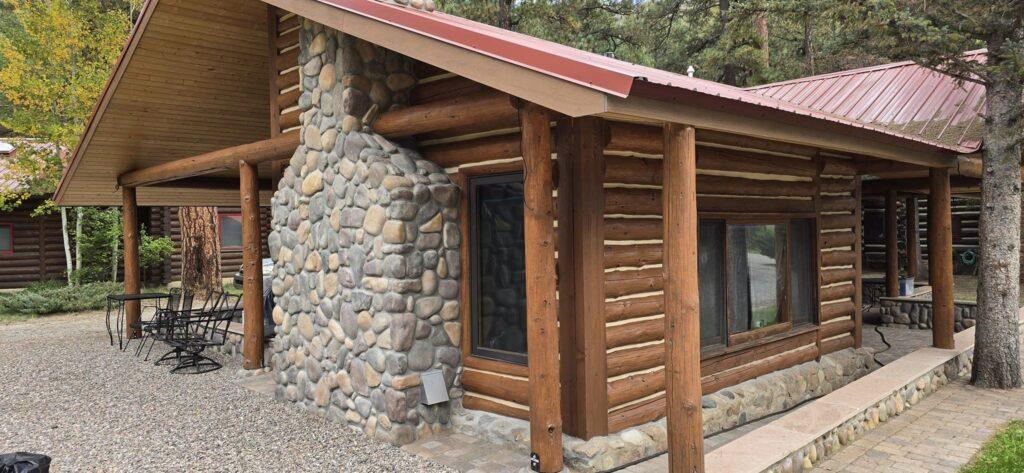
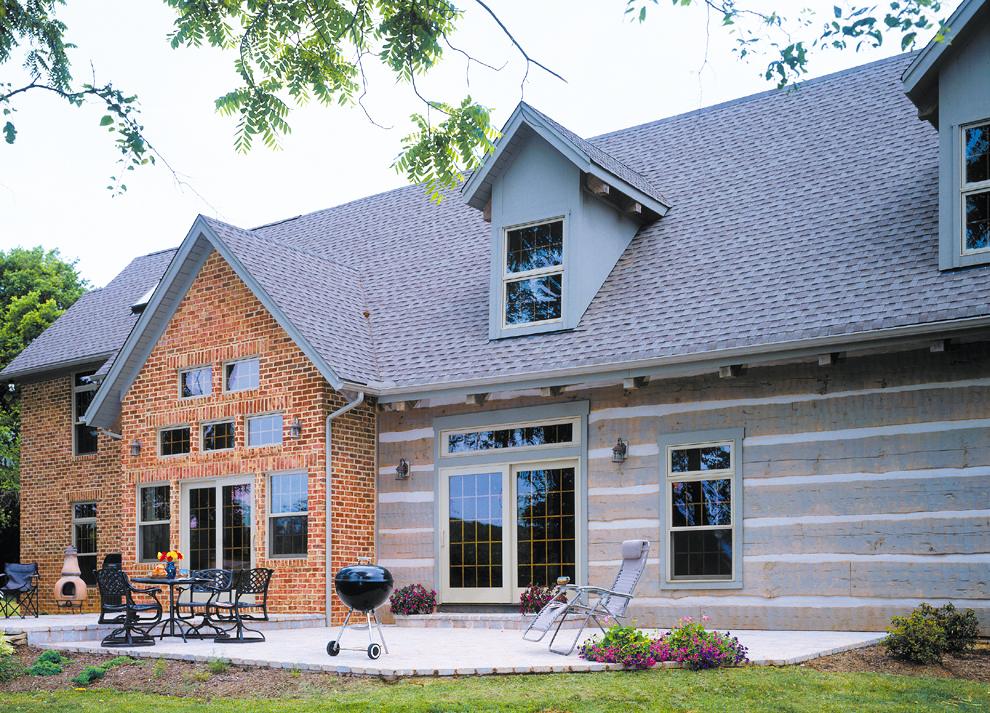
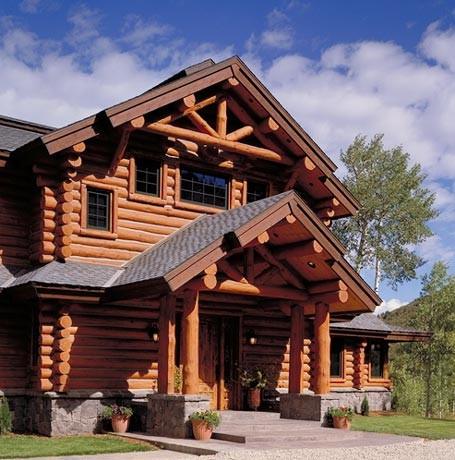
The Visible Difference of a Log Home Topcoat
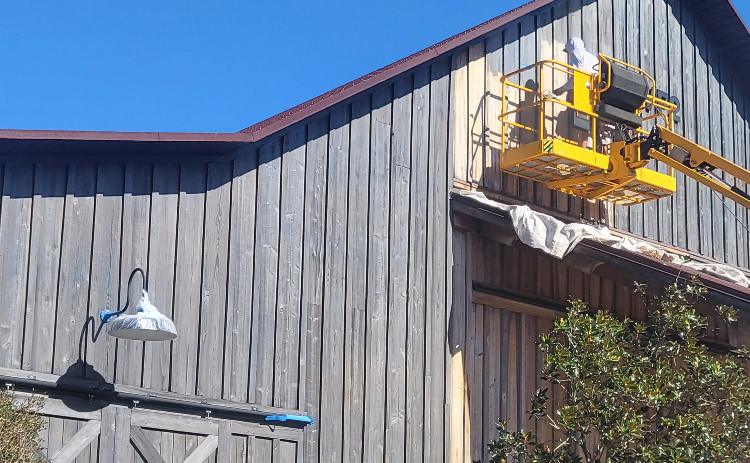
Here is an example of a fresh application of LIFELINE Advance on a log home, protecting the finish and wood underneath from damaging environmental factors. One of our Preferred Applicators, Log Masters Restoration, performed this exceptional work.
Order Topcoat Today
Order your LIFELINE Advance topcoat today, in either Gloss or Satin finish, and make your log or timber home look like new. Call us at 1-800-548-3554 or order online at Store.PermaChink.com.
Help Us Minimize Our Environmental Impact by Storing Our Products Correctly.
At Perma-Chink Systems (PCS), we are committed to creating a sustainable future through our innovative, environmentally-conscious products. Our goal is to safeguard energy-efficient log and timber homes by creating finishing products that embody a strong commitment to ecological and social responsibility.
Our holistic approach extends beyond just sustainable materials. We integrate healthy living principles into every stage of our product development, ensuring that human well-being is a key consideration.
Our dedicated chemists invest significant time and effort into research to ensure our products excel in durability and shelf life. We begin by selecting raw materials that meet both our protective performance standards and our rigorous environmental criteria. These materials include resins, surfactants, solvents, biocides, pigments, fillers, colorants, and UV inhibitors.
We develop environmentally friendly solutions that minimize the need for frequent reapplications. By extending the shelf life of our products, we ensure they remain effective for longer periods, which helps to reduce waste and lessen the environmental impact associated with disposal.
To ensure you get the most out of your Perma-Chink Systems products and extend their shelf life, please follow these guidelines:
- Keep Containers Sealed: Ensure containers remain sealed and unopened to prevent exposure to oxygen and oxidation.
- Avoid Sunlight: Store products away from windows and direct sunlight to protect them from UV damage.
- Keep Away from Heat Sources: Avoid placing products near heaters or forced air vents to prevent temperature fluctuations.
- Distance from Exterior Walls: If possible, store products away from exterior walls to maintain a stable environment.
- Maintain Optimal Temperature: Keep products in a controlled temperature range of 50°F to 70°F (10°C to 21°C).
For products in opened containers, transfer the remaining product into smaller, tightly-sealed plastic containers to minimize air exposure and maintain freshness. Your careful handling ensures that our products remain effective and sustainable, minimizing waste and conserving resources.
Perma-Chink Systems’ environmental initiatives are making a positive impact globally, reflecting our commitment to a healthier, more sustainable world.
♻ Proud to Be Part of the Solution – Not the Pollution!
We’ve been quietly green for decades and now we’re sharing the story!
Perma-Chink Systems is proud to be a founding member of PaintCare, a nationwide network of paint manufacturers dedicated to keeping used paint and stains out of our landfills and waterways.
Through convenient drop-off locations and paint recycling events across 14 states (and growing), PaintCare helps give leftover paints and stains a responsible second life—protecting our environment for generations to come.
Our commitment isn’t just “nice to have” – it’s essential. Being part of PaintCare shows our industry peers, customers, and communities that we walk the talk when it comes to sustainability and eco-friendly practices.
Every container counts: a small PaintCare fee (from $0.30 to $2.45, depending on size) funds these recycling efforts and helps ensure paints never end up in the wrong place.
While most states allow manufacturers to add a “PaintCare fee” to the price of their products, we never have. PCS has always paid these fees out of our own pocket – quietly, without fanfare, and without passing the cost on to our customers.
In fact, back in 2009 we helped PaintCare build the foundation for how manufacturers participate, report, and fund the program. Since then, we’ve kept our commitment low-key, but the truth is… it’s a big part of our earth-friendly values.
We’re proud to do our part – not just for our customers, but for the environment we all share.
Because when it comes to the planet, there’s no such thing as leftover responsibility. 🌎💚
Centipedes, millipedes, pill bugs, roaches, crickets, ants, beetles, spiders, wasps, squirrels, opossums, raccoons, bats and mice are just some of the pests that manage to find their way into homes. It’s just about impossible to keep all of them from getting in, but there are several things that you can do to significantly reduce the number of pests that make it inside your home. Most have to do with blocking the ways they can enter. Furthermore, there are also some things you can do outside to make your home less attractive to pest invaders.
Landscaping
Most pests including rodents and insects like shaded, moist environments. All of the plants and shrubs surrounding your home may appeal to you but they also appeal to numerous pests.
It’s not that you have to cut them down and get rid of them, just move or trim them away from your foundation or log walls. What you need is a two foot clear space between the shrubs and your walls and foundation.
Once you move and/or trim them, you need to put some type of cover on the ground to prevent weeds from growing. Do not use pine needles, wood or bark mulch! The objective of these types of mulch is to hold moisture and that’s what you don’t want to do. You want to provide a dry environment that bugs and rodents don’t find attractive. The best thing to use is about three to four inches of coarse crushed stone or pebbles. Yes, it’s more expensive than organic mulch, but it’s permanent. Just keep debris like leaves from building up on top of it, and the stone will keep doing its job for many years.
Gutters
All log homes should be equipped with gutters. One of the most common problems we see is deterioration of lower log courses due to splash up from rain coming off the roof; however, gutters only work if they are kept clean. Blocked gutters provide ideal moist environments for a wide variety of insects including carpenter ants and termites. Although subterranean termites typically live in soil, they can also establish nests above ground as long as there is a consistent source of water. These types of termite colonies are known as aerial infestations and, if left unattended, the termites can cause significant damage over the course of several years.

Chimney Caps
If you don’t already have a cap on your chimney, they are a good investment. It is not uncommon for squirrels, raccoons, and birds to take up residence in a chimney during the summer months and become a nuisance. Raccoons are often infested with fleas that can end up in your living areas.
Door Sweeps, Screens and Weather Stripping
Make sure that you have door sweeps installed on all doors accessible to the outside and check to see if they are in good working order. If you can see visible light coming in at the corners they need to be replaced. It only takes a gap of 1/4” for bugs and mice to gain entry. While you are at it, check the bottom seal of your garage doors. Once mice get into your garage they will probably find a way to get into your living area, too.
Windows are the most common entry points for flying insects in particular. Flies, ladybugs, boxelder bugs, stink bugs, and flying ants are just a few of the insects that can find their way into your home through the windows. Check to see if there are any rips or tears in your window screens, and make sure that the screens fit tightly into the frame. See if the weather stripping is still flexible and maintaining a tight seal when the window is closed. If you have sliding glass doors, check them too.
Weather stripping has a lifespan of about ten to fifteen years so if yours is hard and brittle, it’s time to replace it.
Attic and Crawl Space Vents
Normal window screening is not enough to deter determined pests like squirrels. They can gnaw through normal window screening in a matter of a few hours. To prevent entry of bats, rodents, squirrels and raccoons use 1/4” hardware cloth on the outside followed with small mesh screening on the inside to keep out wasps, ladybugs and large ants.
Caulks and Sealants
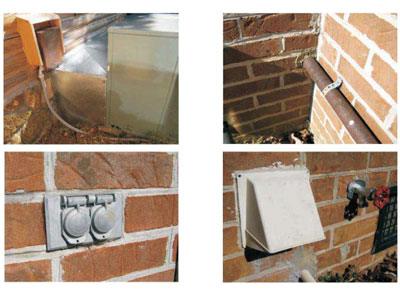
If you take a walk around your home and count possible insect entry points, you may be surprised at how many there are. Besides all of the windows and doors you’ll find electrical, telephone, cable, gas, outdoor faucets, air conditioning, and plumbing entry points. If you have a crawl space, you may have a number of vents, plus a door. And don’t forget your clothes dryer vent. All of these are common entry points for insects and rodents.
Let’s first address windows and doors. Round log or log sided homes, in particular, present a real challenge when it comes to sealing around windows and doors. All too often once a window or door is set into place, the edges of the opening are covered with a piece of trim and that’s it. Rarely is the trim properly sealed to the logs and large voids behind the trim are left empty (see “How to Apply Energy Seal and Woodsman” for the proper method for sealing around windows and doors). If these voids are not filled, they become perfect nesting sites for several species of ants, many of which will get into your home.
A good product to use for filling these voids is a Log Gap Cap™. A Log Gap Cap is a pre-cut foam insert that is available in two different sizes that fit most log profiles and log diameters. Once in place, the Log Gap Cap needs to be covered with a layer of Energy Seal™ or Woodsman™, since direct UV light will degrade the foam fairly rapidly.
Foundation vents also need to be sealed to the walls. Screening the vents won’t do any good if open gaps are left between the vent housing and the wall. If there is room for backer rod be sure to use it. If the foundation is brick, block or stone, Gray Energy Seal provides a good color match to the existing mortar.
Examine all of the electrical and plumbing penetrations mentioned earlier. Most were probably initially sealed with mortar. Most likely you’ll find cracks or gaps where the mortar has fallen out over the years. If a cheap construction caulk was used, it’s probably hard and brittle. Try to dig out as much as you can and replace it with a high-quality sealant like Energy Seal or Woodsman. When properly applied, they will keep those pesky bugs out of your home for many years to come.
Pesticides
We at Perma-Chink Systems, Inc. discourage the broadcast use of pesticides just to keep nuisance pests out of your home. We are a firm advocate of Integrated Pest Management and since there are so many mechanical methods of control available to homeowners, we believe that they should be used as the primary means of preventing pest invasions. Pesticides should be used only as absolutely needed. Yes, there are situations when the use of pesticides may be the only solution to a problem but you may be surprised how effective some of these simple mechanical recommendations can be.
Locations to seal in home:
Resources
Need help getting started? Check out our Tech Tips on mitigating pests.
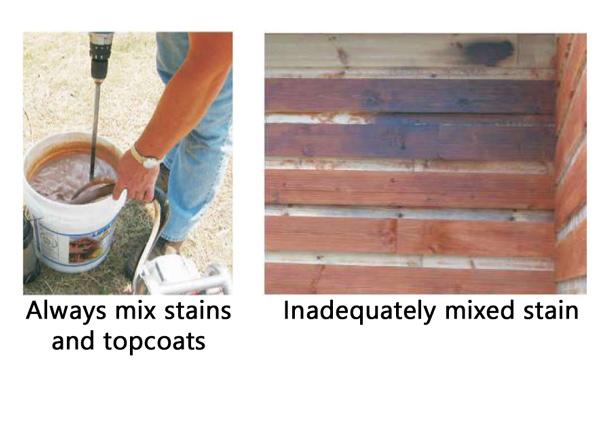
“Stir well before use”
This term, or its equivalent, appears on every container of stain and finish we sell. It is there for a good reason – most of our finishes are formulated with low viscosities, making them easy to apply with an airless sprayer and in thin layers. Any pigments they contain are heavier than the liquids, so over time they may settle to the bottom of the pail.
If the container is not stirred thoroughly and the pigments are not uniformly distributed throughout the product, the color may change as the stain is applied. This situation is easy to avoid with proper mixing both before use and occasionally during use.
What is “Boxing”?
We recommend customers to “box” containers as they get close to empty. When a container of stain gets down to about 1/4 full, you should thoroughly mix up a new container you plan to use and pour about 1/4 of the new container into the used container. Mix the combined stain well, and then use the mixed stain to continue applying the stain. Although we take great strides to maintain consistency within and between manufactured lots, boxing containers ensures that there will be no noticeable color difference as you go from one container to the next.

What should you use to mix our products?
Just about any type of paint mixer that fits into a cordless drill will work. We prefer one called a Jiffy Mixer since it has a ring around the stirring blades that prevents chipping plastic buckets, and its design prevents air being forced into the product.
How Do I Know If The Stain Wasn’t Mixed Properly?
Inadequate mixing is easy to tell: the color on a wall goes from light to dark as the stain gets closer to the bottom of the pail. Unfortunately, there is no fix other than stripping the finish off and starting over again. Proper mixing and boxing of finishes will avoid this issue.
Do I Need to Mix Clear Topcoats?
Short answer: Yes. Since our Lifeline Advance™ Gloss and Satin and Acrylic Gloss and Satin topcoats are clear and colorless, some individuals think that they do not have to be mixed before application. These clear coats consist of several components that may stratify in the container over time. Even though you may not be able to see the different layers, they need to be mixed together for use.
Questions?
In addition to manufacturing the best log home finishes you can buy, one of our commitments is to give you the information you need to do a truly professional job. If you have any questions give us a call at 1-800-548-3554 or chat with us online.
The Difference is Clear, but it’s NOT What You Think.
It makes sense that the more your product costs, the higher the quality of ingredients.
To prove this point, the professionals in the industry performed a careful analysis that shows that in the long run, it’s less expensive to apply the very best quality stain, despite its higher initial cost.
How Does a Low-Cost Option Cost More?
Field tests show that while low-quality finishes last two years or less, top-quality, 100-percent acrylic polymer finishes such as the LIFELINE™ Ultra family from Perma-Chink Systems last five years or more when applied to a properly prepared surface and maintained on a regular basis.
A simple comparison of the cost of a gallon of stain is a mistake because all stains differ in their lifespan, coverage rate and quality of appearance and protection.
A high-performance finish gives long-lasting color retention using a balanced formulation of transparent iron oxides and long-lasting mildew inhibitors.
How Do More Expensive Finishes Last Longer?
The secret behind durability is state-of-the-art resins that create a flexible and tough seal on logs. Perhaps more importantly than the seal’s strength, the resin also ensures that the seal is continuous, providing protection from holes and gaps that might otherwise develop with a lower-quality finish. In addition, it has unsurpassed adhesion to wood.
It’s this continuity that has proven to be much more resistant to UV degradation, color fading and adhesion loss. And just like all LIFELINE finishes, the water-resistant film breathes just like Gore-Tex® to allow trapped moisture to evaporate from the logs.
What Does A Clear Coat Do?
By applying a clear topcoat, you also have the opportunity to create a gloss or satin finish and greatly extend the life of the stain system.
Adding a high-performance clear exterior topcoat over the wood finish acts much as an automotive clear coat to enhance the appearance and extend the life of the finish.
UV And Water Protection Are Important
While UV inhibitors are included in some high-quality stains, your finish should also repel rain but be permeable to water vapor to allow trapped moisture in your logs to evaporate, and the Perma- Chink Systems products do just that. For topcoats and base stain, LIFELINE provides you with options that “breathe,” allowing moisture within the logs to evaporate while reducing checking. Clear topcoats boost protection against UV rays and add water repellency – while making your exterior walls easier to clean. Additionally, LIFELINE Advance clear topcoat is environmentally-friendly, as a water-based formula that is low in VOCs and meets regulatory compliance in all 50 states.
We Use What We Sell
“I have personally applied every one of our products on my log house in Colorado. That furniture grade finish not only provides the best protection for the logs, but it also literally distinguishes the house. I and my staff continuously evaluate every stain on the market and when it comes to ultimate endurance, furniture grade appearance, ease of application and environmentally responsible formulation, there is only one choice – Perma-Chink Systems.”
– Rich Dunstan
Contact Us For Questions or Orders
1-800-548-3554 – www.PermaChink.com – Store Locations – As always, we offer free samples; order at Store.PermaChink.com.