Library
Most of our labels list the recommended surface temperature range for the application of the product. However, there are situations when you may need to know a bit more detail about the surface temperatures in order to schedule or complete a job. In some cases, there are steps that can be taken to help cope with extreme hot or cold temperatures. Just remember that we are concerned with surface temperatures, not air temperatures. It is the temperature of the logs that must be considered, not the temperature on the thermometer hanging on the porch.
Finish Removers
Recommended Range
StripIt® 55°F – 90°F
S-100™ 50°F – 90°F
Finish removers become less effective as the temperature decreases. It is not that these products can not be used in cold temperatures; however, it may take several more hours of contact time to soften an existing finish to remove it. One positive note about both S-100 and StripIt is that prolonged contact with the surface will not damage the wood fibers.
At high temperatures the challenge is preventing either product from drying. Preventing this can be accomplished by keeping the surface damp. When using S-100 mist the surface with water or if using StripIt add additional StripIt to the coated surface (Note: Do Not mist StripIt with water). Additionally, pressing a sheet of plastic (6 mil) against S-100 or StripIt will slow down the evaporation rate. If S-100 or StripIt dries on the surface, they are no longer active. To remove the dried residue of S-100 or StripIt from the wood surface, apply an additional application of the respective material to re-wet the surface followed by pressure washing. As long as they are kept moist (Water for S-100 and additional material for StripIt) in hot weather, these products do not take very long to do their job.
Cleaners & Brighteners
Recommended Range
Log Wash™ 40°F – 90°F (not stated on label)
Cedar Wash™ 40°F – 90°F (not stated on label)
Wood ReNew™ 50°F – 90°F (not stated on label)
Oxcon™ 50°F – 90°F (not stated on label)
Similar to finish removers, cleaners and brighteners work better at warm temperatures. Of the three products listed above, Log Wash is the least affected by cold temperatures. A wash down with Log Wash even at temperatures close to freezing will still do some good. On the other hand, at very cold temperatures, applications of Wood ReNew and Oxcon may not be very effective. The reason is because they rely on chemical reactions to accomplish their tasks. Reaction rates significantly decrease as the surface temperature approaches 32° F.
If any of these products are allowed to dry, they stop working so in hot weather they too need to be kept wet with an occasional light mist of water. It is especially important to keep Oxcon wet. If Oxcon dries on a wall, crystals will form on the top layer of wood. Once formed they are difficult to rinse off. Even a minor amount of oxalic acid residue can reduce adhesion of a finish.
Lifeline™ Exterior Finishes
Recommended Range
All Lifeline™ stains 40°F – 90°F
Lifeline Advance 40°F – 90°F
Log End Seal™ 40°F – 90°F (not stated on label)
Deck Defense™ 40°F – 90°F
Log & Timber Defense 40°F – 90°F
What happens in early spring and late fall if the temperature falls below freezing a few hours after the finish is applied? As far as we know freezing conditions after film formation has no effect on the look or performance of the finish. The surface temperature limitations pertain to the temperature of the walls while staining, not to temperatures that the walls may be exposed to after film formation.
If a film does not form, applying a second coat can result in failure. Applying a second too soon, will result in the film balling up into little beads during back-brushing. The one thing you never want to do is attempt to stain logs that are frozen. A coherent film will not form and the finish will flake off the wood. At high temperatures drying time is also an issue but in this case, the film may dry so quickly that it will not be able to be back-brushed.
An Advance finish applied at cold temperatures and high humidity presents a somewhat different challenge. The longer it stays uncured, the more susceptible it is to blushing. At high temperatures the fast-drying time may prevent adequate back-brushing.
Although the application surface temperature range on the labels of our finishes is between 40°F and 90°F, the most favorable temperature range for easiest application is between 50°F and 80°F.
The finish most sensitive to cold weather application is Log End Seal. Log End Seal is water sensitive before it completely cures and since cold weather retards the curing time, there is a good chance that the Log End Seal may blush white and stay that way for several months, especially on thicker applications. When the temperature increases, the film will eventually become clear and stay that way. It is recommended to coat Log End Seal with Lifeline Advance Gloss or Satin to protect it from blushing and dirt pick-up.
Sealants
Recommended Range
Perma-Chink® 40° F – 90°F
Energy Seal™ 40° F – 90°F
Woodsman™ 40° F – 90°F (label states 40° F – 120°F)
Check Mate 2® 40° F – 90°F (not stated on label)
When applying any of our sealants in cold weather there are two main factors to consider, the temperature of the logs and the temperature of the product. Provided the logs are dry and not frozen, any of our sealants can be applied without comprising appearance or performance. The problem associated with very cold sealants is viscosity, their viscosity increases as the temperature decreases. This is especially apparent when trying to squeeze product out of an 11 or 30 oz. tube or when attempting to load a bulk loading gun from a pail of sealant. Cold product is also more difficult to tool. It is always best to store our sealants in a controlled environment (50-70°F). That will make them easier to apply and tool. Once applied the only effect that freezing temperatures have on our sealants is lengthening the time it takes for them to cure. In the summer months it may take Energy Seal or Perma-Chink a few weeks to cure, whereas in the winter it may take a couple of months to completely cure.
No matter the time of year, it is advisable to never apply a sealant in direct sunlight. Even if the day is cool, direct sunlight can cause the surface to skin over before the remaining free water has a chance to evaporate resulting in blisters forming on the surface of the sealant. In very hot weather blistering can occur if the sun rapidly heats the wall after chinking has been applied, especially if the underlying wood is green or damp. Draping the chinked wall with a tarp until the chinking cures will help prevent the formation of blisters. Another challenge using our sealants in very hot weather is that the surface may dry so quickly that tooling time may be reduced to only a few minutes. If masking tape was used to protect the surrounding outer surfaces, it is imperative to remove the tape before the surface starts to dry. If the tape is left on too long, it will pull off the skinned-over layer of sealant. Although we do not specifically state an upper limit on the Perma-Chink and Energy Seal labels, we discourage either products’ use above 90°F.
Note: The upper limit of the Woodsman™ application temperature range is 120°F on label. That is fine if the Woodsman is to be used between courses of logs, but if it is going to be used as an external sealant like Energy Seal, 90°F should be considered the upper temperature limit.
The Tool Every Contractor/Applicator Should Have
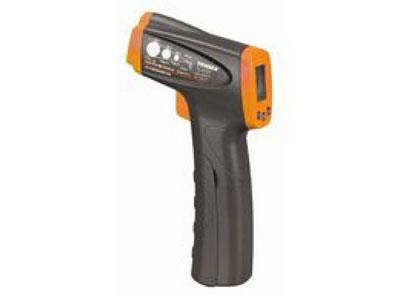
These days there is no reason for any professional to profess ignorance about the surface temperature of a wall prior to the application of any of our products. Infrared thermometers used to be quite expensive but a quick search on Amazon.com resulted in a number of them that cost between $25 and $50. At that price they are affordable to anyone including a homeowner who wants to eliminate the guesswork of determining if a wall is too hot or too cold before applying a finish or sealant. These days there is no reason for any professional to profess ignorance about the surface temperature of a wall prior to the application of any of our products. Infrared thermometers used to be quite expensive, but a quick search on Amazon.com resulted in a number of them that cost between $25 and $50. At that price they are affordable to anyone, including a homeowner who wants to eliminate the guesswork of determining if a wall is too hot or too cold before applying a finish or sealant.


How to Use Deck Defense™ and Log & Timber Defense™ Products
Proper treatment and care of your horizontal and vertical structures can add beauty and longevity to your entire living space. To help seal and protect your deck, fences, or railings we recommend using our waterborne finish Deck Defense. For vertical structures such as wood siding, trim, timberframe, beams, and rough-cut cedar we recommend Log & Timber Defense.
Defense products work by penetrating several layers deep into the wood fibers creating a lattice network that strengthen and protect your wood from the inside out. These products are formulatedfor better performance, longer life, easier application, and upkeep. They also will not flake or peel when applied according to labeled instructions.
All structures should have a surface moisture less than 20% before applying a Defense product. High moisture content will hinder the penetration and adhesion of the finish. If constructing a new deck, boards should be placed bark side down. Also, if the boards have a high moisture content, they should be placed in direct contact with one another when laid down. As the boards dry a gap will open for proper airflow and drainage. If you gap them when they are too wet, the gaps between the boards will likely be too large. Having to estimate what the final gap will be, can be avoided if moisture equilibrated kiln dried boards are used. Finally, let the new boards season for several months prior to application of a finish. This will allow time for the wood to shrink completely and come to an equilibrium with its environment.
Wood Preparation
In situations where a Defense product is going to be applied on an established deck, the deck must be free of the existing finish, in addition to being clean and dry. The cleaning solution required depends on the condition of the boards.
Log Wash™ is an excellent wood cleaner to remove dirt, grime, pollen and surface stains from bare wood (use two cups per gallon of water).
Cedar Wash™ is a ready to use cleaner designed specifically for wood with high extractives content such as Southern Pine, Spruce, Douglas Fir and Cyprus wood.
Wood Renew™ is used when the wood surfaces have been damaged. i.e., grayed wood and mill glaze. It will restore the wood back to its natural color. Wood Renew is also the preferred method for preparing deck boards for staining. It is important to follow all labeled instructions when using this product.
Sanding is used to remove surface imperfections. Although labor intensive, sanding helps to increase mechanical adhesion, provides for better color uniformity and aids in opening the substrate to promote better penetration of the stain. 40 – 60 grit sandpaper is recommended for decks. Always sand in the direction of the grain. When finished with the sanding, clean the surface using our Log Wash solution.
Finish Removers are used to remove an existing finish. There are two relatively safe waterborne finish removers designed to soften the finish so that it can be removed mechanically using a pressure washer.
(1) S-100™: Is supplied as a ready to use high pH gel. The gel helps it to remain active for an extended period.
(2) Strip It®: Is supplied as a ready to use pH neutral finish remover. It is designed to remove multiple layers of finish at a time.
We recommend that you obtain samples of each and test both to determine which works best for removing your finish. Follow all labeled instructions.
Rinsing is very important to completely remove the cleaning solution and debris. Use pH strips to test the rinse water run off to make sure the rinse water is between 6.5 – 7.5. Inadequate rinsing will lead to unnecessary problems and shorten the life of the stain. After rinsing allow the surface to completely dry before application of a finish.
Application Guidelines
• Surface Preparation: Must be applied to clean, dry surface.
• Application Weather Consideration: Do not apply if rain is eminent within 6 hours.
• Personal Protective Equipment: Although Defense products are considered non-toxic, gloves are recommended when applying.
• Protect from overspray: Wet down and cover nearby vegetation and adjacent surfaces. Keep these areas wet during application and rinse promptly when finished.
• Mixing: Mix thoroughly initially and every 15 min. to ensure color uniformity. Do not use powered mixing equipment.
• Boxing: We recommend boxing pails together if using different batch numbers. This will help with uniform color.
• Application Methods: Low-pressure pump-up sprayer, Paint Pads (for deck application), quality brush, or roller. Apply in a flooding manner to completely cover the surface of the wood, allowing the product to soak into the wood. Back-brush the finish into the wood using a quality brush.
• Maintain a wet edge: Work in small sections to help maintain a wet edge. This will help prevent lap marks.
• Work in the same direction: When applying the finish apply in the direction of the grain and stop only at natural breaks such as board ends to prevent lap marks.
• Application Surface Temperature: 40 – 90 degrees Fahrenheit:
• Number of Coats: Defense products works great as a one coat stain. However, for color or if the surface appears blotchy, a second coat may be applied. The second coat should be applied wet on wet. If it is not, wait one week before application of a second coat.
• Drying Times: Drying times will vary with application, airflow temperature and humidity. Under ideal conditions Defense Products will dry to the touch in 20-30 minutes. For horizontal surfaces wait 4 – 6 hours before walking on the surface and 24 hours before replacing heavy furniture.
• Coverage Rates: Coverage rates will vary considerably based on the type of substrate and methods of application. A second coat will require much less. Below are some approximations of coverage rates based on the type of wood.
• Rough Sawn Wood: Rough sawn wood such as fences will soak up a large amount of stain. Perhaps as low as 100 – 175 ft2 per gallon
• Older mature decks: 175 – 250 ft2 per gallon
• New Wood: 250 – 300 ft2 per gallon
• Protect from Freezing: Although freeze thaw stable, this will ensure any possibility of degradation.
Clean Up
If cleaned soon after application, tools and equipment are easily cleaned with soap and warm water. Dispose of unused product in accordance with local, state and federal guidelines.
Maintenance
Good maintenance for decks as well as for other wood surfaces will prolong the need for re-staining or removal. Defense products will not flake or peel when properly applied. Clean with log wash when needed. We recommend using one cup concentrated log wash per gallon water. Expect to see more wear in high traffic areas such as steps and traffic patterns. These areas can be recoated easily where needed after cleaning with log wash. We discourage using a clear topcoat over Defense products. A topcoat will prevent any future recoating.
Although Energy Seal™ and Woodsman™ come in different colors and both may be used for a multitude of purposes, the proper application of these products are quite similar. The main difference between Energy Seal and Woodsman is a matter of surface texture. Energy Seal contains a fine aggregate that gives it texture, whereas Woodsman is a smooth surfaced sealant. The texture of Energy Seal enables it to more closely match the texture of wood and accept a stain, so that it will blend in with the stained wall color if so desired. Although Woodsman is stainable, it will not become as indiscernible as Energy Seal.
Energy Seal and Woodsman are usually recommended for use in joints, seams and gaps that are one inch wide or less. Although they can be used in wider joints, we typically recommend using Perma-Chink Log Home Chinking for wide chink joints. All of the following application directions and conditions are applicable to both Energy Seal and Woodsman but for brevity we will only refer to Energy Seal or the generic term “sealants.”
When should Energy Seal be applied?
The best time to apply Energy Seal is after the home has been cleaned and before the finish is applied. The wood surfaces will be fresh and clean and Energy Seal adheres best to bare wood surfaces. That’s not saying that it won’t adhere to stained and/or top-coated surfaces, but it adheres best to bare wood. Application to surfaces with a freshly applied oil-based stain should be avoided. For the least visible caulk lines, choose a color that’s a shade lighter than the stain color you plan to use. It’s easier to cover a lighter color sealant with a darker color stain than it is to hide a dark colored sealant with a light colored stain. However, if you prefer the look of visible caulk lines, apply Energy Seal after you stain. Just be sure that the surface is clean and dry.
If you are going to be applying Lifeline Advance™ Topcoat, apply the topcoat after the Energy Seal. This results in a more even appearance to the sealed areas and helps them blend in with the rest of the wall. Furthermore, it helps keep the Energy Seal application clean and easier to clean when maintenance cleaning is required.
Using Backing Materials
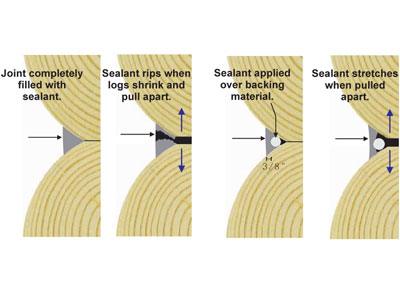
Backing materials furnish an even surface for the application of a sealant and makes it easier to apply a uniform thickness across the joint or gap. They also provide two-point adhesion to ensure maximum elasticity and flexibility after the sealant has cured (they form a bond breaker in the center of the sealant band with adhesion to the wood at both sides). The use of improper or poorly installed backing materials can result in unsightly sealant joints and substandard performance. They are an integral part of the sealant system and should always be used whenever and wherever possible.
There are a number of products specifically designed for use as backing materials for sealants. For smaller gaps, joints, and cracks, the most commonly used material is round Backer Rod. It comes in a range of sizes and is relatively inexpensive. Since it is flexible, it can be pushed into a crevice without needing to be nailed or stapled. Grip Strip is designed for sealing larger gaps. Similar in composition to backer rod, it is shaped like a trapezoid so it can be squeezed in between round logs although it can be used in a variety of situations. It provides a flat surface for chinking or sealing.
In situations where a joint, seam, or gap is too small to insert Backer Rod, you can hold it in place by applying small dabs of Energy Seal along the seam and then pressing the Backer Rod into them (see picture on previous page). The dabs of Energy Seal will hold the Backer Rod in place while a proper thickness of Energy Seal is applied on top. You can also use a narrow strip of water-resistant masking tape. You don’t want to use masking tape that wrinkles when it gets wet, since the wrinkles may show through the sealant. For extremely narrow seams, an excellent option is to use pinstripe tape; available at most automotive supply stores. The tape is vinyl; therefore, it’s waterproof and since our sealants do not bond to it, it makes an excellent material to use. Pinstripe tape is available in widths down to 1/8”.
Approved Backing Materials
- Log Gap Cap
- Grip Strip
- Backer Rod.
- Expanded polystyrene (EPS) beadboard
- Polyisocyanurate board (Polyiso or R Max)
- Water-resistant masking tape or pinstripe tape
DO NOT USE
- Extruded Polystyrene, XPS (causes blisters)
- Blue Board, Pink Board or any other colored board (outgases and causes blisters)
- Barewood or strips of bare wood (outgases and loss of elasticity, 3-point adhesion)
- Polyurethane foam (PurFill,GreatStuff,etc.)
- Foil Faced Substrates (sealants will adheres well to the foil)
- Anything that you are unsure about, please check with Perma-ChinkSystems before using it
Round Logs
When deciding the width of a sealant joint between round logs, a good guideline to follow is for the width of the sealant to be one-sixth the log diameter. For example, with six-inch diameter logs 6” ÷ 6 = 1.0” wide sealant joint. The width of the backing material you require depends on the profile of your logs but you need to take into account that you will be applying a 3/8” thick layer of sealant over it and you’ll need at least 1/4” top and bottom for adequate adhesion to the wood.
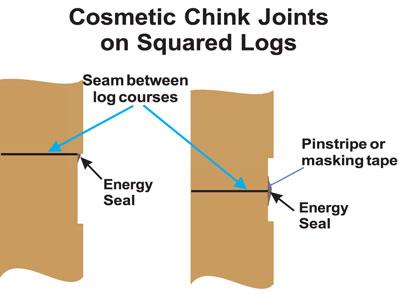
Squared Logs
We rarely see squared log chink joints less than 2” wide, so Energy Seal or Woodsman is seldom used in these situations. However, for cosmetic chink joints less than 3/8″ deep, we recommend sealing the seam with Energy Seal and then applying Chink Paint over the entire joint. On the other hand, Energy Seal is often used on squared logs for sealing corners, butt joints, widows, door frames and other areas where a visible chink joint is not desired.
Applying Energy Seal or Woodsman
The overall performance of any sealant system is dependent on the use of proper application methods. Any sealant must be applied in a manner that will allow it to stretch in order to compensate for log movement. If it is applied too thick, once it cures it won’t be able to stretch enough to compensate for the movement and it may tear away from the wood. Think of it like a rubber band. A thick rubber band will not stretch as far as a thin one. However if the rubber band is too thin, it will break when it is stretched. The same thing applies to sealants. If applied too thick, they can’t stretch and if too thin they may be weak and will tear when pulled apart. In the case of our sealants, the magic number is an applied wet thickness of 3/8”. When cured, this results in the best elongation with maximum strength.
Have the Proper Tools
Before you start have all of the tools that you will need at hand and be sure that they are clean and in good working order. These may include:
- Caulk gun or bulk loading gun
- Rags
- Trowels and/or spatulas
- Plant mister with water
- Masking tape
Weather Conditions
Freshly applied sealants should be protected from direct rainfall for a minimum of 24 hours. Either watch the weather or drape a newly sealed wall with plastic film. Be sure to allow some airspace between the wall and the plastic to facilitate drying. Avoid applying sealants in direct sunlight or when the temperature is less than 40°F. In cold weather it’s important that the logs be free of frost and dew in order to ensure that the sealant adheres tightly to the wood. The best surface temperature range for easiest application and best results is between 50°F and 80°F.
Application
Cut the applicator, or tube tip, to the desired diameter of the sealant bead you want to apply.
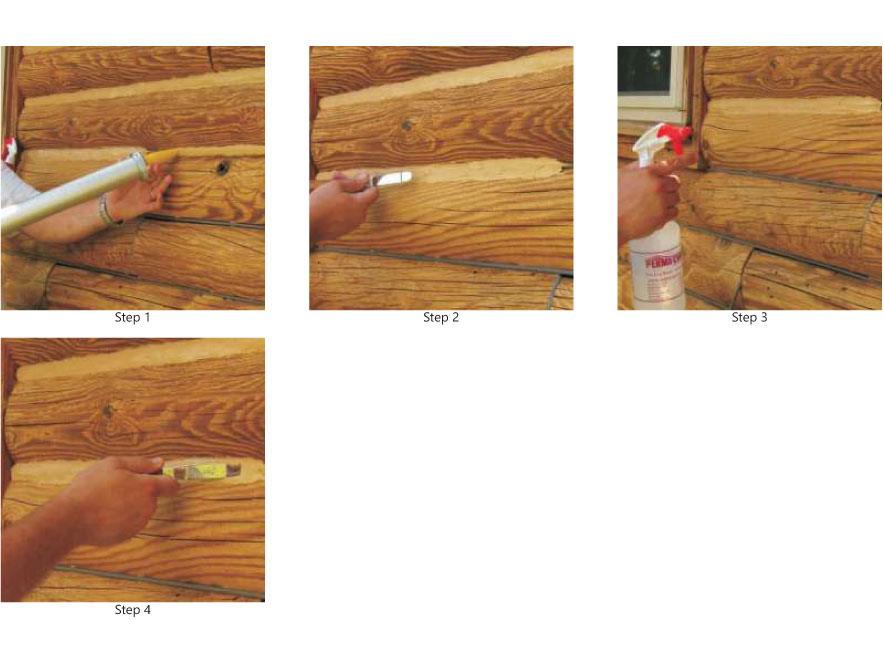
Step 1: Begin by holding the tip firmly against the seam or joint and apply a bead of sealant. You need to apply enough sealant to maintain a wet thickness of at least 5/16” and no more than ½” (target = 3/8”) across the entire seam or joint after tooling. Only apply as much sealant as you can tool smooth in about 15 minutes.
Step 2: Once the joint is filled trowel it out to approximately 3/8th of an inch thick across the entire joint. Do not spray it with water at this time! Make sure there is good contact between the sealant and the exposed edges of the wood. The most difficult areas to tool are corners. You tend to drag product out of the corners resulting in the sealant becoming too thin. You can occasionally check the thickness of the sealant using a toothpick to see if you are maintaining the proper thickness.
Step 3: Once the sealant is roughly in place and any entrapped air worked out of it, spray it with a light mist of water. Do not saturate the surface with water. If water begins to run down the wall, you have applied too much.
Step 4: Tool the surface smooth with a trowel or spatula. If you used masking tape to protect the surrounding wood, be sure to remove it as soon as you are finished tooling and make sure that you have not left any lip on the top edge of the sealant that may catch water. If you have, tool it smooth.
Clean-Up
If you get any sealant on the surface of the wood, be sure to wipe it off with a wet rag as soon as possible. If you allow it to dry, it will be just about impossible to completely remove. Make sure to clean your tools and equipment with clean water occasionally during application. Dried sealant is difficult to remove from just about anything – including clothes.
Drying and Curing
Drying time and curing time are two entirely different terms. In warm or hot weather, Energy Seal and Woodsman may begin to skin over in as little as ten minutes, while a complete cure may take a couple of weeks. Cooler temperatures will slow both the drying time and curing process.
Sealing Window & Door Frames
A lot of wasted energy is released through poor sealing of windows and doors. Luckily we at Perma-Chink Systems have a solution to solve these air leaks. Energy Seal and Log Gap Cap work together to seal the windows and doors.
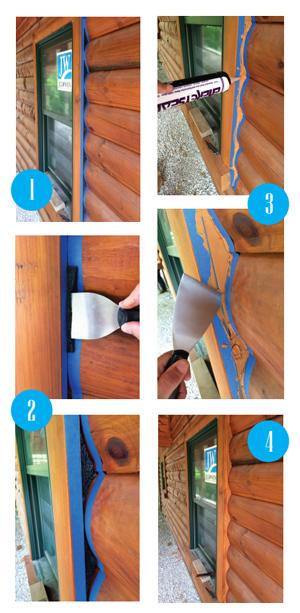
How to Seal Windows & Door Frames Step-by-Step:
1. Use masking tape around the window or door seam.
2. Insert Log Gap Cap into the crevice using trowel. Log Gap Cap provides an even surface for sealant application and makes it easier to apply a uniform thickness across the gap.
3. Apply Energy Seal™ and tool smooth.
4. Remove masking tape as soon as tooling is complete.
When it comes to using elastomeric sealants, considering the potential movement of your wood is almost always a smart move. Some important factors to consider that impact wood movement are moisture content, species type, type of cut (flat tangential cut or quarter sawn radial cut) and local environmental conditions. Not taking these into account has the potential to lead to costly repairs in the future.
Movement Threshold Related to Moisture Content
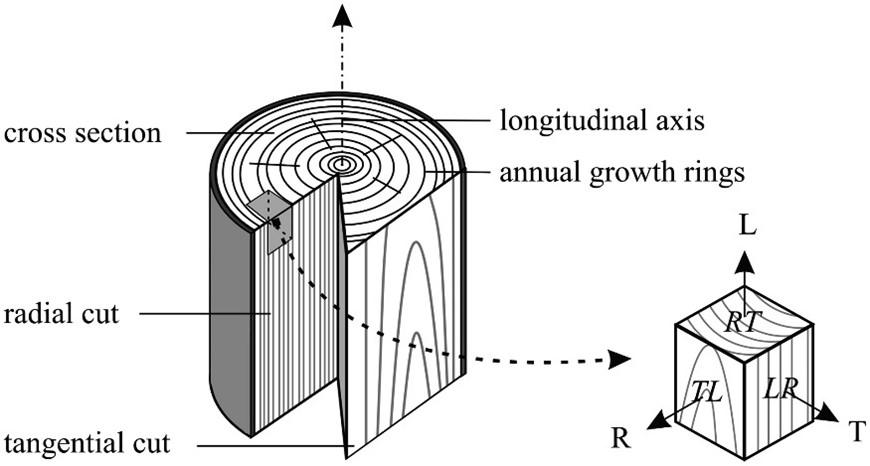
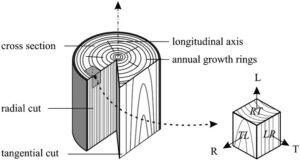
When a tree is first harvested the water content is usually extremely high. For example, depending on the wood species the moisture content can be 200% or higher in freshly cut green wood. However, it is not usually until the moisture content drops below approximately 30% that dimensional changes begin to occur. This is where bound water within the cell walls begins to leave resulting in dimensional shrinkage. These changes occur primarily in three different directions: tangential (T), radial (R) and longitudinal (L). See figure 1 below.
Log Cutting Method Impact on Movement
Wood does not move much in the longitudinal (L) direction. Therefore, a traditional house is framed with the two by fours placed in the longitudinal upright position and as a result the structure does not shrink or move very much. However, most wood cut for log siding falls somewhere in between radial and tangential cut and is not placed in a vertical position but rather a horizontal one. If the log siding is mostly the flat sawn tangential cut type a large amount of movement in the wood is possible. For example, depending on the pine species the percent shrinkage can range from 6.0 – 7.5% for a tangential cut board from green to oven dry. This translates to a twelve-inch-wide board shrinking by almost three quarters of an inch or more!
For round logs the movement component that causes the log home to shrink in size is the radial (R) movement. This is not nearly as much as the tangential movement but still can be quite large. In pine species the percent shrinkage can range from 2.0 – 5% from green to oven dry. Take for example a wall using ten-inch round logs and ten courses in height. The total wall shrinkage might be anywhere from two inches to as much as five inches.
One way to minimize all this potential movement is to use kiln dried wood. Doing so reduces the movement potential. In addition, using an inexpensive moisture meter can also be a great help in determining your woods moisture content at any point in time. Waiting for wood to equilibrate to its environment and reach a stable moisture reading is also very helpful. In general, we tell homeowners and applicators to be at least below 20% for the surface moisture content. However, being closer to 10% is ideal and is associated with lowest amount of risk for movement.
Joint Sizes to Minimize Effect of Movement
Another excellent way to minimize your risk is to pay careful attention to proper recommended joint designs for our sealants. We recommend the joint width for Perma-Chink chinking be a minimum of one inch for every six inches of log diameter or siding width (1:6 ratio). For example, a 15-inch log would have a chinking joint width of 2-1/2 inches wide minimum. For small gaps less than one inch we recommend using Energy Seal™, Woodsman™ or Check Mate 2 ™. The smaller gaps will have a much larger percent change in movement and need products specifically formulated to accommodate this large movement potential. Furthermore, following proper thickness as well as backing material recommendations is also very important to help reduce one’s risk.
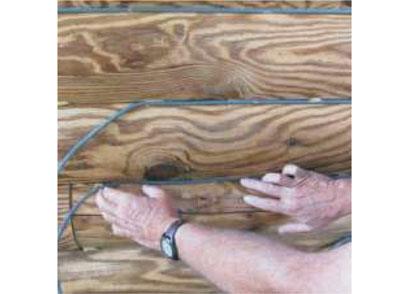
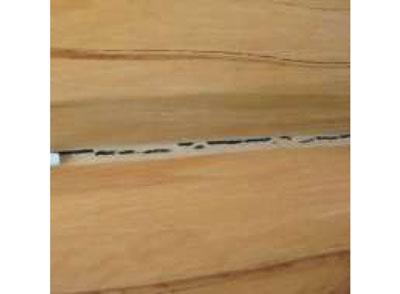
Failure to adhere to proper joint design coupled with large dimensional changes in wood can often lead to poor outcomes. In the example below green wood was used to maximize wood movement during curing. The chinking joint in (Figure 2) failed completely due to improper joint width and large wood movement. The starting width (1/4”) of this joint was nowhere near the 1:6 ratio recommended. The starting width for the joint below should have been three to four times as wide relative to the width of the wood.
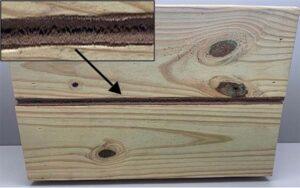
Chinking should never have been used in a joint this small; Energy Seal™ or Woodsman™ would have been much better options. The expansion in the joint due to shrinkage of the wood was very large, relative to the original starting width, resulting in cohesive failure across the entire joint length. Cohesive failure is where the sealant stays adhered to the top and bottom of a joint but fails by cracking down the middle of the joint. The box in figure two magnifies the crack so it is more visible.
Help Available Through Application Guide
To help aid in proper joint design, we provide our customers a Log Home Sealants Application Guide. This guide provides a great deal of helpful information regarding proper joint design. Our technical tips are additional sources of information on many topics of concern to the log homeowner. Don’t let wood movement be a source of failure for you. Instead anticipate the movement and come prepared with the right products, tools, and knowledge for success.
Which is the best way to remove an existing finish, media blasting or chemical stripping? Like most questions of this nature there is no definitive answer, it depends on the situation. Both methods of removing a finish have their positive and negative attributes. The results will depend on the competence of the person or persons doing the work as well as the method used. For the sake of comparison, we will look at the features of each method to help you make a more informed decision about which one to choose.
Media Blasting
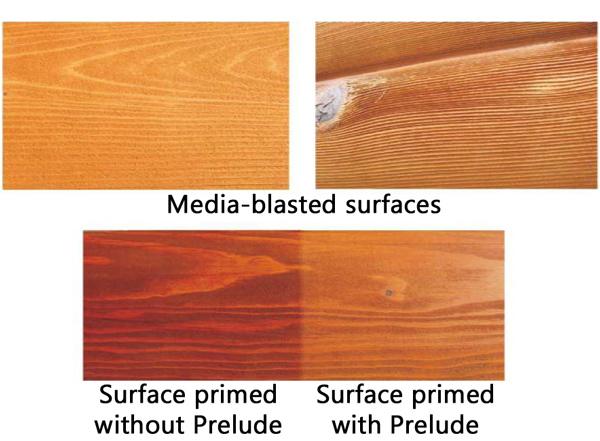
Although media blasting can be accomplished by a homeowner, it requires the rental of an industrial size air compressor and a Blaster Buddy unit.Media blasting not only removes the existing finish, but it also removes the top layer of wood. Media blasting can be a very aggressive procedure. In the hands of someone inexperienced with media blasting, extensive damage can be done to the surface of the wood in a very short span of time. That is why media blasting is best left to professionals who have prior experience. After media blasting, it is recommended that the walls be cleaned witha Log Wash™ solution (1 cups per gallon of clean water) to remove debris.
In general we take the position that media blasting should be considered carefully and evaluated as a secondary method rather than the preferred method of removing an existing finish. We have received calls from homeowners who are disappointed after seeing what media blasting did to their log home. They call us wanting to know what they can do to restore the logs to their original smooth surface. Unfortunately, the only way to restore the surface is labor intensive hand sanding. Media blasting followed by Osborn brushing can result in a relatively smooth surface if done by a well-trained and experienced individual. However, this is more the exception than the rule.
Some Advantages of Media Blasting
- Does an excellent job removing most paints and stains
- Fairly quick and cost effective
- Avoids water getting into the home, but dry dust and blasting media will most likely penetrate into the interior of the home
- Since the blasting media consists of either recycled crushed glass, or organic materials like corncob grit or walnut shells, there is little chance of well or water contamination
Disadvantages of Media Blasting
- Media blasting changes the surface characteristics of the wood
- In addition to roughening the surface, it increases the surface porosity
- Many people consider a media blasted surface unattractive and the only way to restore the wood to a smooth surface is with lots of hand sanding
- Prelude™ should always be used as a primer on media blasted surfaces
- Having enough blasting media on hand is critical. You don’t want to run out in the middle of a wall since it may take two or three days to have additional material shipped to your location
Chemical Stripping
Chemical stripping refers to the use of finish removers used in conjunction with a pressure washer. Chemical strippers only soften an existing finish, they must be used along with a pressure washer to remove the finish from the wall. In contrast to media blasting, chemical stripping is much more user friendly. All that is required are a general-purpose pressure washer, available at most do-it-yourself outlets or equipment rental locations, and either our S-100 or StripIt® Finish Remover. A pressure washer is much easier to handle than media blasting equipment. Although aggressive pressure washing can still do surface damage, it is usually relatively easy to repair with a light sanding or an Osborn Buffing Brush.
The main advantage of chemical stripping is that when following the proper procedures, the result is a beautiful smooth clean surface. So why do some stain manufacturers recommend media blasting over pressure washing? Media blasting significantly increases the surface area and porosity of the surface resulting in better adhesion of an inferior product. However, media blasting may result in an unattractive finish.
Some Advantages of Chemical Stripping
- Does an excellent job when correct procedures are used.
- User-friendly. Takes little expertise and no special equipment is required.
- One wall can be refinished at a time.
- Results in a more attractive surface.
Disadvantages of Chemical Stripping
- Water will get into the home.
- Need to protect plants and shrubs from chemicals.
- May take more than one application to completely remove an existing finish.
- Must thoroughly rinse any applied chemicals before applying finish.
“Never attempt to strip or clean a section of a wall without applying whatever you are using to the entire wall.”
For years this phrase was the key for obtaining a uniform surface in preparation for applying a transparent stain. In many cases, this phrase is still valid but with the introduction of some of the newer technology products and better methods of application, occasional spot cleaning and stripping can be accomplished without creating a problem.
Strippers
Years ago the most commonly used finish removers contained sodium or potassium hydroxide. They were fairly effective for removing most types of paints and stains, but due to their extremely high pH, they darkened the wood as a result of alkali staining. If only a section of a wall was exposed to these products, it was almost impossible to obtain a consistent final color over the entire wall. That’s where the use of Oxcon™ came into play and why the use of oxalic acid became known as a Blonding Agent. Oxcon’s low pH helped brighten the wood back to its original color, but if it was only applied to sections of a wall, the resulting color would end up significantly different than the remainder of the wall. The solution to this problem was to apply Oxcon to the entire wall to even out the color of the bare wood and avoid a blotchy appearing finish.
Today’s finish removers are mostly based on organic solvents, and one of their most advantageous features is that they don’t change the color of the wood. When removing an old, tired oil finish, it is not unusual for pressure washing with just water and a mild cleaner like Log Wash™ or Wood ReNew™ to remove any residual pigments and extenders on surfaces directly exposed to the sun and weather. But underneath roof overhangs and shaded areas, the stain may still be in pretty good shape. There is nothing wrong with using S-100™, StripIt® or other organic solvents only on those spots where the finish is still adhering. Since they don’t change the color of the wood, you may not be able to see where these products were used.
Cleaners
Wood cleaners are a somewhat different story since they are designed to both clean and brighten the surface. It is rare that anyone would want to clean a section of a wall without cleaning the entire wall. Once a wall has been cleaned with Log Wash, Cedar Wash™, or Wood ReNew, there is nothing wrong with going back and spot cleaning areas that are still showing signs of dirt or discolorations with the same product.
Log Wash, Cedar Wash, and Wood ReNew are not interchangeable! Never attempt to clean part of a wall with Wood ReNew or Cedar Wash and the rest of the wall with Log Wash. Since Wood ReNew and Cedar Wash are alkaline, and Log Wash is acidic, there is a very good chance a chemical reaction will occur and the resulting color of the wood will differ. If Wood Renew has been used to remove grayed wood on an area of a wall, there is nothing wrong with using Log Wash afterward as along as the Wood Renew is completely rinsed from the wood surface, and it is applied to the entire wall to ensure a uniform color.
Chlorine bleach solutions are not recommended by Perma-Chink Systems and should never be used for spot cleaning. The more the surface is exposed to bleach, the more damage is done to the wood fibers, and the greater the chance that discolorations or adhesion issues will arise sometime in the future.
Oxcon Oxalic Acid
Now that most of the log home industry has followed our lead and stopped recommending chlorine bleach solutions for preparing logs and siding for a finish, the next most problematic surface preparation product that we encounter is oxalic acid. The use of Oxcon oxalic acid should be limited to eliminating inorganic discolorations, such as metallic tannate stains, strap marks, rust stains, and water stains.
Although the label clearly states “Do not spot-treat since this method of application can cause blotching”, there are some steps that can be taken that will allow localized discolorations to be spot treated while avoiding the risk of creating blotches on a wall.
The first step is to make sure the wall has been well cleaned using Wood Renew or Log Wash. Log Wash is preferable since the use of Wood ReNew will occasionally darken the wood a bit. If that occurs, a Log Wash solution (two cups of Log Wash per gallon of clean water) will typically brighten the wood back up. Once the surface is clean, bright and dry, a solution of Oxcon may be applied to those areas that show signs of metallic tannates or water stains. Make sure the Oxcon is diluted to the recommended one part Oxcon to four parts water ratio, and don’t leave it on the wood for more than 10 to 15 minutes. And whatever you do, don’t allow it to dry on the wood.
Now comes the most important step in the process, rinse, rinse, and rinse again. You want to be sure that ALL of the Oxcon is rinsed off of the wood. The best way to verify adequate rinsing is by using pH Strips. Oxcon is fairly strong acid. If the pH of the rinse water on the wall remains below 6.0, it is a good indication that some oxalic acid is still present on the wood.
Once the surface is dry, if the spot treated areas are the same color as the surrounding wood, you are ready to apply the first coat of finish. However, if the treated spots stand out from the surrounding wood, you may have to go back and apply Oxcon to the entire wall to even out the color.
Hand sanding is a commonly used technique to prepare wood surfaces for a coat of finish. Sanding may be used after media blasting, pressure washing or to touch up areas that are needing maintenance or repair. One common mistake is to sand the surface as smooth as possible.
We recommend the use of 60 to 80 grit sandpaper or equivalent sanding pads onexterior surfaces. Leave enough surfacetexture/roughness so that the first coat of finishhas an increased surface area for contact and improved adhesion. Using 100 or finer grit sandpaper may ultimately cause adhesion failure, especially around checks and fissures that allow water to get behind the finish.
When the sanding process has been completed, all surfaces must be clean and free of sanding dust. The best procedure is to wash the sanded walls or areas with a Log Wash™ solution (two cups Log Wash per gallon of clean water). In addition to removing the sanding dust, it will also wash away any mold spores that may be present.
The use of fine sandpaper does not apply to interior finishes like Lifeline Interior™, Lifeline Accents™, Acrylic™ Gloss and Satin and Sure Shine™. Since you don’t have to worry about water getting into cracks and fissures, we rarely encounter interior adhesion problems. We do recommend the use of 120 grit sandpaper or equivalent sanding pad to prepare the bare wood surface for interior applications. Furthermore, interior walls, too, should be washed after sanding to remove any sanding dust before the first coat of finish is applied.
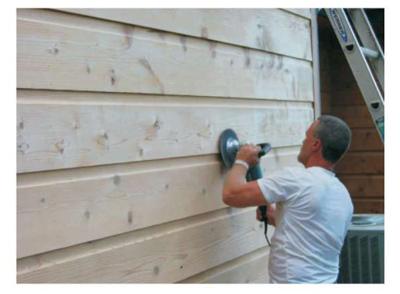
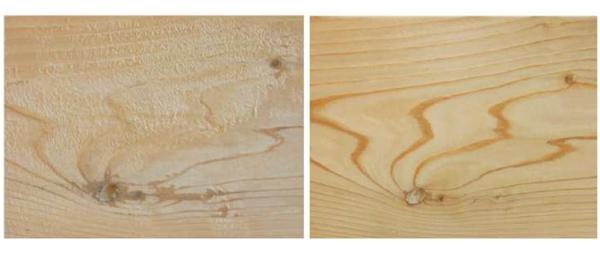
Osborn Brushes are excellent tools to help prepare a surface before the first coat of finish is applied. They consist of nylon bristles impregnated with particles of silicon carbide which act as an abrasive. Osborn brushes are surface conditioning brushes, not sanding brushes. So what is the difference? Sandpaper and sanding disks are designed to remove the top layer of wood, whereas Osborn Brushes are designed to smooth the surface of the wood without removing the entire top layer.
Osborn Brushes require a buffer or polisher with 5/8 x 11 National Coarse (NC) threads. Although a constant speed buffer of around 1800 RPM will work, one with a variable speed is much easier to use and will do a better job.
So what are some applications for the use of Osborn Brushes?
1. When the surface has been stripped or pressure washed and you want to remove any feathering that may have occurred.
2. If the grain of the wood has been raised due to contact with water (mostly interior situations).
3. To remove mill glaze on interior and exterior wood surfaces.
4. To even out the texture of hewn surfaces since the flexible bristles reach the hills and valleys.
5. If a home has been blasted the use of an Osborn Brush can help reduce rough texture of the surface.
What are Osborn Brushes not suitable for?
1. To make a blasted surface completely smooth again.
2. To remove a finish.
3. To remove discolorations that are deep within the wood.
Osborn brushes are not an alternative to sandpaper or sanding disks. Sanders and sanding disks consist of rough, flat surfaces and will remove more wood on high spots than in depressions, whereas Osborn Brushes follow the contour of the surface. To correctly use an Osborn brush you never need apply much pressure to the buffer, just hold it in place and let the brush do the work.
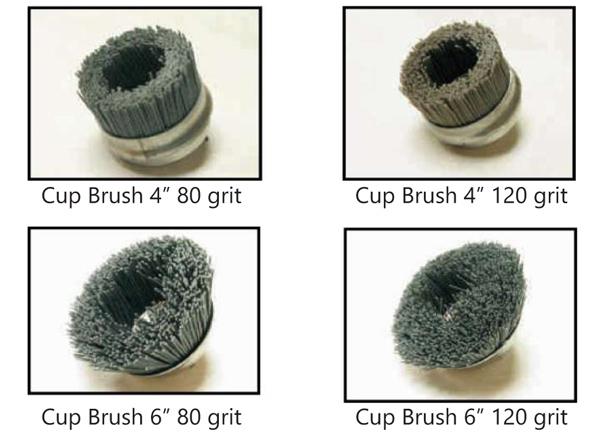
We carry four different Osborn Brushes. For logs and log siding, we recommend using the flared 6” diameter brushes since they do a good job and are easy to use. The 4” brushes may be used for small or tight areas. For exterior surfaces 80 grit brushes should always be used. On interior surfaces you can use either 80 or 120 grit brushes.
Tools Required
Buffer or polisher with 5/8×11 National Course (NC) threads. Best speed is around 1800 RPM but varible speed is handy.
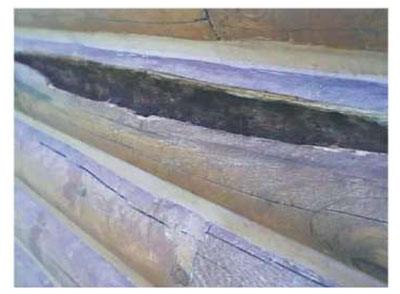
Neglected log homes occasionally develop sections of logs that have medium or deep pockets of decayed wood that is either very soft, or loose and crumbly. If caught early enough, the pocket may be only a few inches across, but if the decay has been active for a while the pocket may extend a couple of feet or more along the length of the log. If the pocket extends more than halfway through the logs and runs more than a couple of feet, log replacement or at least new log facing should be seriously considered, especially if the log is supporting any weight on top of it. However, there are some repair methods that can work.
Repairing Large Voids
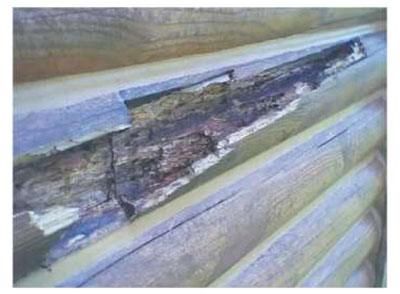
Step 1: Dig as much loose, friable wood fibers as you can out of the void or decayed zone.
Step 2: If the damage was caused by rot or insects (it usually is) the inner surfaces of the void should be saturated with Shell-Guard RTU. It is also a good idea to spray, or if there is an intact finish still in place, inject Shell-Guard RTU into the area surrounding the damage. This will kill any active fungi and/or insects and prevent the return of an infestation to the treated area. Allow the treated area to dry completely. At minimum, two days or more depending on conditions.
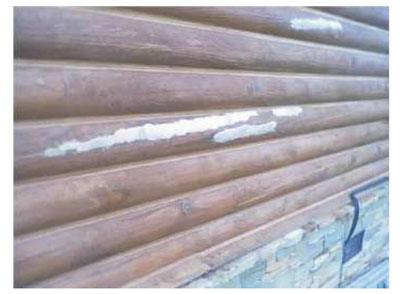
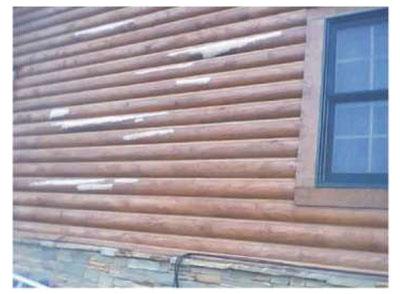
Step 3: Coat the inner surfaces of the void with M-Balm. You can use a brush or squeeze bottle to apply it, but the wood must be dry for it to work. You do not have to wait until the M-Balm cures before proceeding to the next step since E-Wood bonds better to uncured M-Balm..
Step 4: You can start filling the void with E-Wood. If the void is large enough, you can insert lengths of pressure treated 2x4s into it and pack the E-Wood around them. Just make sure that you do not leave any large voids. Cured E-Wood is structurally stronger than the wood itself. Do not bring the surface of the E-Wood all the way out to the surface of the log, leave about 1/8” to1/4” inch depressed in from the surface of the wood. Allow the E-Wood to harden.
Step 5: If the log is stained, sand the entire affected log down to bare wood. This will help prevent the repaired areas from standing out compared to the rest of the wall and will also remove any M-Balm or E-Wood that may have inadvertently adhered to the exterior surface of the logs.
Step 6: Fill in the 1/8” to 1/4” depression with a layer of Energy Seal. Choosing the right color is critical in order for the repaired area to blend in with the rest of the wall. If you are artistically creative you can texture the Energy Seal to match the surrounding wood and even use a different color Energy Seal to create wood grain and simulated knots.
Step 7: Allow the Energy Seal to dry for a few days then apply a matching Lifeline stain and topcoat to the entire sanded log.
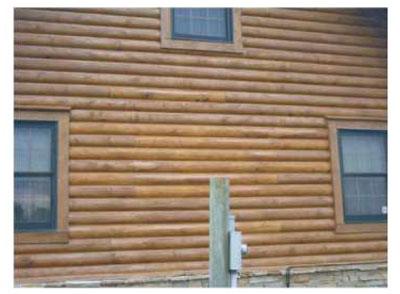
One thing to keep in mind about these types of repairs is that the repaired areas will weather differently than the rest of the wall and may take some special attention when it comes time to refinish the wall.
The first question about bulk loading guns is if they are worth buying. For example*, comparing the retail cost of Perma-Chink in pails to 30 ounce tubes; the price of two pails is $591.98, whereas the price of an equivalent amount of Perma-Chink in 30 oz.
tubes is $1079.60. Rather than buying four cases of 30oz. tubes you can purchase two pails of Perma-Chink and an Albion Bulk Loading Gun and a Follow Plate for $166.98 and still have $320.64 leftover. Plus you will have a great tool for future use.
In the case of Energy Seal, the savings are even greater. Two pails of Energy Seal plus the Bulk Loading Gun and Follow Plate ends up being $334.64 less expensive than four cases of 30oz. tubes.
So now that we know that they can save you money, how easy are they to use? First of all, don’t try to save more money by not buying the Follow Plate. The Follow Plate is an integral part of the Bulk Loading Gun system and trying to load a gun without it can be a very frustrating and messy experience.
*Pricing example based on retail pricing as of 4/1/2022 and may not reflect current actual pricing
Let’s go through the procedure of loading and using an Albion Bulk Loading Gun step by step.
1. Remove the lid and the plastic liner from the pail. Put them aside and try to keep them clean in case you need to reseal the pail later.
2. Place the follow plate on top of the product in the pail making sure that there is a good seal between the wall of the pail and the flexible edges of the follow plate.
3. Remove the cap and cone tip from the end of the Albion gun barrel and ensure that the rod and plunger are fully forward.
4. Push the end of the barrel onto the lip surrounding the hole in the middle of the Follow Plate. Make sure the gun is perpendicular to the plate, and there is a tight seal between the barrel and the O-ring. If the barrel is tilted, air will be sucked into the gun during the loading process.
5. Depress the rod release plate and draw back the rod with a smooth, even pull. Make sure the barrel stays flush with the plate and don’t tilt the gun as you pull the rod back.
6. Once the rod is fully extended and the barrel is full of product, give the trigger one squeeze then disengage the barrel from the Follow Plate with a twisting motion.
7. Attach the end cap and cone tip to the end of the barrel. Make sure the tip of the cone is cut to the diameter of the bead you want to apply.
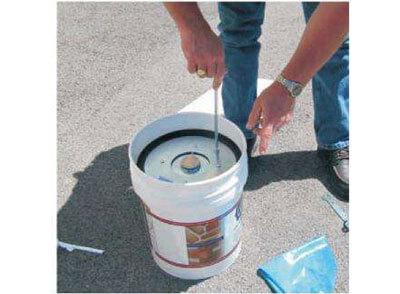
8. Apply sealant using the same technique as you would use with a standard caulk tube and ratchet gun.
9. To remove the Follow Plate from an empty or partially used container, insert the handle rod into the open nut on the surface of the plate and pull it out.
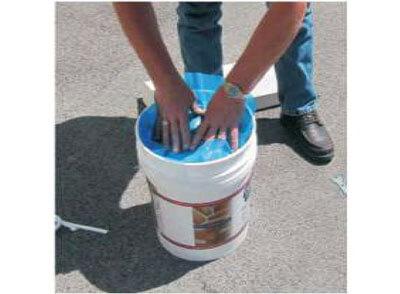
10. Replace plastic liner over the surface of the sealant.
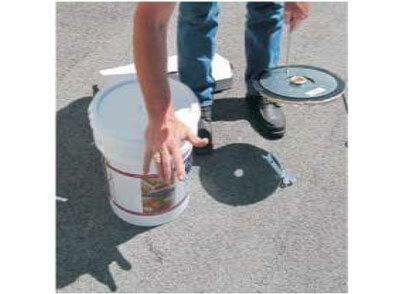
11. Replace the lid. Make sure that it is seated tight on the pail.
Tip: Make sure that the plungers are positioned correctly on the end of the rod. If the gun begins to suck air, tighten the blue base with the wrench that comes with the gun.
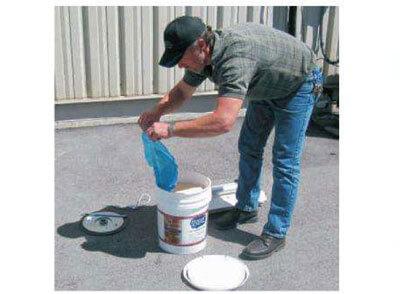
Step 1
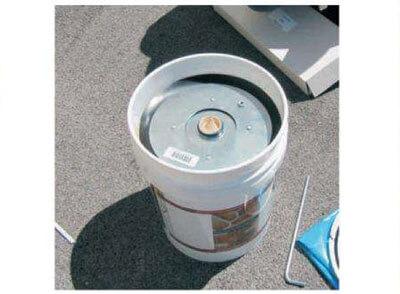
Step 2
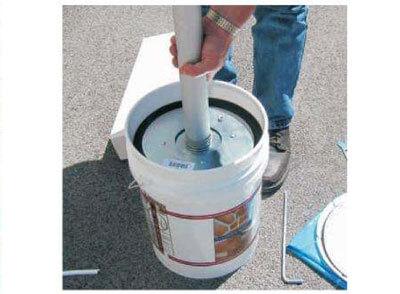
Step 3
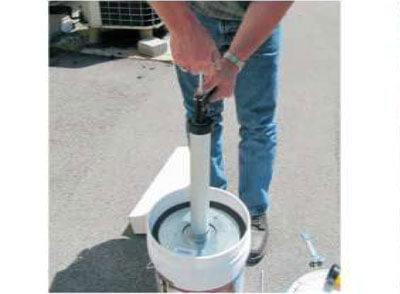
Step 4
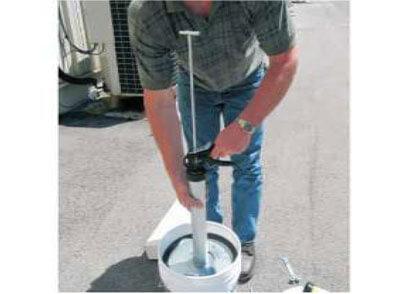
Step 5
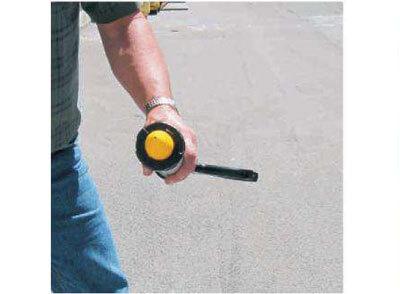
Step 6
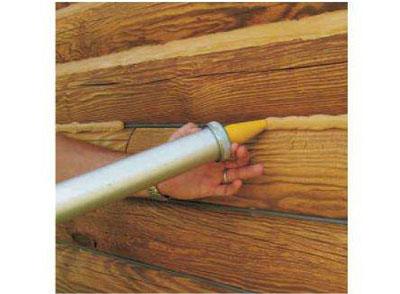
Step 7
Step 8
Step 9
Step 10
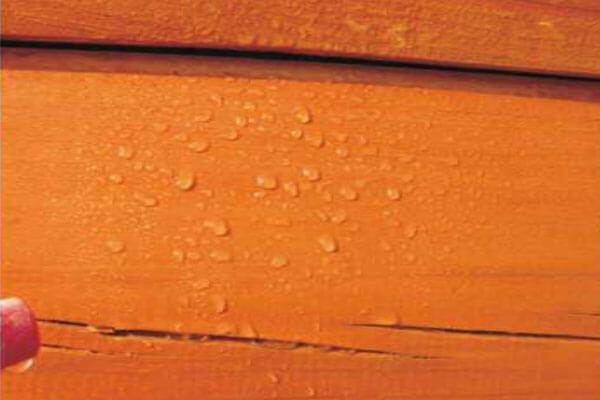
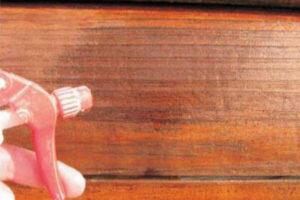
A fallacy that many people have accepted as fact is that water beading on the surface of wood is the only sign that a finish is repelling water and beading water is an attribute of a quality finish. Nothing could be further from the truth. Beading water is only an indication of the presence of a hydrophobic additive (water-hating or repelling water) like oil, or more commonly, paraffin wax. In addition, there is no correlation between beading water and protecting wood from sun (UV) damage. Furthermore, water beading holds water closer to the finish for a longer period of time, thus increasing the chance of softening the film.
We get calls from homeowners asking if they need to apply another coat of Advance on their home, since they’ve tested by spraying water on the finish and the water does not bead up. Since none of our current finishes contain oil or paraffin wax, they “sheet” water – but do not “bead” water. Why don’t we add wax to our finishes? Wax may contribute to water repellency for the short term, but it weathers away fairly quickly, especially in areas that are in direct sunlight. Once it is gone, it leaves microscopic voids that may allow water penetration, and roughens the finish, making it not as easy to keep clean.
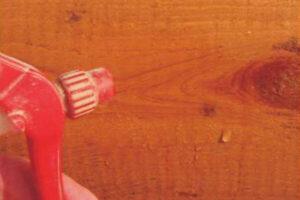
By maintaining a wax-free smooth polymer film, we’ve been able to significantly increase the long-term performance of our exterior finish systems. Finishes containing wax also increase the difficulty of applying additional coats or applying a water-based finish on top of the wax finish.
There is also a misconception that only the topcoat imparts water repellency to our finish system. The fact is that all of our exterior and interior primers, stains, and topcoats prevent liquid water from coming in direct contact with the wood fibers. So even though the topcoat may show some signs of wear, it does not mean that the finish system has lost the ability to prevent water penetration.
So how can you tell if a finish no longer repels water? If the wood is dry, it is pretty easy. When dry wood is sprayed with water and there is no change in color, it is a sign that the wood is not getting wet. On the other hand, if the wood turns dark it’s an indication that the wood fibers are getting wet, and the finish is no longer water repellent.
All Lifeline™ finishes are water-based, film-forming coatings. Although we refer to our pigmented coatings as “stains,” they do not “colorize” the wood like penetrating oil-based products; they form a film on the surface of the wood, thus protecting the underlying wood from the effects of wind, water, and sunlight. Since they form a film on top of the wood, they rely on proper surface preparation to ensure good adhesion.
The presence of dirt, dust, mill glaze, chemical contaminates, or non-compatible finishes will compromise adhesion of the Lifeline finish to the wood. In addition, sanding exterior surfaces using sandpaper or Osborn Brushes finer than 80 grit will also prevent proper finish adhesion since Lifeline finishes need some surface texture in order to bond tightly to the wood fibers. However, even with coarse sanding the final finished surface will be quite slick and smooth. If you have any questions about what constitutes proper surface preparation, call a Perma-Chink Systems location before proceeding.
For weekend do-it-yourselfers we recommend working on one wall at a time, start to finish. It is better to complete one entire wall than it is to have several walls in some stage of the process and be interrupted for days, weeks or months by a change in the weather or other unforeseen circumstances. Also be aware of extreme temperatures when applying finishes to the log home. For guidance, review our Tech Tip on Application Temperatures.
Equipment to Have on Hand
- Ladders, ladder jacks and platform, if necessary
- Electric Drill
- Paint mixer (available from Perma-Chink Systems or most paint stores and DIY outlets)
- An airless sprayer equipped with a 0.015 or 0.017 orifice tip
- A high quality stain brush
- Clean rags
- Although our finishes may be applied with a brush or pad, they are designed to be most easily applied using an airless sprayer. Using one will result in a more uniform, professional looking finish. Do not use a pump-up garden type sprayer!
Weather Conditions
You don’t want to start the job if there is a chance of rain within the next 12 hours. You also don’t want to stain a wall if it’s going to be in direct, hot sunlight during the staining process. If it’s a clear day and you are working on a south or west facing wall, start early in the morning before the sun starts beating on it, but make sure it’s dry. It’s better to work on a wall that’s a bit cool than it is on a wall that’s still hot from being exposed to the sun for most of the day. High surface temperatures accelerate the drying process, and you may not have sufficient time to properly brush out the product. The labeled ambient temperature application range is between 40°F and 90°F. Note that it is the surface temperature of the logs that is most important, not the temperature of the air. This is especially important during the winter when you can get a nice February day, but the logs are still frozen. You may need a few warm days before the temperature of the logs reaches the 40°F+ range.
Application
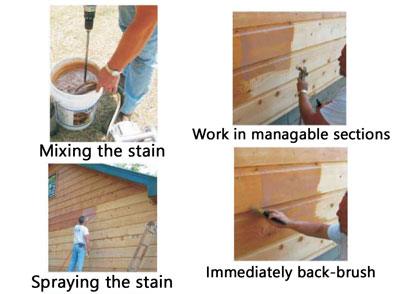
Mixing is also required for all clear Lifeline exterior finishes, including Prelude™ and Advance™ Gloss or Satin. When using pigmented stains, we also recommend “boxing” containers to avoid any slight color differences as you go from container to container. The best way to do this is to mix up each pail then pour some Lifeline from at least two pails into a separate container. As the working container gets low add additional Lifeline but be sure to mix the pail again before pouring any stain from it.
Step 1: Remove the lid from the pail and stir the contents for at least 5 minutes using an electric drill and a paint mixer. Be sure that all of the pigment is uniformly dispersed throughout the finish and there is no pigment still adhering to the bottom of the pail.
Step 2: Set up the airless sprayer according to the manufacturer’s directions or if brushing, pour a small amount into a separate container. Manually mix the pail whenever additional material is removed and occasionally turn on the sprayer’s re-circulator during use.
Step 3: Start your application at the top of the wall and work your way down. This avoids having to set your ladder against a wet finish and allows you to work out any drips and runs that may occur during the application process.
Step 4: Work on one or two courses of logs at a time. Hold the spray tip about a foot or so from the surface and apply the finish to no more than two running feet of logs. If the Lifeline™ begins to run down the wall you are applying too much.
Step 5: Once applied, immediately back-brush the area making sure to get Lifeline into all of the checks and fissures in the wood. Continue back-brushing until you have spread the Lifeline out as far as it will go. Lifeline finishes are made to go on in thin coats. If your brush becomes saturated, it is an indication that you are applying too much finish.
Step 6: While maintaining a wet edge, continue the application process until you come close to a break point like a window frame or butt end of the log. Never stop in the middle of a log. If you do, you may end up with a lap mark that will be difficult or impossible to hide. When you get close to a break point, feather the edges and empty the brush. Then start to spray from the opposite direction so you can blend the stained areas together and avoid lap marks.
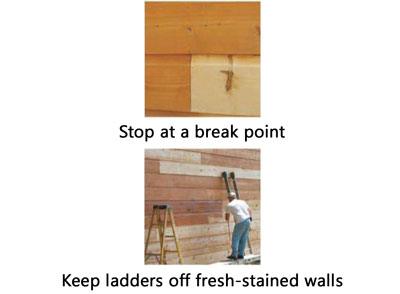
Step 7: Continue the application process, working your way down the wall. Once the finish coat is dry, you can move your ladders and complete the logs that you may have skipped to make room for the ladders. If you need to take a break, be sure to submerge your spray tip in water to prevent it from blocking up with dried product.
Step 8: Allow the finish to dry before applying subsequent coats. Drying time depends on temperature and humidity. In warm, dry conditions the surface may be dry to the touch in as little as one hour. On the other hand, on a damp day when the air temperature is below 50ºF it may be impossible to apply more than one coat per day.
Step 9: Lifeline Advance Clear Gloss and Satin Topcoats are best applied using exactly the same application techniques as the color coats. However, boxing containers is not necessary since they are colorless. Advance is somewhat sensitive to cool, moist weather, and if it has not had an opportunity to dry before the sun sets, cool evening dew can cause “blushing,” a hazing of the finish created by the interaction of water with the uncured Advance topcoat. In the spring and fall when evening temperatures drop below 60°F, it’s best to apply Advance early in the day so that it gets several hours of drying time before being exposed to the evening dew. Blushed Advance will turn clear after a few warm, dry days.
Step 10: Clean brushes, tools and equipment with soap and water.
Tips and Bullet Points
- Never use sandpaper, sanding pads or Osborn Brushes finer than 80 grit
- Make sure the surface has been cleaned within seven days of applying the first coat of Lifeline. Do not use bleach! Log Wash™ is a much better product to use.
- Check the weather forecast. Do not start if there is a chance of rain before the finish has a chance to dry.
- Ambient air temperatures should be between 40°F and 90°F at the time of application. Log surface temperatures should be between 40°F and 160°F
- Thoroughly mix all Lifeline finishes before and during use
- Use high quality brushes
- Do not use a pump-up sprayer or a roller to apply Lifeline
- Use a 0.015 or 0.017 orifice tip on airless sprayers
- If working up high, use ladder jacks and a platform
- Apply thin coats, back-brushing is critical
- Work on one or two courses of logs at a time
- Do not stop in the middle of a log. Continue to a break point.
- Start at the top of a wall and work your way down the wall
- Do not lean ladders against freshly stained surfaces
- Allow adequate drying time between coats
- During the cool spring and fall months do not apply Advance Topcoats late in the afternoon
- Clean your hands and tools with soap and water before the Lifeline dries
If you have any questions, give us a call at 1-800-548-3554, we are more than happy to help with your project.


