Library

Over the past several years we have discovered many things about cleaning wood and existing finishes. First and most importantly is that chlorine bleach is not the best product to use. In addition to its potential for damaging the finish and bare wood fibers, its use and misuse contribute to specific problems including the loss of film adhesion, discolorations due to tannin extraction, streaks, blotches, and premature failures of the finish system. We have also discovered that many wood and deck cleaners available at paint and hardware stores, home improvement centers and Do-It-Yourself outlets contain components that interfere with the proper performance of our finish systems.
Therefore, we have decided that the only cleaning products approved for use with our finishes are those products supplied or recommended by Perma-Chink Systems, Inc. We are not doing this to increase our sales of cleaning products. It is because we have tested our cleaning products with our finish systems and have confidence that when properly used and applied, their use will result in the best possible appearance and performance of the final LIFELINE finish. We can not say the same about the use of other types and brands of wood cleaners, and strongly discourage their use with any of our LIFELINE stains.
Guidelines for Cleaning Bare Wood Prior to Applying Lifeline Stains
New Log Homes
1. If the wood has not grayed, wash the surface with a two (2) cups per gallon Log Wash™ solution and a pressure washer no more than seven (7) days prior to staining. Smooth log siding should be washed using Wood ReNew™. Rinse well and allow the wood to dry.
2. If you are finishing Western Red Cedar, Redwood, Walnut, or Mahogany, use Cedar Wash™, a ready-to-use cleaner, instead of Log Wash for better surface preparation and finish longevity on these specific wood substrates.
3. If there are signs of grayed wood, use Wood ReNew according to the label along with a pressure washer. Rinse well and allow wood surfaces to dry before staining. If more than seven (7) days pass before the home is ready for staining, wash the surface with a two (2) cups per gallon of water Log Wash solution, rinse well with a garden hose, and allow wood surface to dry.
4. If, after steps one or two, there are still dark streaks or discolorations on the surface, use a solution of OxCon™, which contains oxalic acid, on the entire wall according to the directions for use. Rinse well and allow the wood to dry before staining.
Older Log Homes That Have Had a Previous Finish Removed
1. If there are no signs of gray surface wood, wash the surface with a two (2) cups per gallon Log Wash solution no more than seven (7) days prior to staining. Rinse well and allow the wood to dry.
2. If you are finishing Western Red Cedar, Redwood, Walnut, or Mahogany, use Cedar Wash, a ready-to-use cleaner, instead of Log Wash for better surface preparation and finish longevity on these specific wood substrates.
3. If there are areas where grayed wood is still evident or if the wood has darkened after the finish was removed, use Wood ReNew according to the label along with a pressure washer. Rinse well and allow the wood to dry before staining. If the wood has darkened or more than seven days has passed before the home is ready for staining, wash the surface with a two (2) cups per gallon of water Log Wash solution, rinse well with a garden hose, and allow the wood surface dry.
4. If, after steps #1 or #2, there are still dark streaks or discolorations on the surface, use OxCon, an aqueous oxalic acid solution, on the entire wall according to the directions for use. Rinse well and allow the wood to dry before staining.
Log Homes with an Existing Finish That is Still in Good Condition
1. If a maintenance coat of Lifeline stain or topcoat is going to be applied over an existing Lifeline finish, wash the coating surface with a two (2) cups per gallon Log Wash solution no more than seven (7) days prior to staining. Pressure washing is not recommended. Rinse well and allow the wood to dry. For maintenance cleaning of finished surfaces that are not going to be stained or top-coated, use a one (1) cup per gallon Log Wash solution.
A NOTE ABOUT RINSING
No matter what product you use to clean bare wood, nothing is more important than making sure you have adequately rinsed the surface. Any chemical residue remaining on the surface can have serious consequences later on. We always recommend using pH Strips to make sure that the surface of the wood has been sufficiently rinsed. A pH between 6.5 and 7.5 indicates the surface has been properly rinsed. pH Strips are available at most pool supply dealers, aquarium supply shops and Perma-Chink Systems, Inc. They are not expensive, are very easy to use and a great tool to ensure adequate rinsing.

For the past 40 years the most accepted and effective method for preventing infestations of wood destroying insects and decay fungi in log homes has been by impregnating the wood with a solution containing the element boron.
Boron salts are referred to as borates and the most used borate utilized for this purpose is disodium octa borate tetrahydrate (DOT), the active ingredient found in Tim-Bor®, Bora-Care® and PenaShield®. The reason for using this material instead of borax or boric acid is because it has a much higher boron content per pound and is significantly more water soluble than other boron
containing compounds.
But what is it about boron that makes it so effective for preserving and protecting wood? In the case of wood consuming insects like termites, it is postulated that boron interferes with the metabolic process and inhibits protozoan symbiotic activity that allows the insects to digest cellulose. These modes of action may take some time, and it is not unusual for insect activity to continue for several months after being exposed to a borate treatment. However, once eliminated, the wood will be protected from future wood consuming insect infestations if the boron remains within the wood’s
cellular structure.
In the case of decay fungi, it is thought that the presence of boron disrupts the cellular production of enzymes that allow the fungi to extract nutrients from the wood. As opposed to insects, a borate treatment can kill decay fungi rather rapidly, usually within a day or two depending upon several factors, i.e. borate concentration, fungi type and wood moisture.
Borate Treatment Methods
Pressure Treatments
Pressure treating wood with preservatives dates to the 19th century when railroad ties were impregnated with creosote under pressure. Since then, several chemical formulations have been used for pressure treating logs and dimensional lumber, but most have been discontinued due to their toxicity or health and environmental hazards.
Due to their low mammalian toxicity and environmental friendliness, borates are now being used by several pressure treating companies for treating both logs and dimensional lumber. The one limitation of borate pressure-treated lumber is that it cannot be used for wood in contact with the soil since the moisture in the soil will extract out the water-soluble borate within a few years.
Dip Treatments
Several log home manufacturers dip their logs in a solution of borate before they are shipped to the customer. Although there are set standards for the “Dip Diffusion” process, very few companies meet these standards since it requires dipping green, unseasoned logs in a hot, concentrated borate solution and then storing the logs in a covered building for a minimum of two weeks.
Most log suppliers simply dip their logs in a borate solution for a few minutes then allow them to dry. Although this procedure does not meet set standards, it has been used for over 30 years and if the borate concentration in the dipping solution is maintained at or above 10%, we rarely hear of this process not providing adequate protection to new logs.
Topical Treatments
Back in the late 1980s Perma-Chink Systems developed the very first borate preservative that could be applied to wood in the field during or after construction. Since then, hundreds of thousands of log and conventionally constructed homes have been borate treated using the technology originally developed by Perma-Chink Systems. What made this possible was combining the borate with a combination of glycols that allow the borate to penetrate the wood rather than remaining just on the surface. In addition, the glycols increase the efficiency of boron, allowing less applied product to be just on the surface. This technology is incorporated in both PenaShield® and Bora-Care®
Pure borate / water solutions like our Tim-Bor® are also used for topical applications but since they do not contain anything that aids in the penetration of the borate into the wood, we recommend that they be used only on new, un-infested logs and be reapplied any time the home is stripped of its existing finish.
The one limitation of any topically applied borate is that it must be applied to bare wood. If there is anything on the surface that inhibits the absorption of water into the wood the borate solution will remain on the surface and no protection will be imparted to the wood itself.
Conclusion
The success rate of properly applied borate treatments is truly astounding. In the 40 years that we have been involved with borate treating wood the number of reported complaints is miniscule and most of them involve insects that do not consume wood for nourishment like carpenter bees, parasitic wasps, house ants and other pests that are not included on the label. We occasionally get calls about a continuing beetle infestation after a borate treatment, but it is almost always within a week or two of the products being applied and that’s just not long enough for the borate to eliminate an active infestation of wood boring beetles. However, once the borate has had time to work and the activity ends, that is the end of the infestation, and they never return.
For many years the product of choice for cleaning bare wood surfaces was a solution of chlorine bleach and water, perhaps with some detergent or TSP (trisodium phosphate) added to help clean the wood. When correctly applied and well rinsed, bleach solutions can work fairly well most of the time. However, household bleach does not come with a set of directions for using it on wood, and even within the log home industry there is no agreement as to how to properly use bleach.
Consequently, homeowners and professional applicators end up misusing chlorine bleach solutions, which can result in several problems with both the appearance and performance of the finish system. But even when used correctly, chlorine bleach solutions can create discolorations that may not show up for weeks, or months, after a finish is applied.
Adhesion
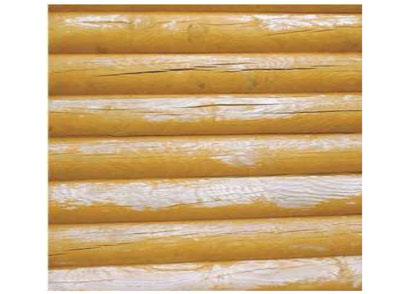
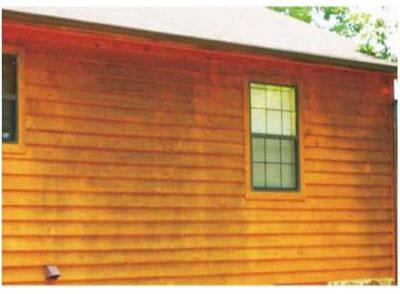
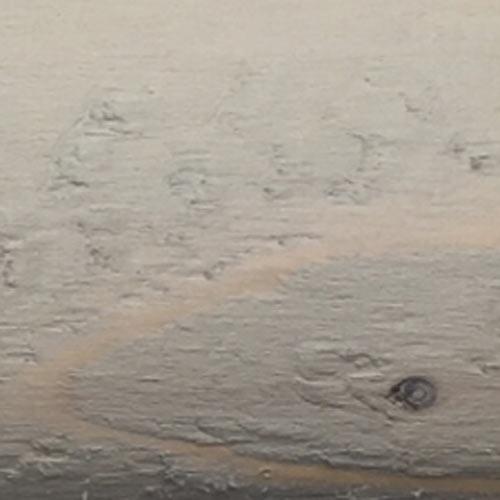
Chlorine bleach destroys lignin, a component of wood that hardens and strengthens the cell walls. Once the surface cellular structure loses its integrity, film-forming finishes like LIFELINE™ have no sound wood to bond to, and can peel off. The picture at right is a typical example of what can happen when a high concentration of chlorine bleach is applied to a home.
Before a new finish can be applied the damaged wood fibers must be mechanically removed by sanding, media blasting or aggressive pressure washing. If the bleach solution dried on the wood, sodium hypochlorite crystals will form in the top layer of wood. These crystals are extremely difficult to dissolve and rinse away. If a water-based finish is applied over the bleach crystals, it would be the same as trying to apply the finish on top of unrinsed bleached wood, and problems with finish adhesion will likely reoccur.
Discolorations
The use of bleach can cause several types of discolorations on both bare and finished wood. If the wood is bare, any discolorations that may appear can usually be corrected either chemically or by physically removing the discolored wood. However, if the discolorations show up after the finish has been applied, the only way to eliminate them is to first remove the finish.
Streaks and Runs
These types of discolorations usually appear within a few days. They are the result of either applying the bleach starting at the top of the wall and allowing it to run down, or not adequately rinsing the bleach solution from the wall. As with all types of discolorations under the finish, the only way to get rid of them is to remove the finish and start over again.
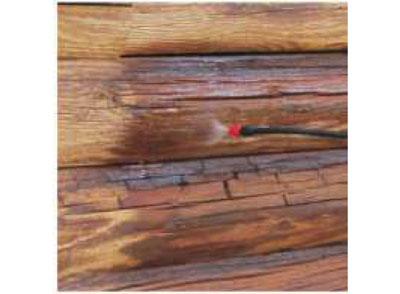
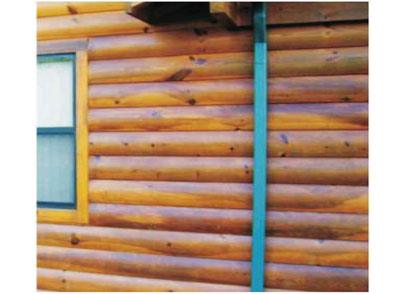
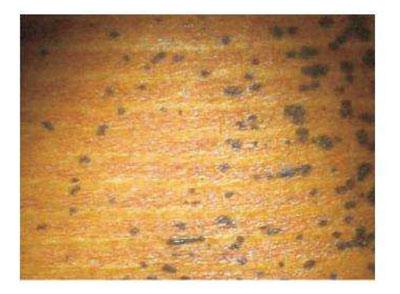
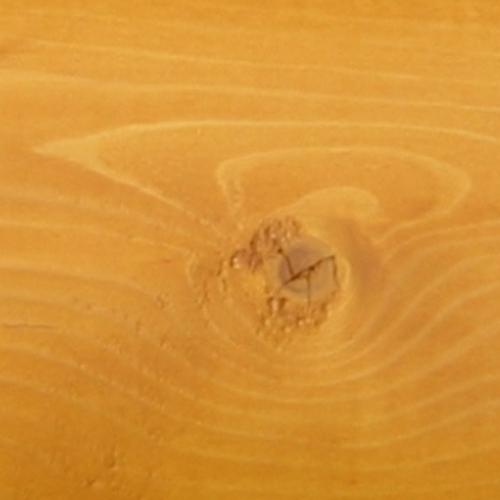
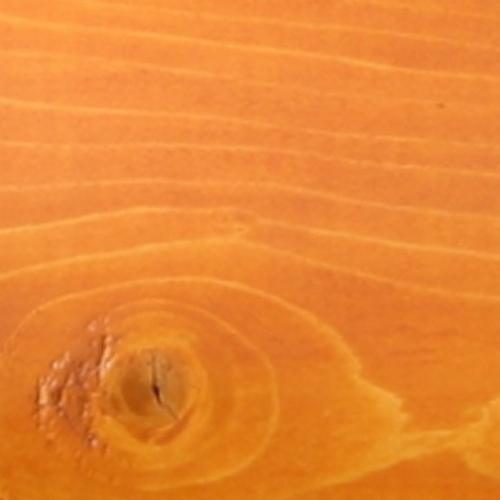
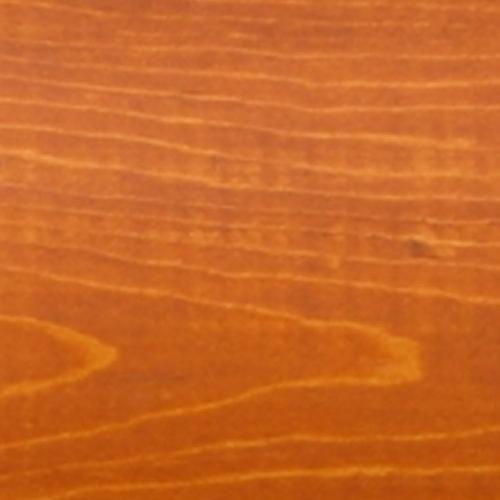
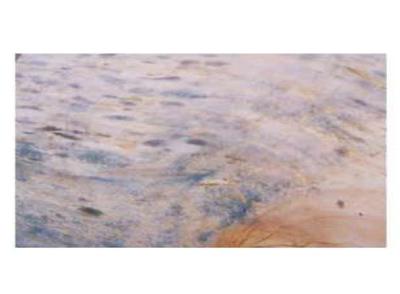
Iron Tannate Stains
These types of discolorations may appear days, weeks, or even months after a finish is applied. They are the result of bleach bringing tannins to the surface of the wood where they react with minute metal particles remaining on the surface from the sawing, planning, or milling process.
As you can see from the picture, it was not so much the use of a bleach solution that created this problem as it was inadequate rinsing of some of the areas of the wall. The finish must be removed in order to treat these iron tannate discolorations with Oxcon™, an oxalic acid solution.
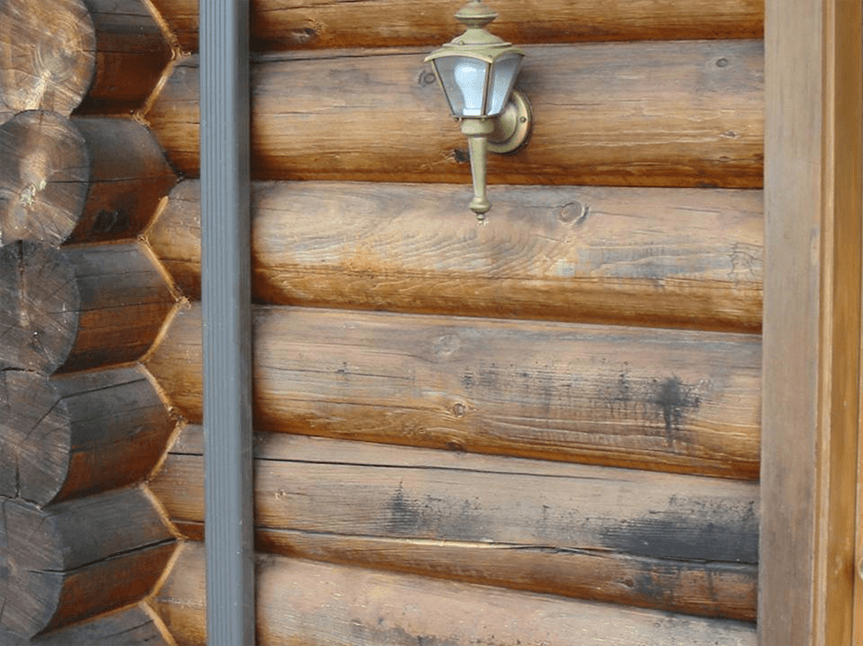
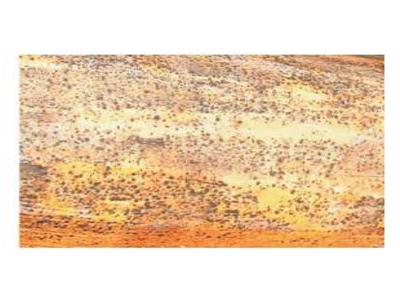
Brown Stains, Black Marks, Etc.
All wood contains a multitude of chemical components. Some of them may be present in the sapwood, others in just the heartwood, and still others throughout the entire tree. They can vary from species to species; and even within the same species they can vary from log to log, depending on the nutrients that may have been in the surrounding soil while the tree was growing.
If the chemistry of the wood is not disrupted, these components usually stay in their natural state. But when subjected to highly alkaline chemicals (i.e. chlorine bleach) they can become quite dark. This process may take several months to occur, but once the wood has discolored there is nothing that can be done without first removing the finish. Even then it may not be possible to completely remove these types of discolorations if they go deep into the wood.
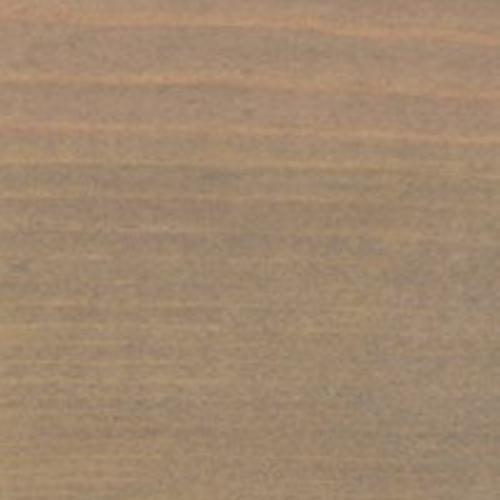
The best product that we’ve found for treating these discolorations, once the finish is removed, is a two (2) cups per gallon solution of Log Wash™. Although it may not completely eliminate the discolorations, it may lighten them enough so that the use of a darker colored stain will hide them.
Although we emphasize the importance of cleaning the surface prior to the application of our finishes, there are some types of surface contaminates that can be very difficult or even impossible to remove with just a light washing. The leading cause of dark discolorations appearing under any transparent finish like LIFELINE™ is the presence of minute metal particles imbedded in the surface of the wood.
All wood contains tannic acid and when tannic acid comes to the surface, it can react with these metal particles creating dark color bodies or discolorations. There is much about this process that we have yet to understand but there are some things that we do know.
The first is that the application of chlorine bleach not only accelerates – and in many cases – initiates this process. The second is that direct sunlight intensifies the discolorations. That’s why the south and west walls are typically (but not always) more prone to discolorations than the north and east walls. The third is that areas of the log that cut through heartwood are usually worse than exposed sapwood. This makes sense, since heartwood contains a higher concentration of tannic acid than sapwood.
The Origin of Metallic Contamination
Milling, Planning and Shaping
All logs and siding used in a log home go through some type of process to remove the bark, cambium, and branches, and to also shape the wood. No matter what process is used, be it milling, planing, draw knifing, or even hand hewing, some type of steel blade is involved. Although you may not be able to see them, microscopic particles of steel are deposited on the surface as the blade or blades cut through the wood. If the blades on a milling machine, for example, get dull, many times more particles of steel will shear off as opposed to when the blades are sharp.
Using the Wrong Materials
Using wire brushes, steel wool or metallic abrasives to aid in the removal process of old finishes, or smooth the surface, will definitely create discoloration problems. Small bits of metal will be deposited on the wood, and the use of these materials should be avoided at all costs.
Sandpaper and Sanding Pads
Although the use of most sandpaper and sanding pads present no risk to the formation of discolorations, it is not out of the realm of possibility for them to be a source of metal contamination, especially if they have been previously used. Let’s say a sanding belt was used to remove rust from a steel plate and then used again on a log home. Thousands of small metallic particles will be forced into the wood fibers. The same thing can happen if a sander or sanding disk goes over a nail or screw during the course of sanding a wall. The metal contamination will then be spread over a wide area. We also believe that there are some types or brands of sandpaper that may contain metallic particles along with the abrasives, but at this time we have not specifically identified them.
Contaminated Blasting Media
Blasting media like crushed glass is very abrasive and since it maintains its abrasiveness even after being used, some people try to reclaim and reuse it several times. If done once or twice, it usually does not present a problem but when reused multiple times it can become contaminated with metal as it flowed through the blaster pot, valves, and connections. It can also pick up contamination from the ground when it is reclaimed.
Installation of Steel Roofs and Other Metal Components
You can easily envision the amount of metallic dust and particles generated by cutting or sawing steel roof panels. They may well end up on the surface of your logs or even more likely, your deck. If they are not completely washed away, they will become a source of discolorations. Fortunately, we have never seen any discolorations associated with particles of aluminum. But any metal that contains iron has the potential for creating dark discolorations.
Preventing Discolorations Due to Contamination
The best way of preventing metallic tannate discolorations is to avoid contaminating the surface in the first place. In the case of metallic particles deposited during the shaping process, well, that’s impossible. Wood surfaces should always be thoroughly cleaned with Log Wash™, or in the case of milled log siding, Wood ReNew™, before the first coat of finish is applied.
Steps to Take to Avoid Metallic Contamination:
- Never use a wire brush or steel wool on a wood surface that’s going to be finished.
- Use good quality sandpaper and sanding pads specified for use on wood and never use any that have been previously used for another purpose. Store them separately in plastic bags and don’t allow the abrasive side to contact any metal prior to use.
- If during sanding you run over a nail or screw, discard the paper or pad.
- Do not attempt to reuse blasting media more than two times, and avoid picking up dirt or other contaminates as you reclaim it.
- Wood surfaces should always be thoroughly cleaned with Log Wash, Cedar Wash (for specific wood species like Western Red Cedar), or Wood ReNew before the first coat of finish is applied.
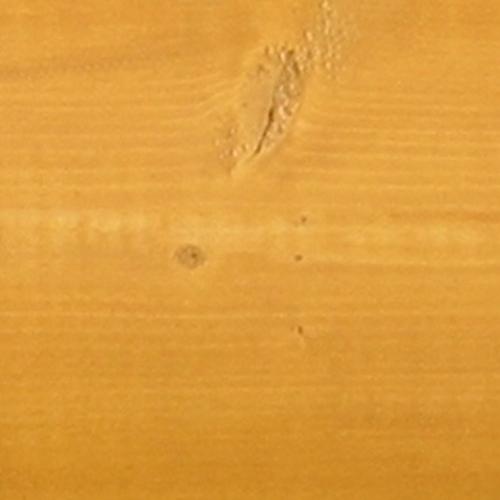
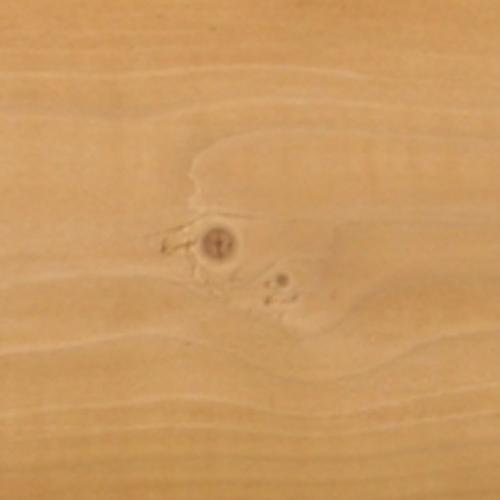
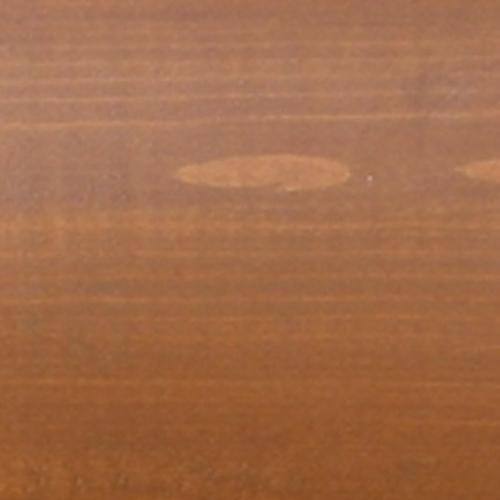
Spots created by steel wool
Dark section was wire-brushed
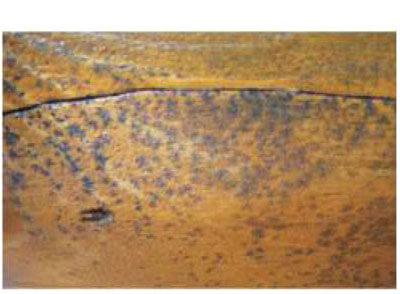
Metallic tannate discolortions from unknown source
Section of facia that was wire-brushed
Caulks and specialty log home sealants are used to keep air, water, and insects from getting into your home.
The most important decision you will make is choosing the right sealant for your log or timber home.
Many sealing problems are attributed to the caulking material itself, and most often the proper sealant was not used for the job. It’s easy to run to the local big-box home improvement store and pick up some all-purpose caulking, but therein lies the problem.
There are six types of caulks: butyl, oil-based, ethylene vinyl acetate, urethane, silicone, and acrylic/latex. All are designed to do a specific job, and none are suitable for every application.
Caulking vs. Sealants
The most frequent mistake made by log home owners is choosing a silicone caulk. Silicone-based caulks are excellent for many applications, but they do not work well on wood. Silicones are formulated for use on non-porous surfaces like metal, plastic, or glass. However, wood is porous, and silicones do not adhere to either damp or dry wood. In addition, silicone caulk is difficult to tool and clean up and does not accept a stain or paint.
Presently, the most widely used products are acrylic/latex sealants. Although they are suitable for a wide variety of applications, their quality depends on the specific formulation and manufacturer. And that is where Perma-Chink Systems comes in. The deficiency in these caulks is they are not designed specifically for log and timber homes.
Premium acrylic/latex sealants such as Perma-Chink, Energy Seal, Check Mate2, and Woodsman are manufactured from high-quality components to perform specific tasks. They are more expensive than a tube of general-purpose caulk, but they are formulated for excellent appearance, high performance, and ease of application. These sealants are made to be long-lasting and durable for the ultimate in wood care for decades.
Apply New Sealant Over Old Caulking? – NO!
An application of new sealant over old, failed caulk is rarely a good idea, even if it looks like the caulk still adheres to the wood. It may take a little more time, but old caulk should be removed for several reasons. If the caulk no longer adheres to the wood, it may be because moisture got under the caulk creating decay. Old caulk must be removed to properly treat and seal the wood substrate.
Newly applied sealant can only work if it is applied to a clean, sound wood surface or a compatible stain. So, if you want to use the old caulking as a backing material, you can apply a new sealant over the surfaces to adhere to a clean wood surface beyond where the old caulking reached. Otherwise, you should remove the old stuff.
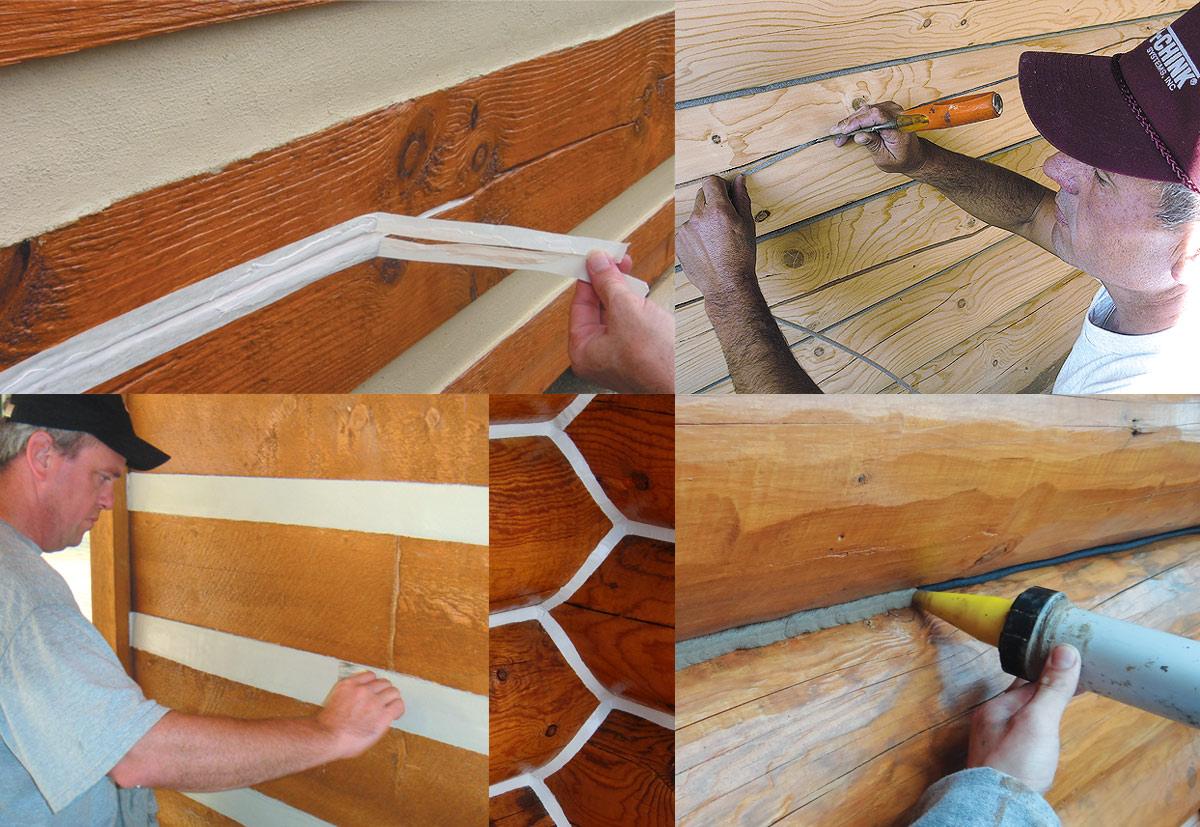
Removing Old Caulk Between Logs
The right tools can make the removal process easy. Remember the old church key used to punch a hole into soda or beer cans? It is a handy tool to scrape out old caulk. Hook knives also work well. If the old caulk is silicone-based, you can usually remove it with your fingers. Always inspect failed caulk areas for evidence of moisture. If the wood is damp, these areas should be properly treated before a new sealant is applied.
Sooner or Later? When is the Best Time to Seal Your Log Home?
If you are doing other work, a decision to make early in the process is when to apply your sealants. This decision might have some bearing on which sealant to use. One consideration is that some sealants take a stain much better than others.
Smooth-surfaced sealants like Check Mate 2 do not stain as well as textured sealants like Energy Seal. If you are planning to apply sealants to your log walls first and then stain afterward, Energy Seal is your best choice.
Usually, the best time to seal logs is after the LIFELINE stain has been applied. The log surfaces are fresh and clean and whichever Perma-Chink Systems sealant you select will adhere to wood surfaces stained with LIFELINE. If you are going to use a topcoat like LIFELINE Advance for exteriors or LIFELINE Acrylic for interiors, we suggest that the topcoat be applied after Energy Seal. This gives the most even appearance over the entire wall. However, if you want to hide the sealant and want a seamless appearance, apply Energy Seal before you stain.
Now let us look at various caulking applications around a log home and select the right product for each job.
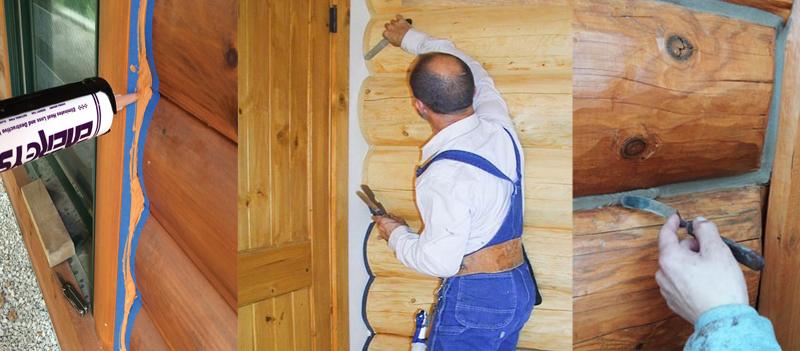
Sealing Door and Window Frames
When sealing around window and door frames you have several options.
For either new or older log homes, we recommend Energy Seal since it has outstanding elongation and adhesion. This means that as your home settles and shifts, Energy Seal stretches to maintain its bond to the wood. It is available in 12 different colors and since it is textured, it will take the color of the stain.
On chink-style homes many people want the sealant to match their chinking. If that is the case, Perma-Chink can be used to seal around window and door frames, too.
Checks and Small Gaps in Logs, Log Corners and Log Ends
Upward-facing cracks and checks in logs should be filled with Check Mate 2.
Otherwise, they collect water that can lead to decay and insect damage. You need not worry about checks on the bottom half of round logs unless they penetrate through the log wall. Choose a color that is closest to the color of the stained logs. If checks are more than ¼ inch wide, stuff a length of backer rod into the check to about 1/4 to 3/8 inch below the surface before filling it with Check Mate 2. The Check-Kit has both backer rod and convenient applicator tubes. For more instructions on how to seal checks in logs and log siding click here
Sealant Application
One of the most common mistakes made when sealing logs is to fill deep gaps or checks with the sealant material. Quality sealants are made to stretch and elongate with the movement of the joinery. When a sealant is applied too thickly, it loses its ability to stretch and may separate from the wood.
A good rule of thumb is that the thickness of the sealant should be approximately 1/2 the width of the gap you are trying to fill. However, sealant joints never need to be more than 3/8 inches thick. So, how do you fill a large gap?
If you are trying to fill a void behind a window frame, for example, Log Gap Cap foam is the product to use. You can also put backer rod into gaps. See step-by-step instructions here.
The space left after the installation of the backing material is called the “caulking well.” This well should be approximately 1/4 to 3/8 inch in depth, regardless of the width. This space is what you fill with sealant. Some sealant applications have geometries that do not allow for these “textbook” conditions. But, whenever possible, adhere to these specifications for the highest performance seal.
For filling in large voids or gaps, urethane foams are an excellent choice. However, many foam systems have a high expansion ratio which forces foam out of the void you are filling. It is difficult to remove. If you are unsure about your backing material, check with Perma-Chink Systems before using it.
Tips On Applying Perma-Chink and Energy Seal
Some people think that Perma-Chink and Energy Seal is just like any other caulking product on the market, so they apply and finish it with the same methods. Typically, silicone caulking can be smoothed just by running a damp finger along the bead of caulking. Using that method with Perma-Chink or Energy Seal will net you disastrous results. To get a smooth, clean finish, spray the sealant liberally with water then tool it with a metal spatula or similar. It’s counter-intuitive to apply water to smooth it, but it’s the best way. Unlike smooth caulking, the texture in Perma-Chink and Energy Seal needs more water to maintain a smooth finish. And it’ll be much, much easier.
Conclusion
Remember, hot air that gets into your home in the summer and cold air in the winter increases your energy bills. Water penetration can cause decay and insect nesting. One of the best ways to keep insects out of your log walls is to eliminate the openings where they get in. Properly selected and applied sealants are among the best materials for protecting your home. Use the right sealant for the job for years of protection and comfort.
Call 1-800-548-3554 to request a copy of the “Log Home Sealant Application Guide” for more detailed information, or click here.
Despite our best efforts, sometimes problems develop in wood that requires some more serious work than just stripping the finish or applying a new topcoat. Wood decay does happen, and it can be repaired if caught early enough. Perma-Chink Systems offers two-part epoxy products, M-Balm and E-Wood, to repair damaged logs.
If you’re looking to restore your home’s beauty through taking the wood down to bare wood and applying a new finish, we can help you with that, too. We offer S-100 and StripIt, environmentally-friendly water-based strippers.
For years, Lifeline Advance™ Topcoats have been an essential part of our exterior finish systems. In addition to extending the life of the finish, Advance helps keep exterior wood surfaces cleaner by reducing the buildup of dust and dirt, making routine maintenance and washdowns much easier.
That’s because Advance is engineered specifically to perform as a true topcoat. Unlike many “clear” products on the market, it isn’t simply a non-pigmented version of a Lifeline™ stain. Stains are formulated for maximum color retention and strong adhesion to bare wood, while a clear topcoat must meet a completely different set of performance demands. That’s why we use an entirely separate formulation to deliver the durability, cleanability, and long-term protection you need from a high-performance topcoat.
For interiors, we follow the same approach: A pigmented finish designed for adhesion and color fastness, covered with a clear topcoat specially formulated for protection. Let’s go through the options homeowners have to best achieve their desired look.
Choosing a Pigmented Interior Stain & Clear Topcoat
The same concept applies to our Lifeline Interior stains as well. Acrylic Gloss and Satin (G/S) and PCS Clear Shield™ Gloss and Matte (G/M) are completely different formulations than Lifeline Interior.
Lifeline Interior, Lifeline Accents, and Prelude™ use a polymer system that provides distinct adhesion advantages when applied to bare wood. However, if these products are left exposed without a protective topcoat, they can be more susceptible to dirt pick-up and often making the surface harder to keep clean over time.
When topcoated with Acrylic G/S or Clear Shield G/M, the finished surface becomes far more resistant to dirt and grime. And because the topcoat creates a smooth, slick surface, it can typically be cleaned with much less effort.
Bottom line: Lifeline Interior, Lifeline Accents, and Prelude are strongly recommended to be topcoated with either Acrylic G/S or PCS Clear Shield G/M for the best long-term appearance and cleanability.
The Difference of Interior-Specific Topcoats
Whenever a house is over one or two years old, or you are sure your logs are dry, be sure to obtain samples of both PCS Clear Shield G/M and Acrylic G/S to try. If Acrylic G/S does not result in the smooth, slick surface that you may be expecting, try PCS Clear Shield G/M.
Choosing a Natural Finish on Interior Logs
What if you don’t want a pigmented stain on your interior wood? Do you need to apply Prelude or Lifeline Interior Clear before applying PCS Clear Shield G/M or Acrylic G/S? From a technical and performance standpoint it does not matter, although Prelude does include an additive called UV Boost that will help prevent the picture frame effect that occurs over time. Although UV Boost can be added to Lifeline Interior Clear, Acrylic G/S and PCS Clear Shield G/M, most people prefer not to spend more money than they need to, and using Prelude as a primer on bare interior wood will significantly decrease the amount of more expensive Acrylic G/S or Clear Shield G/M you will require.
Order today (don’t forget our FREE samples!) online at Store.PermaChink.com or call 1-800-548-3554.


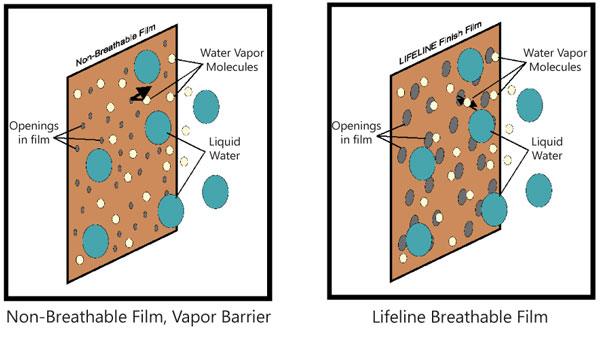
One feature of Perma-Chink’s LIFELINE™ finish systems is their ability to breathe, but what does this mean? The term describes the ability of water vapor to permeate a film.
What Exactly Does “Breathable” Mean?
To understand, it takes a little bit of chemistry and physics but the concept is fairly simple. Technically, for those of you who want to impress friends, the scientific term is vapor permeability, which is the ability of water vapor to permeate through a film.
Polymer films are composed of long chains of molecules that are bound together in a three-dimensional matrix. This matrix, in films like polyurethane and alkyd coatings, is quite dense and there is not much space between the polymer chains. These polymer chains prevent small water vapor molecules from making their way through the film. On the other hand, LIFELINE finishes form a less dense matrix with room enough for water vapor molecules to penetrate through the film, but not enough space to allow liquid water to make its way into or through the film.
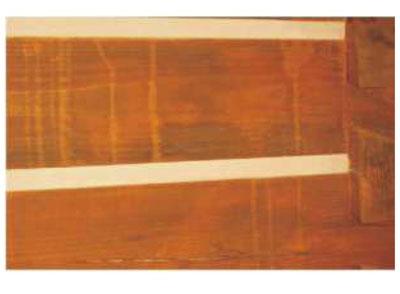
The water vapor transmission rate is measured to determine the extent of vapor permeability through a film. It can be thought of in terms of a film with many small holes- or pores- that filter out large objects but allow smaller objects to pass through (see illustrations below). These types of films are known as semi-permeable membranes, but they are often referred to as breathable films. Our LIFELINE finish system, the image below on the right, is one such system.
In addition to the chemical composition, another factor that influences vapor permeability is the thickness of the film. The thicker the film, the more difficult it becomes for water vapor molecules to permeate the film. That is one reason we constantly remind people to apply our finishes in thin layers. When applied too thickly, even acrylic latex films cannot breathe or become a vapor barrier.
Why Breathability Is Important
Logs and timber that cannot breathe end up with trapped moisture inside the wood. This moisture can bring about mold, which eventually leads to rot, and moisture makes the wood inviting to wood-eating insects like termites. But by being protected by a breathable finish, logs and timbers avoid the conditions where mold grows and the wood attracts harmful insects.
How To Prevent Mold And Mildew
Learning about Mold and Mildew
Mold and mildew are terms that are used interchangeably since they refer to the same living micro-organisms. For simplicity we’ll refer to them as molds. Molds encompass a wide range of fungal species that can live on the surface most materials, including wood. They require air, water, and food. Their color is usually white or black, but can be just about any color. If the growth is green, it’s probably a plant-like organism called algae.
The molds that concern us live on wood fibers or even on finished surfaces. Bare green wood is very susceptible to mold growth since the high moisture content provides lots of available water, and the wood’s nutrients are readily available as food. Many types of mold grow on green wood. They vary from black spots to white tendrils (commonly called dog hair). All mold growth MUST be removed before any of our LIFELINE™ finishes are applied.
Use Specialized Cleaners not Bleach
While common household bleach has traditionally been used to remove mold, it should never be used on bare wood surfaces. It is fairly easy to remove mold and prevent their reappearance underneath our finishes without having to use caustic wood-damaging chemicals like chlorine bleach. Wood cleaning products like Wood ReNew™ and Log Wash™ usually do an excellent job when used correctly.
Know Where Mold and Mildew Grows
All of our exterior stains and topcoats contain dry film preservatives that help prevent the growth of mold on the surface of the finish. They do not prevent the growth of mold on the substrate under the finish. That’s why it’s so important to thoroughly clean the surface prior to applying the first coat of stain or primer. Mold spots forming under a finish is an indication that the surface was not properly cleaned during preparation. The only way to remove them is to strip the finish down to bare wood to get at the mold.
Occasionally shaded, warm, moist environments can create conditions so conducive to mold growth that they can overcome the preservative or mildewcide additives contained in the finish.
Prevent Mold and Mildew
One way to handle this type of situation is to thoroughly clean the walls with Log Wash and then apply a coat of Advance™ Clear Topcoat mixed with a Mildew-X additive. Just be aware that the addition of Mildew-X will diminish the reflectivity – or gloss – of Advance Gloss.
A final thought about maintenance of exterior finishes: An occasional wash with Log Wash will help keep the surface clean and mold-free. If needed, a maintenance coat of Lifeline Advance will renew the water repellants, UV inhibitors, and the mildewcides. Cleaning and maintaining your exterior finish will protect the wood and maintain the appearance of your home, including keeping it free of surface mold.
Perma-Chink Systems namesake product, Perma-Chink, is the leading sealant for log homes. We’ve extended the same performance and quality of Perma-Chink in our other sealants, Energy Seal and Woodsman.
Below are our Tech Tips for all our sealants, including our Chink Paint, which provides an excellent solution to refresh old, but sealed, chinking.
Sealants Application Guide
Do you need to remove any caulk that’s already in place before applying Energy Seal™, Woodsman™, or Check Mate 2®? Applying new sealant over old caulking is never a good idea, even if it looks like the old caulk is still sticking to the wood. The old caulk should be removed for several reasons.
If the caulk has lost some of its adhesion, it may have allowed moisture to seep in under it, possibly creating decay. The old caulk must be removed to properly treat and seal the area, so it does not happen again.
The old caulk may have deteriorated due to age, decomposition, or the wrong type of caulk being used. We often find that silicone caulks were used to seal wood joinery or checks. Although silicone caulk does a good job sealing glass and tile, it does not adhere well to porous materials like wood and deteriorates rather quickly when exposed to direct sunlight.
Butyl rubber caulks and oil-based caulks may out-gas, creating blisters in freshly applied Energy Seal, Woodsman, or Check Mate 2. Inexpensive hardware store caulks harden with time and will pull away from adhesion point surfaces. No matter what type of caulking was previously used, if it is not removed, the adhesion of Energy Seal, Woodsman or Check Mate 2 to the wood will only be as good as what’s left in the old caulk.
All sealants manufactured by Perma-Chink Systems are formulated to have excellent adhesion to wood and other building materials. They contain high-quality acrylic resins to insure that they do not lose adhesion, color, or elasticity when exposed to the elements for decades.
There are some tools that can help make old caulk removal easier. Hawk-billed or linoleum knives are great tools for scraping off old caulk. If the old caulk is silicone-based, it can usually be peeled off by just pulling on it with your fingers or needle-nosed pliers.
Check caulked areas that have failed for evidence of moisture. If the wood has been damp for an extended period, these areas should be treated with a borate and allowed to dry before Energy Seal, Woodsman, or Check Mate 2 is applied.
Energy Seal, Woodsman, and Check Mate 2 work best when applied to bare wood or over stains or topcoats manufactured by Perma Chink Systems, Inc. If it is applied over an existing old caulk, you run the risk of adhesion failure and your time and money will have been wasted.
Note: Please remember that Energy Seal, Woodsman, and Check Mate 2 should always be used in conjunction with Backer Rod wherever possible.
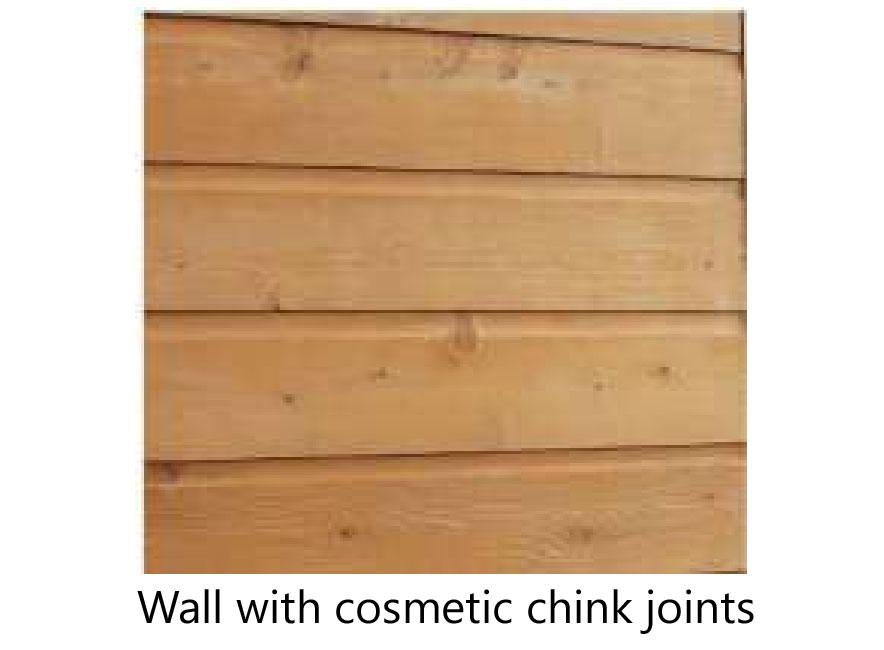
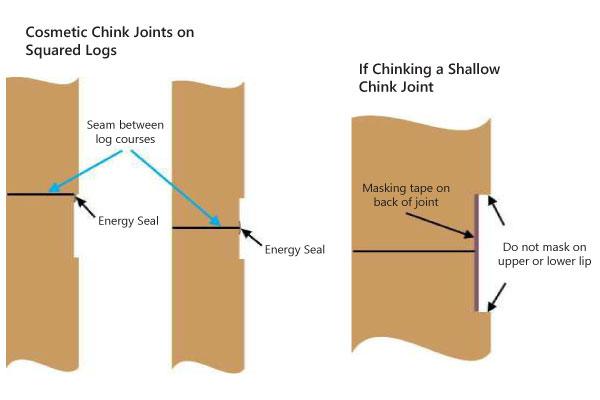
A number of log home manufacturers offer squared log homes with cosmetic chink joints. Although, some owners of these style homes ignore cosmetic joints and just stain over them. Others like the look of a chink-style home, which may be the reason that they bought the home in the first place. For these cosmetic joints, do homeowners need to use Perma-Chink® or can Chink Paint™ be used instead?
For those cosmetic joints that are less than 3/8 inches deep, the answer is fairly easy. Unless the log home manufacturer specifies the use of Perma-Chink, Chink Paint is less expensive and much easier to apply, especially if you are planning to do it yourself. Since there is no room for backing material, we have seen several instances when a thin layer of Perma-Chink was applied directly over bare wood, and blisters formed in the chinking. Even if the bare wood is covered with masking tape, it still is not be a good idea to use Perma-Chink. If the Perma-Chink only has a 1/4” lip of wood to hold onto on the upper and lower edges, there may not be enough surface area for good adhesion. If Perma-Chink is applied and masking tape is used as a backer in shallow chink joints, it’s especially important to make sure that the tape does not cover any edges. If it does, there will be virtually no adhesion of the Perma-Chink at that point.
Whenever Chink Paint is used and a seam is present within the cosmetic joint, the seam may be first sealed with Energy Seal. Once the Energy Seal is dry, Chink Paint can be applied over it. Do not use masking tape under Chink Paint. It will prevent the Chink Paint from adhering to the wood and may eventually peel off.
For cosmetic chink joints that are 3/8 inches deep, or deeper, Perma-Chink may be used; however, you should be aware that Chink Paint is a less expensive alternative that is much easier to apply. If the joint is deep enough to accommodate both backing material and the proper thickness of Perma-Chink, it’s best to actually chink it to prevent water from accumulating on top of the bottom lip.