Blog

There is a popular misconception that spraying the wood with water before applying a borate will aid the penetration of the borate into the wood. Wetting the surface does not increase the interior moisture content enough to matter. Pores of the wood get filled with water and less borate is absorbed into the wood, which lessens the effectiveness. When it comes to treating a log home with borates, the drier and more absorbent the surface is, the better the treatment.
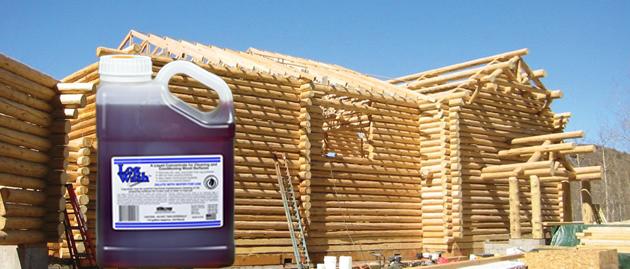
What Can You Expect from Applying Borates to Logs and Timbers?
Borate wood preservatives come in two forms: borate/glycol formulations such as Bora-Care and pure soluble borate powders like Tim-Bor. The active ingredient in both is disodium octa borate tetrahydrate, a compound chemically similar to a combination of boric acid and borax, but with a higher concentration of boron responsible for the effectiveness.
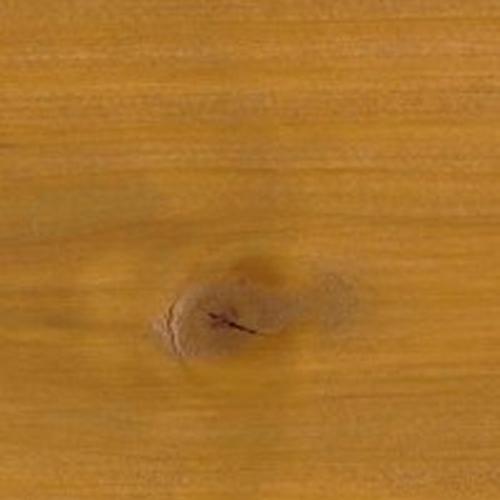
Borates are toxic to rot and decay fungi, subterranean and drywood termites, carpenter ants, and wood boring beetles. It is also toxic to beetle eggs that may be in the wood at the time of treatment or deposited later. Tim-Bor will prevent beetle infestations, but is not as effective as Bora-Care for protecting larger logs and timbers or eliminating existing insect and decay infestations.
Applying Bora-Care should end powder-post beetle activity (small round holes) within a few months to a year after treatment. However, if there is an existing infestation of old house borers (oval holes), it may take up to a year before total control is achieved.
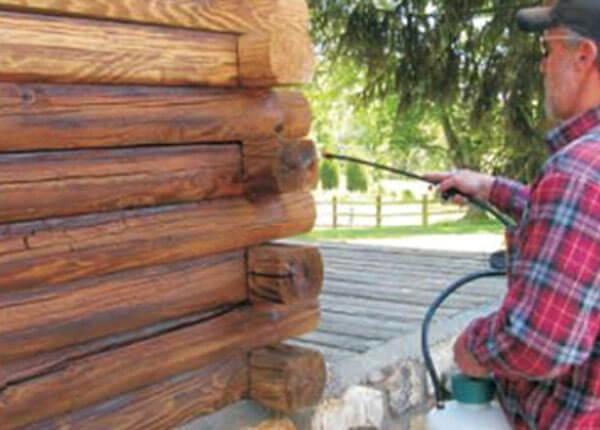
Tim-Bor and Bora-Care solutions are best applied using a compressed-air, garden-type sprayer. You can use either a fan or cone spray tip as long as you completely wet the surface.
BORA-CARE Borate/Glycol Formula
The amount of time it takes Bora-Care to dry depends on several factors: the previous finish, if any; the density and porosity of the wood; and the temperature and humidity. In warm, dry climates the drying time may be as little as a few days. Under humid conditions, it may take four to six weeks of drying time before a stain can be applied. You can check to see how drying is progressing by touching the treated wood, especially in the early morning. If the wood still feels damp, it is not ready for a topcoat.
There is a way to speed up the Bora-Care drying process, but it must be done carefully to avoid removing the active ingredient. One of the components of Bora-Care is a slow-drying glycol that helps the borate penetrate the wood. It is the glycol that interferes with the stain adhering to the wood. After a week or so, most of the borate has penetrated deep enough that it will not be removed by washing the glycol off the surface. If washing occurs in the morning, or soon after a rain when the wood is damp, you can lose a significant portion of the active borate ingredient.
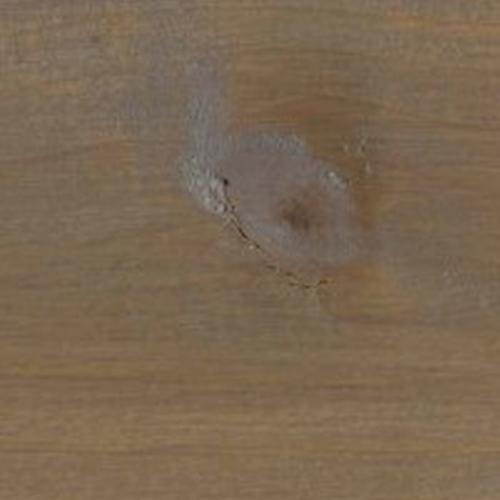
Once the Bora-Care is dry, inspect all of the treated surfaces before applying a stain. Occasionally, a white residue may appear over knots and other areas of the logs. These white deposits are created by a small amount of the borate crystalizing on the surface. Their appearance does not mean that the treatment will not work! Wipe this residue off with a damp sponge or rinse it off with a hose. If you stain over any white spots they will show through the stain.
TIM-BOR – Pure Soluble Borate Powder
Like Bora-Care, the solution of Tim-Bor may be applied with a brush or sprayed onto the surface of the wood using any type of compressed air (garden) sprayer. Since Tim-Bor does not penetrate the wood as quickly or completely as Bora-Care, it is important to not expose treated surfaces to rain or snow for at least a day or two after treatment. Tim-Bor solution dries rapidly so is not necessary to wait more than a couple of days before applying stains.
However, longer drying time may be necessary when the weather is humid or cool. Once the solution has dried, inspect all treated surfaces for any signs of white residue. Remove the residue with a damp sponge before applying stains since the white areas will show.
If you have allowed the Bora-Care or Tim-Bor to dry for three or more weeks, we suggest that you give the exterior log surfaces a light wash with Log Wash before applying finishes. This will help remove any pollen, dust, dirt, and mold spores that may have accumulated on the wood during the drying period.
Unused borate solutions should never be left in application equipment overnight. Clean and rinse your equipment after each use.
Many people are under the impression that the winter months are hard on their logs and finishes. To some extent that’s true. In cold climates where the exterior log surfaces may be covered with ice and snow for several months can be damaging if the logs aren’t properly finished. But even then, the most damaging effects of weather on wood and coatings actually occur during the hot summer months. Once homeowners understand the main causes of surface weathering, the better equipped they will be in choosing the right products to protect the home from weathering.
Understanding The Causes of Weathering
One component of sunlight is ultraviolet light, commonly referred to as UV light, or UV rays. UV light is responsible for most damage to exposed wood because it changes or destroys the wood’s lignin, a component of wood that hardens and strengthens the cell walls. In more scientific terms, this process is called photo-oxidation.
Lifeline™ finish systems help retard this photo-oxidation process through three distinct mechanisms: reflection, absorption, and chemical reaction. Our Advance Gloss and Advance Satin topcoats help reflect the sun’s rays, thus reducing the amount of UV light hitting the color coats and the underlying wood.
Glossy surfaces are better reflectors than dull surfaces, which is why our Advance Gloss provides a bit more protection than Advance Satin. However, an accumulation of dirt on the finish will significantly reduce the reflective properties of the topcoat, one reason why a home should be routinely cleaned with Log Wash™. Advance topcoats also help protect the color coats and wood from the abrading effects of wind, rain, ice, and snow.
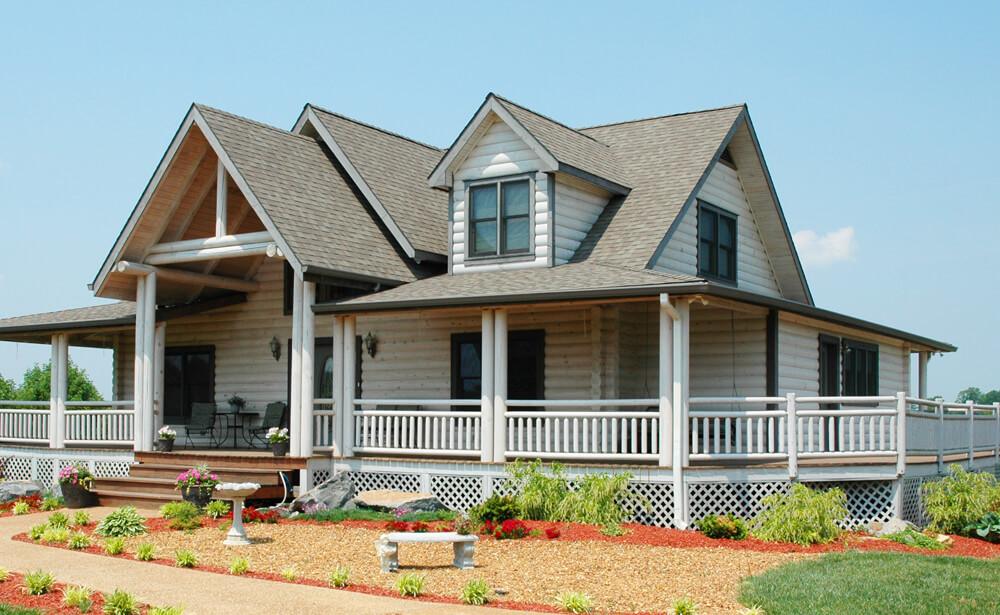
The profile of the logs has a significant impact on the weathering characteristics of a wall. The effect of sunlight and the weather on round logs is altogether different than on square logs or flat, vertical siding.
ROUND LOGS
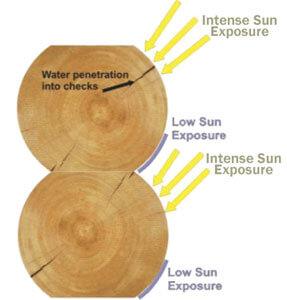
The top third of a round log is subjected to much more intense weathering than the bottom third. In cold weather climates snow and ice can accumulate on the upper third while the bottom third remains somewhat protected. Upward facing checks that have formed in the top section of the log will funnel rainwater directly into the interior of the log where it can soak into the surrounding wood. But most damaging of all is the angle of the top third of a round log towards the sun. The top third of round logs catches many times more UV light than the bottom third. Besides exposing the wood to more UV exposure, the UV inhibitors in the upper third may become used up, whereas in the lower third they may still be active. Over time this can result in a noticeable difference in color and signs of weathering between the upper and lower sections of the logs. Providing some maintenance to the upper sections of round logs without creating lap marks or color differences can be accomplished, but it may be a bit of a challenge. The key is to do the maintenance before the wood becomes gray due to photo-oxidation.
SQUARED LOGS
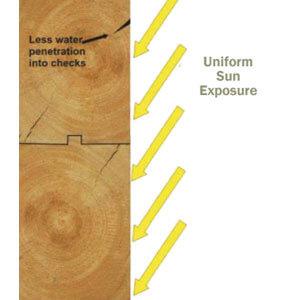
Squared logs and vertical flat siding are easier to maintain since the sun hits the logs at the same angle, and the UV light is evenly distributed over the entire surface. In addition, the flat vertical surfaces cannot accumulate snow and ice and even upward facing checks are not as prone to rainwater entering the logs. Although squared logs are subject to the same weathering parameters as round logs, and since the weathering is mostly uniform over the entire exposed surface, maintenance is easier to accomplish without worrying about lap marks and color differentiation.
LOG SIDING
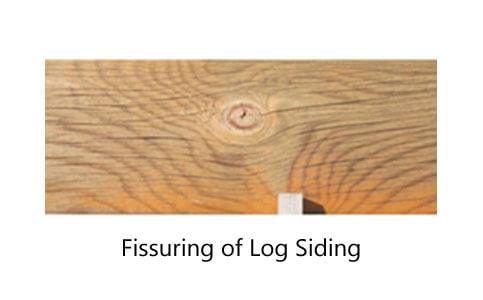
Round log siding probably presents the greatest challenge to forestalling the effects of weathering. Typically used in high exposure locations such as dormers and gable ends, in addition to suffering the same weathering characteristics as round logs, log siding has some features which makes it even more difficult to protect from the effects of the weather. Siding is often manufactured from lower quality wood than logs, frequently using green wood. This makes it more susceptible to twisting, warping and cracking. Since siding does not have the high thermal mass of full logs, during the summer months their temperature can range from 80ºF to 160ºF – or higher – during the course of one day. This puts a lot of mechanical stress on both the siding and its finish system resulting in small fissures forming on the surface. Rainwater can then enter these fissures and get behind the finish.
FISSURING OF LOG SIDING
Round log siding is typically milled quite smooth. The extreme smoothness presents a challenge applying the proper thickness of pigmented film necessary for adequate protection of the underlying wood. Smooth log siding should be coarse sanded or pressure washed using Wood ReNew™ before the application of the pigmented stain.
Protect From Weathering
There are two basic ways to combat the effects of weathering. The most effective method is to keep log walls and siding in the shade by extending roof overhangs or constructing roofed porches around the home. In conjunction with using a high quality finish system like Lifeline™ Ultra-7 and Advance Topcoat, this will be the most effective measure to prevent excessive weathering. If unable to protect by structural shade, the next best way is to apply the best finish system – Lifeline™ Ultra-7 and Advance Topcoat. But the overall performance of even the best finish system is dependent upon proper surface preparation and application technique. Avoiding the use of chlorine bleach will preserve the wood and finish, and back-brushing all coats of finish to assure adequate film thickness is crucial for long-term protection of the wood.

Log home living is a tradition that never loses its charm, the warmth of its country ambiance unmatched. And with all the modern innovation, this cozy way of life is more comfortable than ever.
Just about the only drawback has been maintaining its exterior. Log home owners dread with a passion the mighty job of refinishing that inevitably must be done to preserve the beautiful look of their natural logs. But you have come to the right place. There are plenty of reasons you’ll never have to give it a second thought again.
Wood Surface Preparation Methods
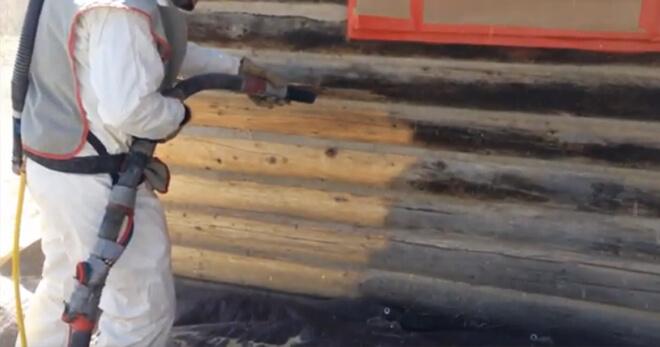
Traditionally, we dread using any kind of chemical strippers to soften the surface due to the environmental impact. Since chemical strippers only soften an existing finish, they must be used along with a pressure washer to actually remove the finish from the wall. We offer two types of environmentally-friendly wood finish removers that specifically designed for log homes: S-100 and StripIt. Both products are water-based solvents that remove most oil, water-based stains and topcoats. They contain no-harsh chemicals, are bio-degradable and non-flammable, and unlike caustic strippers will not discolor the wood. As opposed to media blasting, chemical stripping is much more user-friendly since all it takes is a general purpose pressure washer.
Check out this video on chemical stripping the finish
Round logs are a pain to sand with a flat belt. Getting to every corner and crevice takes hours, and the dust is not so great on our lungs in the meantime. Well, now you can file all those inconveniences under ancient memory. It might sound crazy at first, but the latest and greatest dry method around is blasting that aging, discolored finish off with new age glass media. Glass media is lighter than sand, so while it strikes your home with necessary force, it has less weight – this allows it to remove the stain without harming the wood. There is also no risk of blowing water into your house because the media is dry, and you can re-stain immediately.
Check out this video on media blasting the finish.
Of course, you can hire someone to do it for you. If you prefer, call us and we can find you a contractor near you, or visit https://www.permachink.com/contractors/ for a list of contractors in your area.
Either way, you can rest assured you are making the right decision for the environment, your home, your budget and your family.

There are many great things about log homes that make them appealing to the owners and future owners. Usually at the top is the look and design of the log home, capturing the spirit of the frontier and settling the wild west. Sometimes a custom home, sometimes an ordered home from a builder, but definitely a chosen home for the owners. Achieving this look is completed with the final design choice – the color of the log stain and log sealant. The two main options are contrasting colors or blended colors. Our stains and finishes pair with our sealants to make sure your home looks the best, no matter what you decide.
Color Choices
On occasion, our team is asked “What color should I choose?” While it’s up to you as the log home owner, our color selection is unmatched and we can give recommendations. Then owners have the follow-up question: “What color of log home sealant goes with this?” There are so many different combinations possible, it’s hard for us to answer for the owners.
The first decision to make is the choice between wanting a contrasting sealant to the stain or a blending or matching the sealant to the log stain. Our photo galleries reflect the many different combinations of stains and sealant, and, in the humble opinion of this author, all of them look fantastic on log homes.
Samples of Contrasting and Blended Colors


It tends to be personal preference how the home looks at the end of the day. Perma-Chink Systems’ photo galleries offer great visualizations of the possible combinations, both contrasting and blending. Our staff is more than willing to help you find that perfect combination, and we offer free color samples to make sure you like the color.
Deck Defense Deck Stain for Decks, Railings, and Fencing
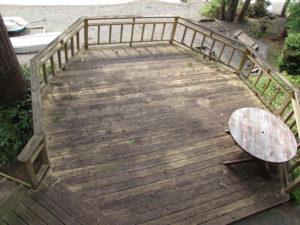
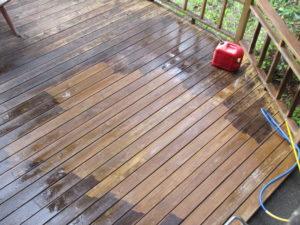
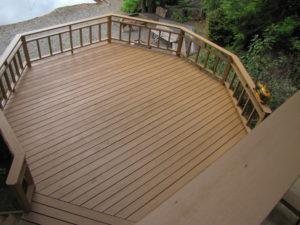
Deck Defense™ deck stain was designed for better performance, longer life and easier application. We removed the oils and hazardous driers to produce a friendlier product. Although it is a totally waterborne product, it has the penetrating properties like oil. Unlike oil, Deck Defense hardens into a lattice, supporting and strengthening the natural cellulosic fibers to protect from the inside out, not just on the surface.
Additionally, powerful additives to Deck Defense inhibit the growth of mold, mildew and algae within the cured film. We also have incorporated a bit of wax to help repel surface water. Homeowners can feel secure in the knowledge that their investment is protected from the damaging effects of wind, sun and water.
Deck Defense is easily applied to dry surfaces with a pump-up sprayer, roller, brushes, pads or an airless sprayer. Designed for a one coat application, an additional coat may be applied using a “wet on wet” method in order to achieve a deeper and richer color. Wet product should be back-brushed to eliminate splotchy areas and reduce the chances of lap marks and eliminate pooling of product.
Normal maintenance has also been made easier as there will be no need to strip off the product prior to re-application, as it will not flake or peel when properly applied. Just clean the surface to remove any dirt or dried materials, allow drying before applying your maintenance coat. Clean up with soap and water before the product dries on application equipment.


Deck Defense is available in seven colors to match our most popular colors, but we’ve now added the ability to order custom colors! If you have a particular color in mind for your deck, contact your local Perma-Chink Systems store to discuss our custom color option.
Choose Deck Defense for your home’s deck, railings, and fencing and receive these benefits:
- Excellent weather resistance
- Excellent color retention
- Allows texture and grain to show through
- Low odor and VOC
- Contains Trans-Oxide pigments for enhanced UV protection
- Easy application
- Easy soap and water clean-up
- Coverage rate: 175-250 sq. ft. per gallon, depending on substrate condition and application methods
- See label directions for additional information
Deck Defense FAQs
Click the question to see the answer.
What makes Deck Defense better than other products?
Deck Defense is a true, penetrating water-borne product without any sort of emulsified oils or alkyds. The product penetrates the wood substrate and forms lattices to strengthen and support the natural cellulosic fibers for protection from the inside out, not only on the surface.
How about water protection?
We have incorporated ingredients in the formula to serve as a deterrent to water intrusion. One must remember that waxes are sacrificial, and the beading on the surface will go away over time. This does not mean a re-coat is necessary. It is just an indication the waxes have worn away from the surface. The protection for the wood is still in place.
I already have a finish on my deck; does this have to be removed before I can apply the improved Deck Defense?
The old rule of thumb says for the best success with a coating, the best practice is to remove any old finish before applying a new product. However, if you are applying over an older, tired oil-based product, you can apply the new Deck Defense after a thorough cleaning with Wood ReNew™ or Log Wash™. If you have previously applied Deck Defense, you can also apply the newer product after cleaning. If there has been a film-forming product applied (Vista, Endure, or “painted” surfaces), then it will need to be removed prior to the application of the new Deck Defense.
Is there protection against UV damage in Deck Defense?
Yes, there are UV inhibitors within the product, plus, as transparent iron oxide pigments are also used to produce the desired color, they will enhance the UV protection through the sun-blocking properties of the color itself.
Is Deck Defense safe for the user as well as the environment?
The product is considered non-toxic, but as with any product, certain precautions should be observed as they just make good sense. Wear gloves and eye protection when applying the product and avoid inhaling vapors (See precautions on the label). Shrubbery and plants should be rinsed before and after application (or covered). Covering adjacent surfaces like concrete or paver pathways is also a good practice.
Pre-Application steps needed?
First and foremost; the surface needs to be clean and dry. New treated wood needs to “season” before application. This process will vary with temperature and humidity and the actual moisture content of the new wood. On older wood, a thorough cleaning with Wood Renew will help to restore the color of the wood and remove stains and dirt. Make sure to adequately rinse with water and check the pH of the run-off water to make sure all the surfaces have been rinsed well. Ph of run-off water should be around 6.5 to 7.5 (depending on the pH of the water source). Make sure to check the fasteners and condition of the wood prior to cleaning, replacing any decayed or unstable wood.
Do I need to sand the wood first?
In an ideal world, sanding would be best. But most applicators and homeowners do not want to go through the effort or labor expense to do so. Sanding increases the mechanical adhesion of the surface and will also make the substrate color match better. The sanded surface also opens the substrate and promotes better penetration of the product. If a decision is made to sand, we recommend 60-grit or possibly even 40-grit paper. Media blasting may also be used but may be considered overkill unless the entire home is being media blasted. After sanding or blasting, wash with Log Wash, rinse well, and allow for complete drying prior to application.
How do I mix the product?
Before applying Deck Defense, mix well. The colorants used in Deck Defense do not settle hard and re-disperse easily. DO NOT USE POWERED MIXING EQUIPMENT, as this action can possibly shear the backbone of the product and cause product failures. As with any product, box the pails together if there are different batch numbers.
How do I apply Deck Defense?
Applying Deck Defense is very easy, and many methods or “tools” can be used. On surfaces such as decking or fencing, a low-pressure pump-up sprayer is the most economical. Deck Defense can also be applied with paint pads designed for deck application or with a quality brush. Rollers can also be used, but due to the low viscosity of the product, there will be some excess “splatter” when rolling. An airless sprayer can be used, and we recommend the use of a 511 or 513 tip due to the low viscosity. Apply the product in a “flooding” method to completely cover the surface to allow good penetration.
Deck Defense should be back brushed when applied by a sprayer, or when using a pad, to make sure the product is spread evenly. Work in the same direction using broad strokes to alleviate “pooling” of product, promoting even coverage for the best appearance. Do not allow “pooling” on surfaces. Work from the bottom up and back brush on vertical surfaces as you go. Do not apply in the hot sun as this can cause “flash drying” and interfere with the penetration of the product. Application temperatures are 40-90 degrees F, and that is surface temperature, not air temperature. DO NOT APPLY DECK DEFENSE OVER FILM-FORMING FINISHES (Vista, Endure, or “painted” surfaces) AS IT NEEDS TO PENETRATE THE SUBSTRATE FOR THE BEST PERFORMANCE.
How many coats are required?
Deck Defense is designed as a one-coat stain, although due to the deep penetrating properties of the product, it may appear lighter than expected. This is especially true on older surfaces that have been exposed for long periods of time. Also, as this is a semi-transparent product that allows the natural grain and texture of the surface to show through, colors may appear blotchy or uneven, and the user may want to apply another coat. If a second coat is to be applied it should be done in a “wet on wet” application, meaning the first coat needs to be wet when the second is to be applied. If a second coat is desired after the initial application has dried, allow one week for the first application to cure completely.
What is the dry time for Deck Defense?
Dry times will vary with application, airflow, temperature, and humidity. Under ideal conditions – 60 degrees F, and 50% humidity – Deck Defense will dry to the touch in about 20-30 minutes. Dry does not mean “cured”. Wait 4-6 hours before walking on the surface and 24 hours before replacing heavy furniture.
What are the coverage rates for Deck Defense?
Coverage rates will vary considerably, based on the type of substrate and methods of application. That’s why most folks buy a bit extra when they repaint, as they don’t want to go back and buy another gallon to finish. On rough-sawn wood, like fences that soak up product, it may be as low as 100-175 sq. ft. per gallon. Older deck surfaces will also tend to soak up lots of product, so figure around 175-250 sq. ft. per gallon. On new wood, expect around 250-300 sq. ft. per gallon. A second coat application will require less product.
Is Deck Defense freeze-thaw stable?
Yes, this product is freeze-thaw stable. It’s not the freezing that could cause issues; it is the number of cycles a product is exposed to that causes damage.
What are the maintenance guidelines?
Good maintenance for decks, as well as other wood surfaces, will prolong the need for re-staining or removal. Deck Defense will not flake or peel when properly applied, so a general cleaning should be done every year with Log Wash. Maintenance requirements will vary with exposure and environmental conditions, and heavy traffic. Expect to see wear in high-traffic areas such as steps and traffic patterns first. This does not mean protection is gone but indicates for appearance purposes that it’s time for a light re-coat.
How do I clean up when I am finished?
If done right after application, tools and equipment are easily cleaned with soap and water. Warm water works best.
Due to the penetrating and adhesion properties of Deck Defense; keep overspray areas wet during application and rinsed promptly when finished. Removal after three hours will be difficult, but after three days it will be almost impossible without the use of strippers or solvents. Dispose of containers in accordance with local, state, and federal guidelines (Do not reuse containers).
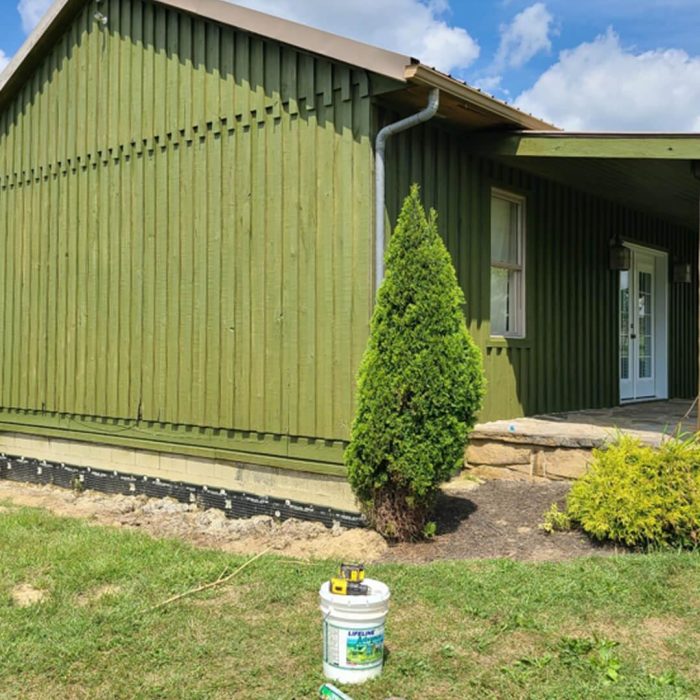
Being green isn’t being the color green – although we make a family of bold colors like this green finish in the picture above. Our standard and custom colors aside, being “green” is how our products are produced to be safe for the environment.
We know that in today’s environment being “green” is considered an important factor in the decision process of many of our customers. Being “green” – environmentally friendly – is one reason why log homes are so popular. But what about the finishes used on log homes, can they be “green” as well? The answer depends on the criteria used to define “green.”
For example, there are several manufacturers of oil-based finishes that claim their products are “green” since they contain linseed or soybean oil which are considered renewable resources. What they don’t say is that their products also contain large amounts of petroleum-based solvents and the only way to clean-up these products is to use turpentine or mineral spirits, products that fall under regulated disposal requirements due to their toxicity and high, negative environmental impact.
One standard for being “green” is the amount of volatile organic compounds (VOC) contained in a product. Both state and federal agencies regulate the amount of allowable VOCs contained in coatings, since VOCs have been implicated in both depletion of the ozone layer and global warming. These regulations have had a serious impact on oil-based products forcing manufactures to reduce solvent content by adding fillers and other solids with a subsequent reduction in attractiveness and performance.

All of Perma-Chink Systems’ LIFELINE-brand stains are water-based products that contain no petroleum distillates and comply with all state and federal regulations for contained volatile organic compounds (VOC). Ever since our inception in 1981, we at Perma-Chink Systems, Inc. have always tried to formulate our products to have the least impact on our environment. In addition, we’ve targeted healthy living areas with our specifically-formulated interior finishes by meeting the highest interior air quality standards. Through our testing, we’ve found that solvent or petroleum based finishes don’t perform as well in exposure testing compared to our water-based LIFELINE finishes. In case you doubt testing, here are some real customer testimonials:
I have been very impressed with how well your product has preserved my home for nearly three decades. – Greg D.
Very pleased with Perma-Chink products. They are easy to use and they brightened up our 35-year old cabin with a warmth of color, couldn’t be happier! – Valerie K.
I am a ticketed carpenter and a ticketed log builder. I believe that if you build with wood you must protect it. I believe that Perma-Chink provides you with the best line of products to do so. They are environmentally friendly and if you apply them as they recommend then they will perform as you expect them to. I use only Perma-Chink products and I recommend you do so as well! – Dave B.
Our stains and sealants are recognized by environmental organizations as being truly “green” since they have minimum impact on the ecosystem. And since clean-up requires only soap and water, they do not contribute any toxicants or pollutants to our surroundings.
It’s a sad fact that being “green” has become a meaningless term used by companies’ marketing departments to help promote and sell their products. We are proud to say that our technical staff will continue to produce and develop superior products that do not damage our environment and have no adverse health effects on either the people applying our products or individuals who live in log homes stained or sealed with materials supplied by Perma-Chink Systems, Inc.
In fact, our chemists evaluate all the components that go into our products to ensure they are the safest for our employees, product applicators, the homeowner, and the environment. Our sealants are completely free of petroleum distillates which has improved the sealant’s performance as well as made it safer for people and the environment.
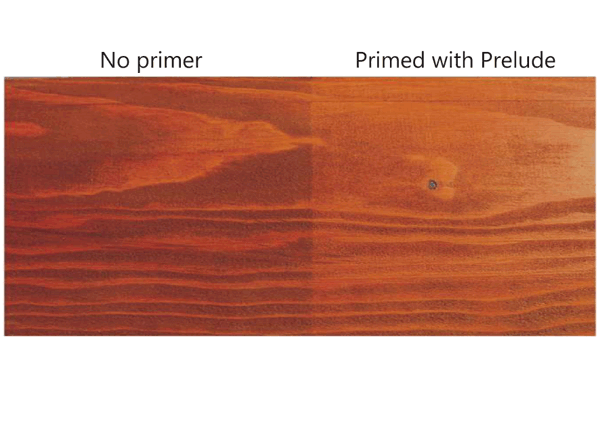
Although paint primers have been used for many years, clear primers for wood are few and far between. Lifeline Prelude™ is the only water-based clear wood primer on the market that’s specifically designed for use on log and timber homes before the application of a water-based stain.
Following are a few situations where we recommend the use of Lifeline Prelude:
1. After a home has been media blasted.
2. If a home is aggressively pressure washed to the point where the surface is feathered and the porosity of the wood varies from area to area.
3. On wood where the surface has been unevenly sanded.
4. On rough cut siding before the application of the color coat(s).
5. If a section of a wall has been repaired or replaced and the new sections don’t match the surface characteristics of the old.
6. Whenever an older log home (more than 80 years old) is going to be restored. Once the surface of old wood is cleaned of grayed wood it typically takes on the porosity characteristics of a blasted surface.
7. Whenever you want to use only clear coats on interior surfaces. Although Lifeline Interior Clear can be used, the use of Lifeline Prelude as the first sealing coat is a somewhat better deal, since it already contains UV Boost. Once the Prelude dries, Acrylic Gloss or Satin or PCS Clear Shield™ Gloss or Matte can be applied over it.
8. Whenever a home is completed but may remain without an exterior finish for many months, a coat of Lifeline Prelude will help prevent surface graying and make it easier to clean when it comes time to stain.
There may be other occasions when a priming coat will make a home more attractive, easier to stain or add to the longevity of the finish system, but it should never be used on smooth surfaced wood to obtain a lighter final color.
Lifeline Prelude should never be used as the final coat. It is a primer and must always be covered with one of our interior or exterior finish systems.
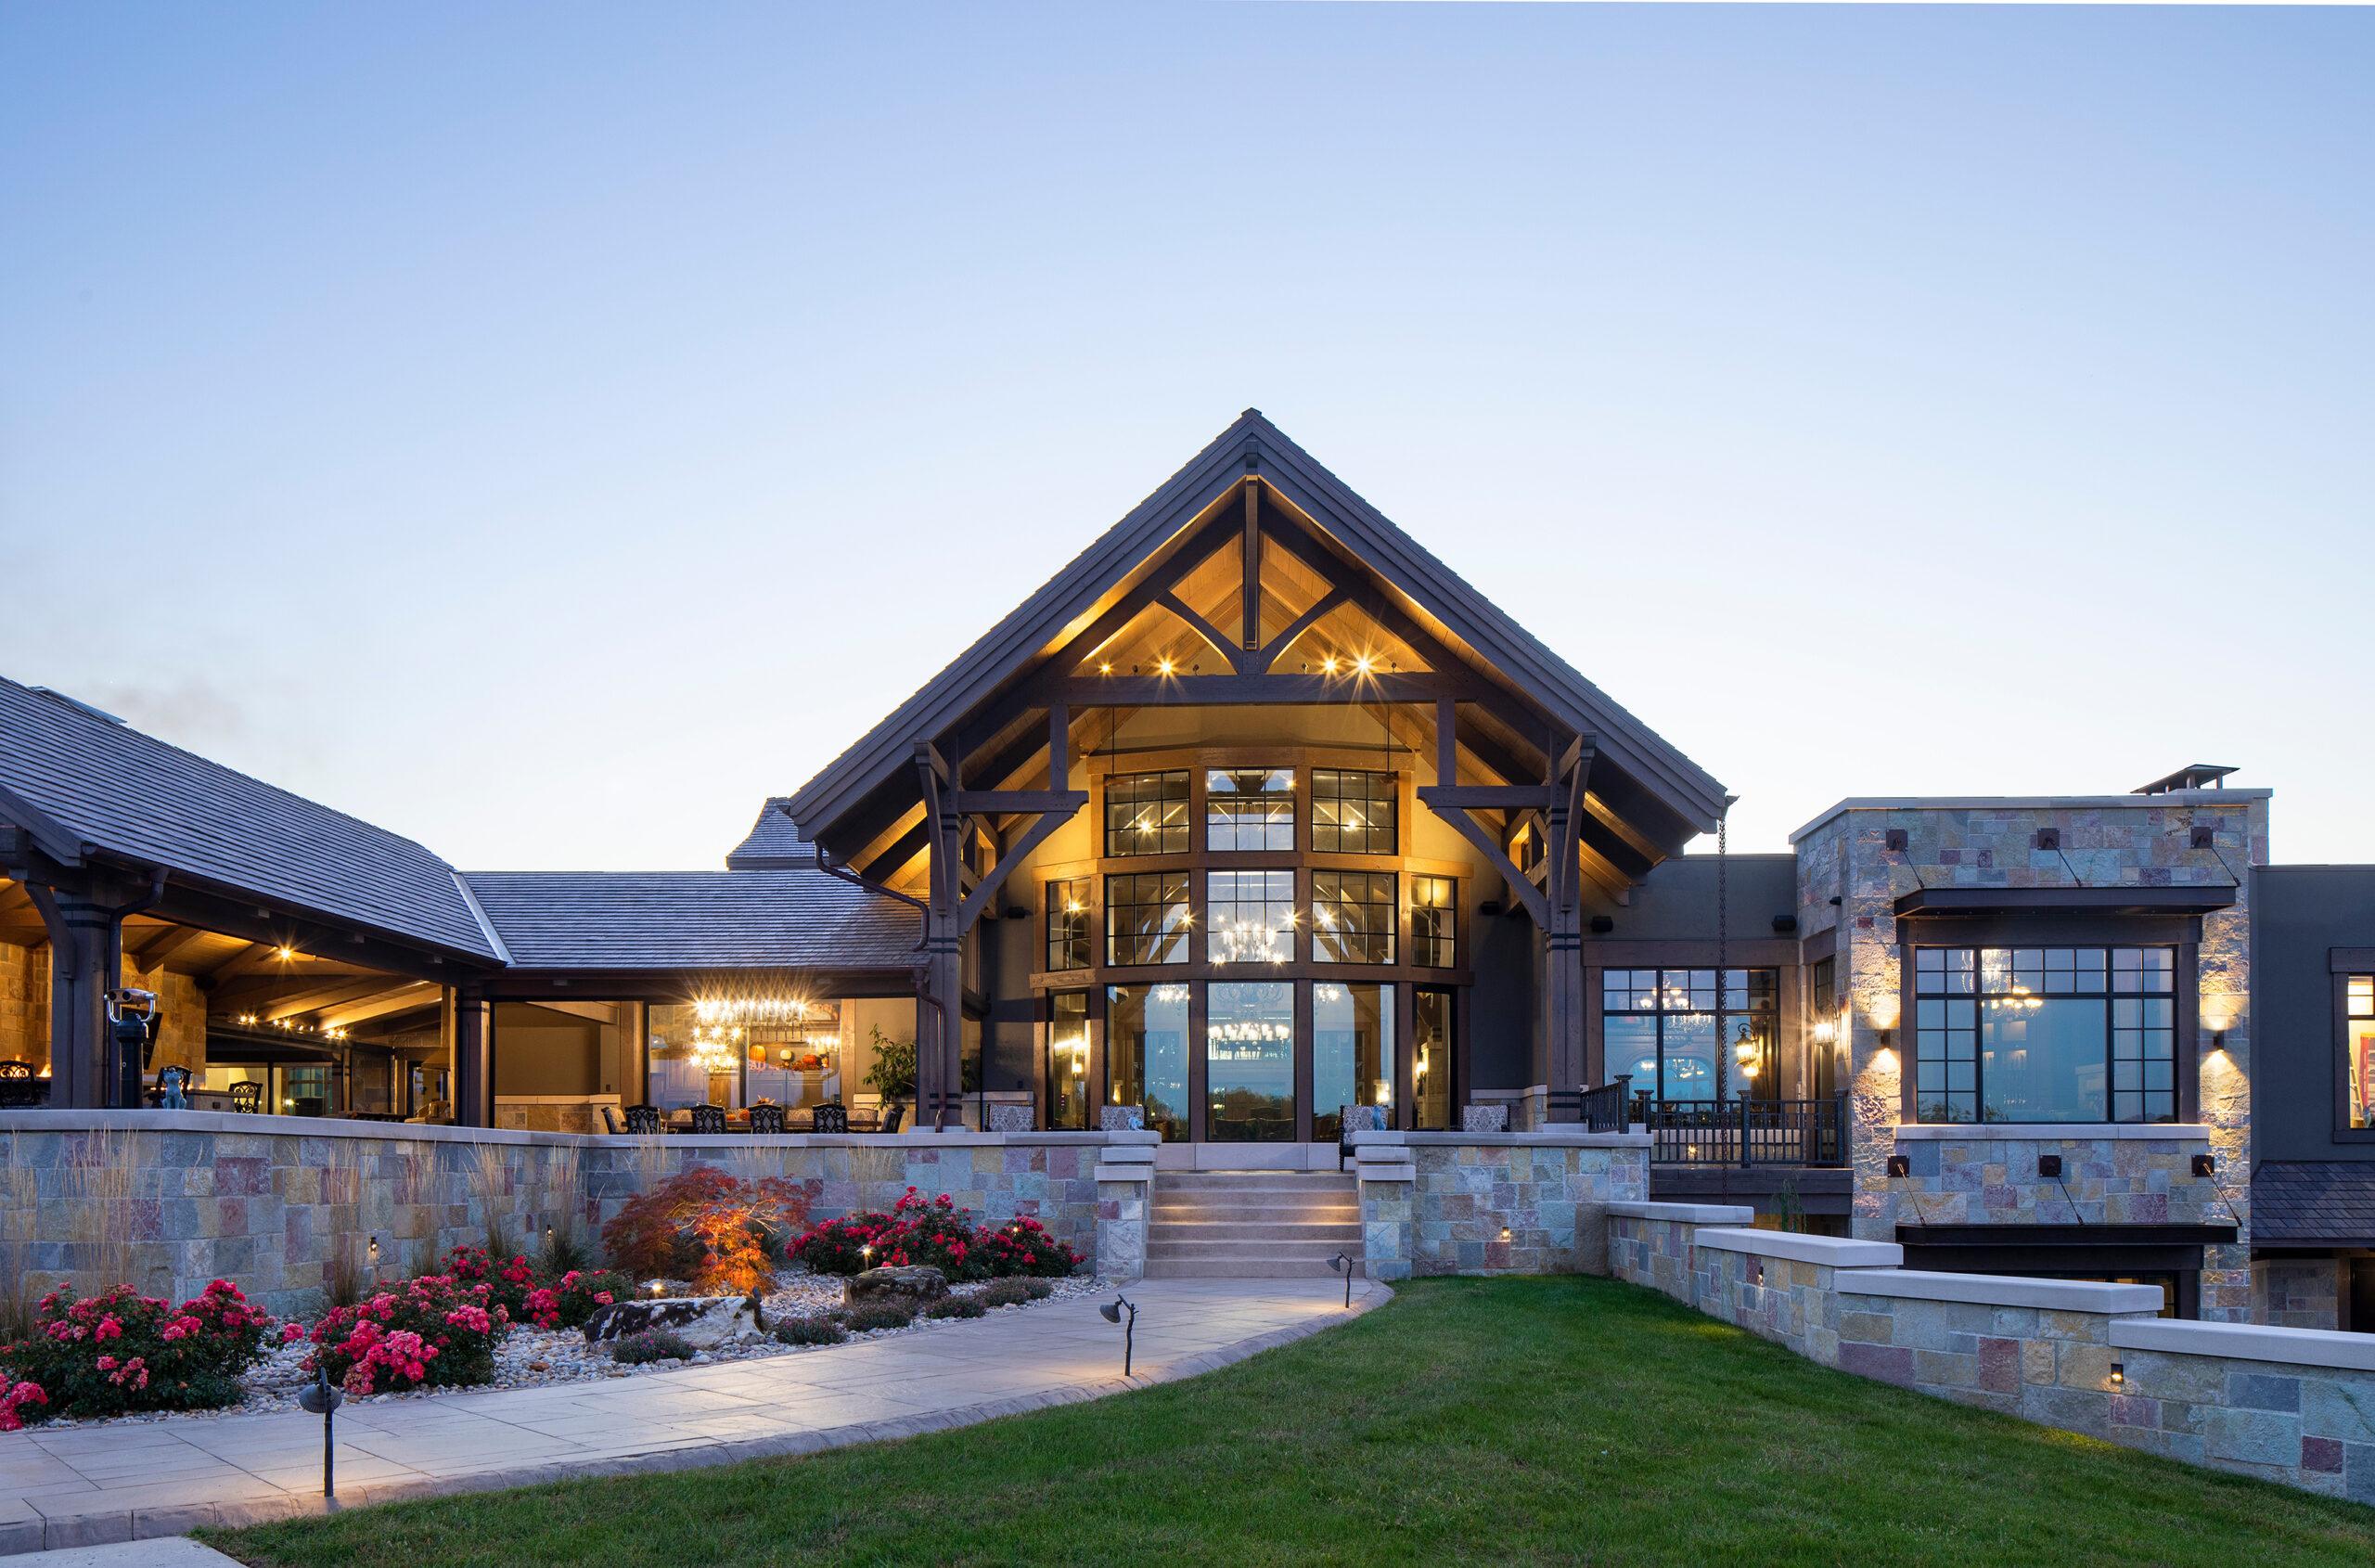
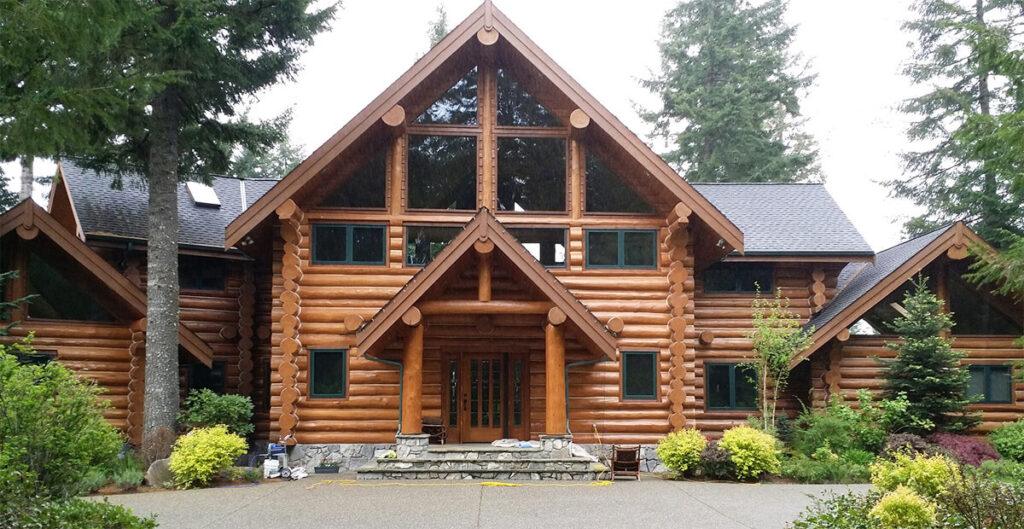
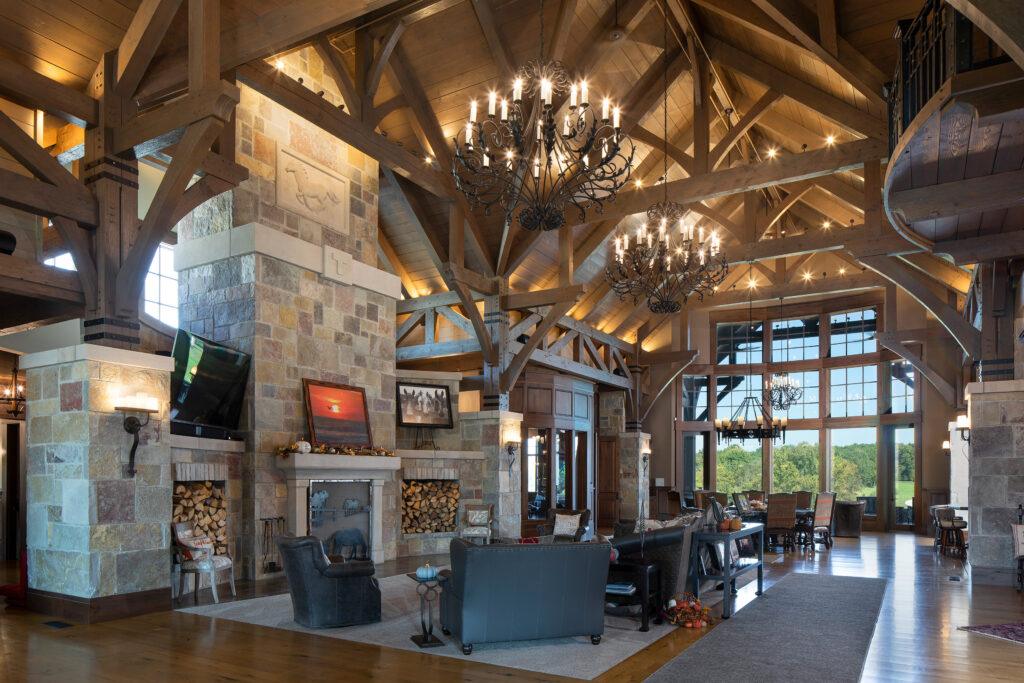
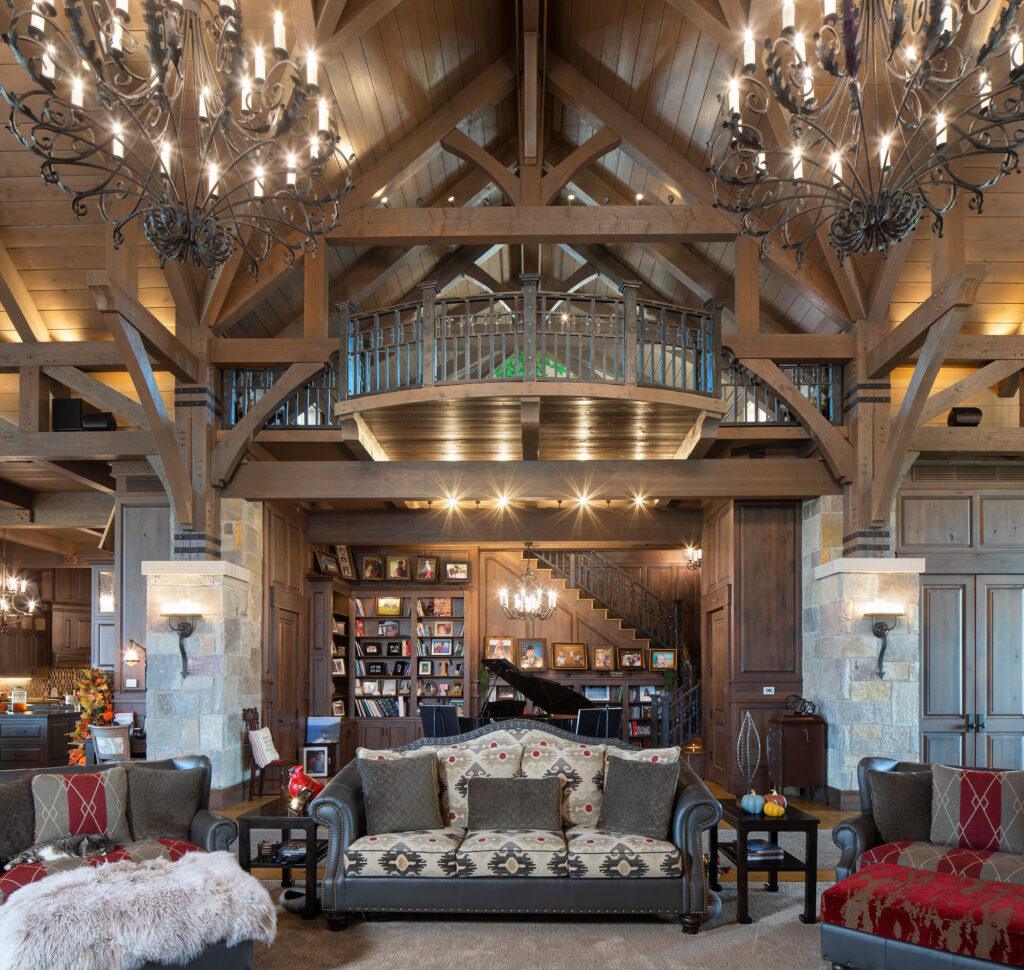
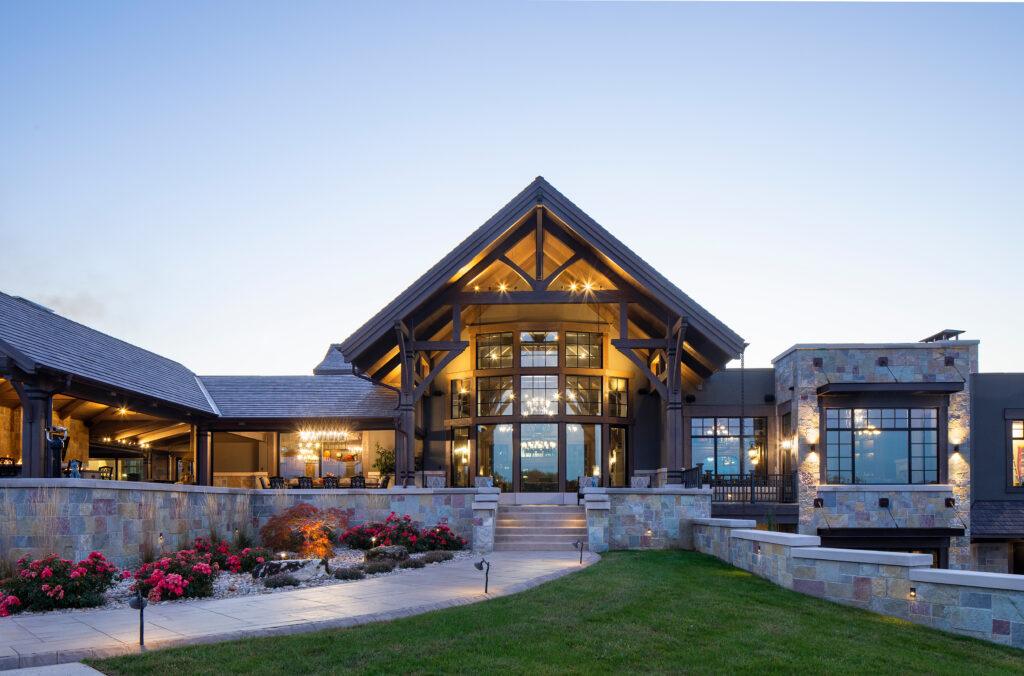
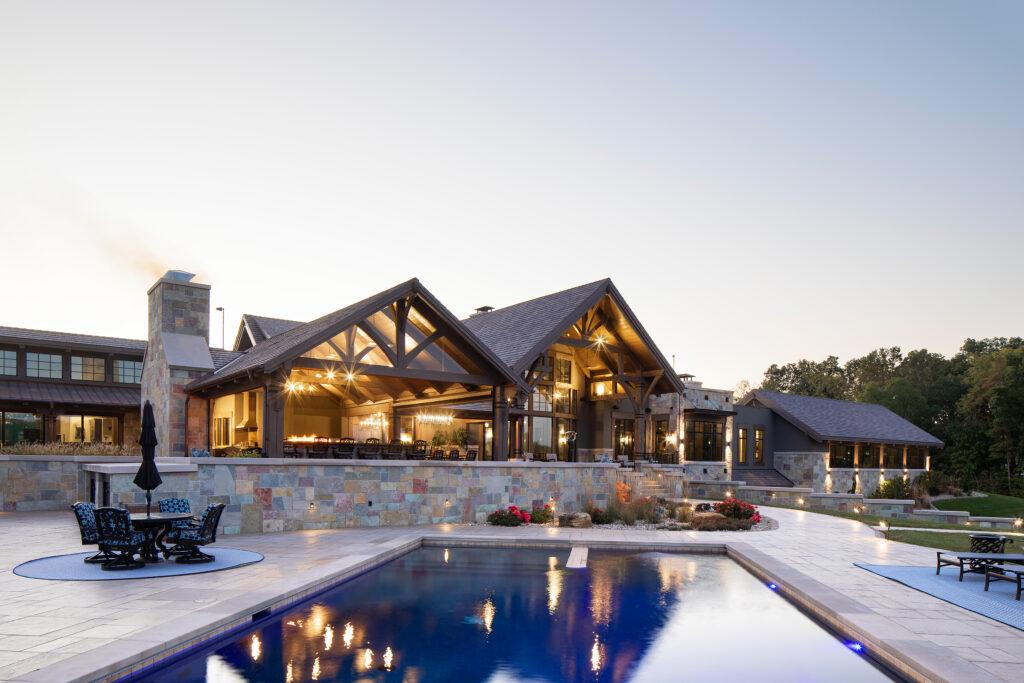
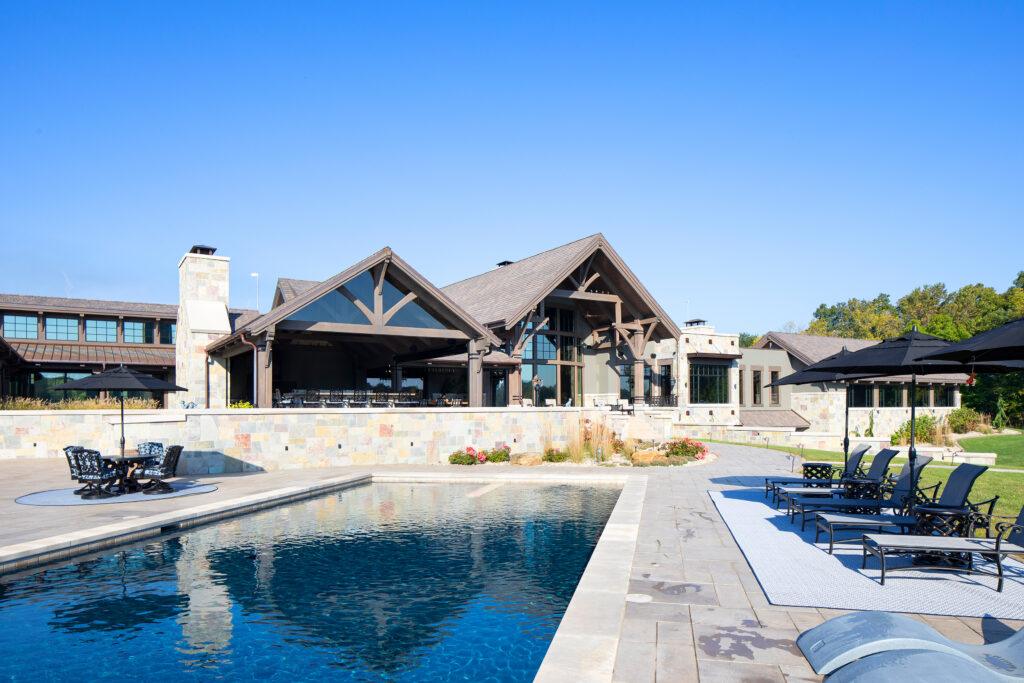
This Custom Luxury Timber Home Is Draped In Perma-Chink Systems Ultra-7 And Advance Satin
This extraordinary custom timber frame home was designed by Jan Donelson with Timberland Design and Hearthstone Homes, in TN. Hearthstone Homes feature an unmatched ability to create any imaginable style of custom, luxury, handcrafted Heavy-Timber or Log-Based Home. Timber framing is a noble type of construction that utilizes exacting variations of mortise-and-tenon type joinery and massive timbers to form the framework of a building. Note Hearthstone’s signature ‘antique weathered’ texturing on the Doug Fir Timbers
Log Home Care crew did the staining and energy seal application in 2018.
Picture Gallery
“Thompson Thrift Construction has been a national residential and commercial builder since 1986 with over 500 employees operating in 21 states. Being asked to complete the interior and exterior stain application on the owner’s personal new build residence was an honor. This client set high standards for every facet of the planning and execution of the build process, including the finish work, and after extensive product testing Perma-Chink Systems LIFELINE Ultra-7 Smoke and LIFELINE Advance Satin were selected for the project. The surfaces were treated with Log Wash, and some areas with Wood ReNew, and the stain/topcoat applied as specified by the manufacturer. The results are stunning.”
Wayne Bell, Owner Log Home Care, www.LogHomeCareOnline.com
For more images of this home visit:https://hearthstonehomes.com/photo_gallery/paris-il-timber-frame/

Most of our labels list the recommended surface temperature range for the application of the product. However, there are situations when you may need to know a bit more detail about the surface temperatures in order to schedule or complete a job. In some cases, there are steps that can be taken to help cope with extreme hot or cold temperatures. Just remember that we are concerned with surface temperatures, not air temperatures. It is the temperature of the logs that must be considered, not the temperature on the thermometer hanging on the porch.
Finish Removers
Recommended Range
StripIt® 55°F – 90°F
S-100™ 50°F – 90°F
Finish removers become less effective as the temperature decreases. It is not that these products can not be used in cold temperatures; however, it may take several more hours of contact time to soften an existing finish to remove it. One positive note about both S-100 and StripIt is that prolonged contact with the surface will not damage the wood fibers.
At high temperatures the challenge is preventing either product from drying. Preventing this can be accomplished by keeping the surface damp. When using S-100 mist the surface with water or if using StripIt add additional StripIt to the coated surface (Note: Do Not mist StripIt with water). Additionally, pressing a sheet of plastic (6 mil) against S-100 or StripIt will slow down the evaporation rate. If S-100 or StripIt dries on the surface, they are no longer active. To remove the dried residue of S-100 or StripIt from the wood surface, apply an additional application of the respective material to re-wet the surface followed by pressure washing. As long as they are kept moist (Water for S-100 and additional material for StripIt) in hot weather, these products do not take very long to do their job.
Cleaners & Brighteners
Recommended Range
Log Wash™ 40°F – 90°F (not stated on label)
Cedar Wash™ 40°F – 90°F (not stated on label)
Wood ReNew™ 50°F – 90°F (not stated on label)
Oxcon™ 50°F – 90°F (not stated on label)
Similar to finish removers, cleaners and brighteners work better at warm temperatures. Of the three products listed above, Log Wash is the least affected by cold temperatures. A wash down with Log Wash even at temperatures close to freezing will still do some good. On the other hand, at very cold temperatures, applications of Wood ReNew and Oxcon may not be very effective. The reason is because they rely on chemical reactions to accomplish their tasks. Reaction rates significantly decrease as the surface temperature approaches 32° F.
If any of these products are allowed to dry, they stop working so in hot weather they too need to be kept wet with an occasional light mist of water. It is especially important to keep Oxcon wet. If Oxcon dries on a wall, crystals will form on the top layer of wood. Once formed they are difficult to rinse off. Even a minor amount of oxalic acid residue can reduce adhesion of a finish.
Lifeline™ Exterior Finishes
Recommended Range
All Lifeline™ stains 40°F – 90°F
Lifeline Advance 40°F – 90°F
Log End Seal™ 40°F – 90°F (not stated on label)
Deck Defense™ 40°F – 90°F
Log & Timber Defense 40°F – 90°F
What happens in early spring and late fall if the temperature falls below freezing a few hours after the finish is applied? As far as we know freezing conditions after film formation has no effect on the look or performance of the finish. The surface temperature limitations pertain to the temperature of the walls while staining, not to temperatures that the walls may be exposed to after film formation.
If a film does not form, applying a second coat can result in failure. Applying a second too soon, will result in the film balling up into little beads during back-brushing. The one thing you never want to do is attempt to stain logs that are frozen. A coherent film will not form and the finish will flake off the wood. At high temperatures drying time is also an issue but in this case, the film may dry so quickly that it will not be able to be back-brushed.
An Advance finish applied at cold temperatures and high humidity presents a somewhat different challenge. The longer it stays uncured, the more susceptible it is to blushing. At high temperatures the fast-drying time may prevent adequate back-brushing.
Although the application surface temperature range on the labels of our finishes is between 40°F and 90°F, the most favorable temperature range for easiest application is between 50°F and 80°F.
The finish most sensitive to cold weather application is Log End Seal. Log End Seal is water sensitive before it completely cures and since cold weather retards the curing time, there is a good chance that the Log End Seal may blush white and stay that way for several months, especially on thicker applications. When the temperature increases, the film will eventually become clear and stay that way. It is recommended to coat Log End Seal with Lifeline Advance Gloss or Satin to protect it from blushing and dirt pick-up.
Sealants
Recommended Range
Perma-Chink® 40° F – 90°F
Energy Seal™ 40° F – 90°F
Woodsman™ 40° F – 90°F (label states 40° F – 120°F)
Check Mate 2® 40° F – 90°F (not stated on label)
When applying any of our sealants in cold weather there are two main factors to consider, the temperature of the logs and the temperature of the product. Provided the logs are dry and not frozen, any of our sealants can be applied without comprising appearance or performance. The problem associated with very cold sealants is viscosity, their viscosity increases as the temperature decreases. This is especially apparent when trying to squeeze product out of an 11 or 30 oz. tube or when attempting to load a bulk loading gun from a pail of sealant. Cold product is also more difficult to tool. It is always best to store our sealants in a controlled environment (50-70°F). That will make them easier to apply and tool. Once applied the only effect that freezing temperatures have on our sealants is lengthening the time it takes for them to cure. In the summer months it may take Energy Seal or Perma-Chink a few weeks to cure, whereas in the winter it may take a couple of months to completely cure.
No matter the time of year, it is advisable to never apply a sealant in direct sunlight. Even if the day is cool, direct sunlight can cause the surface to skin over before the remaining free water has a chance to evaporate resulting in blisters forming on the surface of the sealant. In very hot weather blistering can occur if the sun rapidly heats the wall after chinking has been applied, especially if the underlying wood is green or damp. Draping the chinked wall with a tarp until the chinking cures will help prevent the formation of blisters. Another challenge using our sealants in very hot weather is that the surface may dry so quickly that tooling time may be reduced to only a few minutes. If masking tape was used to protect the surrounding outer surfaces, it is imperative to remove the tape before the surface starts to dry. If the tape is left on too long, it will pull off the skinned-over layer of sealant. Although we do not specifically state an upper limit on the Perma-Chink and Energy Seal labels, we discourage either products’ use above 90°F.
Note: The upper limit of the Woodsman™ application temperature range is 120°F on label. That is fine if the Woodsman is to be used between courses of logs, but if it is going to be used as an external sealant like Energy Seal, 90°F should be considered the upper temperature limit.
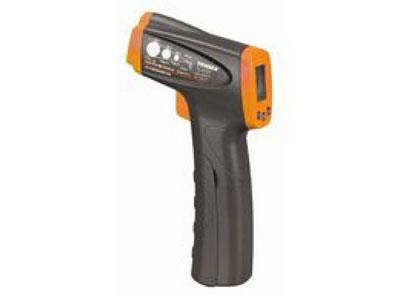
The Tool Every Contractor/Applicator Should Have
These days there is no reason for any professional to profess ignorance about the surface temperature of a wall prior to the application of any of our products. Infrared thermometers used to be quite expensive but a quick search on Amazon.com resulted in a number of them that cost between $25 and $50. At that price they are affordable to anyone including a homeowner who wants to eliminate the guesswork of determining if a wall is too hot or too cold before applying a finish or sealant. These days there is no reason for any professional to profess ignorance about the surface temperature of a wall prior to the application of any of our products. Infrared thermometers used to be quite expensive, but a quick search on Amazon.com resulted in a number of them that cost between $25 and $50. At that price they are affordable to anyone, including a homeowner who wants to eliminate the guesswork of determining if a wall is too hot or too cold before applying a finish or sealant.


Perma-Chink Systems History Over 40 Years
The Beginning
In 1980 my neighbor told me about building a log home in Eastern Washington. He said that he loved the home and the lifestyle but was disappointed that with the wind constantly blowing and harsh cold winters, there was no real effective way to seal the gaps between the logs. The house leaked air and heat, and wind-driven rain literally came right through the walls.
He tried various caulking materials with little success. Caulking around a bathtub or sink was significantly different from ‘caulking’ literally miles of seams between logs in a log house. After a number of conversations and experiments, it became apparent that there was no readily available product that could seal the gaps, look like authentic chinking, and last more than a few months.
After literally months of trial and error, it became apparent that if we were going to design a material that would be acceptable, we would have to design it ourselves.
Defining a New Industry Standard
The product we were designing was to be a replacement for what was known in the Log Home Industry as chinking – the sealant that historically provided the seal between the logs. A “chink” is a gap – as in Biblical Times, “A chink in his armor’. Therefore, chinking is a material to fill a gap. Throughout the centuries of constructing dwellings out of logs, a number of methods were used to seal in between them. Early builders used pretty much anything they could get their hands on – mud, straw and mud, cow manure, mixtures of cement and mortar, and a method I discovered in Russia that was a particular type of moss that, when pounded into the gap, excreted a compound that delayed wood rot.
During our investigation we determined that in order to be a true solution the sealant must meet most important requirements.
- It had to be textured to look like authentic mortar chinking.
- It had to ‘look like it belonged there’.
- It had to be able to expand and contract in order to follow perpetual log movement.
As logs dry out in the summer, they shrink in diameter – in the winter and rainy months they absorb moisture and swell, increasing in diameter.
- The sealant had to adhere tightly to the logs and form a continuous watertight seal that would not separate from the wood.
- It had to be easy to apply – in some cases, gaps up to 4 and 5 inches, and not slump or wash out.
- And most importantly, it had to LAST for decades.
Common caulking materials were quickly ruled out. Everyone has seen thin caulking beads applied to exterior trim that inevitably separate, peel off, flake, crack, and ultimately fail.
No ‘caulk’ could adhere to the wood well enough, could not be applied to the thickness and height required without slumping and running out of the joint, and all caulks had that smooth, artificial look that frankly, of course, looked like caulk! It’s okay for around the tub or sink, but not for my log home, thank you.
Creating the Industry Standard
So, after months of experimentation and learning a tremendous amount of the chemistry of what are called polymers (the chemical building blocks of literally everything that we commonly call paint, plastic, vinyl, glue, etc.), we designed a unique sealant that met all of the most important requirements.
During the design phase we located an innovative small company south of Seattle that manufactured a synthetic stucco. They had experience and machinery that helped us scale up lab designs to large-scale production. We began selling early product in 1981, and the first house we did was in Sun Valley, Idaho – in the middle of winter.
Soon after we had a saleable product that met every design requirement, I did a little market research and discovered that the larger part of the national market for log homes was in the eastern part of the United States, and in particular, the southeast. I also discovered that of the numerous styles of log homes, the three largest manufactures of ‘Dovetail’ log homes were within 100 miles of Knoxville, Tennessee. I liked the Dovetail design because the nature of the structure, and the way the logs are stacked resulted in a chinking gap of up to 4 inches! In some cases, almost 25% of the wall area was chinking!
So, we set up a manufacturing plant in Knoxville, Tennessee. Timing was right because as soon as log home owners and log home manufacturers discovered that we could finally provide a dramatic solution to one of the most significant and perplexing aspects of a log home – the business grew rapidly.
Winning the Manufacturers
Early adopters such as Hearthstone, Honest Abe, Stone Mill, and Appalachian Log Homes helped pave the way for essentially all others to follow. As a matter of fact, one of the earliest applications for any manufacturer was Appalachian. Turns out they had a contract with the US Forest Service to build an outhouse. The location was remote, and the house needed to be completely assembled and transported via helicopter. Obviously, mortar chinking could not withstand that type of stress, so they tried Perma-Chink. That outhouse is still standing today and is weather tight – some applications simply CANNOT fail!
The development of synthetic chinking solved one of the most serious and vexing aspects of the Log Home Industry. The chinking formulation is unique and not simply ‘caulk with sand in it’ as others have offered.
Rick Denton, Honest Abe Log Homes President Emeritus said, “Perhaps the invention of Perma-Chink kept Honest Abe in business, as well as every other log home company using a chinked product line.” Read his story here https://www.honestabe.com/blog/perma-chink/.
What started out as an idea has revolutionized the entire industry. Worldwide, every log structure uses synthetic chinking, and the largest supplier of the most authentic and highest-performance log home chinking is Perma-Chink.
Expanding the Preservation of Log Homes
The next vexing challenge was with log home stains and finishes. Every log home owner wants a log home that looks like an outdoor piece of furniture. One that blends in with the rustic back to nature look and feel of the surroundings. No one would consider painting a log house. That would be like painting a beautiful hand rubbed antique! Log home owners tend to start down the following path after stains start failing: That beautiful stain we applied only lasted a year or maybe two and after two recoats, we may as well paint it. Why can’t someone develop a stain that looks like a furniture grade finish and LASTS?
We began to have literally thousands of people say, ‘You solved my sealant dilemma – now do you have a solution to the stain and finish dilemma?’ So challenge number two was tackled.
Creating the Best Log Home Stains
We used the knowledge and expertise we developed in formulating Perma-Chink Chinking (remember the polymers?) to design the longest lasting semi- transparent stain in the Industry. The formulation is also unique, provides that ‘furniture grade’ appearance, and outlasts any exterior stain on the market. Also, with a Clear Coat (which Perma-Chink Systems also introduced), when the finish is finally starting to “wear” out, all that is needed is a cleaning and application of an additional clear coat. That eliminates the tint buildup and subsequent hiding of the wood and completely eliminates the phrase ‘After two re-coats, I may just as well paint it.’
I personally require hands-on experience with every product Perma-Chink Systems offers. We are dedicated to providing the best products available for the care and maintenance of Log and Timber Frame Homes. As history has shown, and something we take pride in, is ‘Whenever a log home owner becomes aware of a concern, whether it be sealing, staining, or preservation or maintenance, we already have a solution.’
Take a Look At Total Cost
An interesting story – I recently had a heating problem with my log house in Colorado. The bill to repair the system included a small starting capacitor in one of the air handlers. The bill for the part was $6.25 and the bill for the labor was $220! So why would I try save sixty cents on the capacitor when the cost by far was in the labor to replace it? Same is true with a log home stain. By far the largest cost is in application and labor, so it pays to use the best product available. Cheaper stain is a cheap solution that sets you up for a repeat in a year or two, and in the meantime your exterior looks like crap! Pay the extra sixty cents and buy yourself some peace of mind.
By choosing our high-performance finish like Lifeline™ Ultra-7, you are ensuring that the finish will look as beautiful years after application as it did the second day it was applied thanks to a balanced formula of transparent iron oxides, mildew inhibitors and an advanced polymer resin.
Our Success is From Working With Great Customers, Industry-leading Partners, and Fantastic Employees
I am humbled that Perma-Chink Systems has become a ‘household’ name in the log home industry and is recognized for highest of quality. Our products grace the log houses of such noted Americans as former President Jimmy Carter, clothing designer Ralph Lauren, movie stars Tom Cruise, Olympic champion figure skater Kristi Yamaguchi, Nascar champion Dale Earnhardt (read the story here) and thousands of great American home owners.
I am proud of my company, of my employees and our customers. Beginning with our 40th Anniversary, Perma-Chink Systems’ new slogan is “Simply Unmatched”.
By being engaged in best quality products and the best customer service, we will attain our goals and make great strides towards meeting our customers’ expectations for years to come. We raise a toast to the next 40 years of great products, service, and customers of Perma-Chink Systems.
- The late Rich Dunstan, President Perma-Chink Systems, Inc.
How to Prepare New Construction Log Surfaces for Finishing
New logs may look clean and fresh to you, but it doesn’t mean that they are ready to stain. There is some preparation involved in getting new logs ready for finishing.
Logs that have been exposed to the sun may have slight gray areas on them and dirt, dust and mold spores are probably on most of the logs. It is important to start with a clean, uniform surface before applying a coat of stain, since dirt and discolorations will show through semi-transparent stains and the stain will seal in any blemishes. Cleaning also opens up the pores of the wood, allowing better adhesion of the stain. This is especially true if there is a mill glaze present on the logs. Not only will the mill glaze reduce the stain’s performance, but caulks and chinking will have a difficult time adhering to mill glazed wood.
Aggressive cleaning of a new log or timber home is not required. A light cleaning with Log Wash and a pressure washer will usually remove the dirt and mill glaze, as well as clean the surface to prevent the formation of mold under the stain. If the new logs have started to gray from sitting unprotected in the sun, a percarbonate cleaner like Wood ReNew will restore the wood back to its original color. Log Wash and Wood ReNew are much safer products to use compared to bleach solutions which destroy wood fibers.
The leading cause of stain adhesion failures and discolorations appearing under the semi-transparent stains is inadequate rinsing of a bleach-cleaned surface. Bleach (sodium hypochlorite) solutions are alkaline (high pH). Wood, on the other hand, is slightly acidic (low pH). Whenever low pH materials are exposed to high pH solutions, chemical reactions occur. Often these chemical reactions are minor and do not affect either material, but in the case of wood, exposure to bleach solutions may result in several irreversible reactions that may not become apparent for several months. Once the wood fibers are damaged or destroyed, a stain will not properly adhere to the surface and eventually will chip or peel. Even when used at a low concentration, a bit of bleach residue left of the wood will eventually result in discolorations due to iron tannates coming to the surface under the stain.
Occasionally, steel straps used to bundle the logs during transportation will leave iron stains that need to be removed with OXcon oxalic acid. Whenever oxalic acid is used, be sure to clean the entire wall to avoid blotches and streaks.
We never suggest media blasting new construction, but if that is what your log home manufacturer recommends, be sure to use a fine grit media to avoid damaging the surface of the wood.
Congratulations on your new home and happy cleaning!
How to Use Deck Defense™ and Log & Timber Defense™ Products
Proper treatment and care of your horizontal and vertical structures can add beauty and longevity to your entire living space. To help seal and protect your deck, fences, or railings we recommend using our waterborne finish Deck Defense. For vertical structures such as wood siding, trim, timberframe, beams, and rough-cut cedar we recommend Log & Timber Defense.
Defense products work by penetrating several layers deep into the wood fibers creating a lattice network that strengthen and protect your wood from the inside out. These products are formulatedfor better performance, longer life, easier application, and upkeep. They also will not flake or peel when applied according to labeled instructions.
All structures should have a surface moisture less than 20% before applying a Defense product. High moisture content will hinder the penetration and adhesion of the finish. If constructing a new deck, boards should be placed bark side down. Also, if the boards have a high moisture content, they should be placed in direct contact with one another when laid down. As the boards dry a gap will open for proper airflow and drainage. If you gap them when they are too wet, the gaps between the boards will likely be too large. Having to estimate what the final gap will be, can be avoided if moisture equilibrated kiln dried boards are used. Finally, let the new boards season for several months prior to application of a finish. This will allow time for the wood to shrink completely and come to an equilibrium with its environment.
Wood Preparation
In situations where a Defense product is going to be applied on an established deck, the deck must be free of the existing finish, in addition to being clean and dry. The cleaning solution required depends on the condition of the boards.
Log Wash™ is an excellent wood cleaner to remove dirt, grime, pollen and surface stains from bare wood (use two cups per gallon of water).
Cedar Wash™ is a ready to use cleaner designed specifically for wood with high extractives content such as Southern Pine, Spruce, Douglas Fir and Cyprus wood.
Wood Renew™ is used when the wood surfaces have been damaged. i.e., grayed wood and mill glaze. It will restore the wood back to its natural color. Wood Renew is also the preferred method for preparing deck boards for staining. It is important to follow all labeled instructions when using this product.
Sanding is used to remove surface imperfections. Although labor intensive, sanding helps to increase mechanical adhesion, provides for better color uniformity and aids in opening the substrate to promote better penetration of the stain. 40 – 60 grit sandpaper is recommended for decks. Always sand in the direction of the grain. When finished with the sanding, clean the surface using our Log Wash solution.
Finish Removers are used to remove an existing finish. There are two relatively safe waterborne finish removers designed to soften the finish so that it can be removed mechanically using a pressure washer.
(1) S-100™: Is supplied as a ready to use high pH gel. The gel helps it to remain active for an extended period.
(2) Strip It®: Is supplied as a ready to use pH neutral finish remover. It is designed to remove multiple layers of finish at a time.
We recommend that you obtain samples of each and test both to determine which works best for removing your finish. Follow all labeled instructions.
Rinsing is very important to completely remove the cleaning solution and debris. Use pH strips to test the rinse water run off to make sure the rinse water is between 6.5 – 7.5. Inadequate rinsing will lead to unnecessary problems and shorten the life of the stain. After rinsing allow the surface to completely dry before application of a finish.
Application Guidelines
• Surface Preparation: Must be applied to clean, dry surface.
• Application Weather Consideration: Do not apply if rain is eminent within 6 hours.
• Personal Protective Equipment: Although Defense products are considered non-toxic, gloves are recommended when applying.
• Protect from overspray: Wet down and cover nearby vegetation and adjacent surfaces. Keep these areas wet during application and rinse promptly when finished.
• Mixing: Mix thoroughly initially and every 15 min. to ensure color uniformity. Do not use powered mixing equipment.
• Boxing: We recommend boxing pails together if using different batch numbers. This will help with uniform color.
• Application Methods: Low-pressure pump-up sprayer, Paint Pads (for deck application), quality brush, or roller. Apply in a flooding manner to completely cover the surface of the wood, allowing the product to soak into the wood. Back-brush the finish into the wood using a quality brush.
• Maintain a wet edge: Work in small sections to help maintain a wet edge. This will help prevent lap marks.
• Work in the same direction: When applying the finish apply in the direction of the grain and stop only at natural breaks such as board ends to prevent lap marks.
• Application Surface Temperature: 40 – 90 degrees Fahrenheit:
• Number of Coats: Defense products works great as a one coat stain. However, for color or if the surface appears blotchy, a second coat may be applied. The second coat should be applied wet on wet. If it is not, wait one week before application of a second coat.
• Drying Times: Drying times will vary with application, airflow temperature and humidity. Under ideal conditions Defense Products will dry to the touch in 20-30 minutes. For horizontal surfaces wait 4 – 6 hours before walking on the surface and 24 hours before replacing heavy furniture.
• Coverage Rates: Coverage rates will vary considerably based on the type of substrate and methods of application. A second coat will require much less. Below are some approximations of coverage rates based on the type of wood.
• Rough Sawn Wood: Rough sawn wood such as fences will soak up a large amount of stain. Perhaps as low as 100 – 175 ft2 per gallon
• Older mature decks: 175 – 250 ft2 per gallon
• New Wood: 250 – 300 ft2 per gallon
• Protect from Freezing: Although freeze thaw stable, this will ensure any possibility of degradation.
Clean Up
If cleaned soon after application, tools and equipment are easily cleaned with soap and warm water. Dispose of unused product in accordance with local, state and federal guidelines.
Maintenance
Good maintenance for decks as well as for other wood surfaces will prolong the need for re-staining or removal. Defense products will not flake or peel when properly applied. Clean with log wash when needed. We recommend using one cup concentrated log wash per gallon water. Expect to see more wear in high traffic areas such as steps and traffic patterns. These areas can be recoated easily where needed after cleaning with log wash. We discourage using a clear topcoat over Defense products. A topcoat will prevent any future recoating.