Blog
One of the key bits of information for keeping hardwood floors shiny is knowing what type of finish has been applied to the wood. Was your hardwood sealed with a polyurethane or polyacrylic urethane finish, or was it finished with a paste wax? If you don’t know, here’s a test to help you make the best cleaning choices:
- In a spot with normal foot traffic, place a drop of water on the floor. If the water is quickly absorbed or causes spotting on the finish, this indicates the hardwood has not been sealed and should never be cleaned with water. But if the bead of water just sits on the surface without being absorbed, it means the hardwood floor has been sealed.
- To test for a paste wax finish, grab some fine steel wool and rub it lightly over the floor in a corner. If the floor has been waxed, there will be a gray, waxy film left on the steel wool.
How to Clean Hardwood Floors and Make Them Shine
Unless you have neglected the floors for weeks and have mud and sticky messes everywhere, there is no need to damp mop more than four times per year, suggest experts from The Spruce.
With a lightly dampened microfiber mop, clean in the direction of the wood grain. Never use a sopping-wet mop because too much water can cause floors – even sealed floors – to buckle. For step-by-step instructions, follow these steps from Spruce.
How to Refinish Hardwood Floors?
Up until about 20 years ago, the “Swedish Finish” was the only way to go. Extremely high-performance, it worked well, but as a solvent-based product, it was highly caustic. Certainly not a do-it-yourself project, it required trained professionals and total evacuation for up to a week (including the houseplants!)
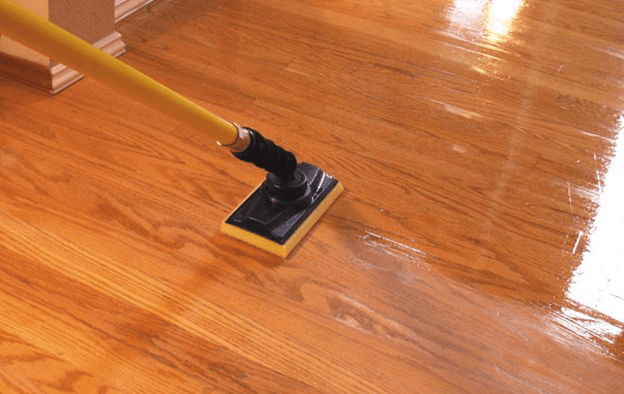
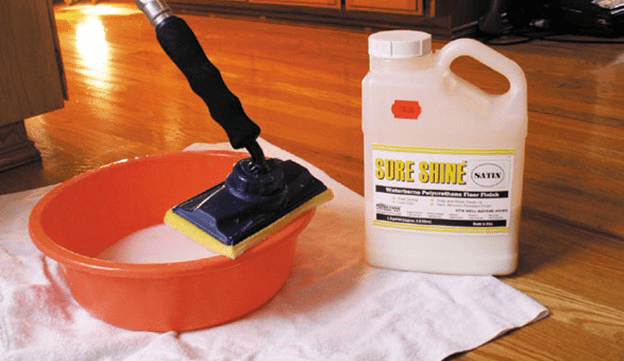
Sure Shine offers all that original wearability, durability and beautiful shine, without the toxic fumes and disruption to your life. Instead of solvent-based, it uses a water-based technology that is both environmentally and user-friendly.
If you want a deep, clear finish using fewer coats, Sure Shine premium finish is the one to use!
Sure Shine can be used to re-coat older oil-based floor finishes. Sure Shine cures to a smooth, hard surface that resists scuffing and abrasion. It prevents discolorations from water and most household cleaners and chemicals.
How to Apply Sure Shine Hardwood Floor Finish?
This product shines even brighter from an application standpoint. It’s easy to do yourself, and it dries so quickly (only one hour) you can apply it in one day. Sure Shine never yellows, is non-flammable and there are no fumes, which means there is no reason to suffer the inconvenience of vacating your home. Cleaning up your tools is a simple matter of a little soap and water. And when the work is done, you can walk on your new floor finish in 8 short hours!
More on application of Sure Shine here.
Order your free sample of Sure Shine in Satin or Gloss finish to try on your floor or your walls here.
Although Energy Seal™ and Woodsman™ come in different colors and both may be used for a multitude of purposes, the proper application of these products are quite similar. The main difference between Energy Seal and Woodsman is a matter of surface texture. Energy Seal contains a fine aggregate that gives it texture, whereas Woodsman is a smooth surfaced sealant. The texture of Energy Seal enables it to more closely match the texture of wood and accept a stain, so that it will blend in with the stained wall color if so desired. Although Woodsman is stainable, it will not become as indiscernible as Energy Seal.
Energy Seal and Woodsman are usually recommended for use in joints, seams and gaps that are one inch wide or less. Although they can be used in wider joints, we typically recommend using Perma-Chink Log Home Chinking for wide chink joints. All of the following application directions and conditions are applicable to both Energy Seal and Woodsman but for brevity we will only refer to Energy Seal or the generic term “sealants.”
When should Energy Seal be applied?
The best time to apply Energy Seal is after the home has been cleaned and before the finish is applied. The wood surfaces will be fresh and clean and Energy Seal adheres best to bare wood surfaces. That’s not saying that it won’t adhere to stained and/or top-coated surfaces, but it adheres best to bare wood. Application to surfaces with a freshly applied oil-based stain should be avoided. For the least visible caulk lines, choose a color that’s a shade lighter than the stain color you plan to use. It’s easier to cover a lighter color sealant with a darker color stain than it is to hide a dark colored sealant with a light colored stain. However, if you prefer the look of visible caulk lines, apply Energy Seal after you stain. Just be sure that the surface is clean and dry.
If you are going to be applying Lifeline Advance™ Topcoat, apply the topcoat after the Energy Seal. This results in a more even appearance to the sealed areas and helps them blend in with the rest of the wall. Furthermore, it helps keep the Energy Seal application clean and easier to clean when maintenance cleaning is required.
Using Backing Materials
Backing materials furnish an even surface for the application of a sealant and makes it easier to apply a uniform thickness across the joint or gap. They also provide two-point adhesion to ensure maximum elasticity and flexibility after the sealant has cured (they form a bond breaker in the center of the sealant band with adhesion to the wood at both sides). The use of improper or poorly installed backing materials can result in unsightly sealant joints and substandard performance. They are an integral part of the sealant system and should always be used whenever and wherever possible.
There are a number of products specifically designed for use as backing materials for sealants. For smaller gaps, joints, and cracks, the most commonly used material is round Backer Rod. It comes in a range of sizes and is relatively inexpensive. Since it is flexible, it can be pushed into a crevice without needing to be nailed or stapled. Grip Strip is designed for sealing larger gaps. Similar in composition to backer rod, it is shaped like a trapezoid so it can be squeezed in between round logs although it can be used in a variety of situations. It provides a flat surface for chinking or sealing.
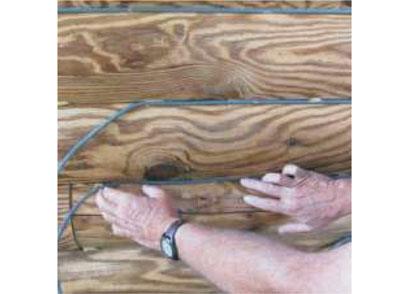
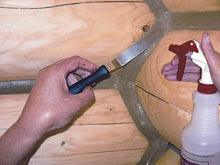
In situations where a joint, seam, or gap is too small to insert Backer Rod, you can hold it in place by applying small dabs of Energy Seal along the seam and then pressing the Backer Rod into them (see picture on previous page). The dabs of Energy Seal will hold the Backer Rod in place while a proper thickness of Energy Seal is applied on top. You can also use a narrow strip of water-resistant masking tape. You don’t want to use masking tape that wrinkles when it gets wet, since the wrinkles may show through the sealant. For extremely narrow seams, an excellent option is to use pinstripe tape; available at most automotive supply stores. The tape is vinyl; therefore, it’s waterproof and since our sealants do not bond to it, it makes an excellent material to use. Pinstripe tape is available in widths down to 1/8”.
Approved Backing Materials
- Log Gap Cap
- Grip Strip
- Backer Rod.
- Expanded polystyrene (EPS) beadboard
- Polyisocyanurate board (Polyiso or R Max)
- Water-resistant masking tape or pinstripe tape
DO NOT USE
- Extruded Polystyrene, XPS (causes blisters)
- Blue Board, Pink Board or any other colored board (outgases and causes blisters)
- Barewood or strips of bare wood (outgases and loss of elasticity, 3-point adhesion)
- Polyurethane foam (PurFill,GreatStuff,etc.)
- Foil Faced Substrates (sealants will adheres well to the foil)
- Anything that you are unsure about, please check with Perma-ChinkSystems before using it

Round Logs
When deciding the width of a sealant joint between round logs, a good guideline to follow is for the width of the sealant to be one-sixth the log diameter. For example, with six-inch diameter logs 6” ÷ 6 = 1.0” wide sealant joint. The width of the backing material you require depends on the profile of your logs but you need to take into account that you will be applying a 3/8” thick layer of sealant over it and you’ll need at least 1/4” top and bottom for adequate adhesion to the wood.
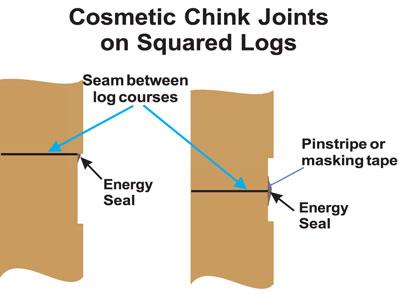
Squared Logs
We rarely see squared log chink joints less than 2” wide, so Energy Seal or Woodsman is seldom used in these situations. However, for cosmetic chink joints less than 3/8″ deep, we recommend sealing the seam with Energy Seal and then applying Chink Paint over the entire joint. On the other hand, Energy Seal is often used on squared logs for sealing corners, butt joints, widows, door frames and other areas where a visible chink joint is not desired.
Applying Energy Seal or Woodsman
The overall performance of any sealant system is dependent on the use of proper application methods. Any sealant must be applied in a manner that will allow it to stretch in order to compensate for log movement. If it is applied too thick, once it cures it won’t be able to stretch enough to compensate for the movement and it may tear away from the wood. Think of it like a rubber band. A thick rubber band will not stretch as far as a thin one. However if the rubber band is too thin, it will break when it is stretched. The same thing applies to sealants. If applied too thick, they can’t stretch and if too thin they may be weak and will tear when pulled apart. In the case of our sealants, the magic number is an applied wet thickness of 3/8”. When cured, this results in the best elongation with maximum strength.
Have the Proper Tools
Before you start have all of the tools that you will need at hand and be sure that they are clean and in good working order. These may include:
- Caulk gun or bulk loading gun
- Rags
- Trowels and/or spatulas
- Plant mister with water
- Masking tape
Weather Conditions
Freshly applied sealants should be protected from direct rainfall for a minimum of 24 hours. Either watch the weather or drape a newly sealed wall with plastic film. Be sure to allow some airspace between the wall and the plastic to facilitate drying. Avoid applying sealants in direct sunlight or when the temperature is less than 40°F. In cold weather it’s important that the logs be free of frost and dew in order to ensure that the sealant adheres tightly to the wood. The best surface temperature range for easiest application and best results is between 50°F and 80°F.
Application
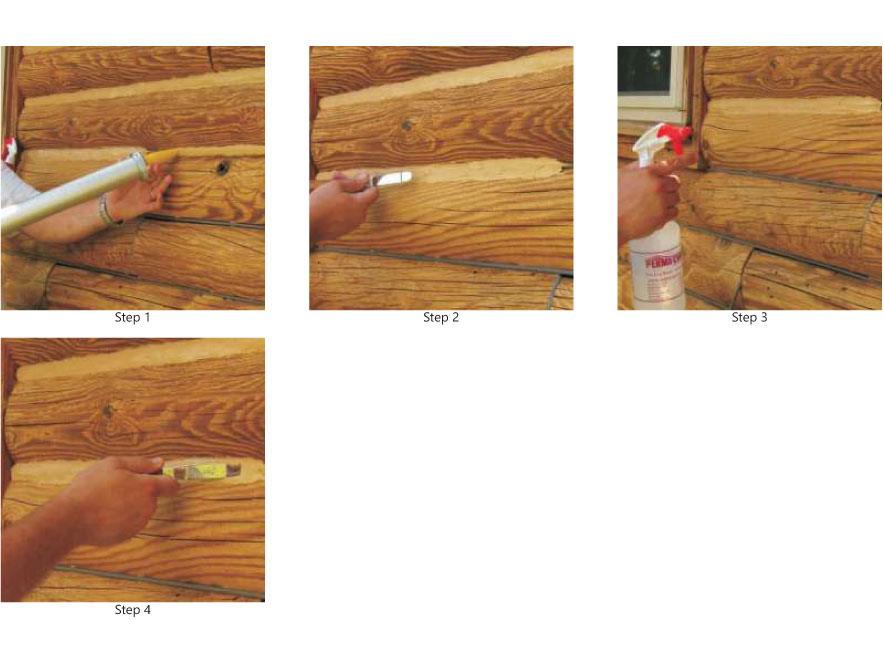
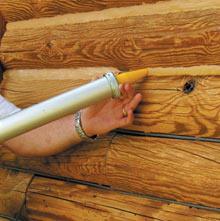
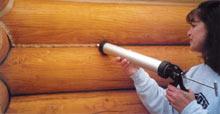
Cut the applicator, or tube tip, to the desired diameter of the sealant bead you want to apply.
Step 1: Begin by holding the tip firmly against the seam or joint and apply a bead of sealant. You need to apply enough sealant to maintain a wet thickness of at least 5/16” and no more than ½” (target = 3/8”) across the entire seam or joint after tooling. Only apply as much sealant as you can tool smooth in about 15 minutes.
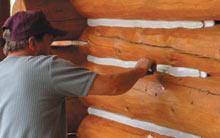
Step 2: Once the joint is filled trowel it out to approximately 3/8th of an inch thick across the entire joint. Do not spray it with water at this time! Make sure there is good contact between the sealant and the exposed edges of the wood. The most difficult areas to tool are corners. You tend to drag product out of the corners resulting in the sealant becoming too thin. You can occasionally check the thickness of the sealant using a toothpick to see if you are maintaining the proper thickness.
Step 3: Once the sealant is roughly in place and any entrapped air worked out of it, spray it with a light mist of water. Do not saturate the surface with water. If water begins to run down the wall, you have applied too much.
Step 4: Tool the surface smooth with a trowel or spatula. If you used masking tape to protect the surrounding wood, be sure to remove it as soon as you are finished tooling and make sure that you have not left any lip on the top edge of the sealant that may catch water. If you have, tool it smooth.
Clean-Up
If you get any sealant on the surface of the wood, be sure to wipe it off with a wet rag as soon as possible. If you allow it to dry, it will be just about impossible to completely remove. Make sure to clean your tools and equipment with clean water occasionally during application. Dried sealant is difficult to remove from just about anything – including clothes.
Drying and Curing
Drying time and curing time are two entirely different terms. In warm or hot weather, Energy Seal and Woodsman may begin to skin over in as little as ten minutes, while a complete cure may take a couple of weeks. Cooler temperatures will slow both the drying time and curing process.
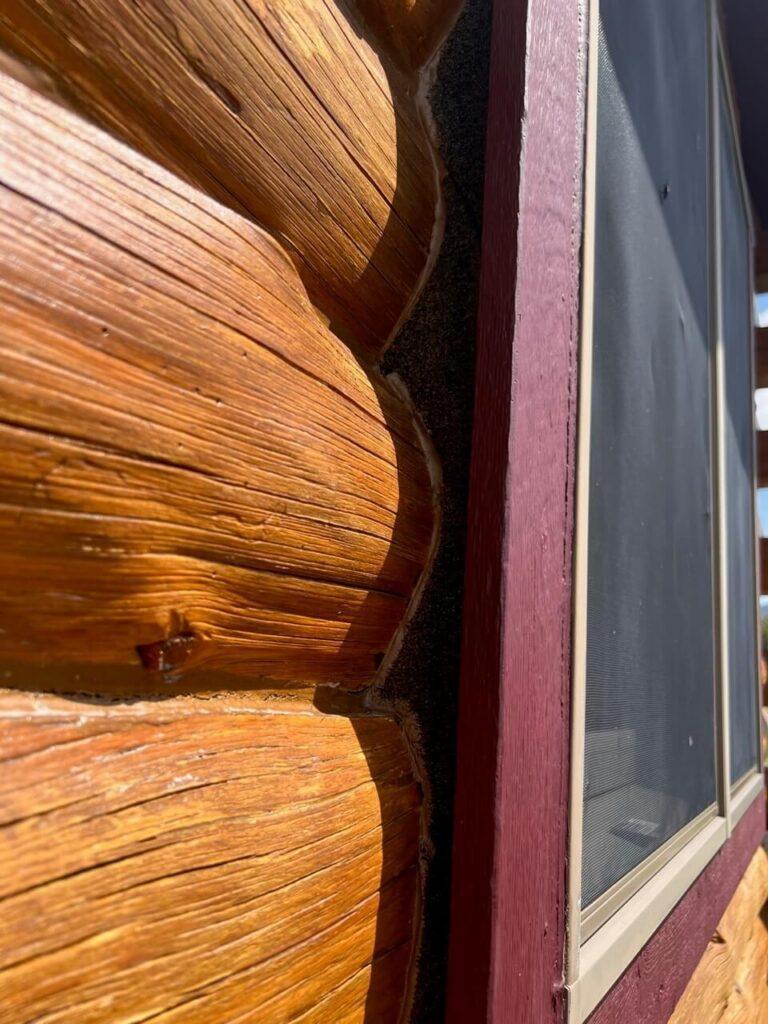
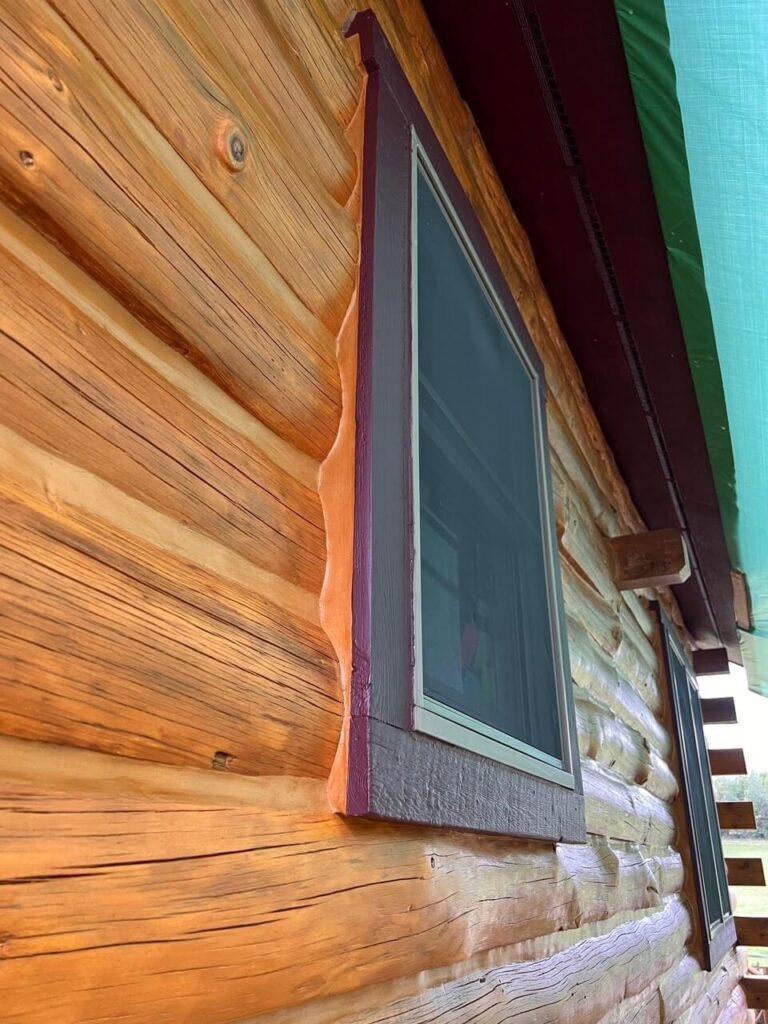
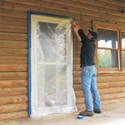
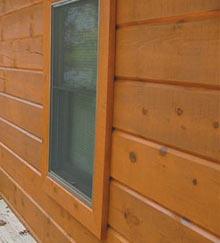
Sealing Window & Door Frames
A lot of wasted energy is released through poor sealing of windows and doors. Luckily we at Perma-Chink Systems have a solution to solve these air leaks. Energy Seal and Log Gap Cap work together to seal the windows and doors.
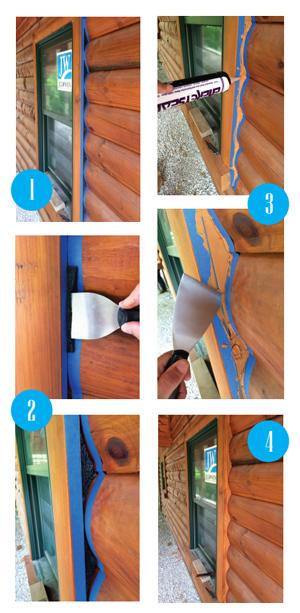
How to Seal Windows & Door Frames Step-by-Step:
1. Use masking tape around the window or door seam.
2. Insert Log Gap Cap into the crevice using trowel. Log Gap Cap provides an even surface for sealant application and makes it easier to apply a uniform thickness across the gap.
3. Apply Energy Seal™ and tool smooth.
4. Remove masking tape as soon as tooling is complete.

Projects can be daunting if you have limited or no experience. You gain experience by doing, and getting expert advice when you need, whether it’s before the project, during, or after. Our customer service exists to help all log home owners get the best results using the best products for their log or timber home.
One recent homeowner project done by our customer Beth H. required removing the old finish and sealant, then restoring the home with Lifeline Ultra-2 Natural and Energy Seal in Cedar. Lifeline Advance Gloss topcoat encapsulated the wood, ensuring a long-lasting finish and great look.
| Products Used | |
| Log Wash | Log gap caps |
| Prelude | 1/4″, 3/8″, and 1/2″ backer rod |
| Lifeline Ultra-2 – Natural | Lifeline Advance Gloss |
| Energy Seal – Cedar |
With DIY-friendly products, anyone can tackle a home project and have fantastic looking results like this. In addition to our excellent customer service available to all customers, we have a library of Tech Tips for in-depth information on maintaining your log home.
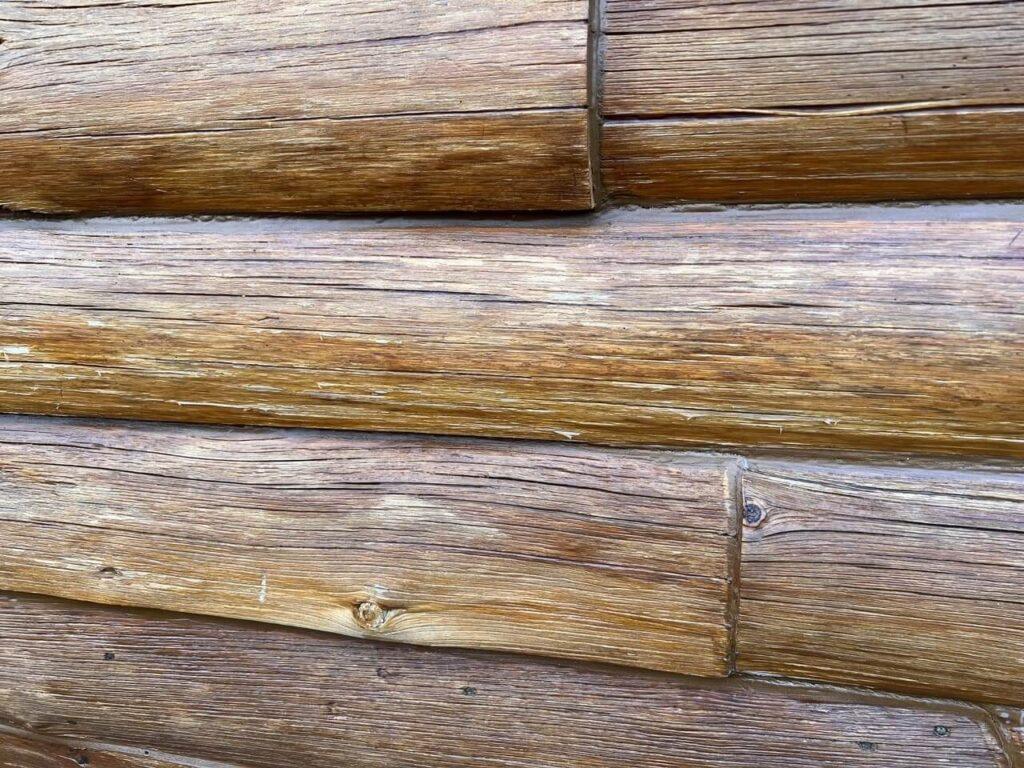
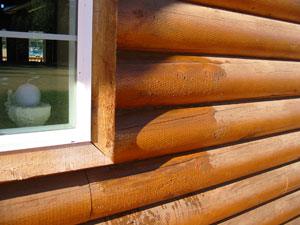
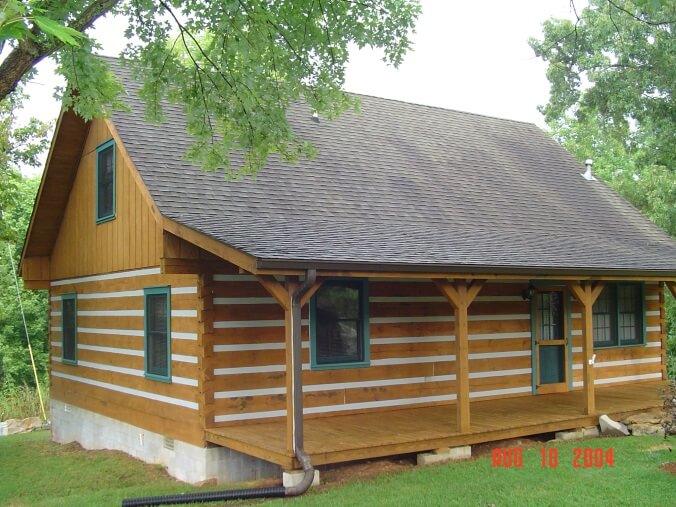
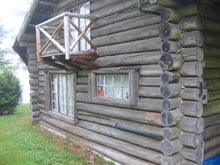
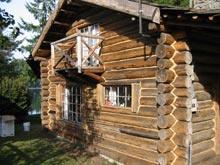
Take a look at these pictures from Beth, showing the home before and after.
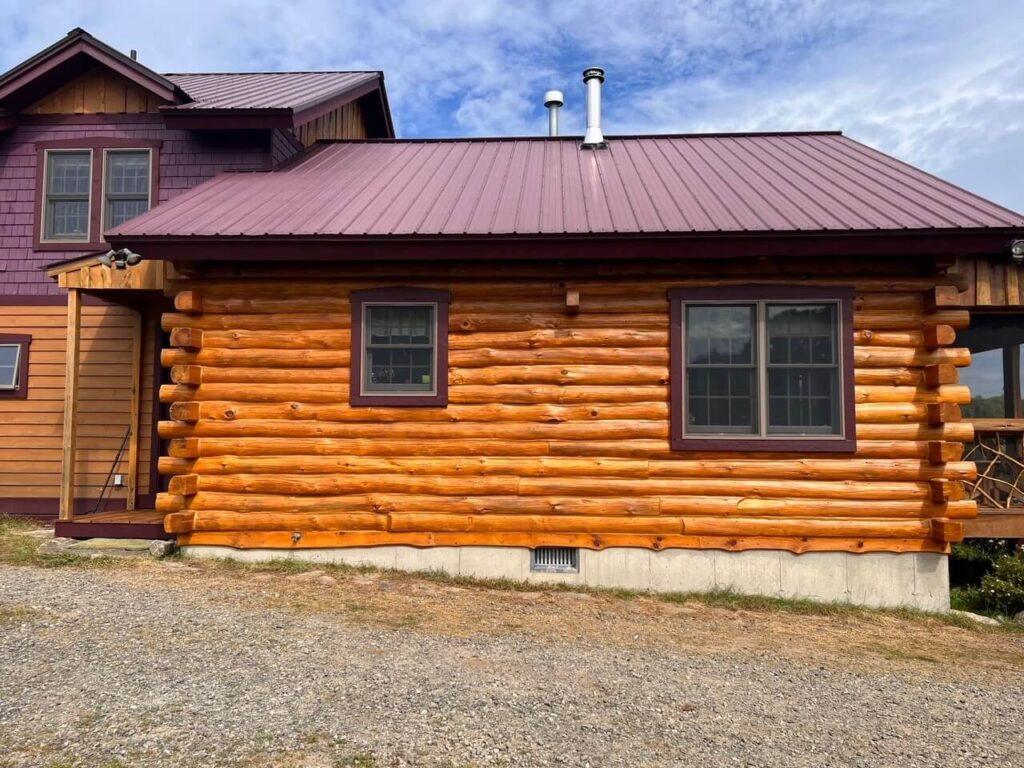
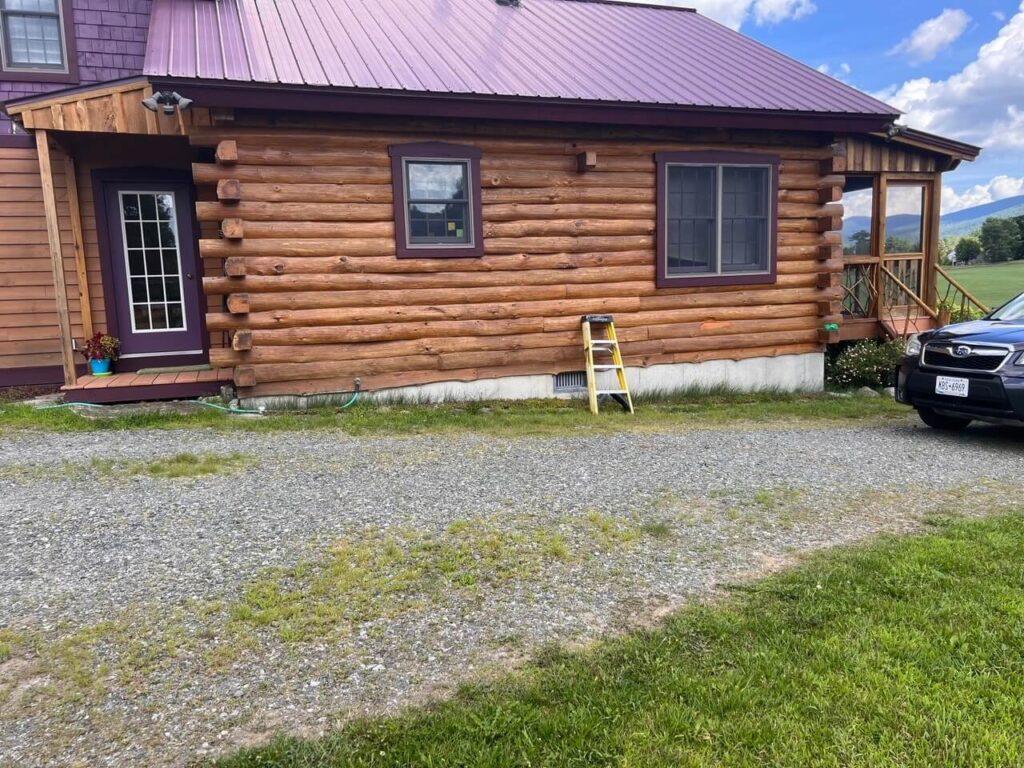
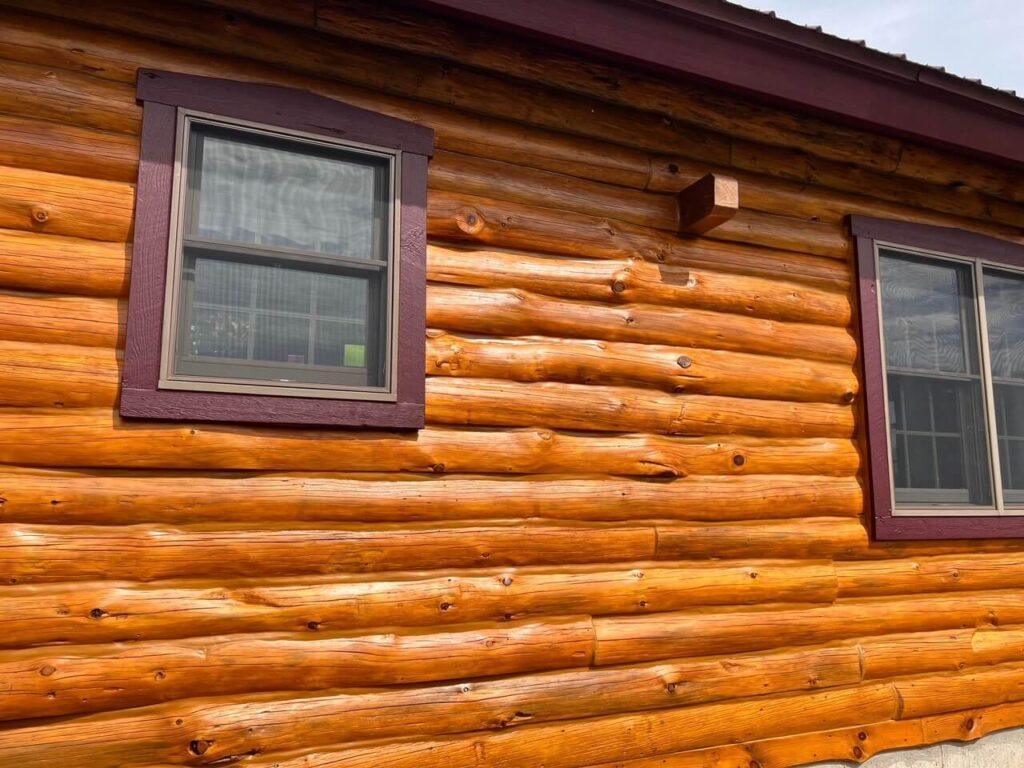
Take note of the proper use of Log Gap Caps and Energy Seal. We get a lot of questions about the best method to seal around windows and doors. We have a quick reference Tech Tips article here, but here are some pictures to illustrate how they work.
Lifeline Interior™ is a natural looking, transparent wood finish. It forms a breathable, protective layer for your walls and ceilings while highlighting the beauty and grain of the wood. Our unique breathable formula allows natural wood moisture to escape from the wood, yet provides a tough film surface that can easily be cleaned and dusted, especially when top coated with our Lifeline Acrylic Gloss or Satin clear finish.

If you use one of our Lifeline Interior color stains, the colorants in the finish help stabilize color of the wood and slow down, or even prevent, the fading that you may notice when removing pictures or furniture from against the wall. If using Lifeline Interior Clear, we recommend the addition of UV Boost to the first coat to help prevent this “picture frame” effect due to UV light exposure. The addition of UV Boost should also be considered when using lightly tinted stains like Light Honey and Light Natural. Since interior surfaces are not subjected to the adverse effects of weather, two coats of Lifeline Interior are not necessary. However, you can apply multiple coats of Lifeline Interior in order to achieve the appearance you desire.
Lifeline Interior is easy to apply. It can be applied by brush, spray or pad. Lifeline Interior dries to the touch in as little as one hour and clean-up is easy- just use soap and water.

One of the best reasons to use Lifeline Interior is that it reduces the absorption of pet, fireplace, and cooking odors into the wood of the home.
Lifeline Interior resists yellowing and is non-flammable and virtually odorless. Like all of our premium finishes, it allows the natural look and beauty of all species of wood to come through. Lifeline Interior can be used on new or existing log homes, as long as the surfaces are clean and dry.

Now you can order Lifeline Interior in any color you desire in addition to our 13 standard colors plus Clear. For a custom color or color matching, please call 1-800-548-3554. You can request wet samples to try on your logs by calling 1-800-548-3554 or by visiting our online store.
When it comes to using elastomeric sealants, considering the potential movement of your wood is almost always a smart move. Some important factors to consider that impact wood movement are moisture content, species type, type of cut (flat tangential cut or quarter sawn radial cut) and local environmental conditions. Not taking these into account has the potential to lead to costly repairs in the future.
Movement Threshold Related to Moisture Content
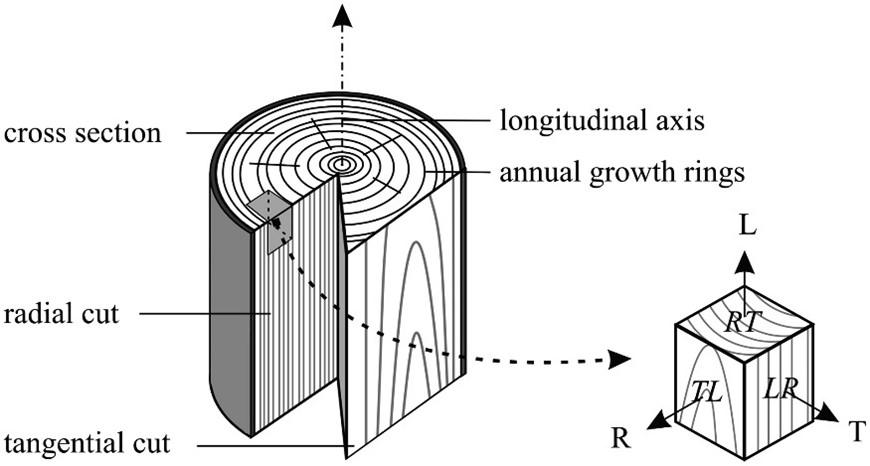
When a tree is first harvested the water content is usually extremely high. For example, depending on the wood species the moisture content can be 200% or higher in freshly cut green wood. However, it is not usually until the moisture content drops below approximately 30% that dimensional changes begin to occur. This is where bound water within the cell walls begins to leave resulting in dimensional shrinkage. These changes occur primarily in three different directions: tangential (T), radial (R) and longitudinal (L). See figure 1 below.
Log Cutting Method Impact on Movement
Wood does not move much in the longitudinal (L) direction. Therefore, a traditional house is framed with the two by fours placed in the longitudinal upright position and as a result the structure does not shrink or move very much. However, most wood cut for log siding falls somewhere in between radial and tangential cut and is not placed in a vertical position but rather a horizontal one. If the log siding is mostly the flat sawn tangential cut type a large amount of movement in the wood is possible. For example, depending on the pine species the percent shrinkage can range from 6.0 – 7.5% for a tangential cut board from green to oven dry. This translates to a twelve-inch-wide board shrinking by almost three quarters of an inch or more!
For round logs the movement component that causes the log home to shrink in size is the radial (R) movement. This is not nearly as much as the tangential movement but still can be quite large. In pine species the percent shrinkage can range from 2.0 – 5% from green to oven dry. Take for example a wall using ten-inch round logs and ten courses in height. The total wall shrinkage might be anywhere from two inches to as much as five inches.
One way to minimize all this potential movement is to use kiln dried wood. Doing so reduces the movement potential. In addition, using an inexpensive moisture meter can also be a great help in determining your woods moisture content at any point in time. Waiting for wood to equilibrate to its environment and reach a stable moisture reading is also very helpful. In general, we tell homeowners and applicators to be at least below 20% for the surface moisture content. However, being closer to 10% is ideal and is associated with lowest amount of risk for movement.
Joint Sizes to Minimize Effect of Movement
Another excellent way to minimize your risk is to pay careful attention to proper recommended joint designs for our sealants. We recommend the joint width for Perma-Chink chinking be a minimum of one inch for every six inches of log diameter or siding width (1:6 ratio). For example, a 15-inch log would have a chinking joint width of 2-1/2 inches wide minimum. For small gaps less than one inch we recommend using Energy Seal™, Woodsman™ or Check Mate 2 ™. The smaller gaps will have a much larger percent change in movement and need products specifically formulated to accommodate this large movement potential. Furthermore, following proper thickness as well as backing material recommendations is also very important to help reduce one’s risk.
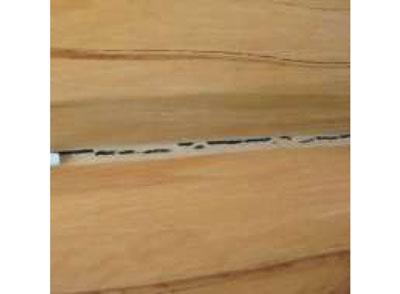
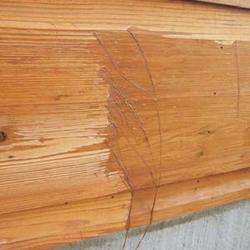
Failure to adhere to proper joint design coupled with large dimensional changes in wood can often lead to poor outcomes. In the example below green wood was used to maximize wood movement during curing. The chinking joint in (Figure 2) failed completely due to improper joint width and large wood movement. The starting width (1/4”) of this joint was nowhere near the 1:6 ratio recommended. The starting width for the joint below should have been three to four times as wide relative to the width of the wood.
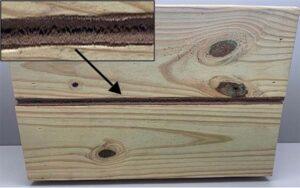
Chinking should never have been used in a joint this small; Energy Seal™ or Woodsman™ would have been much better options. The expansion in the joint due to shrinkage of the wood was very large, relative to the original starting width, resulting in cohesive failure across the entire joint length. Cohesive failure is where the sealant stays adhered to the top and bottom of a joint but fails by cracking down the middle of the joint. The box in figure two magnifies the crack so it is more visible.
Help Available Through Application Guide
To help aid in proper joint design, we provide our customers a Log Home Sealants Application Guide. This guide provides a great deal of helpful information regarding proper joint design. Our technical tips are additional sources of information on many topics of concern to the log homeowner. Don’t let wood movement be a source of failure for you. Instead anticipate the movement and come prepared with the right products, tools, and knowledge for success.
Download the “Inspection Checklist” in PDF here.
Exterior Inspection
General Inspection Surrounding the Home:
- Landscape plants should be more than 36 inches of exterior walls. Landscaping tips.
- Gutters & down spouts in good working order, evacuating water away from the home.
- Check for decaying wood within 12 inches of (or especially in contact with) ground.
- Wood piles at least 18 inches away from house.
- General patterns of fading of the finish.
- Look more carefully at areas that are most exposed to weather. South- and West-facing walls usually receive more sun exposure. Walls facing prevailing winds are exposed to more rain, dust, and pollen.
- Pay special attention to all logs and ends extending to or beyond roof overhangs.
- Make sure that no sprinkler directs water at the wall. Including water patterns on windy days!
Check for Weathering Patterns:
- Fading of the finish.
- Water staining on exposed log ends.
- Water staining on exposed walls.
What to Look For When Inspecting the Exterior Finish, Sealant, and Wood:
- Dirt, dust, pollens, etc. on upward facing portion of logs. Clean this off with Log Wash solution.
- Inspect for any cracking, peeling or blistering of finish.
- Check water repellent quality of finish. Spray or splash water on walls, then look for it to “sheet”. Read more here.
- Inspect for presence of molds or mildews.
- On top of finish (can it be washed off?)
- Underneath finish (cannot be washed off)
- Upward facing checks (1/4 inch or wider), if any, should be sealed. Use Check Mate 2 and backer rod. Read how here.
- Carefully inspect logs for signs of moisture:
- Discolored wood
- Softened wood
- Inspect integrity of all sealant joinery (Perma-Chink, Energy Seal, Check Mate 2) at log-log interfaces, windows, doors, checks, roof lines or other potential air or water intrusion points.
Protecting Wood
There are two basic steps in protecting wood: surface preparation and product application. You must first start with clean wood. The better condition the wood is, the better your home will look. Think of surface preparation on wood the same way you look at site preparation for construction of a log home on your lot. If you stain over dirty, moldy, rotten wood with a transparent or semi-transparent finish, you will always see dirty, moldy, rotten wood underneath the finish.
The proper application of preservatives, stains and finishes is equally important as the prepwork to the wood. Always follow label instructions before you start the job. Call us to clarify any questions you have before you start.
Next Steps
1. Inspect | 2. Clean and restore | 3. Preserve | 4. Stain and Finish | 5. Chink and Seal
Over the past several years we have discovered many things about cleaning wood and existing finishes.
First and foremost is that chlorine bleach is not a good product to use. In addition to its potential for damaging the finish and bare wood fibers, its use and misuse contributes to a number of problems including the loss of film adhesion, discolorations due to tannin extraction, and the formation of iron tannates, streaks, blotches and premature failures of the finish system. We have also discovered that a number of wood and deck cleaners available at paint and hardware stores, home improvement centers and Do-It-Yourself outlets contain components that interfere with the proper performance of our finish systems.
With this in mind we have decided that the ONLY cleaning products approved for use with our finishes are those products supplied or recommended by Perma-Chink Systems, Inc. We are not doing this to increase our sales of cleaning products. It is simply because we have tested our cleaning products with our finish systems and have confidence that when properly used and applied, their use will result in the best possible appearance and performance of the final Lifeline™ finish. We cannot say the same about the use of other types and brands of wood cleaners and strongly discourage their use with any of our Lifeline stains.
Guidelines for cleaning Bare Wood prior to applying Lifeline stains.
New Log Homes
- If the wood has not grayed, wash the surface with two (2) cups per gallon of water Log Wash™ solution and a pressure washer no more than seven (7) days prior to staining. Smooth log siding should be washed using Wood ReNew™. Rinse well and allow the wood to dry.
- If you are finishing a log or timber home that uses Western Red Cedar, Redwood, Walnut or Mahogany wood, use Cedar Wash™, a ready-to-use cleaner, instead of Log Wash for better surface preparation and finish longevity on these specific wood substrates.
- If there are signs of grayed wood, use Wood ReNew according to the label along with a pressure washer. Rinse well and allow wood surface to dry before staining. If more than seven (7) days pass before the home is ready for staining, wash the surface with two (2) cups per gallon of water Log Wash solution, rinse well with a garden hose and allow the wood surface to dry.
- If, after steps one or two, there are still dark streaks or discolorations on the surface, use a solution of Oxcon™ which contains oxalic acid, on the entire wall according to the directions for use. Rinse well and allow the wood to dry before staining.

Older Log Homes with a Previous Finish Removed (A Restoration or Re-staining)
- If there are no signs of gray surface wood, wash the surface with a two (2) cups per gallon Log Wash solution no more than seven (7) days prior to staining. Rinse well and allow the wood to dry.
- If you are finishing Western Red Cedar, Redwood, Walnut or Mahogany, use Cedar Wash, a ready-to-use cleaner, instead of Log Wash for better surface preparation and finish longevity on these specific wood substrates.
- If there are areas where grayed wood is still evident or if the wood has darkened after the finish was removed, use Wood ReNew according to the label along with a pressure washer. Rinse well and allow the wood to dry before staining.
- If the wood has darkened or more than seven days pass before the home is ready for staining, wash the surface with two (2) cups per gallon Log Wash solution, rinse well with a garden hose and allow the wood surface dry.
- If, after steps one or two, there are still dark streaks or discolorations on the surface, use Oxcon, an aqueous oxalic acid solution, on the entire wall according to the directions for use. Rinse well and allow the wood to dry before staining.
Log Homes with an Existing Finish Still in Good Condition
- If a maintenance coat of Lifeline stain or topcoat is going to be applied over an existing Lifeline finish, wash the coating surface with a two (2) cups per gallon Log Wash solution no more than seven (7) days prior to staining. Pressure washing is not recommended. Rinse well and allow the wood to dry. For maintenance cleaning, finished surfaces that are not going to be stained or top-coated, use a one (1) cup per gallon Log Wash solution.
*A NOTE ABOUT RINSING
No matter what product you use to clean bare wood, nothing is more important than making sure you have adequately rinsed the surface. Any chemical residue remaining on the surface can have serious consequences later on. We always recommend using pH Strips to make sure that the surface of the wood has been sufficiently rinsed, preferably to a pH of between 6.5 and 7.5. pH Strips are available at most pool supply dealers, aquarium supply shops and Perma-Chink Systems, Inc. They are not expensive, are very easy to use and a great tool to ensure adequate rinsing.
Guidelines for Restoring your logs prior to applying Lifeline stains.
There often comes a time, usually over the course of many years of neglect, when you may choose to remove all existing finish and reapply a fresh coat. There are a few methods that can be used; either the dry media blasting process or pressure washing, which at times may need a chemical stripper first applied. Both have their advantages and both can provide stellar results. The variables that should be considered when deciding which process is best for you include:
- Stain condition and how much of it needs to be removed
- Type and age of wood
- Accessibility to the walls
- Your budget and/or how much time you wish to invest if doing the project yourself
- What your expectation for the finished look may be
The process that is best for one house isn’t necessarily the best for another. Let’s take a look at two options below:
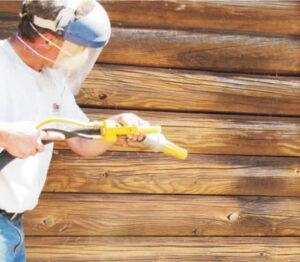
OPTION 1: Using a Chemical Finish Remover Step-by-Step
It is always best to use finish removers supplied or approved by Perma-Chink Systems. Never use finish removers containing potassium or sodium hydroxide. They disrupt the chemistry of the wood and can lead to discolorations appearing under the finish. Before purchasing any finish remover, be sure to obtain a sample and test it on your existing finish to see how well it works. Finish removers do not dissolve finishes; they only soften them enough to allow the finish to be removed with pressure washing.
Tools
Before you start, have all of the tools that you will need at hand and be sure that they are clean and in good working order. These may include:
- Paint brushes
- Paint scraper
- Stiff nylon brush (never use a wire brush)
- Airless sprayer (optional, requires larger sprayer tip)
- Wet and dry rags
- Water hose
- Gas powered pressure washer with an output of 2 to 3 gallons per minute (gpm)
- Tarps
- Recommended safety equipment such as eye protection and rubber gloves
Preparation
Before you start, remove downspouts and cover or mask off any areas that you don’t want to strip. Finish removers will soften both stains and paints. You may wish to protect window and door trim with plastic sheeting. If you do get some finish remover on an area that you don’t want to strip, immediately wash it or wipe it off with a wet rag. If you have a deck or porch floor that you want to protect, it’s best to cover it with a tarp. Although neither S-100™ nor StripIt® is highly toxic to plant life, it is best to either cover plants or wet them down prior to starting, then rinse them off when stripping is complete.
Application and Removal
Step 1. Thoroughly read the label and be sure to wear the proper safety equipment and eye protection. Starting at the bottom of the wall apply the finish remover with a brush or airless sprayer according to the directions for use. Be sure to follow the directions pertaining to the application rate; if applied too thinly, the finish remover may not work and you will have wasted your time and money. Be sure to give the product time to work. On hot dry days; work on small sections of a wall at a time so that it does not dry out.
Step 2. Allow the finish remover time to soften the finish. It may take 30 minutes or several hours, depending on the existing finish, product, and temperature. If you see that the S-100 is beginning to dry, mist it with a light spray of water. For drying StripIt, apply another coat of finisher remover. In colder weather conditions it may take longer for the finish to soften compared to warm or hot weather. On cool days you can apply the finish remover to the entire wall late in the afternoon or early evening, and leave it on overnight. Neither S-100 nor StripIt will damage the wood or cured Perma-Chink sealant with prolonged contact.
Step 3. Once the finish has softened, use a pressure washer to remove the chemical stripper along with the finish. Using a 15 degree fan tip works well. Start at the bottom of the wall and work up. You don’t want to wash away the chemical stripper from those areas you are not ready to strip. Hold the pressure washer wand at a 30 to 45 degree angle from the wall. The objective is to “peel” the softened finish off of the surface, not blast it off with a lot of water pressure. This will help avoid gouging the surface and prevent severe feathering. If there are some spots of remaining finish, try scraping them off with a paint scraper or a stiff nylon brush before they dry.
Step 4. Once the entire wall is completed, begin the rinsing process starting at the top of the wall and working your way down. Rinsing off all remaining chemical residue and bits of loose finish is very important for the long term performance of the new Lifeline finish system.
Step 5. If, after rinsing, there are still remnants of finish remaining on the wall, repeat the steps 1 through 3 (slightly modified) until all of the existing finish is removed. It is not necessary to reapply the stripper to the entire wall, spot removal will work. Only use it on those areas that need it.
Step 6. Once the entire wall is completely bare, rinse the entire wall starting at the top and work your way down. Allow the wall to dry before making your final evaluation.
Step 7. If pressure washing the wall has feathered the surface, you may wish to lightly sand it or use an Osborn™ Brush to remove the feathered wood fibers. Never use sandpaper or Osborn Brushes finer than 80 grit on exterior surfaces. Sanded or brushed surfaces MUST be washed with two (2) cups per gallon Log Wash solution and the surface allowed to dry before the first coat of finish is applied.
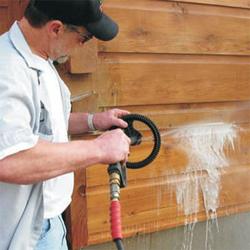
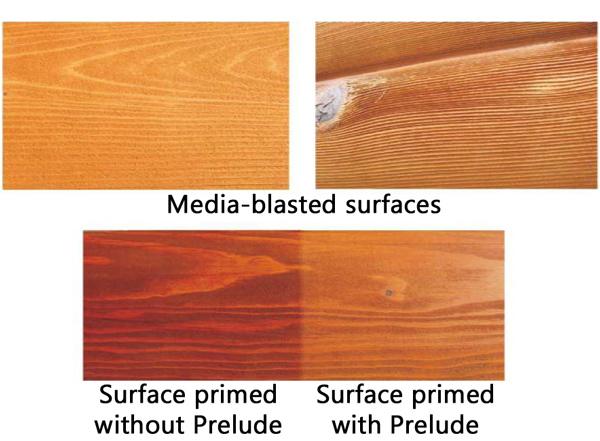
OPTION 2: Media Blasting
Although we rent and sell the Blaster Buddy™ and furnish crushed recycled glass blasting media, we usually advise do-it-yourself homeowners to use chemical finish removers along with pressure washing because the process can be easily accomplished by an average homeowner and it is less susceptible to surface damage, resulting in a more attractive finished surface. However, when performed by an experienced professional, media blasting can effectively and efficiently remove the most stubborn existing finish. We do recommend that you first inspect a home that has been media blasted before making your final decision about which method of finish removal you want to use.
Media blasting consists of using corncob grit, walnut shells, glass beads, baking soda, dry ice, or recycled crushed glass to abrade the finish off the wood. We prefer crushed glass since it is very efficient, relatively inexpensive, and does not impregnate the wood with organic material that can later mold. Plus, it is very safe for the environment.
Once a home has been media blasted, there are two steps that are often overlooked but need to be followed:
Step 1. Blow off as much dust and debris as possible using compressed air.
Step 2. Wash the walls down with a two (2) cups per gallon Log Wash solution no more than seven days prior to staining. It is not necessary to use a pressure washer to wash the wall, a garden hose will do. Clean from the bottom up and rinse from the top down. Rinse well and allow the wood to dry before applying Prelude Clear Wood Primer or a Lifeline stain color coat. This removes all of the loose wood fibers and dust that may still remain on the surface and ensures better finish adhesion to the wood.
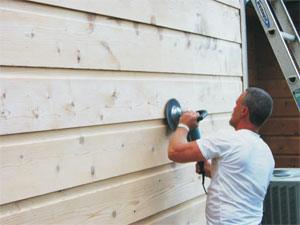
Sanding

Sanding can effectively remove an existing finish, but it is time consuming and a lot of work. The use of sanding disks, rather than sandpaper, can save you both time and money, but you need to be careful not to create swirl marks in the wood. When sanding exterior surfaces never use anything finer than 80 grit.
Water-based film forming finishes require some wood texture for good adhesion, especially on exterior surfaces. Osborn Buffing Brushes work great for removing raised wood fibers (feathers) that may have resulted from aggressive pressure washing, but they are not suitable for removing finishes.
Remember – a sanded wall is not clean! Always wash down sanded walls with a two (2) cups per gallon Log Wash solution no more than seven days prior to staining. It is not necessary to use a pressure washer, a garden hose will do. Clean from the bottom up and rinse from the top down. Rinse well and allow the wood to dry before applying the first coat of finish.

Next Steps
1. Inspect | 2. Clean and restore | 3. Preserve | 4. Stain and Finish | 5. Chink and Seal

Most preservatives offer some type of guidelines to the actual life expectancy of the product, but as a rule of thumb, left exposed to the elements, you can expect two to four years before a reapplication is necessary.
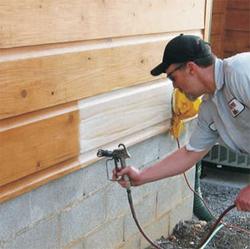
Typically, Shell-Guard is applied with a garden type pump sprayer, although for smaller jobs, a hand held mist type sprayer is more efficient. When in doubt, follow application recommendations found on the label.
Use Shell-Guard for the protection and preventative treatment of wood against termites, carpenter ants, wood destroying beetles, wood decay fungi and for remedial control of such pests in infested wood or wood foam composites.
Apply the solution of Shell-Guard by brush or spray until the surface is thoroughly wet (1 gal per 108 square feet), but not so much that you reach drip and run-off.
Application may also be made by drilling and then injecting the solution under pressure into sound wood or until run-off is observed from entry/exit holes of infested wood. Treatment methods as described yields an approximate retention level of .24 pounds per cubic foot of boric acid equivalent (BAE) in the outer 3/4″ of the wood.
To minimize borate leaching, apply a water resistant sealer such as Lifeline Ultra-2, Lifeline Ultra-7 or Lifeline Advance after the surface is dry to the touch. When using Shell-Guard Concentrate, this may take 2-4 weeks. Shell-Guard RTU can be stained over in 2-3 days.
Shell-Guard Concentrate and Shell-Guard RTU are a registered termiticide, insecticide, and fungicide.
Next Steps
1. Inspect | 2. Clean and restore | 3. Preserve | 4. Stain and Finish | 5. Chink and Seal
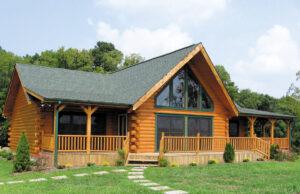
Lifeline™ finishes bring your log homes appearance to life. All Lifeline products are waterborne, breathable, flexible, durable wood finishes which also highlight the natural beauty of your log home. There are Lifeline products available for both interior and exterior walls.
What are the benefits of applying an exterior finish?
- To make your home look it’s best
- To protect your home from UV damage
- To protect your wood from water damage
- To provide protection from unsightly mold and mildew
There is no secret in retaining the beauty of your log home. A little care and maintenance along with the use of quality products designed specifically for log homes will not only keep your home looking great, but will also preserve the integrity of the logs and help prevent costly repairs. You can do no better than selecting any of Perma-Chink Systems Family of Log Home Products.
Lifeline Exterior Stains and Topcoats
Lifeline Ultra 7, Ultra 2 or Exterior followed with Lifeline Advance combine to form the ultimate exterior finish system for your log home, while with the use of Lifeline Accents and Lifeline Advance you can highlight certain areas such as window casements, fascia, and other trim areas. Through many years of research, development, and experience, Perma-Chink Systems has perfected waterborne finishes that provide the following benefits:
- Lifeline stains and topcoats provide the best looking finish you can find. They distinguish your home by highlighting the grain and texture to bring out the natural beauty of your wood. Compare them to any finish you can find. Others have tried to copy the look and performance of Lifeline products, but have never succeeded.
- Lifeline’s high performance polymers encase the wood fibers to protect the surface, where protection is so vital.
- Lifeline forms a flexible, breathable coating that expands and contracts as well as allowing free travel to molecular water vapor to accommodate the seasonal expansion and shrinking of the wood.
Pigments and ultraviolet (UV) inhibitors are important components for protecting your wood. Although UV inhibitors help extend the life of the finish, it is the pigments that provide the majority of long-term protection against UV rays while highlighting the logs natural grain pattern. Lifeline Ultra 7, Ultra 2, Exterior, and Accents contain these necessary, valuable pigments. Lifeline finishes are easy to apply, release no toxic fumes, are not flammable, and clean up easily with soap and water.
Product Application
Initial application to your exterior is one coat of Lifeline Ultra 7 or two coats of Lifeline Ultra 2 or Lifeline Exterior, followed by one coat of Lifeline Advance. After your stain coats, an application of Log End Seal should be applied, to prevent moisture from entering the log ends, which will wick 10 times more moisture than the surface of the log. After these applications of Lifeline, your exterior should require little to no maintenance, other than an annual cleaning with Log Wash, for 3 to 5 years, typically. If local weather conditions are more severe than average, additional maintenance may be required.
Lifeline Interior Stains and Topcoats
Here at Perma-Chink Systems we believe all interior surfaces should have a minimum of two applications of a finish. Are you looking for something to create the depth of color that a stain provides, or are you trying to keep your logs looking as natural as possible? Those two coats could be one coat of Lifeline Interior to enhance the grain pattern, or one coat of Prelude primer-sealer to create a clear, UV protected base, and one or more coats of Lifeline Acrylic or Sure Shine urethane/acrylic as a topcoat. Also, give considerations to Lifeline Accents, to help create highlights with their deeper colors on casements and trim.
Quick Reference – Tech Tips
Download Stains and Finishes Application Guide PDF
Download Cleaning Guidelines Tech Tip
Download How to Apply Lifeline Exterior Finishes Tech Tip
Download Advance Gloss or Satin Tech Tip
Download Log End Seal Tech Tip
Download Maintenance Coats Tech Tip
Download Applying Interior Finishes Tech Tip
Download How to Apply Lifeline Interior Finishes Tech Tip
Next Steps
1. Inspect | 2. Clean and restore | 3. Preserve | 4. Stain and Finish | 5. Chink and Seal
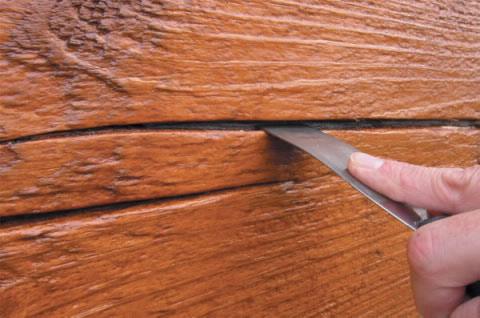
Every homeowner has found checks in the logs at one time or another. Checks are those longitudinal splits that appear as logs lose their moisture. While you may like or dislike checks, they are a part of the character of wood. Some species of wood are more susceptible to checking than others. This susceptibility comes from the different rate at which wood shrinks in its own geometry. Because wood dries out from the surface, the wood at the surface shrinks faster than the wood further down in the core.
Additionally, researchers have found that wood shrinks faster in the tangent direction (around the perimeter) than it does radial direction (toward the center). The ratio between these shrinkage rates tells you which species of wood are more likely to check. The greater the ratio the more the wood is likely to check as the logs dry.
Late summer or early fall is the best time to seal up your checks.
Should you always seal up checks?
The answer is partly a matter of practicality. If your checks are protected from any source of water or the opening is downward and they do not allow air drafts to enter the interior of the house, then it is really not necessary to seal them up. However, if the checks face upward to that they can collect blown rainwater, then weather conditions can introduce water into the heart of your logs – a very undesirable condition that can result in wood rot in the log.
What should you use to seal up checks and how do you do it?
Because seasonal weather variation cause checks to open and close slightly, you must use material that tolerates the movement. By the way, this movement is reduced when you have a good water-repellent and flexible coating on your logs such as Lifeline stain and Advance topcoat.
When you are sealing checks up, do not fill the check completely up with the sealant. On wider checks you should able to push some backer rod into the check so that you have about ¼ inch depth remaining for your sealant.
How big should the checks be before you seal them?
Ideally, you would seal all upward facing, weather-exposed checks. However, checks get small enough that it is very difficult to apply a sealant to them. Seal whatever you can, but don’t try to fill hairline checks. We always advise filling side facing or upward facing checks that go into windows or doors to prevent water intrusions into the frames. Spiral checks that twist into the interior of the house should also be sealed up.
What do you use for sealing up your checks?
Regular caulking is generally not a good choice to seal checks. Our Check Mate 2 specifically developed for this purpose. It is colored to match our exterior stains and available in tubes to make an application easy.
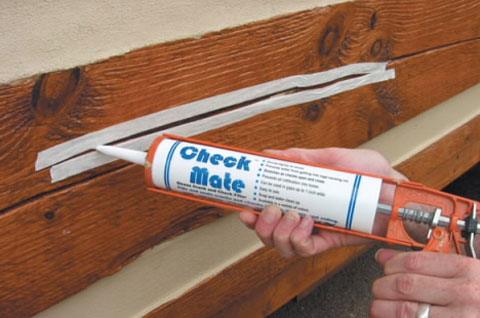
Even though Check Mate 2 is our preferred sealer, some customers use Energy Seal for the purpose. When you are sealing checks, use a line of masking tape along the edge of the check to keep the sealer off the surface of the log. This works whether or not you already have stained the logs.
If the wood within the check is dump from cleaning, rain or borate treatment (it is important to treat an existing check with Shell-Guard RTU before sealing it), make sure the check has time to dry before applying Check Mate 2.
Want to Learn More?
Watch our video that teaches how to seal checks here.
Remember to use a backer material to keep the sealant thickness between 1/4 and 3/8 inch along the check. Also, fill the check completely up and a little beyond the log surface to allow for some shrinkage for the sealant as it dries.
Since 1981, Perma-Chink Systems’ log home sealants have proven themselves on thousands of chinked and chinkless style log homes to become the most widely applied log home sealants in the world and simply the best by every measure:
- Longevity
- Appearance
- Performance
- Ease of Application
Backing Material – Why You Need It
Backing materials are an integral part of a sealant system and should be used wherever possible. The overall performance of any sealant system is dependent on the use of correct application thickness and proper backing. For small joinery the most used backing is round backer rod. It comes in a range of sizes and is relatively inexpensive. It is flexible and can be pushed into a crevice without needing to be nailed or stapled.
In situations where joinery is too narrow to insert some type of backing material, a narrow strip of water resistant masking tape works well. (Avoid masking tape that wrinkles when wet because the wrinkles may show through the sealant after it has cured.) A good option is to use pinstripe tape available at most automotive supply stores. The tape should be water resistant, so Energy Seal does not adhere to it, making it a suitable backer material. Pinstripe tape is available in widths down to 1/8″.
Approved Backing Materials
- Grip Strip
- Backer Rod
- Polyisocyanurate board (Polyiso or R Max)
- Expanded polystyrene (EPS) beadboard, foil-faced. Chinking applied over the foil covered side
- Water-resistant masking tape or pinstripe tape
DO NOT USE: Extruded Polystyrene (causes blisters), Polyurethane foam (Pur Fill, Great Stuff, Styrofoam), Blue Board, Pink Board or other colored board that outgases to cause blisters. If you are unsure about your backing material, check with Perma-Chink Systems before using it.
Tools
- Application bags, caulking gun or bulk loading caulking gun
- Follow plate for bulk loading gun
- Trowels and spatulas (close to the width of the finished seam is best)
- Rags and a bucket of water for general cleanup
- Spray/mist bottle (use water with a few drops of soap as a release agent)
- Masking tape if desired
PERMA-CHINK® – WHEN TO APPLY IT?
Download Log Home Sealants Application Guide PDF
Weather: Freshly applied sealants should be protected from direct rainfall for a minimum of 24 hours. Either watch the weather or drape a newly sealed wall with plastic film. Be sure to allow some airspace between the wall and the plastic to facilitate drying. Avoid applying sealants in direct sunlight or when the temperature is less than 40°F. In cold weather it’s important that the logs be free of frost and dew in order to ensure that the sealant adheres tightly to the wood. Like stain, the best surface temperature range for easiest application and best results is between 50°F and 80°F.
- Best: after application of Lifeline™ stain, but before Lifeline Advance clear topcoat (Lifeline Advance should be applied over Perma-Chink log home sealant, making it easier to clean).
- Second Best: after application of Lifeline stain and Lifeline Advance topcoat.
- Worst: Over a fresh application of oil based stain. Oil based stains must be allowed to dry for 2 months. Then, clean the chinking surface with alcohol to remove dust and oily residues.
Application of Perma-Chink® Log Home Sealant
Before starting the application of Perma-Chink, inspect the installation of backing materials. Where pieces of backer butt up to one another, make sure that there are no gaps or ledges between pieces. If you find gaps, fill them with backing material or cover the span with tape. Make sure that the wood surfaces along the seam are clean and free of oils or waxes to insure proper adhesion of the cured chinking.
- Apply only as much chinking as you are able to tool smooth in about 15 minutes (less in warm dry weather that causes the chinking to skin over rapidly).
- Start by holding the applicator tip against the back surface of the joint and apply a bead of chinking. If multiple beads will be required to span the entire gap, apply them close together to avoid trapped air during tooling. Apply enough chinking to maintain a wet thickness of approximately 3/8 inch.
- The first step in finishing is to wet the trowel only (not the chinking), then spread it out evenly to 3/8 inch thickness, making sure the wet chinking is in good contact with the wood surfaces at both edges of the seam. Good contact is critical for proper adhesion after curing.
NOTE: Be careful to maintain proper thickness in all corners. After smoothing to the proper thickness, lightly wet the surface of the chinking and tool to finished smoothness. Avoid applying enough water to cause it to run onto the wood surface. Wipe any runs immediately.
Tip: If you used masking tape at the edges of the chinking, remove it now and smooth out edges with your tool. If your preference is for the finished chinking to have a different texture than smooth, you should experiment before application.
ROUND LOG CONSTRUCTION
When using Perma-Chink log home sealant on full-round log construction, the finished width of the chinking seam should be approximately 1/6 of the log diameter (i.e. if your logs are 15″ diameter, the chinking seam should be about 2-1/2 inches wide.) This is very important on log home siding applications. Use proper width backing material to provide for your desired seam width when considering that the applied wet material will be approximately 3/8 inch thick.
SQUARE LOG CONSTRUCTION
Backing material and chinking seam width are determined by the engineered geometries of square log wall construction. It is always best to install backing materials so the finished chinking application does not result in a horizontal lip or ledge at the bottom edge of the seam where rainwater can accumulate. A little planning at this point can prevent a lot of maintenance in the future.
Drying/Curing
- Perma-Chink log home sealant develops a skin in a short period of time. Full curing requires it to dry all the way through and may take a number of weeks. Cool temperatures or high humidity extends drying time.
- Protect freshly applied sealants from rain for at least 24 hours to allow a protective skin to form.
- Blisters during curing are common to sealant applications in hot environments. Blisters can be caused by use of improper backing materials or by trapping air inside of the wet chinking during application. Prevent most blisters by making sure to trowel all air out of seams in “multi-bead” applications.
- Avoid application in direct sunlight on south and west walls. If newly applied chinking is exposed to sunlight and begins to blister, the effect can be minimized by shading the walls with white tarps for the first 1-2 days. In the first few days, blisters can be closed by puncturing the surface skin of the chinking and carefully pressing the blister surface back against the wet chinking inside.
ENERGY SEAL® and WOODSMAN™
Energy Seal is a textured sealant that helps to match the appearance of the surrounding wood. The texture also allows it to accept a stain so that sealed joints and gaps become virtually invisible. Energy Seal may also be used in narrow chink joints with a width of one inch or less. Energy Seal can be used to seal gaps between logs, around windows, doors, vents and anywhere else where air or water can enter your home.
Woodsman multi-purpose sealant may be used for multiple applications in and around all types of homes. When used on the outside of a home this smooth surfaced sealant provides a flexible weather and water barrier that will not dry out and crack like most general purpose caulks.
Woodsman adheres to most common building surfaces such as wood, metal, concrete, brick, masonry, porcelain, ceramic tile, marble and glass. Ideal for sealing construction joints like window and door frames, woodwork, eaves, soffits, vents and expansion joints, Woodsman can also be used as an internal sealant between courses of logs.
When Should Energy Seal or Woodsman Be Applied?
Weather: Protect freshly applied sealants from rain until a water resistant skin has formed on new sealant application (usually about 24 hours). Avoid applying in direct sunlight to help prevent heat-induced blisters. Wood surface temperatures should be between 40°F and 90°F. Tarps can be used to protect sealant applications from weather.
Best: It is generally best to apply Energy Seal after walls have been cleaned and before stain is applied. Our sealants adhere aggressively to bare wood surfaces or to wood finished with Lifeline. For the least visible sealant lines, choose a sealant color that’s a shade lighter than the stain you plan to use because it’s easier to cover a lighter color sealant with a darker color stain than it is to hide a dark colored sealant with a light colored stain.
Or: if you want visible sealant lines, you may apply Energy Seal after you stain. If you do this, it is best to apply Lifeline Advance topcoat after the Energy Seal. This results in a more even appearance, helps them blend in with the rest of the wall and makes sealants easier to clean.
Worst: Application to surfaces with freshly applied oil-based stain should be avoided. The width of the backing material you require depends on the profile of your logs but be sure to take into account that you will be applying a 3/8″ thick layer of sealant over it. Often, the sealant width is determined by the profile of milled logs and must be tailored accordingly.
SQUARE LOGS
Energy Seal or Woodsman is used on square log construction to seal corners, butt joints, windows, door frames and other areas where a visible chink joint is not desired. Also, for cosmetic chink joints (less than 3/8 inches deep) we recommend sealing the seam with Energy Seal and then applying Chink-Paint over the entire joint for the best completed appearance.
- Before starting, inspect the installation of all backing materials. Where individual pieces of backing join to one another, make sure there are no gaps, ledges or discontinuities that show through after the sealant has cured. Smooth, trim or bridge gaps with tape as necessary.
- To insure proper adhesion, make sure that wood surfaces where the sealant adheres are clean and free of oils, waxes or other contaminates.
Application
Cut the applicator tip to the desired diameter of the sealant bead you want to apply. Begin by holding the applicator tip firmly against the seam and apply a bead of sealant. Apply enough sealant to maintain a wet thickness of at least 5/16″ and no more than ½” across the entire seam after tooling. Apply as much sealant as you can tool smooth in about 15 minutes to avoid a dried skin before final finishing.
After the joint is filled, trowel out to approximately 3/8th of an inch thick across the entire joint, making sure there is good contact between the sealant and the wood. Do not spray it with water at this time! Be careful to maintain proper thickness especially in corners!
Tip: Occasionally check the thickness of the sealant using a toothpick to see if you are maintaining the proper thickness. Once the sealant is roughly in place, spray it with a light mist of water and tool smooth with a trowel or spatula. Do not saturate the surface with water. If it begins to run you have applied too much.
Tip: If you used masking tape at the edges of the Energy Seal, remove it now and smooth out edges with your tool.
Clean-Up
If you get any sealant on the surface of the wood, be sure to wipe it off with a wet rag immediately. Dried sealant is very difficult to remove. Clean your tools and equipment with clean water occasionally during application.
Drying and Curing
Drying time and curing time are two entirely different terms. In warm or hot weather, Energy Seal and Woodsman may begin to skin over in as little as ten minutes while a complete cure may take a couple of weeks. Cooler temperature and high humidity slows the drying time and curing process.
CHECK MATE™ 2 – CHECK SEALANT
Check Mate 2 is an outstanding water resistant sealant that prevents water and air infiltration through pronounced cracks (called checks) in logs, timbers and wood siding. It is especially important to seal upward facing checks in any location where they may accumulate water. If these checks are left unsealed, they become sites where rot may begin to take hold. If you have old checks where rot is a risk, be sure to apply Shell-Guard before sealing with Check Mate 2.
Application
Like other flexible sealants, Check Mate 2 should be used in conjunction with Backer Rod whenever sealing a gap that’s more than ¼ inch wide.
Make sure the Backer Rod is shoved into the check around 3/8- to ½-inch deep to allow room for the Check Mate 2.
Since Check Mate 2 comes in various colors, you should choose a color that is close to the color of the logs. However, if you are planning to stain over the Check Mate 2, choose a color that’s a shade lighter than the stain. That way the Check Mate 2 will blend in with the surrounding stained wood. Remove masking tape while Check Mate 2 is still wet.
An 11 oz. Check Mate 2 tube will seal about 16 feet of 1/2-inch-wide checks.
Finished!
Call us @ 800-548-3554 | Order Samples or Product Online | Find A Contractor
1. Inspect | 2. Clean and restore | 3. Preserve | 4. Stain and Finish | 5. Chink and Seal
Which is the best way to remove an existing finish, media blasting or chemical stripping? Like most questions of this nature there is no definitive answer, it depends on the situation. Both methods of removing a finish have their positive and negative attributes. The results will depend on the competence of the person or persons doing the work as well as the method used. For the sake of comparison, we will look at the features of each method to help you make a more informed decision about which one to choose.
Media Blasting
Although media blasting can be accomplished by a homeowner, it requires the rental of an industrial size air compressor and a Blaster Buddy unit.Media blasting not only removes the existing finish, but it also removes the top layer of wood. Media blasting can be a very aggressive procedure. In the hands of someone inexperienced with media blasting, extensive damage can be done to the surface of the wood in a very short span of time. That is why media blasting is best left to professionals who have prior experience. After media blasting, it is recommended that the walls be cleaned witha Log Wash™ solution (1 cups per gallon of clean water) to remove debris.
In general we take the position that media blasting should be considered carefully and evaluated as a secondary method rather than the preferred method of removing an existing finish. We have received calls from homeowners who are disappointed after seeing what media blasting did to their log home. They call us wanting to know what they can do to restore the logs to their original smooth surface. Unfortunately, the only way to restore the surface is labor intensive hand sanding. Media blasting followed by Osborn brushing can result in a relatively smooth surface if done by a well-trained and experienced individual. However, this is more the exception than the rule.
Some Advantages of Media Blasting
- Does an excellent job removing most paints and stains
- Fairly quick and cost effective
- Avoids water getting into the home, but dry dust and blasting media will most likely penetrate into the interior of the home
- Since the blasting media consists of either recycled crushed glass, or organic materials like corncob grit or walnut shells, there is little chance of well or water contamination
Disadvantages of Media Blasting
- Media blasting changes the surface characteristics of the wood
- In addition to roughening the surface, it increases the surface porosity
- Many people consider a media blasted surface unattractive and the only way to restore the wood to a smooth surface is with lots of hand sanding
- Prelude™ should always be used as a primer on media blasted surfaces
- Having enough blasting media on hand is critical. You don’t want to run out in the middle of a wall since it may take two or three days to have additional material shipped to your location
Chemical Stripping
Chemical stripping refers to the use of finish removers used in conjunction with a pressure washer. Chemical strippers only soften an existing finish, they must be used along with a pressure washer to remove the finish from the wall. In contrast to media blasting, chemical stripping is much more user friendly. All that is required are a general-purpose pressure washer, available at most do-it-yourself outlets or equipment rental locations, and either our S-100 or StripIt® Finish Remover. A pressure washer is much easier to handle than media blasting equipment. Although aggressive pressure washing can still do surface damage, it is usually relatively easy to repair with a light sanding or an Osborn Buffing Brush.
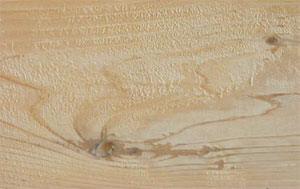
The main advantage of chemical stripping is that when following the proper procedures, the result is a beautiful smooth clean surface. So why do some stain manufacturers recommend media blasting over pressure washing? Media blasting significantly increases the surface area and porosity of the surface resulting in better adhesion of an inferior product. However, media blasting may result in an unattractive finish.
Some Advantages of Chemical Stripping
- Does an excellent job when correct procedures are used.
- User-friendly. Takes little expertise and no special equipment is required.
- One wall can be refinished at a time.
- Results in a more attractive surface.
Disadvantages of Chemical Stripping
- Water will get into the home.
- Need to protect plants and shrubs from chemicals.
- May take more than one application to completely remove an existing finish.
- Must thoroughly rinse any applied chemicals before applying finish.