Blog
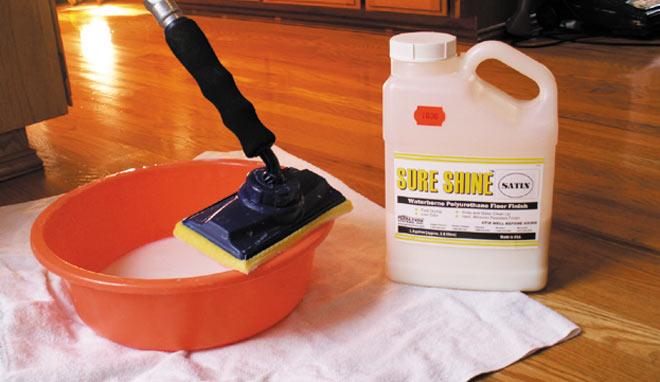
Sure Shine™ Gloss or Satin is a water-based, urethane-acrylic, interior clear finish for application on both horizontal and vertical surfaces; however, the application of a urethane-acrylic finishes is a bit different than those based on acrylic latex polymers. For example, our pigmented Lifeline™ stains and Advance and Acrylic Topcoats should be thoroughly mixed and brushed out as far as they will go. This may include vigorous back-brushing. However, this technique does not work when applying Sure Shine and its proper application is a bit different than any of our other finish systems.
Being a urethane-acrylic hybrid, Sure Shine is very susceptible to air entrapment. That’s why the label states to gently stir Sure Shine using a paint paddle or stick and not to shake or agitate the container as this creates foam that may result in air bubbles within the finish. Vigorously brushing Sure Shine will also entrap air resulting in a rough surface with lots of visible air bubbles.
For best results, Sure Shine should be applied with a good quality brush or pad using slow strokes. It can also be applied with a High Volume Low Pressure (HVLP) sprayer, but only spray small areas at a time and slowly back-brush. Since Sure Shine dries fairly rapidly, back-brushing must be accomplished within a couple of minutes of application. If it begins to dry, back-brushing will leave striations in the finish that will have to be sanded out if a smooth surface is desired.
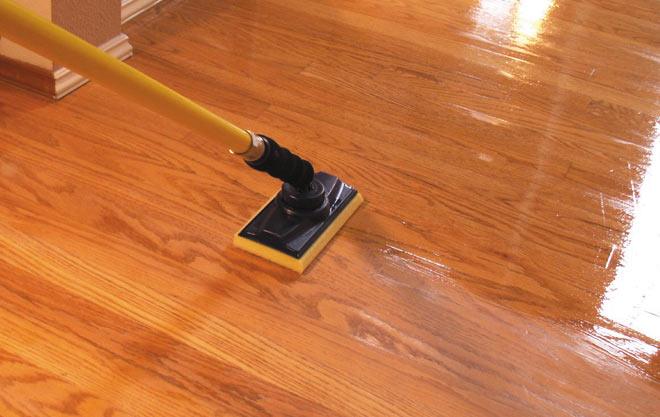
Another application tip about Sure Shine relates to sanding. Typically, the application of a water-based finish directly to wood has a tendency to raise the wood grain; therefore, the first coat of Sure Shine may not be completely smooth. Allow Sure Shine to dry for 1-2 hours before sanding is attempted. Lightly sanding with sandpaper (180 grit or higher) or a buffing brush to remove all of the small bumps, ridges, and other imperfections. If the film is just the slightest bit soft, sanding will generate little pills of finish and make a mess of the surface. Once the first coat is sanded smooth, subsequent coats of Sure Shine can be applied without sanding between coats.
If you want a smooth, deep lustrous finish on your interior wood surfaces, Sure Shine is hard to beat. And remember that Sure Shine can be applied over any of our interior finishes including Lifeline Acrylic Gloss and Satin.
Wayne Bell
Log Home Care Online
Have you ever wished that you could live in a log home but you’re stuck living in conventional housing? If so, join the growing number of people tackling home improvement projects to create a space that has the “feel” of log home living within the limitations of your current home.
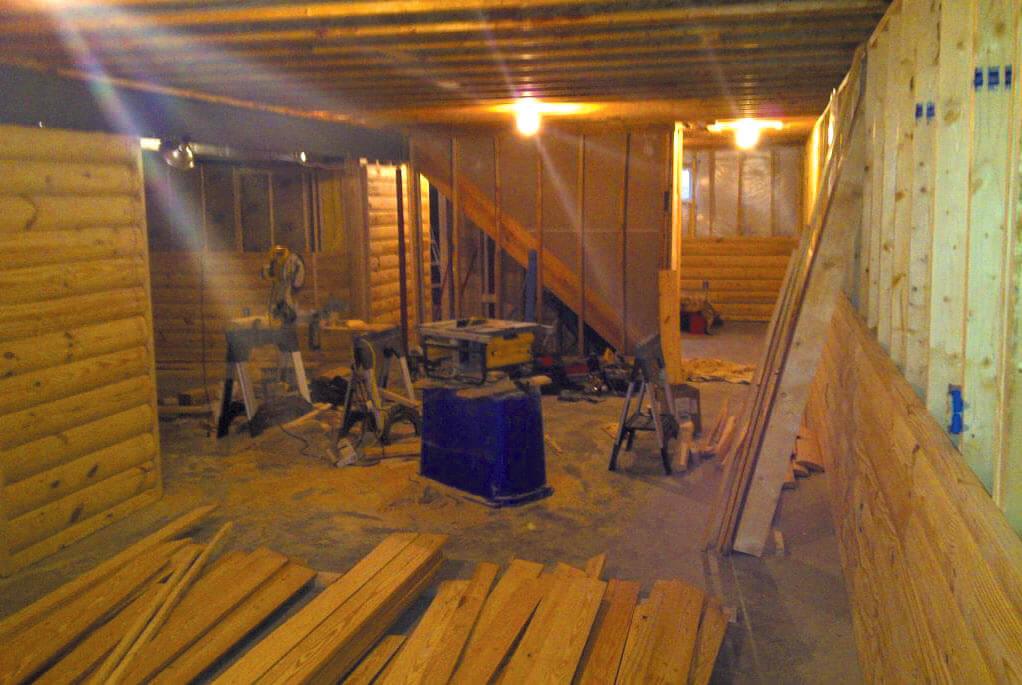
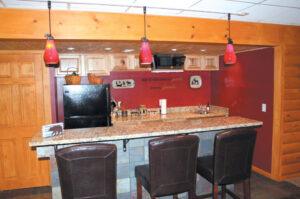
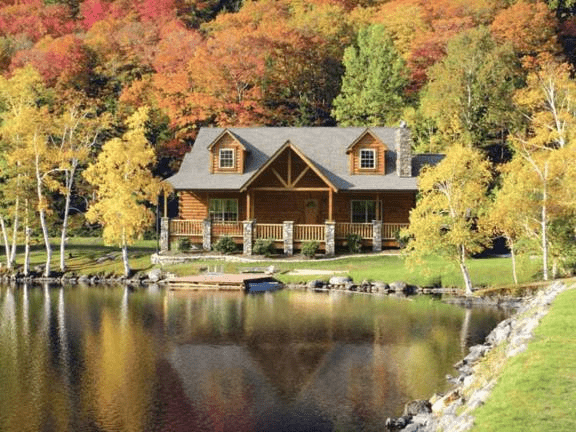
Our project was to convert a roughly 30’x50′ unfinished basement in a contemporary suburban neighborhood into a space that would capture the tranquility of a northwoods lodge. Many of the design and construction techniques we used could just as easily be applied to any interior room, log home basement, or other living space. And best of all, most of the skills required are within the reach of the average handyman, so you can add significant value to your home with only a modest financial investment.
This space needed to harmonize with a contemporary home, so we used a mixture of log siding and drywall in the design.
We included a central fireplace as a gathering point for visitors, kitchen/bar area for entertaining, home theater, game room, guest bathroom and storage areas. To maintain the theme, we used natural materials wherever possible. We sketched out the space and made note of existing features (like the stairs, duct work, support beams and posts) so we could accommodate them in our design.
We’ve seen basement conversions that didn’t address the storage issue and that is a mistake so we framed in the corner that housed the furnace and other utilities to create a generous storage room.
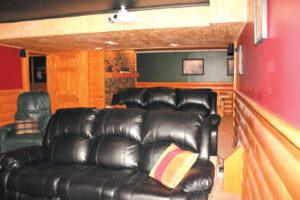
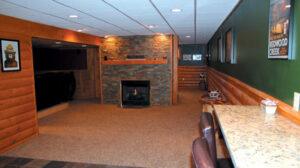
Visitors are impressed with the functionality and attractiveness of the previously unused space. The extensive use of standard construction techniques allow for homeowner participation in the building process, and the use of log siding and natural materials provide for a dramatic effect. When it came to selecting the sealant and finish materials, we chose the same supplier that we have used to professionally finish hundreds of homes: Perma-Chink Systems.
It’s always fun to admire beautiful designs in log home publications, but with some creativity you, too, can enjoy the feeling of a log home wherever you live.
About the Author
Wayne Bell is a log home refinishing, repair and restoration contractor, serving the Midwest and southern United States from his base in Ohio. If you have questions about the materials or processes used in this project, you can contact him at 937-657-4565 or at www.LogHomeCareOnline.com.

Have you ever considered the impact that landscaping can have on the well being and beauty of your log home? Let’s look at some things around your home that can significantly affect its health.
Trees
In summer months trees located close to your home can help provide shade which may lower your air conditioning costs. But if any branches are touching your roof they can provide pathways for insects and rodents to enter your attic and eventually your living space. It’s best to keep tree branches at least three (3) feet away from your walls and roof. This distance will discourage creatures like gray squirrels and roof rats from investigating your attic and help prevent carpenter ants from taking up residence inside your home.
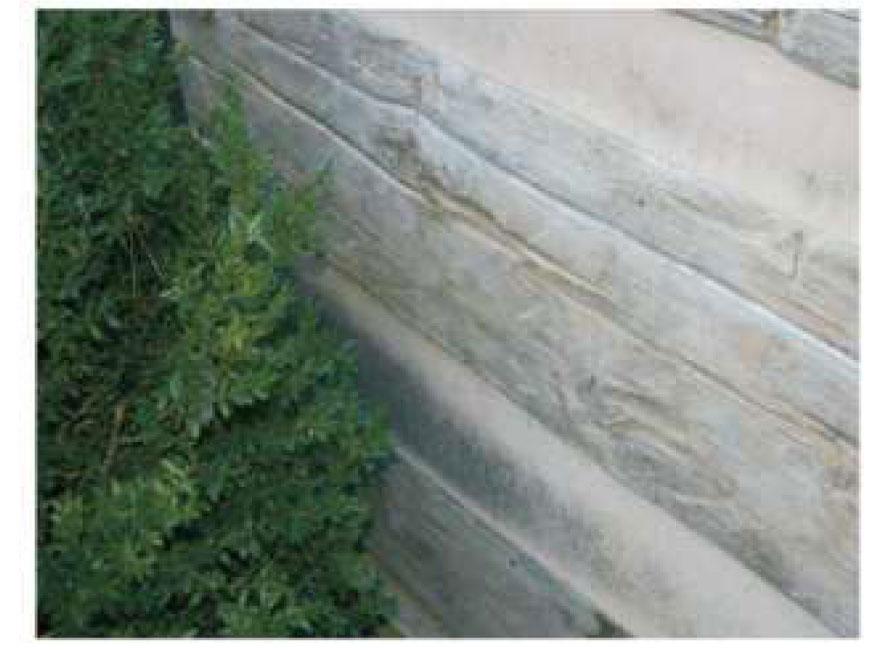
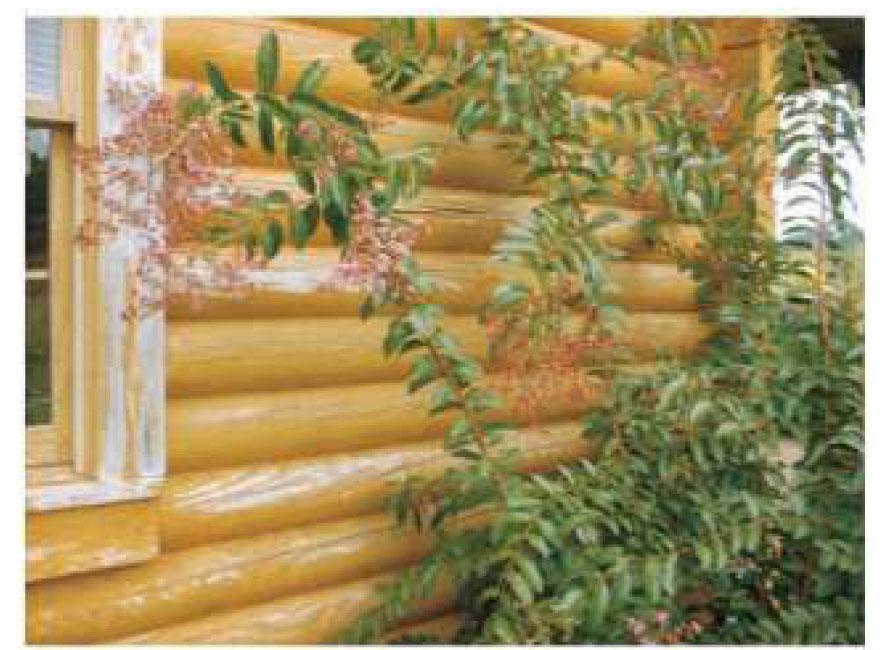
Shrubs and Hedges
The next things to consider are shrubs and hedges planted next to your foundation. Over the years you’ve probably let them grow too large, and they may be getting close to your log walls, or even worse, actually touching the logs. In addition to keeping the logs damp, shrubs and hedges can actually wear the finish right off of the wood. You need to trim them back, if for no other reason than they are hiding the beauty of your home. There should be at least two (2) feet of clear space between any plants and shrubs and your foundation or log wall. This allows air to flow over the logs which helps keep them dry and free from insects, mold, algae and decay.
Plants and Grass
It’s quite common to see plants and grass planted right up against foundation walls. Even though they may not be in contact with the logs, they still provide a lot of moisture to the surrounding area and water is the enemy of wood.
Mulch
If you have flower beds around your home you probably use some type of mulch to keep the weeds down. The most commonly used types of mulch are shredded wood or bark, bark nuggets, or pine straw. All of these types of organic mulch materials attract a wide variety of insects including termites as well as wood decay fungi. In addition, over the years the decayed mulch builds up bringing the soil level closer and closer to the bottom course of logs.
Fall Landscaping Tips
To prepare for fall and winter seasons, here is a checklist to make sure your home and yard looks great. Here are our recommendations regarding landscaping around log homes:
1. There should never be any plant life growing within two (2) feet of the foundation, log, or siding wall. Any existing plants or branches within the two-foot zone should be removed or cut back.
2. The best way to maintain an adequate clear space between your landscaping and home is to lay down a two to three foot wide band of landscaping fabric or perforated plastic around the base of your foundation and cover it with two to three inches of river pebbles or crushed stone (not wood or bark mulch). This will help keep the foundation area dry and you will be surprised how it will reduce the number of bugs you’ll see inside your home.
3. Make sure that your sprinkler heads are not spraying water onto the logs or foundation walls.
4. Take care of your lawn by overseeding, applying fall-specific fertilizer and weed control, and don’t forget to water your lawn (for areas where there’s no rain or snow).
5. Prune and trim trees and shrubs. Since blooms are done for the year, now is the time to cut them down.
6. Don’t forget to winterize sprinkler systems and related items. Don’t forget about outside water timers, too (I may or may not have experience forgetting to bring my timer inside one winter, and it may or may not have frozen and failed).
7. Plant trees, shrubs, and bulbs in October. This allows them to acclimate to their new home without the stress of a hot summer.
8. Rake leaves and clean-up other debris, composting what you can.
9. Place mulch around newly planted trees, but away from the trunk as this invites pests.

From Worst to First With Perma-Chink!
By John & Elaine Judsky
Suches, GA
Perma-Chink Customers Forever
I’ll admit the hard truth. I neglected the exterior of our log cabin in the North Georgia mountains. For years. It was ugly, and we needed restoration.
We had used Perma-Chink products on the interior of our new cabin back in 1999, with Sure Shine on our floors and the Lifeline Interior on our walls. They are holding up well and looking good after 16 years.
But the exterior was a mess from our neglect and from using an inferior product. We used the product recommended and provided by our log manufacturer. It shall remain nameless here because it was an oil-based jug of junk.
This past summer I finally had the time and money to redo the exterior, and there was no question in my mind I was going to use Perma-Chink products. We attended a workshop in Knoxville and learned lots of good tips and info. The logs looked dirty, faded and had no water resistance. I went ahead and sanded the few spots that needed that much care. The S100 finish remover did a great job removing what was left of the old finish. The Wood ReNew made the logs fresh and bright again. Then the Log Wash prepared a good surface for the application of Armor-Guard preservative followed by two coats of the Lifeline Ultra-2, followed by the Lifeline Advance Gloss.
I also used Log End Seal for the logs & Woodsman for caulk touch-up. Our deck and porch floors were treated with Deck Defense. Every single product seemed high-quality and gave the advertised results. The water-based products are a dream to work with and clean-up is easy. All the products used together truly are a log home finishing ‘system’.
Now we have a home with a beautiful finish that looks brand new! My wife says that it looks like we are living inside a piece of fine furniture. The true beauty of the logs is shining through, we have a home we are once again proud of and we could not be more pleased. It was a lot of hard work, but the results are amazing.
I highly recommend Perma-Chink products to all those who want to preserve their logs and want a beautiful home. Their products are not inexpensive, but definitely worth every penny! If you do it yourself or hire it out, make sure you educate yourself on all the excellent how-to’s and advice on the website and make sure the directions are closely followed.
My final advice: You CANNOT go wrong with Perma-Chink.
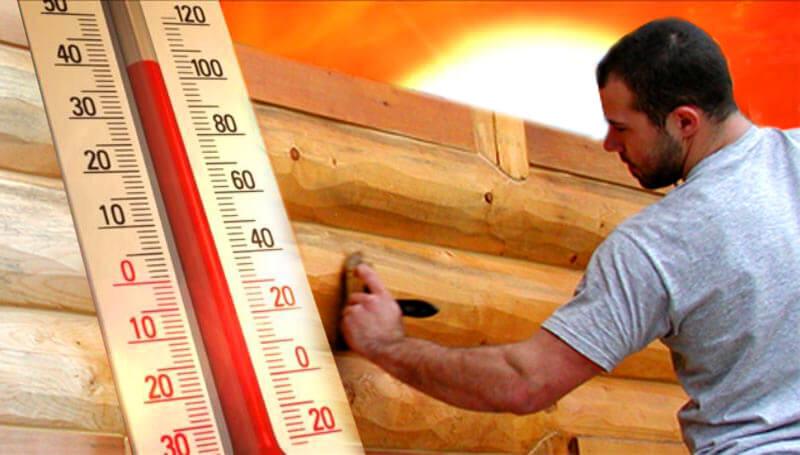
Some DIY homeowners assume that hot weather simply means that the log finish freshly applied on their log home will dry faster. While this is true, there are circumstances when stained log surfaces dry too quickly. Once the finish is on the wall, it does not really matter if it gets hit by direct sunlight a few hours later. It’s the surface temperature during the application process that’s critical.
How Hot is Too Hot to Stain My Log Home and Deck?
A general rule of thumb is that stain can be applied when the outside temperature is between 40°- 90°F. However, temperature for application is based on the surface temperature of the logs, not the temperature of the air. For instance, a wall in the sun can be 10-25 degrees hotter than the surrounding air.
Can I Stain My Log Home in Direct Sunlight?
It’s best to avoid staining in direct sunlight, especially during the hot summer months. The heat causes the stain to dry out too quickly which prevents it from brushing out properly, resulting in brush marks, lap marks, and inadequate adhesion.
What Part of the Day is Best for Applying Finish to My Log Walls?
For exterior log walls, start as early in the morning as possible, after any dew has evaporated. As the sun rises and areas of the house become shaded, work around the house staining the shaded areas as the sun moves East to West.
What Happens When You Apply Stain to the Log Surface Hotter than 90 F?
- Water-based stains cure by the proper evaporation of water, leaving behind the pigments and protective coating. When water evaporates too rapidly, the ingredients/pigments will not disperse evenly for best adhesion.
- Brush marks and lap marks may occur, resulting in an uneven look of the finish.
- Uneven thickness of the stain coat on the surface will result in blotchy appearance.
Will Humidity Affect the Drying Process of the Stain on the Logs?
The best drying will occur when the relative humidity is 40% to 70%. The ideal temperature for staining is 70 degrees with humidity around 50%. To eliminate dew and condensation on logs that can create uneven sheen, allow approximately 2 hours for the coating to dry before sunset.
PRO Tips for Applying Stain to Log Homes in Hot Weather:
- Work or move around the house to avoid the sun as much as possible. Work in the shade when possible.
- You must keep a “wet edge” at all times. This means a lot of stain on the tools and working fast to avoid lap marks.
- Use heavy duty brushes that hold a lot of stain. Professionals typically use 4” high quality brushes. They are heavy and bulky when loaded with stain. Invest in quality brushes.
- Always “box” your stain and make sure it is completely mixed. Colors can slightly vary from one pail to the next. Use another bucket to mix gallons (like a 5 gallon bucket). Be mindful of the stain in your bucket and keep it closed when taking breaks.
- Buy a laser temperature measurement tool and monitor surface temperatures throughout the job.
- Avoid staining when humidity is extremely high or right after a heavy rainstorm. Stop working if temperatures exceed the limits.
- If in need of a professional help, visit our Find A Contractor tool and choose log home contractors near you.

PCS Clear Shield™ Gloss or Matte is a water-based, acrylic latex, interior clear finish for application on both horizontal and vertical surfaces; however, the application of PCS Clear Shield™ is a bit different than our pigmented Lifeline™ stains, and topcoats. Whereas our stains and topcoats should be thoroughly mixed and brushed out as far as they will go, this does not work when applying Clear Shield.
PCS Clear Shield is highly susceptible to air entrapment. That is why the label states to gently stir it using a paint paddle or stick and not to shake or agitate the container as this creates foam that will result in air bubbles within the finish. Vigorously brushing PCS Clear Shield will also entrap air in the finish. For the best results, PCS Clear Shield should be applied with a quality brush or pad using slow strokes.
Another application tip about PCS Clear Shield relates to sanding. Typically, the application of a water-based finish directly to wood tends to raise the wood grain; therefore, the first coat of PCS Clear Shield may not be completely smooth. Allow the first coat of Clear Shield to completely dry before sanding is attempted. It should be dry in approximately 1-2 hours. Lightly sand with sandpaper (180 grit or higher) or a buffing brush to remove the small bumps, ridges, and other imperfections. If the film is just the slightest bit soft, sanding will generate little pills of finish and make a mess of the surface. Once the first coat is sanded smooth, subsequent coats of PCS Clear Shield can be applied without sanding between coats.
Final Note, do not apply PCS Clear Shield to freshly milled lumber as this can result in cracking of the finish as the lumber dries.
If you want a smooth, deep lustrous finish on your interior wood surfaces, PCS Clear Shield is hard to beat. It can also be applied over any of our Interior finishes including Lifeline Acrylic™ Gloss and Satin.
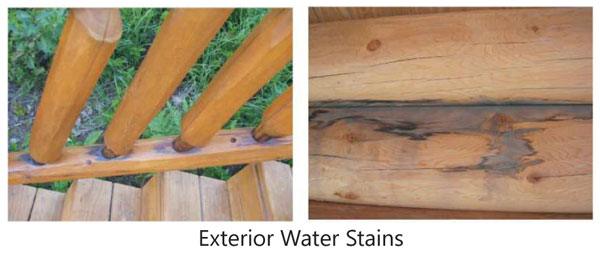
Some of the most challenging discolorations on log home walls, or any wood surface, are water stains. They can run the range from light brown to jet black, and can appear on both interior and exterior surfaces.
How Do Water Stains Form?
All wood contains a number of components that are grouped under the category of “water-soluble extractives.” In other words, they can dissolve in water and as the water within the wood evaporates, they can be carried along to the surface.
Generally, if wood is exposed to water for only a brief period of time, the water does not get a chance to penetrate deep into the wood and dissolve these water-soluble components. However, if the wood is exposed to water for days, weeks, or months, the water can pick up a high concentration of these components and deposit them on or near the surface of the wood.
Exterior water stains typically occur around log checks, fissures, and other openings that collect rain water. The water soaks into the wood and as it evaporates out of the wood, it brings along the colored extractives which can then become visible on the surface. In some cases, water-soluble tannins may react with minute particles of steel on the surface, forming dark iron tannate stains.
This process may occur on bare wood or under an existing finish. Interior water stains typically develop during construction before the home is sealed or from an ongoing water leak. They can be particularly ugly and may cause a lot of distress.
Getting Rid of Water Stains
As previously stated, water stains can be just on the surface or they can go deep into the wood. The first step in determining a course of action is to find how deep the stain goes into the wood. Remove about a 1/16” thick sliver of the discolored surface with a sharp knife, and if the discoloration comes off with the sliver, the discoloration can usually be sanded off or treated with products like Log Wash™, Wood ReNew™, or Oxcon™.
Since there are a number of components involved with water stains it’s impossible to predict which product will work best. We recommend starting with Log Wash and if that does not work, move to Wood ReNew, and finally Oxcon.
The problem is that even these products don’t always work; sanding may be the only solution. If the discoloration goes deep into the wood, still visible after the sliver of wood is removed, it will be virtually impossible to either sand or chemically remove the water stain. In this case there are only two options: replace the discolored wood or hide the stains.
Hiding Water Stains
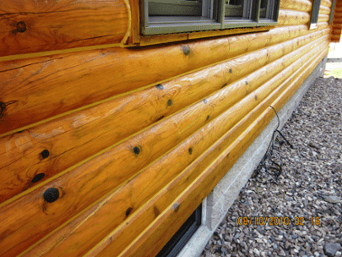
Although Perma-Chink Systems manufactures and sells transparent and semi-transparent finishes, some of our colors are fairly heavily pigmented which gives them some hiding power. On interior bare wood surfaces, Butternut is a good choice, since it is very close to the color of bare white pine. It may take several coats depending on the darkness of the discolorations.
If a colored stain is going to be applied later, it would be a good idea to apply Prelude™ over the entire wall once the water stains are hidden to even out the absorption of the stain and obtain a uniform final color. For hiding very dark discolorations, one or two coats of Kilz® primer will hide virtually anything. Kilz is available in both water and solvent-based formulations, but only comes in white. However, it can then be coated with our colored stains and although it may not result in an exact match with the rest of the wall, it will definitely look better than the dark, visible water discolorations.
The best way to hide exterior water stains is to use a dark-colored finish like Walnut, one of our gray-colored finishes, or our wheat-colored finish. If this is not to your liking, you can try using the same hiding procedures as stated for interior stains, but on exterior walls the opaque finished areas tend to be more pronounced than on interior surfaces.

By Lee Denman, Intensified Wood Restoration
There are essentially two types of log home stains available on the market today:
| Film-Forming FinishesOil-based (Alkyd) Log Home StainsLatex-based Log Home StainsAcrylic Latex-based Log Home StainsVarnishes for Log Homes | Penetrating FinishesOil-based Semi-transparent Log Home Stains |
What are the PROS and CONS of each of these types of log home finishes?
1. Oil Based (Alkyd) Log Home Stain
PROS: Wood grain visibility, UV Protection, Non Porous, Easy application, longer open times.
CONS: Trap Moisture, Brittle, Can’t Breathe, Weather Quickly, Coat build-up over time, Blistering occurs if moisture is present behind finish, High Maintenance.
2. Latex based Solid Color Log Home
PROS: Breathable, Flexible, Durable, High UV Protection, Porous, Easy application, Low maintenance, Long life, low odor.
CONS: Won’t prevent decay if conditions are favorable, Short Shelf Life.
3. Semi-Transparent Acrylic Latex based Log Home Stain
PROS: Breathable, Flexible, Durable, High UV Protection, Wood grain visibility, Porous, Low maintenance, Long life, low odor.
CONS: More difficult to apply than oil based stains and solid color stains, fast drying times.
4. Log Home Varnishes
PROS: Allow for natural look of logs.
CONS: High maintenance, prone to Cracking, Peeling and Blistering, Requires recoating every 1-2 years, Partial UV protection.
5. Oil based Semitransparent Log Home Stains
PROS: Penetrate into wood, Wood grain visibility, Breathable, High UV protection.
CONS: Perform best on rough sawn, weathered, or course textured wood. Compatibility issues with most log home sealants due to waxes found in most penetrating finishes. Don’t have a furniture grade finish look (dull), must apply second coat before first coat dries in order for stain to penetrate wood. Vapor barrier, non-breathable.

What types of log home stains work the best?
So we have all this helpful information on the types of log home stains but which log home stain is the best? It is hard to say which one is the absolute best because there are many factors that ultimately decide how well or long a log home stain will perform. Some of these factors are:
- What season the logs were cut (winter cut logs only)
- Proper surface preparation
- Environment surrounding building
- Moisture content of logs
Of all these factors none is more important than proper surface preparation of the logs before applying a log home stain. If the surface of the logs has not been prepped properly none of these log home stains will perform as they state they will. This is why it is important to only hire a qualified log home restoration expert to work on your log home! They will have the knowledge and expertise to work with the products available in the current log home market. This will ensure your investment is protected well into the future.
While we can’t say which log home stain is the overall best, we can recommend which type of log home finishes we feel perform exceptionally well and keep maintenance costs down throughout the years. This only holds true if proper surface preparation is kept in mind before and during any finish or sealant application. In our opinion, film-forming, latex based waterborne log home finishes such as Perma-Chink Systems’ Lifeline is best bang for your buck!
While Perma-Chink Systems finishes aren’t the cheapest out there they seem to require the least amount of maintenance based on our 25+ years of experience restoring log homes and log cabins of all sizes and shapes. They also offer an unmatched 5 year warranty on their log home stains when applied properly and maintained accordingly.
Lee Denman is the founder of Intensified Wood Restoration Company
Perma-Chink Systems Free Samples
Want to try Perma-Chink Systems products? Order free samples online here.

There are two kinds of wood – wood that is rotten, and wood that one day will be rotten. This statement may seem a bit extreme, but it is a fact. Wood is a product of nature and its nature is to return to the earth in a natural process. As professional log home contractors, it is our job to ensure that wood used in the construction of log homes lasts for many years.
Borates have been used to preserve wood for many years, and because people have lately become more concerned with the toxicity of products used in their homes, it has steadily grown in popularity. We will discuss the use of borates to preserve log homes in detail.
What are borates and how do they work?
Simply put borates or borax are naturally-occurring water-soluable salt-like acids. They are about as toxic as table salt to humans and pets but kill wood-consuming insects like termites, powder-post beetles, and old house borers. More importantly, it kills the wood destroying microorganisms that cause rot.
Rot in log or conventional homes causes hundreds of times more damage to homes every year than damage by insects.
For borates to be effective, they must be actually eaten by an organism. Borates are not effective against carpenter bees because they do not actually consume wood – they just chew it. Interestingly enough, consuming borates does not instantly kill termites or other wood destroying insects. It does however kill the bacteria in their digestive system. These bacteria actually help the insect digest the cellulose fibers that make up a piece of wood. Without these bacteria, the insects die of starvation. Funny how nature works.
Borates
Borax, also known as sodium borate, sodium tetraborate, or disodium tetraborate, is an important boron compound, a mineral, and a salt of boric acid. Powdered borax is white, consisting of soft colorless crystals that dissolve easily in water.
Borax is a component of many detergents, cosmetics, and enamel glazes. It is used to make buffer solutions in biochemistry, as a fire retardant, as an anti-fungal compound, in the manufacture of fiberglass, a texturing agent in cooking, as a precursor for other boron compounds, and along with its inverse, boric acid, is useful as an insecticide.
Types of Borates
Perma-Chink Systems markets four different forms of borates for the purpose of preserving wood. TimBor is sold as a powder that is mixed with water on-site and then sprayed onto wood. PenaShield comes pre-mixed and is Ready-To-Use. Bora-Care contains the highest concentration of borax with glycol added to deepen penetration into wood and must be mixed with additional water on-site. The Concentrate is usually used in extremely wet or rot-prone conditions or on active rot or insect infestations. Cobra-Rods are made from borax and copper which have been compressed and heated to form a glass-like rod of borax which is inserted into holes drilled in rot-prone areas like porch posts. Cobra Rods are so effective that they are now inserted into all new utility poles installed in the southern U.S.
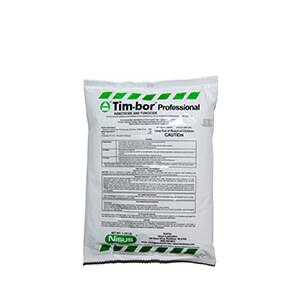
Tim-Bor®
Sold as a powder that is mixed with water on-site and then sprayed onto wood.
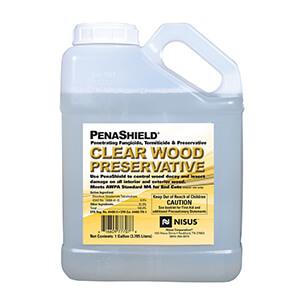
PenaShield®
Comes pre-mixed and is Ready-To-Use.

Bora-Care®
Contains the highest concentration of borax with glycol added to deepen wood penetration and must be mixed with additional water on-site. It is usually used in extremely wet or rot-prone conditions, on active rot, or insect infestations.
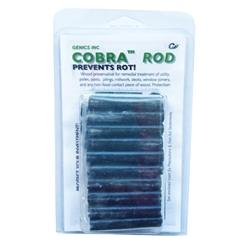
Cobra-Rods®
Made from borax and copper, are compressed and heated to form a glass-like rod. The rods are inserted into holes drilled in rot-prone areas, like porch posts. Cobra Rods are so effective that they are now inserted into all new utility poles installed in the southern U.S.
When most homes are constructed, the logs are clean and smooth with very few checks, or cracks, in the logs. During the first few years, these checks open up, expand, and deepen. Many checks extend to the center of the log – much deeper than any topical application of borax can effectively reach. These exposed deep checks CAN and DO collect water. Over time, this will cause the log to rot. It is very important to include the application of borates into checks during any and all maintenance work done on a log home prior to a maintenance coat of stain, clear coat, or caulking.
Special and Unusual Applications
I have used borate treatments over the years in many other special and unusual applications that I will list below.
For antique log homes – Owners of antique log homes have spent a lot of money purchasing old logs, timbers, and siding because of their unique appearance. They love that silvery-gray rough texture inherent to old timbers. They are very reluctant to remove this look in order to properly apply a protective waterproof coating that would protect these logs from rot.
An alternative for this unique and growing segment of the market is to simply treat the exposed logs every year with borates. The treatment must be done every year because borates are water-soluable and rain will eventually leach the product out of the wood.
The borates will not change the color of the wood and it is almost impossible to over-apply.
For additional protection against insects inside new homes – During initial construction, spread powdered Tim-Bor into open stud wall cavities and on the floor where base cabinets are to be located. Then close up the stud walls and install the base cabinets. The borate powder will stay in those locations forever and kill all roaches and ants that come in contact with Tim-Bor.
Now, I told you earlier that insects must consume the product to be effective and that is true. Insects can crawl through the powder without being harmed. However, ants and roaches belong to a group of insects which constantly groom themselves to stay clean – or a clean as a roach or ant can be. To stay clean, they lick their legs and other body parts. When they do, they consume the borate and will die.
For log replacement projects – I highly recommend a thorough treatment of all replacement logs and log siding with liquid borates and Cobra Rods. The chances are that homeowners who have not maintained their homes in the past will probably neglect them in the future.
A more permanent treatment today will lower your liability in the future as a contractor. An even better plan would be to have replacement logs pressure-treated with borates. There are probably more companies that provide that service, but I do know that Appalachian Log Structures, Lok-N-Logs, and Sisson DuPont Carder will pressure-treat logs for use in log replacement. They all also produce many different log profiles. If I were to replace a log on a customer’s home that was pressure-treated, I would have no problem extending a lifetime warranty on that log – a good selling point for log home contractors.
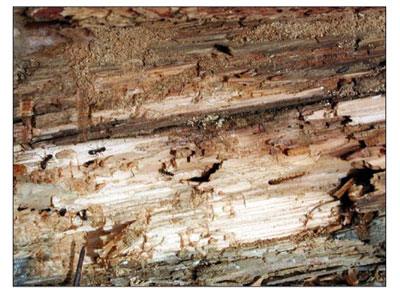
For active infestations – I have successfully used borates against insects that are actively living in isolated spots on structures. In the pictures below, powder-post beetles infested barn wood on my porch. I injected borates into the actual holes using a syringe made for injecting marinade into food.
Any plastic syringe will work when held tightly against the hole to inject the liquid.
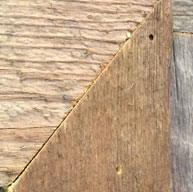
I treated these holes one afternoon and found them dead on my counter-top the next day. I may have simply drowned them, but that was a year ago and they have not returned.
The same type of method can be used in isolated areas of rot or termite damage using – believe it or not – a bulb-type turkey baster or cheap ketchup squirt bottle. Simply drill angled holes into the wood on the upper part of the log (you have to drill to get the product into the wood past the existing water-proof stain on most logs) and insert the bottle or baster full of borate solution into the hole and walk away for a couple of days. The liquid will slowly soak into the log and saturate a large section of log. If the product simply flows quickly into the log, then you will probably be facing a log that is too far gone and it may need to be re-faced or replaced. Once the product is deep in the log, it will soon kill the rot or termites.
I recommend Bora Care for this procedure as it has the highest concentration of borates. Remove the delivery device and add a Cobra Rod as extra insurance and longevity.
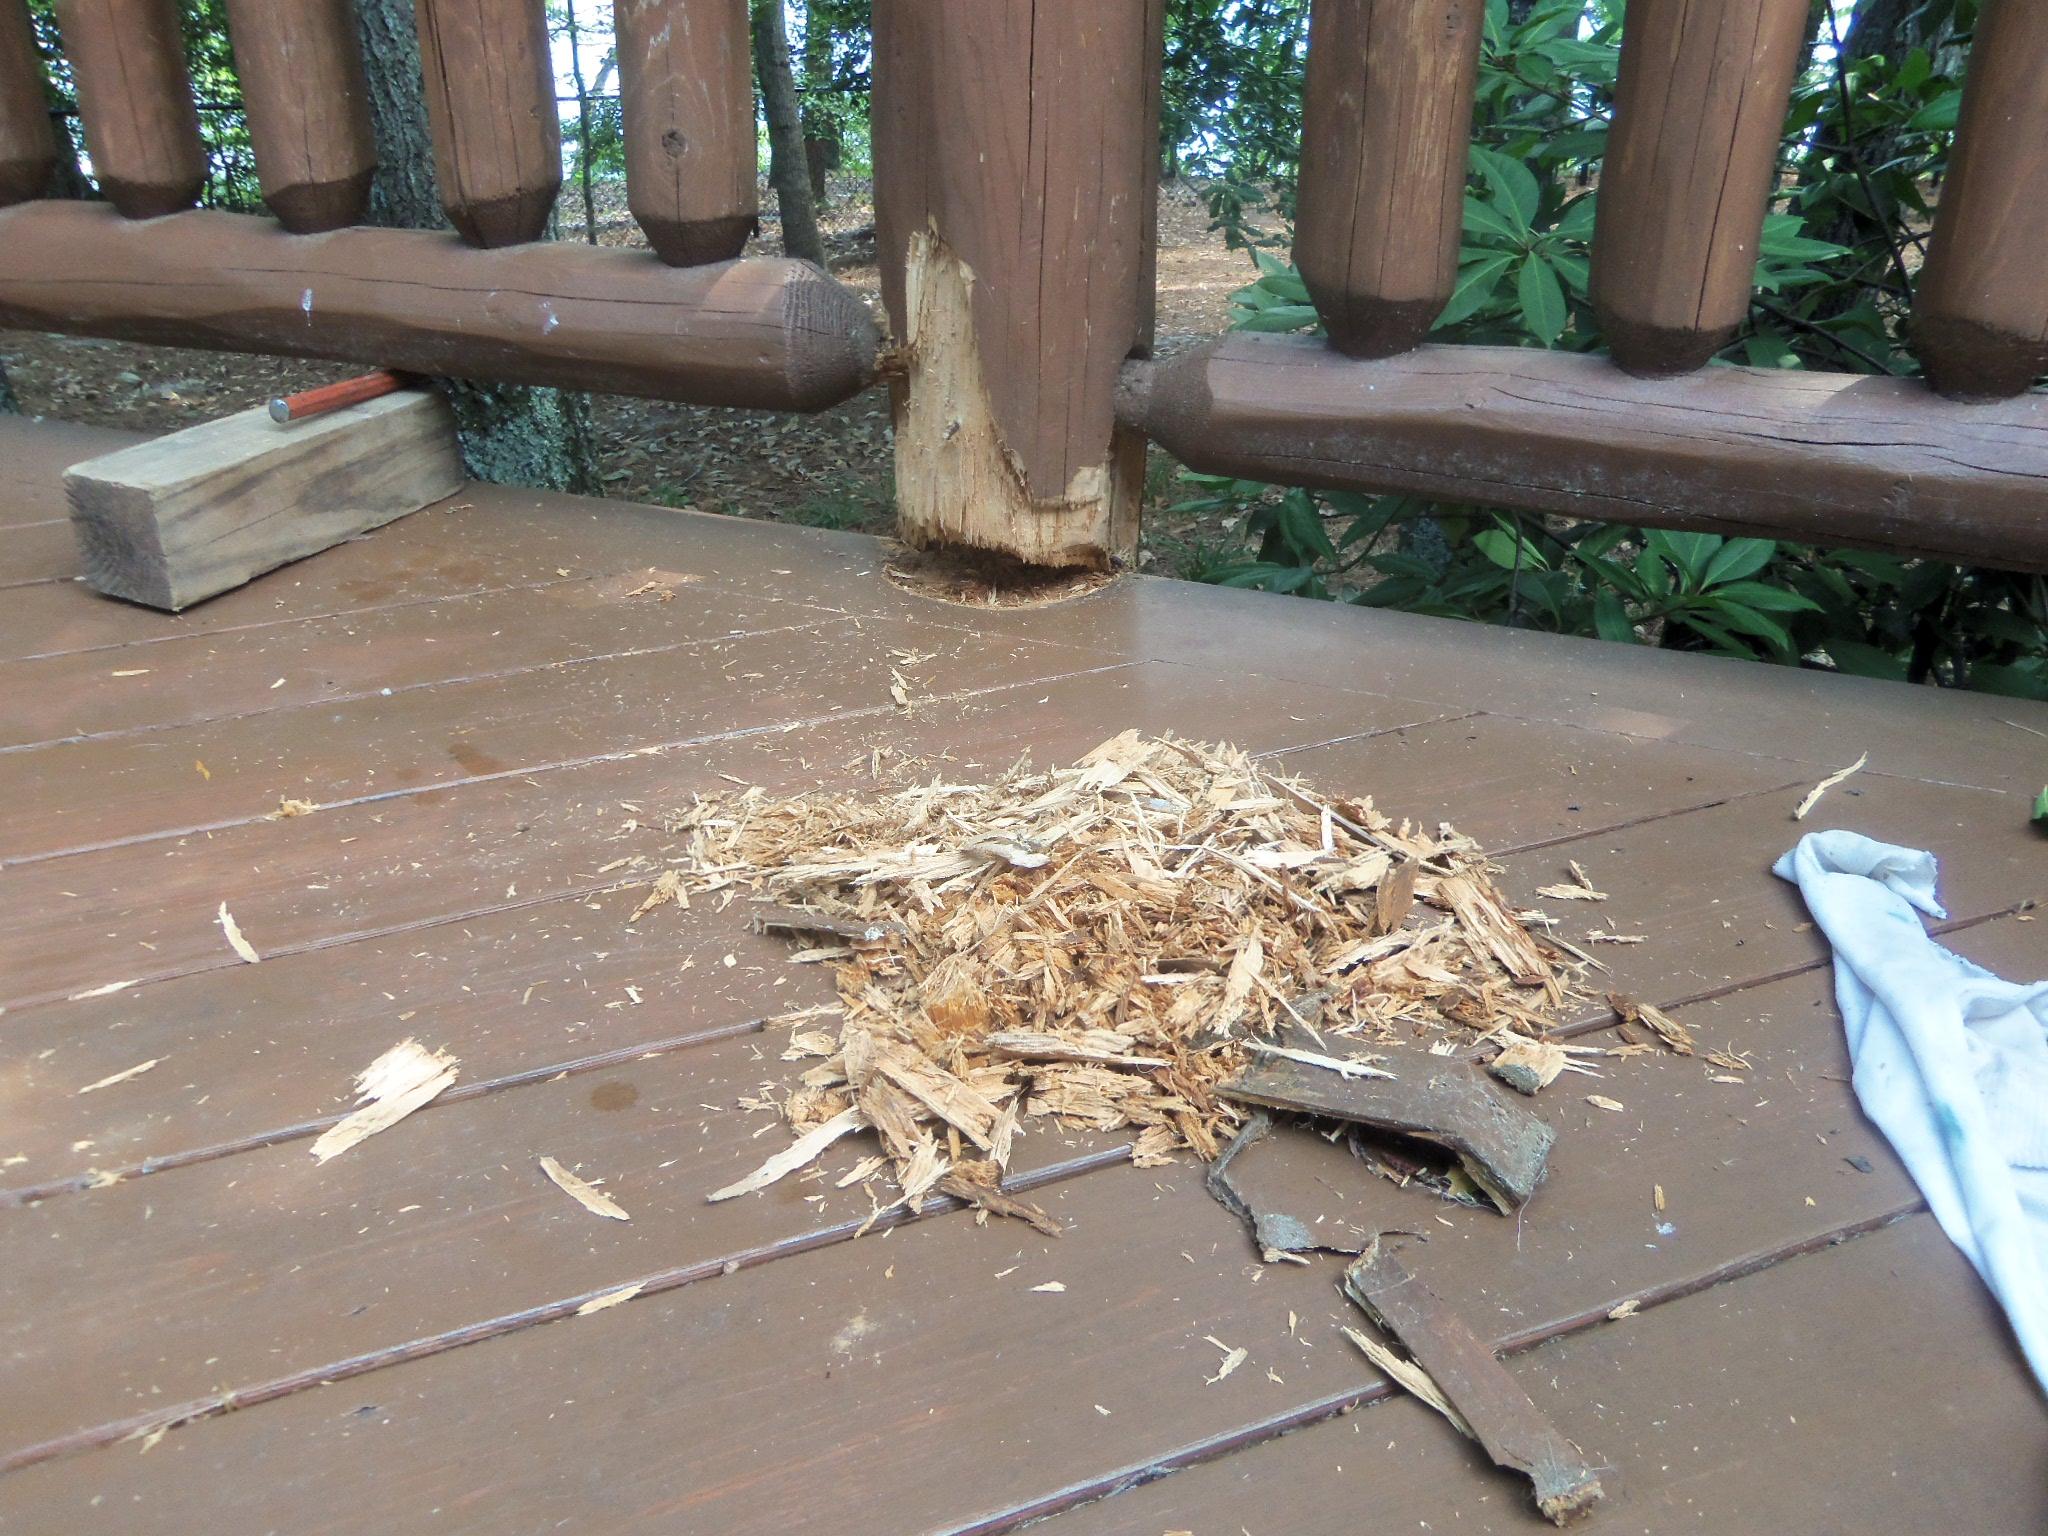
For log railings – Log railings exposed to the weather are a maintenance nightmare. They are very difficult to maintain a stain coating on because they develop checks on the upper curvature of the rails which gather water. However, when located on a raised deck or stairway, they can be downright dangerous. How many homes have you visited a homeowner who warns you not to lean on the railing during your inspection of the home?
Think about it – the only thing between you and serious accident is a rotted handrail! Many state codes now require pressure-treated handrails.
These things are a serious safety problem – and this warning does include cedar or redwood which last longer, but also rot.
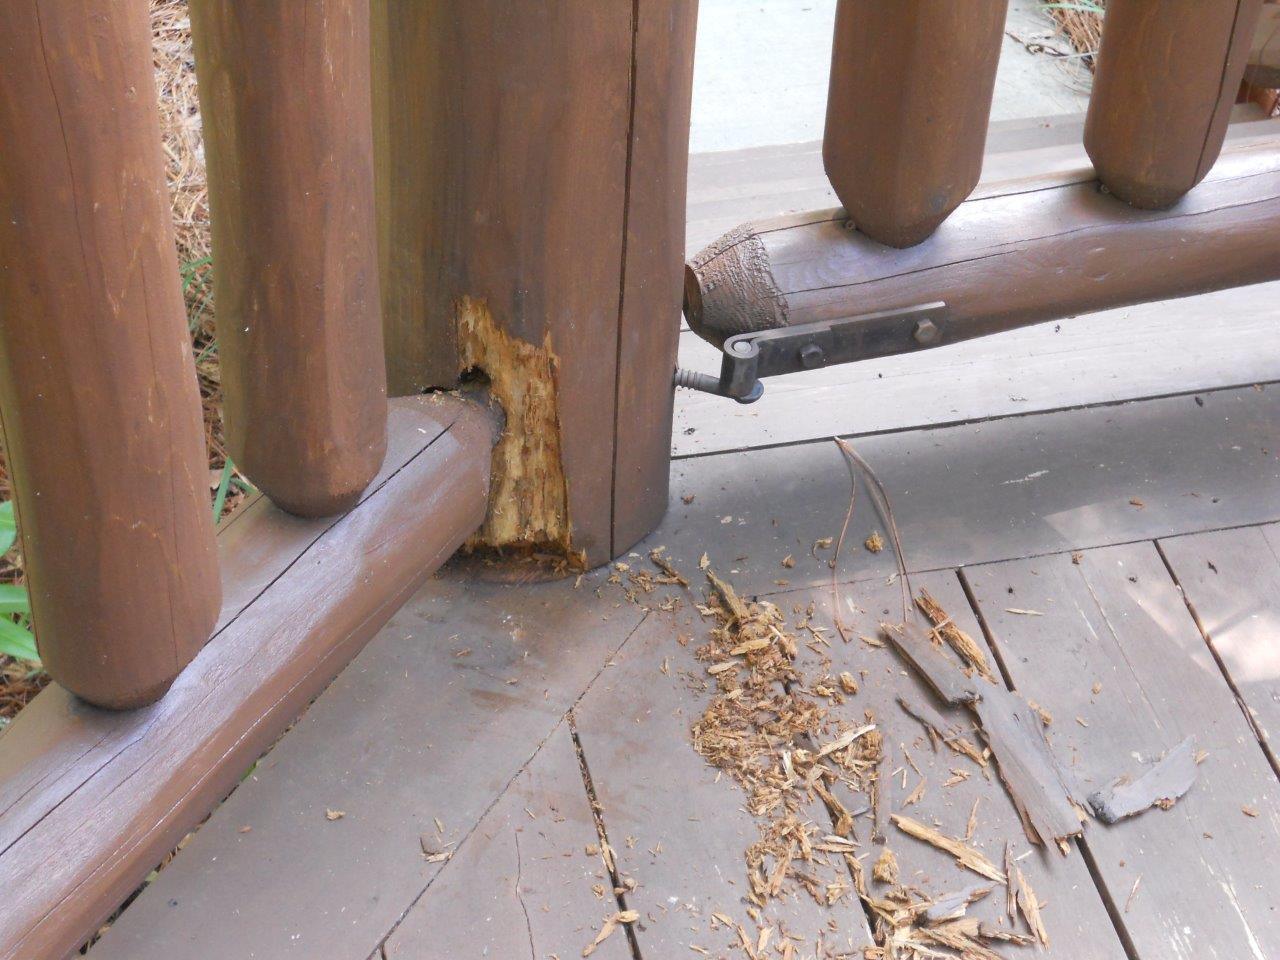
If you are at a new home site, you can treat new hand rails as they are assembled by drilling a hole into the end of each spindle and inserting a Cobra Rod. The borates and copper will dissolve into the surrounding wood and protect against rot. I would also soak all the components in one of our other liquid borate products. A pain, but better than an accident.
If you have more questions, please contact us 1-800-548-3554.
Please visit Perma-Chink’s How-To Tips for more detailed application information on the use of these products.
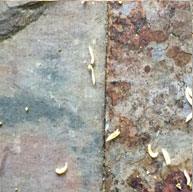
If you live around trees, and many people do, you probably have carpenter ants around your home. Carpenter ants are typically large ants, although the size of the workers can vary in a single colony. Finding a few carpenter ants in your home each week is not necessarily a sign that you have an infestation. Foraging ants roam far and wide looking for food and an occasional ant trapped in a sink or bathtub is quite common. If there are trees close to your home, ants can fall or be blown off the trees onto your roof. They may end up trapped within your home during their journey back to their nest.
Carpenter ants do not eat wood. They get their name from their habit of hollowing out wood in order to make a suitable nesting site. In addition to wood, carpenter ants will happily nest in Styrofoam (EPS) panels and other types of insulation. A good indication of a carpenter ant infestation within a home is the presence of numerous foraging ants, especially in the kitchen or bathroom. Water attracts carpenter ants as much as food and moist wood around leaky pipes and drains provides an ideal environment for nesting ants. Another sign of an infestation is the presence of large winged ants in late spring and early summer.
Most carpenter ant colonies start outdoors in a tree cavity. After a few years, the colony grows and expands its foraging territory. If suitable conditions are found within a nearby home, satellite colonies can become established in voids, moist wood or foam panels within the home. These satellite colonies contain workers, older larvae, pupae, and when conditions are right, some winged reproductive ants. Once a satellite colony has become established within a structure the potential for additional satellite colonies dramatically increases.
Control of a carpenter ant infestation starts with a complete and thorough inspection. Useful inspection tools include a flashlight, a thin bladed screwdriver for probing the wood and a stethoscope, if you have one. Since carpenter ants are most active at night, the best time to perform an inspection is after dusk. Two things to keep in mind during your inspection, find the voids and follow the water. Although carpenter ants are usually found in wood, any dark, damp cavity can provide a suitable nesting site. Carpenter ants make a noise like crinkling cellophane as they move about and a stethoscope makes them much easier to hear and locate. Tapping a suspected nest site excites the ants and you should be able to hear their movement.
When carpenter ants burrow into wood they generate sawdust, or frass, that can pile up beneath the site of their activity. Carpenter ant frass looks like tiny wood shavings and will often contain bits and pieces of dead insects. Look closely at all of the wood directly above any frass piles for signs of any openings. Probing the wood with a thin bladed screwdriver can reveal hollowed out nesting sites.
In addition to food and a nesting site, carpenter ants require water. That’s one reason they prefer to nest in damp wood. A moisture meter is a great tool to have for discovering actual and potential carpenter ant nesting sites as well as finding decay prone areas. Some pretty good moisture meters can be found on eBay or Amazon.com for less than $50. A moisture reading of over 20% is an indication of some type of water problem that needs to be corrected.
Controlling Carpenter Ants
Correcting roof leaks, faulty plumbing and water penetration into log walls are the most important steps for long-term ant control. Even after the leaks have been repaired, enough moisture may remain to sustain a carpenter ant infestation for many months. The application of a contact pesticide directly to the nest is not the best way to control carpenter ants. Most contact pesticides are highly repellent which causes the ants to scatter. This creates the potential for additional satellite colonies to become established in other areas of the home. In addition, contact pesticides do not impart any long-term residual protection to the wood. After a few months the carpenter ants may return to the site of their original nest.
A better way to control a carpenter ant infestation is to treat the infested area and those areas subject to infestations with a borate such as Bora-Care®, PenaShield®, or Tim-Bor®. They are all effective pesticides for preventing carpenter ant infestations. Tim-Bor® is best used as dust in wall voids and other areas as preventative measures. Along with the use of a borate you can use a granular bait such as Amdro Ant Block around your home.
Also, removing all wood debris near the house, keeping shrubs and tree branches from touching your house, and storing firewood away from the house will all help reduce infestation. Carpenter ants are not easily eliminated, and you may wish to call a professional in to take care of the problem.