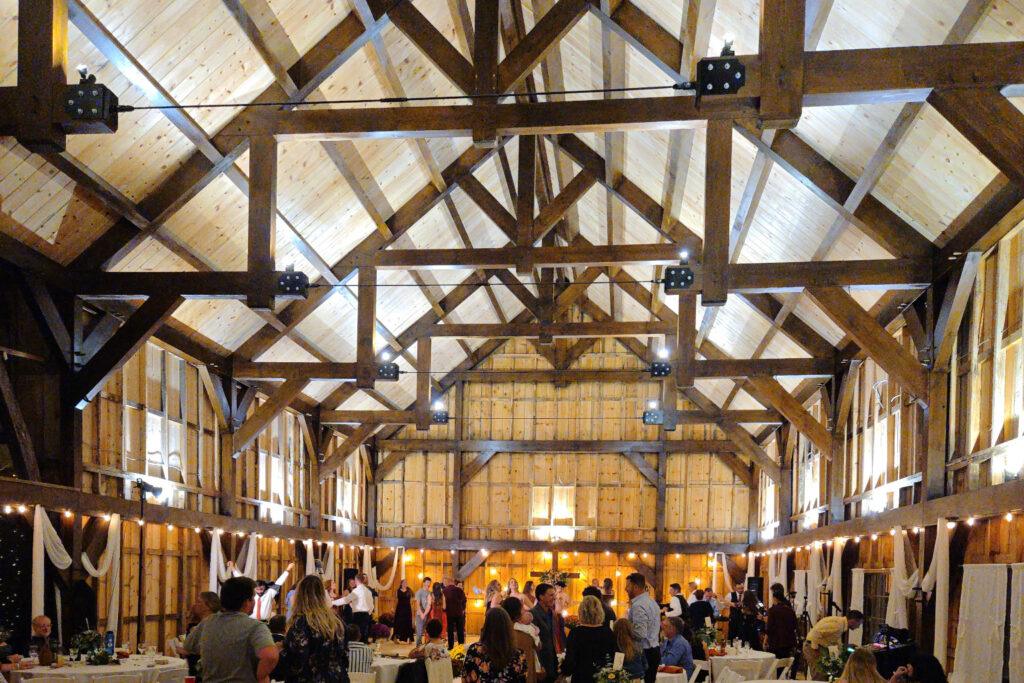
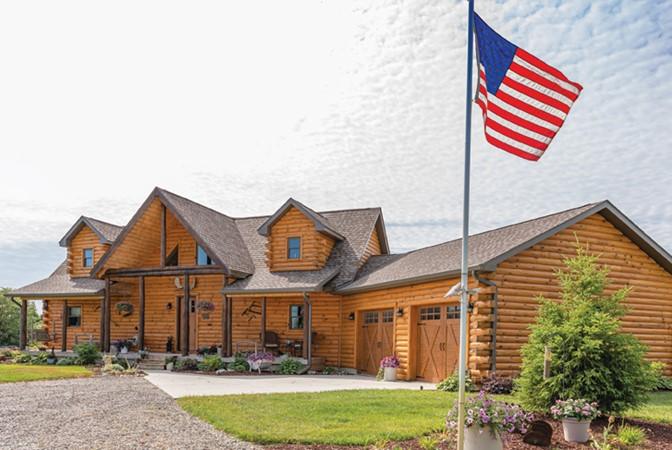
Blog
Remember that the key to maintaining a beautiful exterior and a structurally sound energy-efficient log home depends on controlling UV-light exposure and preventing excessive moisture absorbtion. Proper attention to maintenance during your first three to five years in your log home will reduce maintenance for many years beyond.
Dealing with Seasonal Checks
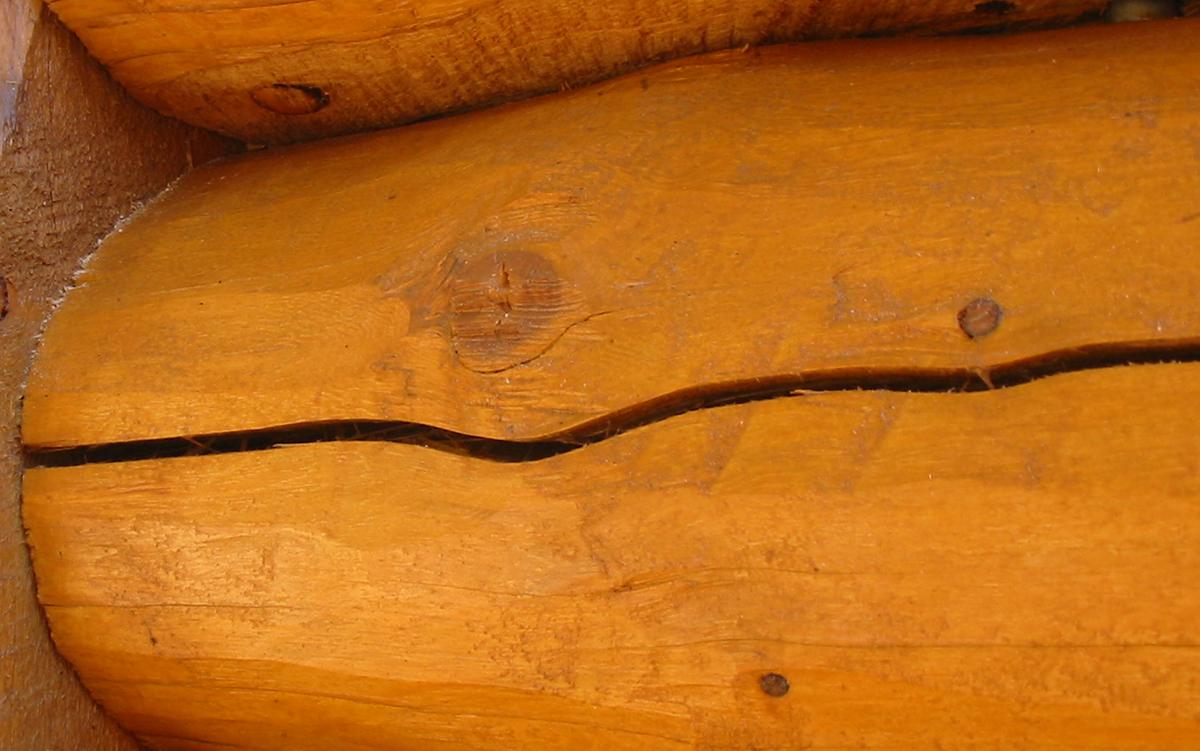
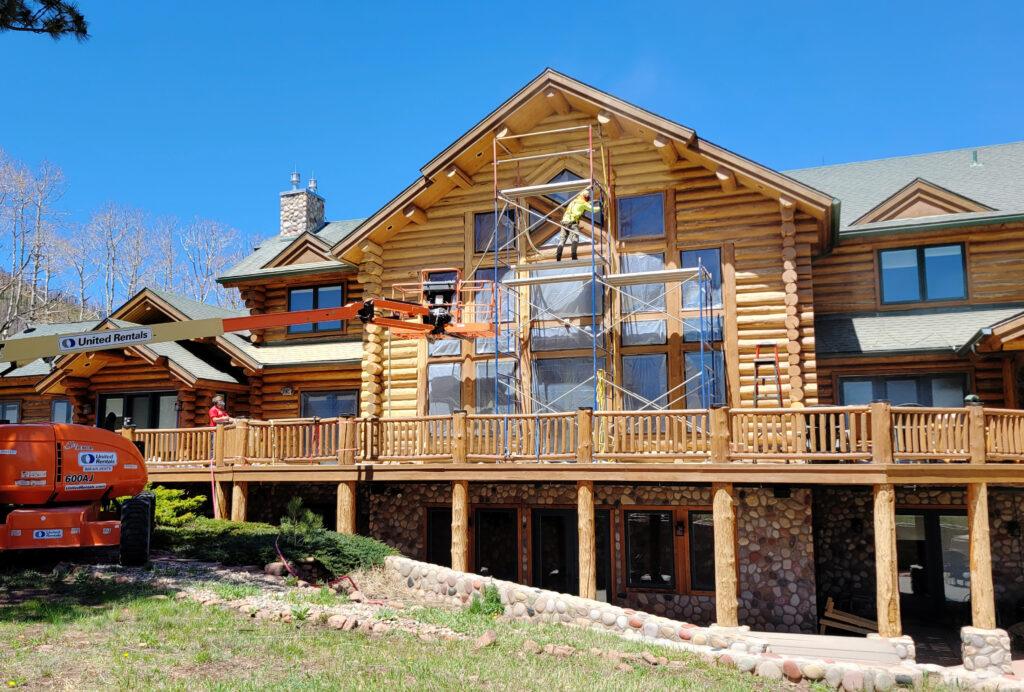
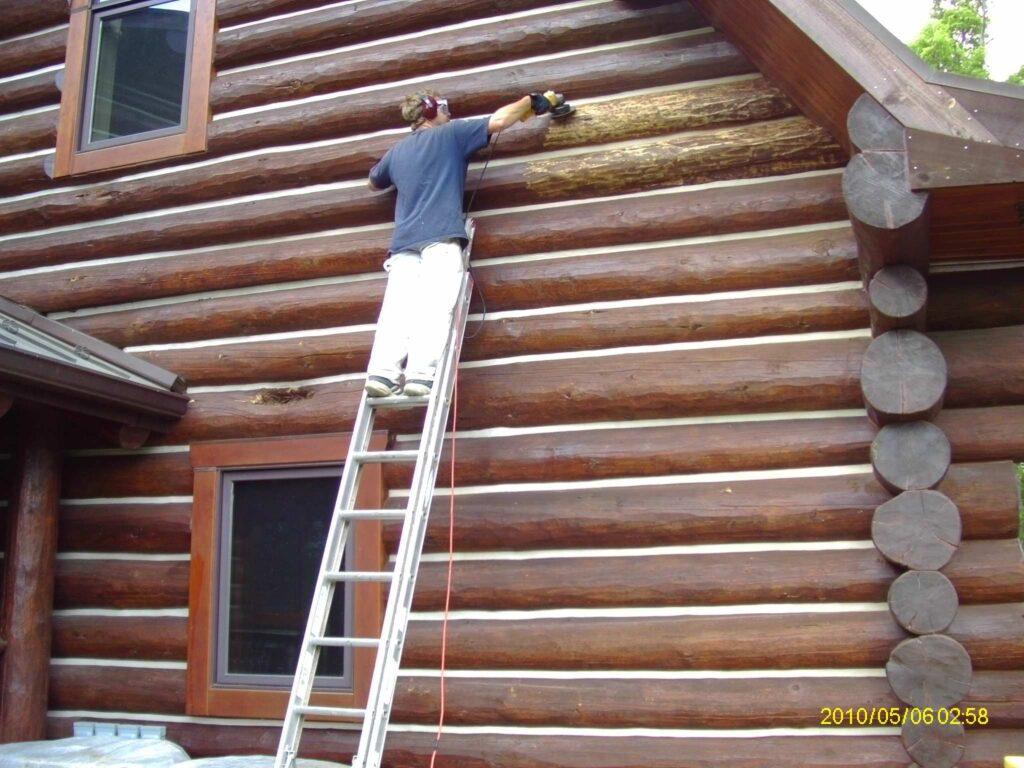
The seasonal checks (the small cracks that develop in wood) that catch water on the exterior should be filled to prevent any further water entry with Check Mate 2 or Energy Seal sealant. Check Mate 2 is the preferred product for sealing checks, as it is highly elastic and adheres exceptionally to wood, allowing for an excellent seal as checks change sizes. You can learn how to seal checks in our Tech Tip here.
What to Look for with Checks and Why
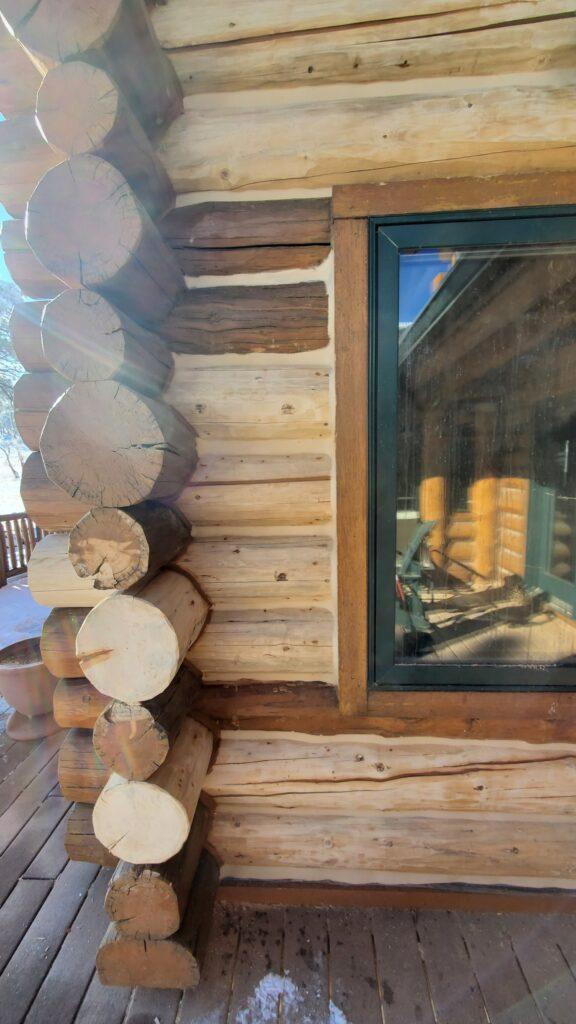
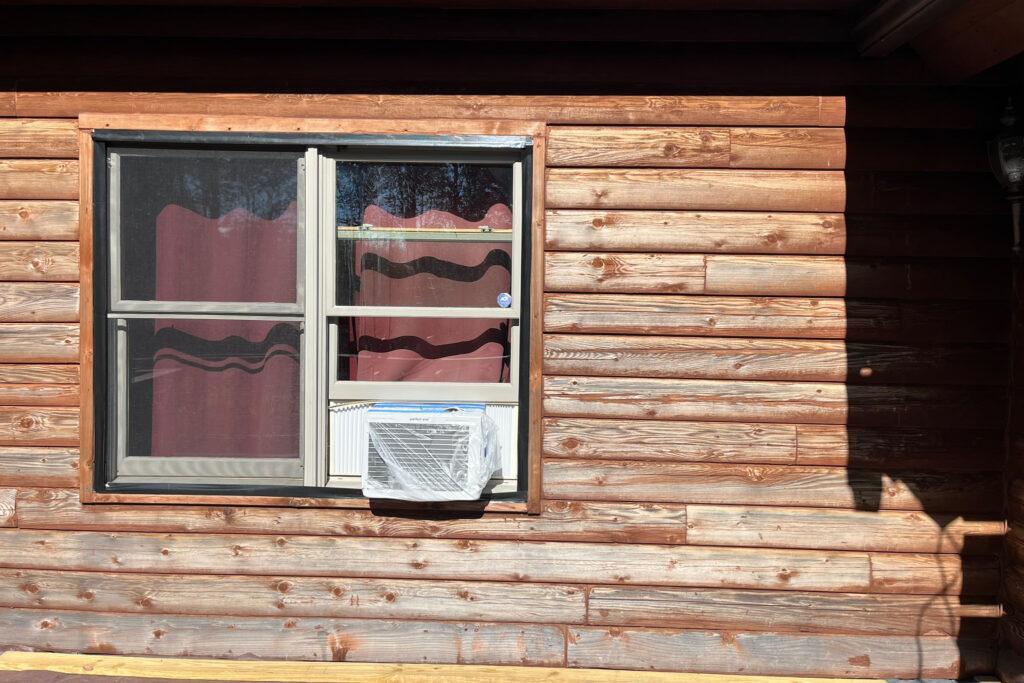
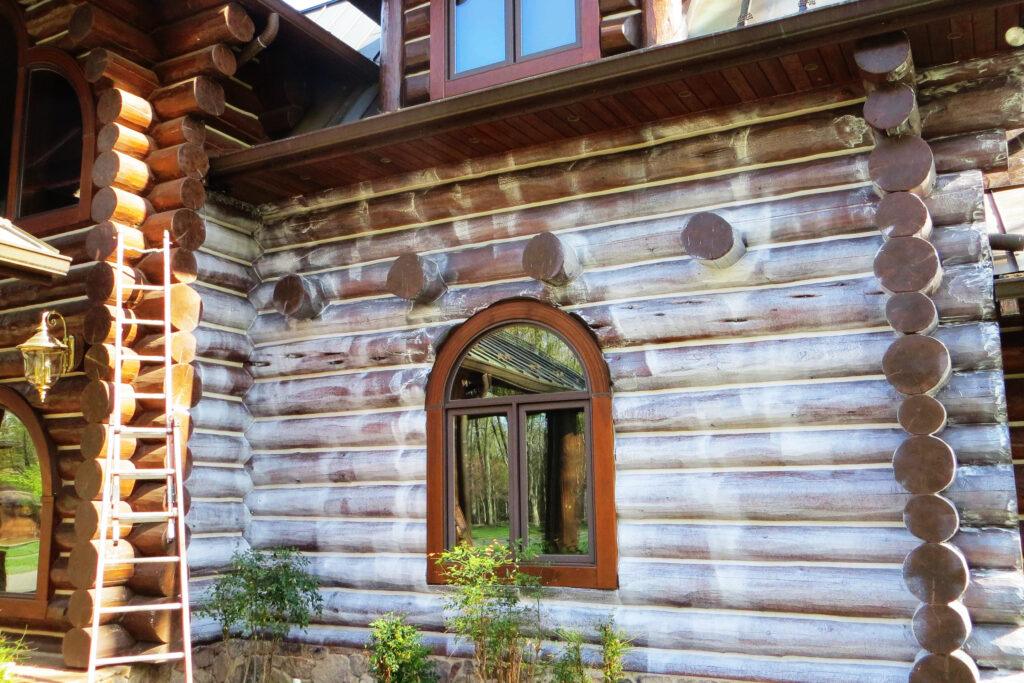
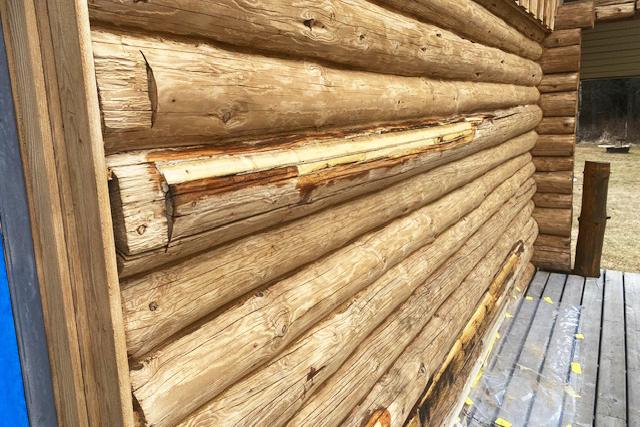
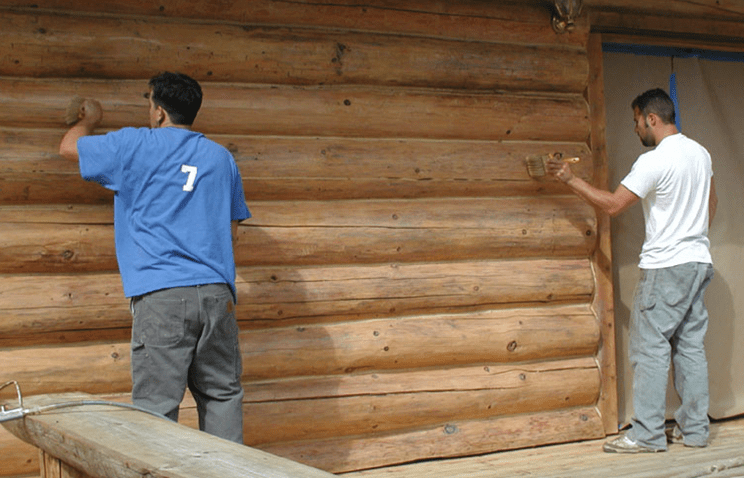
With winter being almost over and spring just around the corner, it’s time to get out of the house and see what the ravages of winter have bestowed on your home and do a little spring cleaning. Depending where you live, winter can be a very unfriendly companion for your home. For instance, if your home is located in areas prone to large amounts of snowfall, the snow can lay against the logs on your home for weeks. Or worse, windblown snow can work its way into unsealed checks, slowly soaking into the wood. As the snow begins to melt during the day and re-freeze at night, the melted snow causes water to run into the seasonal checks and small areas that rainfall normally doesn’t get into. The moisture inside the check can work its way into the wood substrate beneath the finish and make the wood very wet.
Once the freezing process starts again, the trapped water will expand as it freezes beneath the finish and can, in some instances “pop” the finish off at the edges of the check. The wood then is unprotected and can start to suffer damage from ultraviolet light and repeated moisture.
It’s Not Just the Exterior
Seasonal checks that face upward and allow water to enter can not only lead to exterior finish problems, but they can also serve as a channel for the water to work its way to the interior of the home. Water carried into the interior not only brings in unwanted moisture, but it also brings along with it tannin stains or “water stains,” visible and unsightly on interior walls.
These stains can be very difficult to remove, especially if the interior of the home is finished with a stain or sealer. Water stains on unfinished wood can normally be removed with a light scrubbing with Oxalic acid mixed with a mild non-ammonia type cleaner. If the wood is covered with a stain or sealer, it may be necessary to remove the finish, clean and re-finish the affected area.
Repairing Damage to the Stain or Topcoat
If the edges of the check are unprotected, they should be cleaned, lightly sanded and touched up with the stain and topcoat to restore the protection.
Perma-Chink Systems, Inc. is delighted to reveal the winners of the first-ever Icon Project Awards. This inaugural event showcased an impressive array of log and timber home projects, celebrating the craftsmanship and artistry of skilled professionals in the field.
Whether it’s creating new structures or restoring historic log homes, log and timber care professionals play a vital role in preserving a true emblem of the American frontier: the log home. With a rich legacy as homesteads, frontier forts, and more, these homes now symbolize independence and freedom.
Passed down through generations, cherished log homes face the relentless effects of nature, requiring expert care to ensure they endure the test of time.
With this perspective, Perma-Chink Systems recognizes and honors the extraordinary dedication of those who preserve these iconic structures. And now, it is with great excitement that we present the top three projects of the 2025 Icon Project Awards!
Icon Project Gold Award
Log and Timber Care Professional: Log Masters Restorations
Project Name: LaVeta
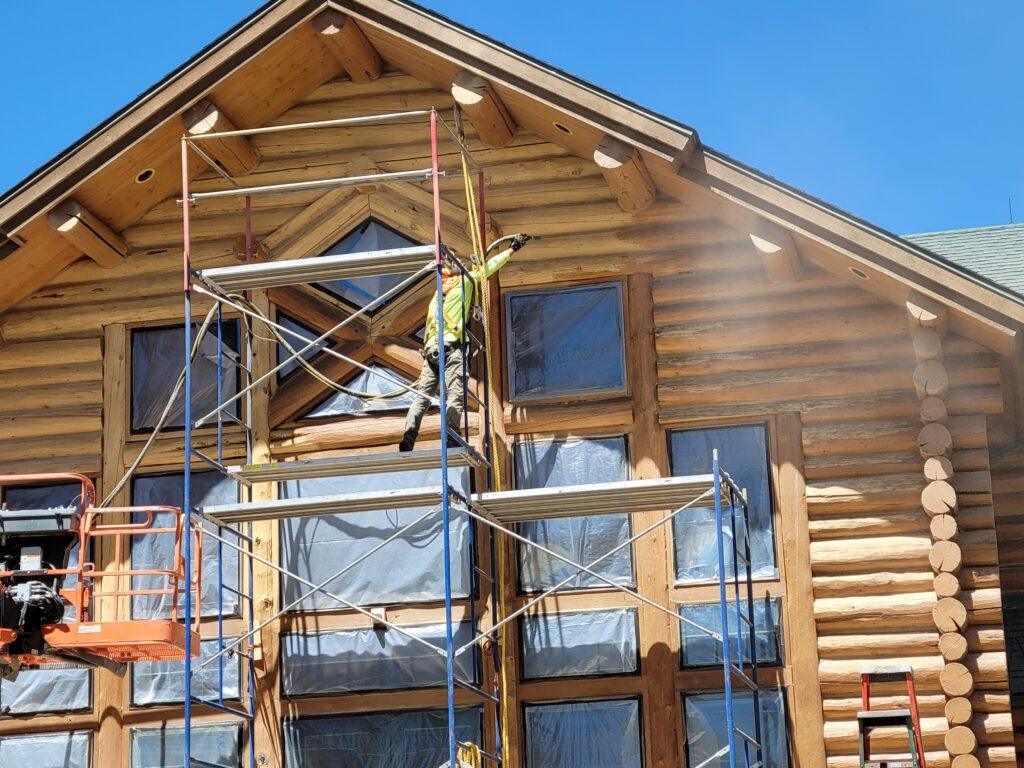
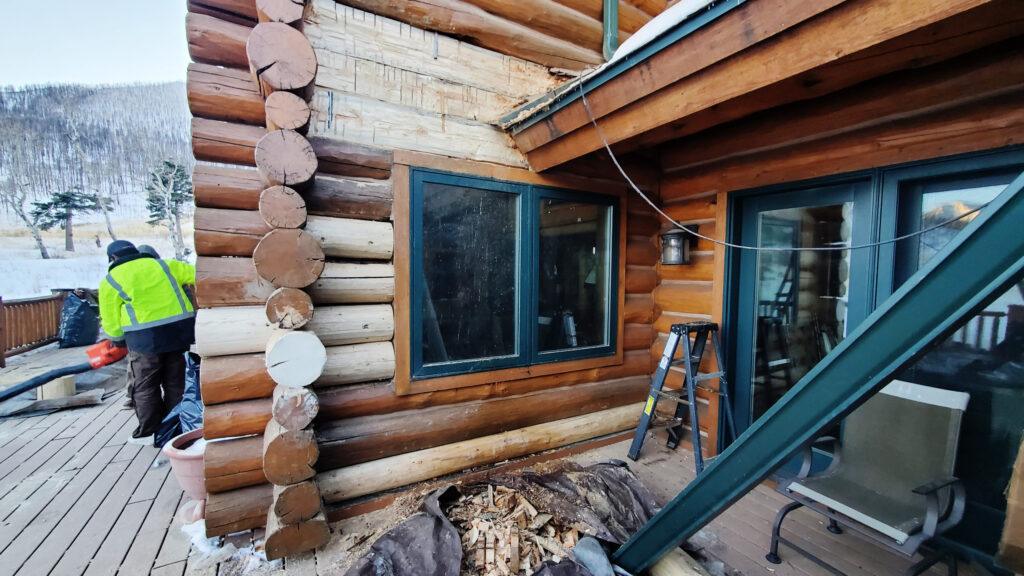
Log Masters Restorations initially embarked on a recoat project but soon discovered the log home had two different stain colors, a result of a previous maintenance company’s mistake. After assessing the situation, the scope of the project expanded into a complete restoration, starting with stripping the logs down to bare wood.
During the process, they identified approximately 80 feet of damaged logs that required replacement. Other areas of log damage were skillfully repaired using Perma-Chink Systems’ M-Balm and E-Wood. The team also replaced handrails and deck posts, finishing them to match the log home. Once repairs were complete, the surface preparation began with Log Wash to remove debris, pollen, and dirt, ensuring the Tim-Bor preservatives could fully penetrate the wood. LIFELINE Prelude Primer was applied to create a uniform base for the final color finish.
To address the mismatched stain colors, Log Masters Restorations applied Perma-Chink Systems’ premium two-coat stain, LIFELINE Ultra-2 Oak, across the entire home. Energy Seal Dark Natural was used to seal log replacements, with Perma-Chink White sealant around the house, and Chink-Paint White giving intact log gaps a fresh, clean appearance. The whole-home protection system was completed with a layer of LIFELINE Advance Gloss.
Adding to the challenge, accessing the property proved difficult due to a 5-mile driveway that was inaccessible to the rental company. As a result, rental equipment had to be transported along the driveway by the Log Masters Restorations team.
Despite these unplanned obstacles, the homeowners were thrilled with the team’s professionalism and dedication. Being a vacation home, Log Masters Restorations kept them informed with regular updates and progress photos throughout the project. Special recognition was given to the team’s craftsmanship in seamlessly blending new logs with the existing structure, creating a cohesive masterpiece. The successful completion of the restoration culminated in the homeowners being placed on a maintenance schedule to ensure the log home’s preservation for generations to come.
Perma-Chink Systems Sealants Used: Energy Seal Dark Natural, Perma-Chink White, Chink Paint White
Perma-Chink Systems Stains Used: LIFELINE Ultra-2 Oak
Perma-Chink Systems Topcoat Used: LIFELINE Advance Gloss
Perma-Chink Systems Preservatives: Tim-Bor
Perma-Chink Systems Primer Used: LIFELINE Prelude Primer
Perma-Chink Systems Cleaner Used: Log Wash
Finish Removal Method: Media Blast
Perma-Chink Systems Log Repair Products: M-Balm, E-Wood
Icon Project Silver Award
Log and Timber Care Professional: Mickel Log Homes
Project Name: Alvin Butz, Inc.
Few things are as frightening as a house fire, and in a log home, fire poses unique challenges due to the thickness of the logs and the wood’s preservation treatments. Mickel Log Homes undertook the significant task of replacing multiple charred log walls following a fire that compromised the structural integrity of the home.
Matching replacement logs to existing logs was its own difficulty, and Mickle Log Homes expertly blended red pine and white pine logs together. After replacing the burned logs, Mickel Log Homes media blasted the repaired walls to prepare them for staining and sealing. A thorough cleaning with Log Wash, followed by the application of Armor-Guard preservative and LIFELINE Prelude Primer, set the stage for a beautiful finish.
The team applied LIFELINE Ultra-7 Cedar, complemented by Perma-Chink Tan and the newest Energy Seal color, Energy Seal Cedar. To complete the restoration, LIFELINE Advance Gloss topcoat was used to protect the fully sealed walls, ensuring a seamless blend with the rest of the home. Thanks to their precision and dedication, Mickel Log Homes successfully rebuilt the log home to be enjoyed for generations.
Perma-Chink Systems Sealants Used: Perma Chink Tan, Energy Seal Cedar
Perma-Chink Systems Stains Used: LIFELINE Ultra-7 Cedar
Perma-Chink Systems Topcoat Used: LIFELINE Advance Gloss
Perma-Chink Systems Preservatives: Armor Guard
Perma-Chink Systems Primer Used: LIFELINE Prelude Primer
Perma-Chink Systems Cleaner Used: Log Wash
Finish Removal Method: Media Blast
Icon Project Bronze Award
Log and Timber Care Professional: Brent’s Repair Service
Project Name: Mike Brown Project
Brent’s Repair Service’s submission for the Icon Project involved an extensive, multi-year restoration and maintenance effort that thoroughly tested the crew’s patience and expertise. The original finish had failed, while the hardened topcoat necessitated a challenging removal process using various techniques. Once the team stripped the log home to its bare wood, they applied Shell-Guard RTU as a preservative and Log Wash for cleaning, preparing the surface for the final coating of LIFELINE Ultra-7 Chestnut and LIFELINE Advance Satin topcoat.
Examining the bare logs revealed the home’s age, along with checks and damaged chinking. To address this, Check Mate 2 was used to seal the numerous checks, preventing water intrusion. While the primary log gap chinking remained in excellent condition, Energy Seal was utilized to repair many joints.
Complicating the project was the home’s intricate construction, featuring dormers, overhangs, and other intricate design elements. The team relied on multiple lifts and ladders to ensure every surface was meticulously addressed. The result surpassed the customer’s expectations, demonstrating Brent’s Repair Service’s exceptional craftsmanship.
In a true testament to their dedication, despite relocating to Florida, the company continues to perform annual maintenance on this West Virginia log home at the customer’s request.
Perma-Chink Systems Sealants Used: Energy Seal, Check Mate 2
Perma-Chink Systems Stains Used: LIFELINE Ultra-7 Chesnut
Perma-Chink Systems Topcoat Used: LIFELINE Advance Satin
Perma-Chink Systems Preservatives: Shell-Guard RTU
Perma-Chink Systems Cleaner Used: Log Wash
Finish Removal Method: StripIt Finish Remover
Icon Project Awards Honorable Mentions
The following projects have been acknowledged for their significant contributions to the care and preservation of homes, historic buildings, and wooden structures. Demonstrating exceptional craftsmanship and expertise in wood restoration and the application of protective products, these endeavors highlight the dedication of skilled professionals. Perma-Chink Systems takes great pride in having such capable hands entrusted with safeguarding natural wood homes and structures. View the gallery at the end of the list to see the projects.
Log and Timber Care Professional: Mountain Ash Log Design, Inc.
Project Name: Franklin
Mountain Ash Log Design’s project showcased an innovative approach to log home construction, utilizing the bases of trees instead of the more traditional uniform-shaped logs. The flared ends of the logs created a distinctive aesthetic for the home while also presenting challenges in properly sealing the joints.
To address these complexities, Mountain Ash Log Design expertly applied Perma-Chink Systems’ Perma-Chink Tan synthetic chinking to seal the log gaps and joints. Their skilled application ensured the intricate seams and gaps were beautifully sealed, accentuating the creative construction technique and celebrating the natural essence of wood.
Log and Timber Care Professional: Alexander Homes
Project Name: Dog House
The Dog House project by Alexander Homes exemplifies their commitment to delivering exceptional transformations that surpass customer expectations. The homeowner, unhappy with the home’s dark brown appearance, desired a lighter, more natural finish.
Since bare wood is vulnerable to UV damage, Alexander Homes proposed the use of LIFELINE Ultra-7 Dark Honey—a premium choice for shielding against UV exposure and other environmental challenges. The team meticulously stripped the structure down to bare wood using StripIt Finish Remover, applied the one-coat Ultra-7 stain in Dark Honey, and sealed the wood with LIFELINE Advance Gloss topcoat, ensuring robust protection and a stunning finish.
Log and Timber Care Professional: Mountain Ash Log Design, Inc.
Project Name: Ardend
Mountain Ash Log Design undertook the restoration of a log home where damaged logs at the base would lead to compromised structural integrity. The team began by media blasting the old finish and washing the home with Perma-Chink Systems’ Wood ReNew, successfully restoring the natural color of the logs.
To repair the damaged sections, M-Balm and E-Wood, reliable wood epoxy fillers from Perma-Chink Systems, were expertly and artistically applied to blend in with the natural wood. LIFELINE Prelude Primer was used to ensure an even color finish, seamlessly blending the repaired logs with the rest of the structure.
For the final touch, the homeowner selected LIFELINE Ultra-2 Dark Honey as the stain, which was safeguarded with LIFELINE Advance Satin topcoat, maintaining a natural and beautifully preserved log home.
Log and Timber Care Professional: Log Home Care
Project Name: Degraf Ohio
Log Home Care took on the challenge of revitalizing a neglected timber-frame structure, formerly a youth camp facility, which had been converted into a private residence. The project required removing a deteriorated finish, further complicated by the home’s intricate design, including tall gables, cupolas, and exposed post-and-beam features that demanded meticulous attention.
To restore the home’s beauty, Log Home Care selected Perma-Chink Systems’ renowned products. The old finish was stripped away using S-100 Finish Remover, and the surface was cleaned with Log Wash to prepare it for staining and sealing.
The homeowners chose LIFELINE Ultra-7 Rustic Gray for the primary color, while Log & Timber Defense Saffron was applied to highlight the timber features, creating a striking appearance. Energy Seal Slate Gray was used to seamlessly match the stain while sealing the home. A final coat of LIFELINE Advance Satin protected the wood and stain, preserving the structure against the elements.
The project was a resounding success, showcasing the skill and dedication of Log Home Care. Their craftsmanship even secured another restoration project on the property, underscoring their excellence in timber-frame restoration.
Log and Timber Care Professional: Knaughty Log Restoration
Project Name: Reviving a Family Legacy: The Woodfords’ Log Home Transformation
When the Woodfords decided to refresh their beloved family cabin—where they had raised their three children—they faced a tight deadline with winter weather quickly approaching. With the guidance of an innovative realtor who recognized that a professional restoration could increase the home’s value by 50%, the Woodfords entrusted Knaughty Log Restoration for a comprehensive exterior media blast restoration.
Knaughty Log Restoration had just three weeks to complete the project, leaving no room for mistakes. The Woodfords requested the full restoration process, ensuring everything was done perfectly from start to finish.
The restoration process began with media blasting to remove the deteriorated finish from all exterior wood surfaces, which revealed logs in need of repair due to rot. Perma-Chink Systems’ M-Balm and E-Wood were expertly used for these repairs, shaped and textured to blend with the natural wood surface. The team prepped the wood surface by sanding with Osborn brushes and applying a wood preservation treatment of Shell-Guard RTU, followed by sealing and staining the home.
Energy Seal Dark Natural was used for sealing, while two coats of LIFELINE Ultra-2 Dark Natural provided the rich wood color the homeowners desired. To protect the cabin from the elements, the team applied LIFELINE Advance Gloss topcoat, while Deck Defense ensured ongoing protection for the deck.
This restoration showcased the excellence of Perma-Chink Systems’ product line, delivering everything from wood rot repair to a durable, clear protective coating. The complete system of products ensured the quality and resilience of Knaughty Log Restoration’s work, preparing the cabin to endure both the approaching winter storm and the long-term future.
Log and Timber Care Professional: Performance Log Finishers
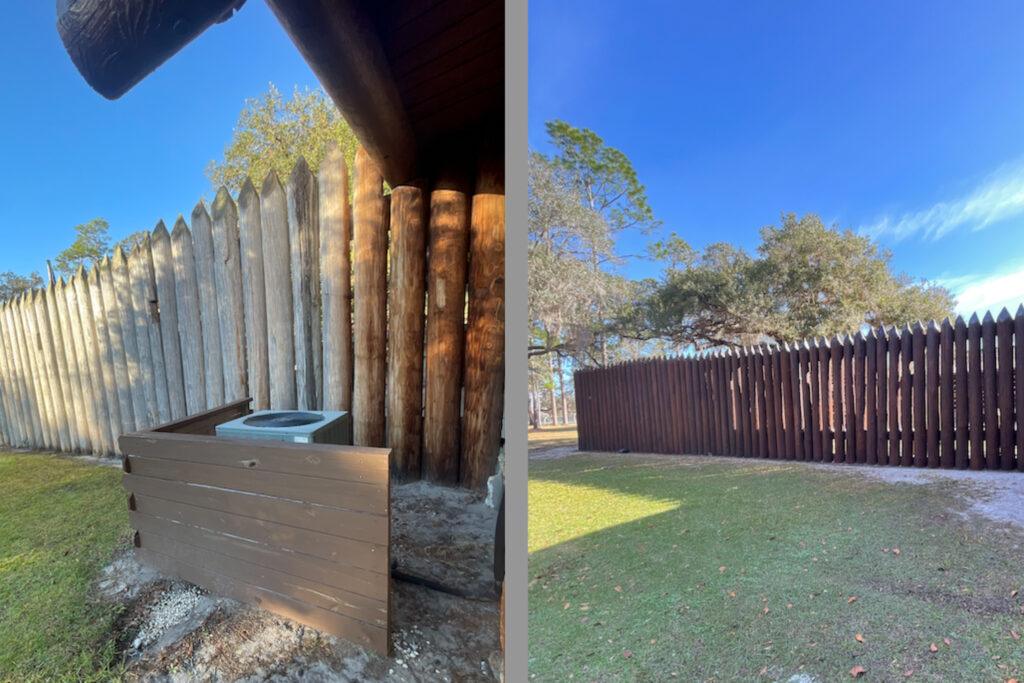
Project Name: Fort Christmas Historical Park
Performance Log Finishers made a vital contribution to history through their restoration efforts at Fort Christmas Historical Park. The preservation and protection of log and timber structures demand specialized products tailored to the unique challenges posed by natural wood. For this ambitious project, involving multiple structures and extensive historical fencing, Performance Log Finishers relied on Perma-Chink Systems’ trusted wood care products.
Working thoughtfully around the park’s schedule to minimize disruption to visitors, they began by media blasting the deteriorated finish, followed by the revitalization of the bare wood using Wood ReNew and Armor-Guard wood preservative. A layer of LIFELINE Prelude Primer was then applied to prepare the surface for staining. LIFELINE Ultra-7 Chestnut provided a rich and vibrant finish, while LIFELINE Advance Gloss safeguarded the structures against environmental wear.
The fort-style fencing was treated with Log & Timber Defense, a penetrating stain that maintained the park’s frontier aesthetic. Additionally, the aging wood required sealing with Check Mate 2 Clear to protect against water intrusion, wood rot, and pest infestations. Log gaps were meticulously sealed using Perma-Chink Stone, ensuring the durability of these historical structures for future generations to experience.
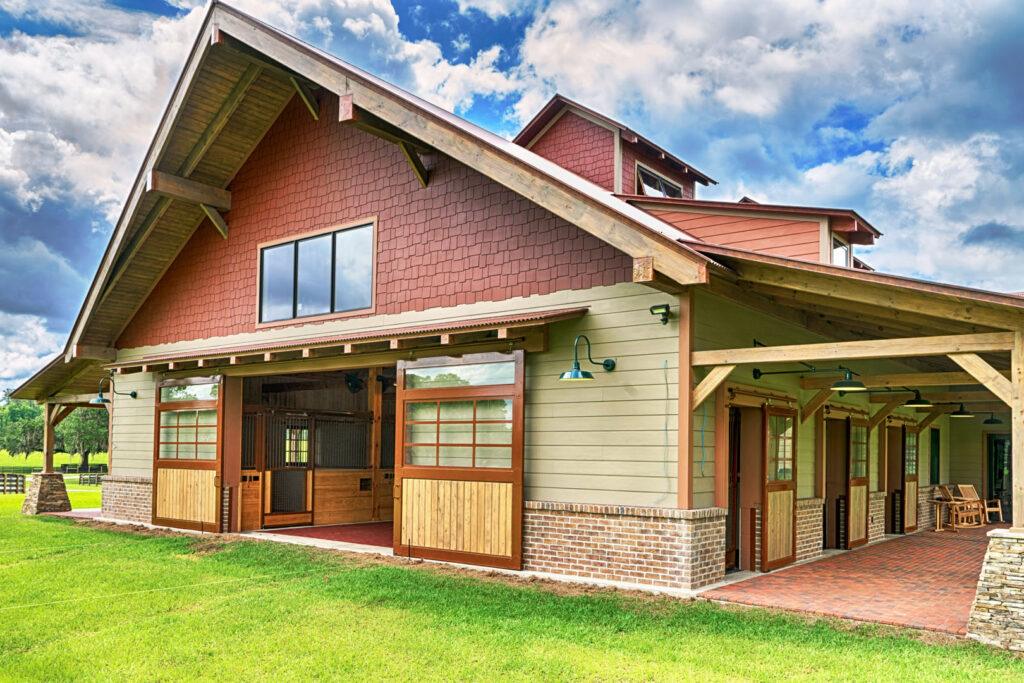
Log and Timber Care Professional: Log Home Care
Project Name: Ocala Horse Barn
Log Home Care collaborated with Hearthstone Homes to construct a stunning timber-frame barn designed for horses and more. The barn serves as a sanctuary for rescued thoroughbred racehorses and includes specialized areas for equine care, an office wing for client meetings, and a space for entertainment.
As part of this new construction project, Log Home Care conditioned the eastern white pine and Hardie board siding using Perma-Chink Systems’ Wood ReNew and applied LIFELINE Prelude Primer to ensure a durable bond between the wood and stain, achieving a smooth and consistent color finish.
The expansive 7,300-square-foot barn was completed with LIFELINE Ultra-7 Smoke and LIFELINE Advance Satin topcoat on the exterior, while Ultra-7 Butternut was chosen for the impressive timberwork and wood surfaces inside. To enhance energy efficiency, Energy Seal Slate Gray was used to seal gaps, perfectly complementing the barn’s aesthetic.
Log and Timber Care Professional: Log and Timber Solutions
Project Name: Event Center
Log and Timber Solutions undertook completing the customer’s vision for a newly constructed timber-frame structure, designed to serve as an elegant event venue for celebrations and memorable occasions. The interior timber elements were intended to be captivating focal points for guests, and Perma-Chink Systems’ LIFELINE Ultra-2 Chestnut and Classic Brown proved to be the perfect choice for the task.
To accentuate the intricate interior woodwork, the ceiling was finished with LIFELINE Advance Satin topcoat, creating a striking contrast and elevating the space into a luxurious setting.
A unique aspect of the project’s construction involved staining the interior timberwork prior to the ceiling’s installation. Following the ceiling’s placement, the interior was coated with Advance Satin, ensuring a flawless and elegant finish.
Log and Timber Care Professional: Wenger’s Do-It All
Project Name: Kathleen Guinter
Wenger’s Do-It All’s project evolved from a straightforward cleaning and topcoat application into a comprehensive re-stain and repair effort addressing carpenter bee damage and wood rot. After enduring over a decade of UV exposure and environmental wear without maintenance, the home’s condition, revealed by an application of Log Wash, made it evident that a fresh coat of color was needed.
To restore the home, Wenger’s Do-It All used Perma-Chink Systems’ M-Balm and E-Wood to repair wood rot found in the roof eaves. They cleaned the home with Log Wash and filled carpenter bee holes to prepare the surface for staining. A single coat of LIFELINE Ultra-7 Classic Brown was applied to refresh the home’s appearance, followed by a layer of LIFELINE Advance Satin topcoat to protect the wood and finish for years to come.
Through their meticulous service, Wenger’s Do-It All identified and resolved key issues with the log home, successfully rejuvenating it with the help of Perma-Chink Systems’ trusted products. Their efforts ensured the home was both restored and safeguarded for the future.


About Perma-Chink Systems
Founded in 1981, Perma-Chink Systems (PCS) revolutionized the log and timber home industry with the introduction of the world’s first synthetic log chinking, specifically designed to accommodate the significant movement demands of these homes. Building on this groundbreaking innovation, PCS expanded its focus to develop a comprehensive system of premium wood care products, including cleaners, restoration solutions, and both exterior and interior stains. Renowned for its exceptional customer service, PCS stands unrivaled in its commitment to helping log and timber homeowners preserve their homes for generations.

When Perma-Chink arrived on the log home scene over forty years ago, it revolutionized the industry in the best way possible. We developed a log home sealant that replaced and outperformed traditional mortar chinking.
Perma-Chink Log Home Sealant stretches with log movement and is vastly more flexible than the cement-based chinking of old. When log home builders and owners want the best log home chinking, what they really want is the best log home sealant: Perma-Chink.
Advancing the log home chinking industry further, Perma-Chink pushed the envelope by providing a synthetic chinking that offers more coverage compared to others on the market. A 5-gallon pail of Perma-Chink log home sealant covers almost 259 linear feet of log gaps.
Some log home sealant brands may offer comparable coverage, but it comes at the expense of the applied thickness. A thick layer of sealant usually induces slumping, where the sealant cannot withstand its own weight. Too thin of sealant application will be tested by environmental exposure and log movement, resulting in blistering and adhesion issues.
| Log Home Sealant Product | Linear Distance Coverage of 1” Gap | Recommended Application Thickness | MSRP of 5-gallon Pail (as of 7/2025) |
| Perma-Chink | 259 linear feet | 5/16”-3/8″ | $295.99 |
| Log Jam | 195 linear feet | 1/2” | $324.49 |
| Triple Stretch Chinking | 347 linear feet | 1/4” Maximum | $312.95 |
Which Is The Best Value?
By the numbers, Perma-Chink Log Home Sealant is $1.00 per linear foot. Triple Stretch Chinking is $0.90 per linear foot at a very thin application thickness, and Log Jam is $1.67 per linear foot at a slightly thicker application thickness.
When you compare the coverage amount at a dependable application thickness, Perma-Chink is the best log home sealant on the market based on cost per linear foot. Add in the superior quality of Perma-Chink and the exceptional performance on homes for 40 years and beyond, it is simply unmatched on the market. The advantage of using Perma-Chink is its fundamental design, as Perma-Chink is a thixotropic* sealant. It stays exactly where the applicator leaves it.
*Thixotropic: Under shear, the compound decreases in viscosity. When pumped or squeeze-applied (shear) it flows as applied, and when the shear goes away the viscosity increases.
In addition, Perma-Chink is part of our whole-home system, designed to work in concert with our finishes and topcoats to make a beautiful log home last for generations.
Perma-Chink Log Home Sealant is also backed by a 10-year Limited Warranty and a dedicated staff of Wood Care Experts that will help you preserve and protect your log home. If you have any questions, call us at 1-800-548-3554 and we’ll be happy to help.
A simple comparison of the cost of a gallon of wood stain is a mistake because all stains differ in their lifespan, coverage rate and quality of appearance and protection
Whether you’re currently building your dream log home or simply checking off tasks on your annual home-maintenance “to do” list, we’re always looking for ways to skimp on expenses around the house.
But when it comes to putting your best foot forward with a beautifully stained home that’s also protected from the exterior elements, you might want to think twice before being lured in by the lower price tag of a middle-of-the-road finishing product.
Why Should I Consider a Higher-Priced Stain?
Not only does a log stain and finish define the aesthetic appeal of your log home, enhancing the striking beauty of the wood’s grain and natural color, but it serves as a shield for your home’s most precious building blocks – the logs. Because of this, it makes sense to spend the extra money upfront on a high-quality wood finish for your home that will protect the wood surface.
And, as it turns out, choosing a premium stain will save yourself oodles of cash over the lifetime of your log home.
How Premium Stains Are Cheaper Than Low-Cost Alternatives
The total cost for finishing your log home includes labor, tools and the materials involved in preparation of the wood surface, application of the finish and maintenance of that finish. When you consider the cost, it’s important to include the total long-term cost of the stain that you choose. There is not just one component to consider, nor one simple calculation to determine which stain is less expensive than the others.
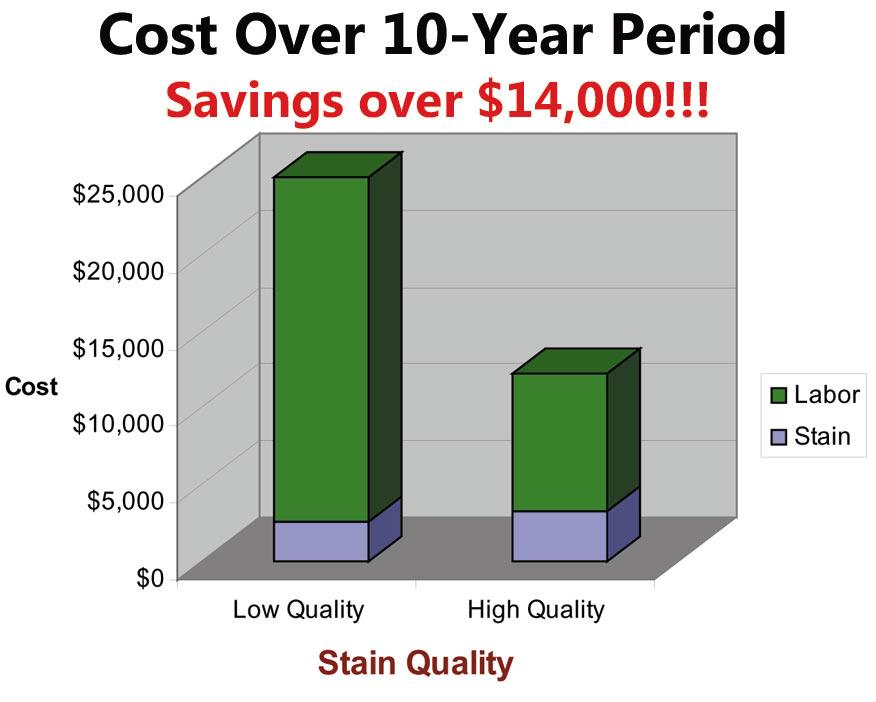
To prove this point, the professionals in the industry performed a careful analysis that shows that in the long run, it’s actually less expensive to apply the best quality stain, despite its higher initial cost.
Field tests show that while low quality wood finishes last two years or less, top quality 100-percent acrylic polymer finishes such as the Lifeline™ family from Perma-Chink Systems (PCS) last five years or more when properly maintained. Restaining every few years requires labor, and whether you perform the restaining yourself or hire an expert applicator, it comes at a cost. A DIY project could require renting equipment (sprayer, scaffolding, etc.) and spending time prepping the surface, applying the stain and topcoat, and clean-up after the project.
To illustrate this idea, let’s look at an example.
Is It Really Cheaper to Use a Premium Stain?
For an average-size log home, let’s take a standard labor cost for finishing of about $4,500 (labor rates vary across markets). In addition, about 20 gallons of stain would be needed to apply two coats to the home. For an ordinary stain from a typical big box home improvement store, let’s say the cost per gallon is around $50, totaling $1000 for the entire job (we’ll ignore taxes for simplicity). Add in $4,500 for labor, and the total cost of the job is $5,500.
Field tests show that the job will last two years, the cost per year of service would be $2,750 ($5500 / 2 years).
Now let’s take a look at the cost of Ultra-2, our premium 2-coat wood stain. At a cost of somewhere around $120 per gallon, the cost for 20 gallons would be $2,400. Again, the labor would be $4,500, so the total would be $6,900 – a significant increase compared to the lower-priced product.
However, the stain will last at least five years, which lowers the cost per year of service to $1,380 – half the yearly cost of the “budget” stain job! Imagine the savings over an even longer period of time – say ten years. With proper maintenance it will last you much longer, just ask John Ricketson :)
Do Premium Finishes Cover Less than Cheaper Finishes?
Our example above doesn’t account for one important factor: coverage rate. Coverage can vary significantly between stain manufacturers, typically ranging from 150–400 square feet per gallon, depending on the wood’s porosity and the coat being applied.
By comparison, Ultra-2 delivers exceptional coverage, averaging 350–450 square feet per gallon on the first coat and 600–800 square feet per gallon on the second coat. In many applications, that’s nearly double the coverage of competing products.
The result? You not only get the long-lasting protection and performance PCS stains are known for, but you also use less product to cover more area, delivering greater value and lower overall project costs than many other stains on the market.
| Finish Brand | First Coat Coverage Rate Per Gallon | Second Coat Coverage Rate Per Gallon | Price per Gallon (as of 6/2026) | Total Price per Square Foot |
| Lifeline Ultra-2 | 350-450 sqft | 600-800 sqft | $119.99 | $0.47 |
| Sashco Capture | 150-250 sqft | 250-350 sqft | $90.99 | $0.80 |
Premium Products Come With Expert Support
PCS offers the best product support in the business, leading the way with free samples (not color chips!) and free customer support. Our Customer Service Representatives deal exclusively with the log and timber home industry and are happy to answer any question regarding wood care. PCS is focused on this niche; we’re not splitting attention to a catalog of thousand different house paint colors, or selling applicances alongside our stains and sealants. Wood care is our sole business, and our customer support is second to none.
PCS is committed to being accessible to customers, with real people staffing phones, chat, and email accounts. We use no automated bots, AI filtering, or complex phone menu when customers reach out for assistance.
We will be with you every step of the way, and have the resources to back that up. For five decades PCS has cared for log and timber homes. We’ve done a fantastic job maintaining our records, so for many homes, we can dig a little through our system and find the historical product usage for a customer’s home. If a customer has recently bought a log home and is unsure of what products are on the home and if the previous owner used PCS products, it’s very possible we’ll have that information.
Choosing a Premium Stain is the Right Thing to Do
It’s no surprise that high-quality products from PCS’ extensive collection of exterior finishes and stains will result in spending less time and money protecting and maintaining your log home over the years. With a longer-lasting finish that saves you time on refinishing projects and a higher coverage rate that goes further than the “competition,” our stains and finishes are the best options on the market. Yes, the initial cost is more than a big-box product. But doing the math in total project cost, PCS’ unmatched stains and topcoats will produce a greater value to log and timber homeowners. The best is worth it.
You will be amazed at how PCS’ premium stains and finishes highlight the natural wood grain, keeping your home looking beautiful over the long term with easy maintenance and fewer restaining projects.
Have Questions or Ready to Order Samples?
Operators are standing by! Just kidding. Our Customer Service Representatives have chairs to sit on, so they’re ready to answer any questions you may have regarding wood care for your log or timber home. If you have your stain options picked out, order free samples today by calling 1-800-548-3554 or visiting Store.PermaChink.com. We recommend trying samples – even if you know the one you want – because lighting, wood color, and wood age can all affect the final color. We want you to be happy – or over the moon – with your color choice.
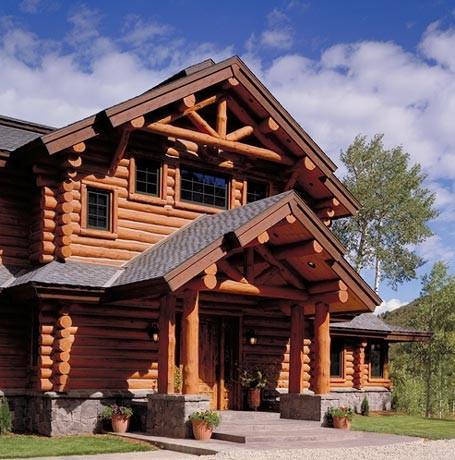
There’s something undeniably magnetic about the American log home. It’s more than just a structure; it’s a symbol of freedom, heritage, and a deep-rooted connection to the land. People are drawn to log homes for their timeless beauty and rustic charm, which evoke a sense of nostalgia and simplicity. They offer a retreat from the noise of modern life, inviting you to slow down, breathe deeply, and reconnect with nature, with family, and with yourself.
Natural Aesthetics of Log and Timber Homes
There’s a liberating power in waking up to a view that feels untouched and wild. Log homes carry a rugged elegance that mirrors the spirit of self-reliance – nestled in forests, perched above valleys, or standing quietly beside a lake, they’re not just shelters – they’re sanctuaries of discovery.
Energy Efficiency Capability of Log Homes
Independence starts with sustainability. The natural thermal mass of logs keeps your home comfortably balanced, often reducing energy use by up to 30%. That means more freedom from energy bills – and more peace of mind.
Durability of Building Materials
A legacy of strength. Properly maintained, log homes endure for generations by weathering storms and standing tall as a symbol of success, built with purpose.
Fire Resistance
While others may doubt, the truth is empowering: the solid structure of thick logs gives log homes an unshakable resilience, and in many cases, they resist fire more effectively than traditional homes. Strength lies in the unexpected.
Health Benefits of Log and Timber Homes
In a log home, you’re not just breathing easier, you’re living freer. The organic materials regulate humidity, reduce indoor pollutants, and create a space where body and mind can truly unwind.
Ability for Customization
Whether you’re dreaming of a mountain retreat or a showstopping estate, log homes are a canvas for your ambitions. Each detail is a chance to express your style, success, and story.
Enabling a Connection to Nature
There’s no substitute for the clarity that comes from a sunset over still water or the rustle of wind through the trees. A log home gives you the space to reset, reflect, and explore life on your terms – far from the noise, and close to what matters.
Step into our gallery of log homes, where you’ll find everything from secluded cabins deep in the wilderness to expansive estates that embody rustic luxury. Whether you’re seeking solitude, adventure, or a legacy built to last, there’s a design waiting to feel like home.
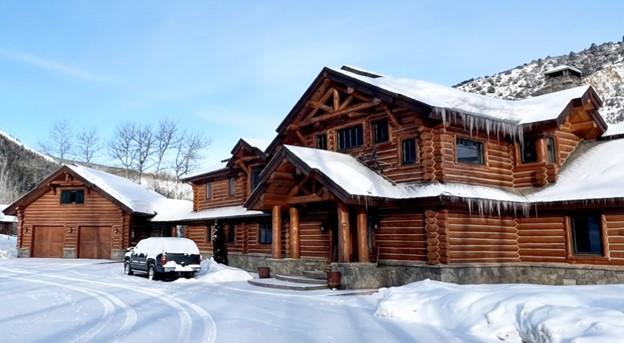
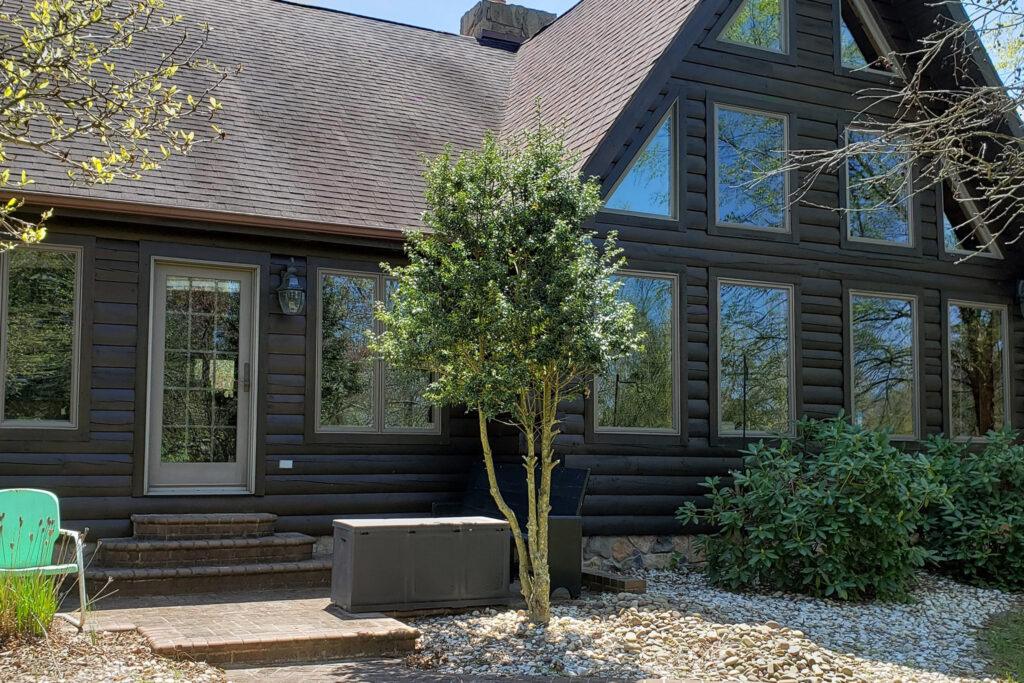
Built By Alpine Log Homes – Protected By Perma-Chink Systems
Protecting a Treasure for Over Two Decades
Those of us that have been in the industry for 20 or more years will remember. Alpine Log Homes was one of the industry leaders in the design and building of handcrafted log homes. For example, this beautiful home in the mountains of Glenwood Springs, Colorado was built by Alpine Log Homes 22 years ago. I know you would prefer to see a photo with spring flowers and green leaves by now, but it is a reality of the Colorado mountains – they have snow in April! Yes, the photo above was taken in early April of 2023. Indeed, the winters in the Colorado mountains can be long and present extreme conditions for any home. But it is not just the winter months that pose challenges to log homes. This log home experiences on average 12+ feet of snow a year but it also sees on average 320 days of sunshine a year, which presents extreme UV conditions being located at an altitude of 8,100 feet.
Will the Products Last Against Colorado’s Extreme Weather?
Trusting in the products to protect the home from such extreme conditions, in 2003 the exterior of this home was stained with Lifeline Ultra-2 Bronze and Advance Gloss topcoat. Two coats Ultra-2, one coat Advance to start with, and with little maintenance done since this home was built, looks as great as it did the year it was first stained. What a great testimony to Lifeline stains and finishes. This beautiful finish has weathered the environment for over 20 years!
Perma-Chink Systems Products Used: Lifeline Ultra-2, Advance Gloss, Perma-Chink, EnergySeal, Log End Seal, Lifeline Interior, and Lifeline Acrylic.
Logs were washed with Perma-Chink Systems’ Oxcon (Log Wash was not invented back then) before stain was applied. A borate treatment similar to Bora-Care was applied to all first-floor framing and two feet up from the foundation to prevent any wood destroying insects from attacking the house. The house is at approximately 8000 feet elevation and the area gets in excess of 320 days of sunshine per year. In addition, it is not unusual to have up to five feet of snow on the ground in the winter. To protect the logs from this extreme exposure the house exterior is coated with two coats of Lifeline Ultra-2 Bronze, followed by a clear protection coat of Lifeline Advance. The transparent pigments in the Lifeline Ultra-2 stain provide crucial ultraviolet protection for the logs. Two coats of the stain further protect the wood and develop the perfect shade of color. A coat of clear Lifeline Advance protects the tint finish and gives that ‘furniture grade’ ever-so-slight sheen to the logs.
Any upward facing checks were filled with a matching tone of EnergySeal (Check Mate 2 is now the recommended product). Upward facing checks can trap water and funnel it into the house. Any check that twists for the length of log can provide a channel for outside air, water, and insect to enter the house. All exterior log ends were coated with Log End Seal to prevent water from being drawn into the logs, as untreated log ends are natural straws.
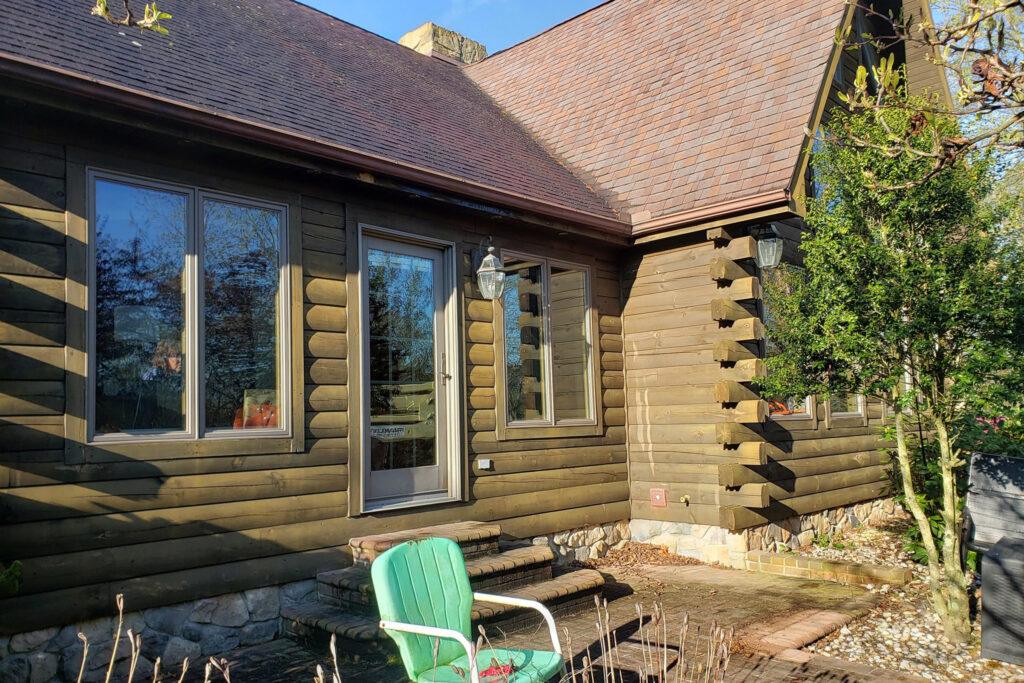
Log Home Interior Using Lifeline Interior
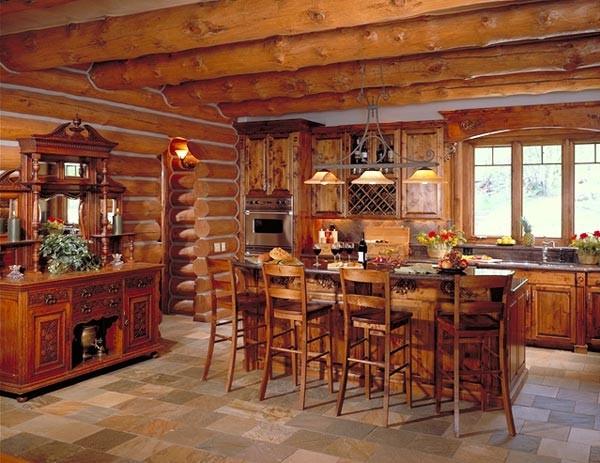
The interior of this Colorado log home is intentionally a darker shade of tint than most log houses. This was done to promote the old-time feeling of the frontier and add warmth to the larger spaces. Two coats of Lifeline Interior 130 (Dark Natural) were applied and then a coat of Acrylic Satin was applied to the interior for a durable, furniture-grade finish.
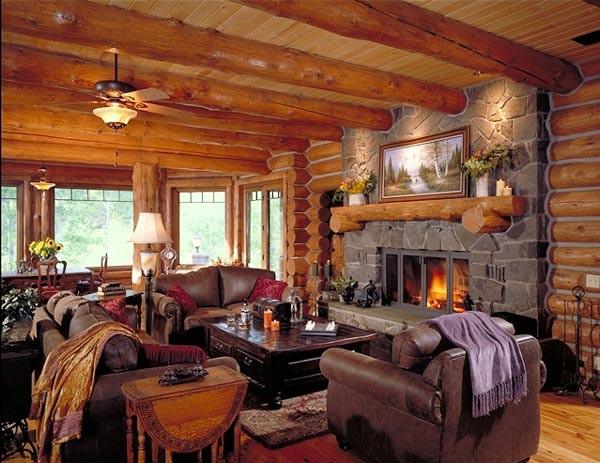
The chinking between the logs is Perma-Chink Medium Grey 224. The darker shade of grey provides a warm contrast to the dark natural shade of the logs.
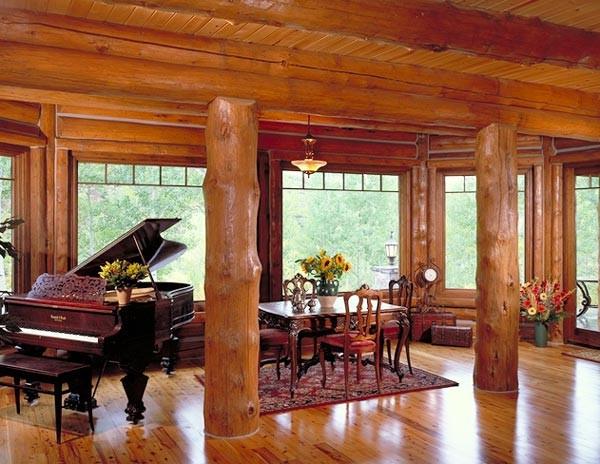
The Dark Natural color develops the warmth and inviting feeling while the Satin topcoat’s unobtrusive film coat makes it easier to dust and clean logs, and aids diffusing the reflected light.
The ceiling in the dining room and the media room are a European stucco product from Stuc-O-Flex International. Both are custom tinted – the kitchen is a hand-troweled light brown tone that reflects light and warms up the large kitchen/dining space.
The ceiling in the media room is an “old leather” maroon look to provide a stately feel to the high ceiling room and highlight the logs.
Over 20 Years of Protection from PCS’ Wood Care Products
This beautiful finish has weathered the environment for over 20 years! With minimal maintenance, the home’s finish and sealant has endured harsh climate conditions without issue. A true testament of quality and performance of PCS products that our customers require to protect and preserve log and timber homes. Our customers have poured their hearts, time, and effort into building their homes – it’s only right they trust products that are just as enduring, so their legacy can stand strong for generations.
If you want to see more photos of the exterior click the following link: https://www.permachink.com/photo-category/photo-gallery/
Which Is the Best Log Home Topcoat
Often we get asked which performs better: Advance Gloss or Advance Satin? Overall, both topcoats protect the finish and your log home exceptionally well. While it mainly comes down to personal preference on which log home topcoat you choose, as the manufacturer of the topcoat, we’ve learned some things that can tip the scales if you’re undecided on which topcoat to select for your log or timber home. So the quick answer is we recommend Advance Gloss.
Reflectivity
When it comes to performance and longevity there is no doubt about it- a gloss topcoat will outperform a satin topcoat. Why? The most important factor is reflectivity. A smooth, glossy surface reflects more ultraviolet (UV) light than a less reflective one, like a Satin, or worse, a dull one. This is why a vast number of automotive finishes don’t come in satin versions, and why a shiny coat of wax helps retain a vehicle’s color.
Cleanliness
The next factor is cleanliness. The smooth, slick surface provided by Advance Gloss sheds dirt easier than the Satin. That’s because the flatting agent used in Satin results in microscopic roughness in the surface of the finish where airborne dust, pollen and pollutants can lodge. Although particulates can be removed with a good washing, it takes a bit more effort with the Satin finish than removing dirt from the Gloss surface.
Bee Deterrent
The last factor, at least in the Southeast, relates to how Advance Gloss reduces carpenter bee damage. A few years ago we did a survey of customers who used both our satin and gloss topcoats and the results clearly revealed that the gloss topcoat substantially reduced the number of carpenter bee holes. Although there was some reduction in carpenter bee activity using Advance Satin, it was not nearly as significant as the Gloss. Carpenter bees are searching for a wood space to create a chamber to lay their eggs. If this wood surface is coated and that coating is reflective, it creates a mechanical deterrent for carpenter activity.
Order Samples To Test
Whenever requesting exterior finish samples, include a sample of Advance Gloss and Advance Satin, even if you are only interested in one topcoat. By applying both on your wood, you will be able to see the difference for yourself. You may end up choosing the other topcoat because of the way it looks and how it highlights the color of the stain. Although there are other gloss topcoats on the market, none that we have tested retained their level of gloss for more than a few months. Advance Gloss, on the other hand, has been on homes and walls since 2003, and they continue to retain most of their initial gloss.
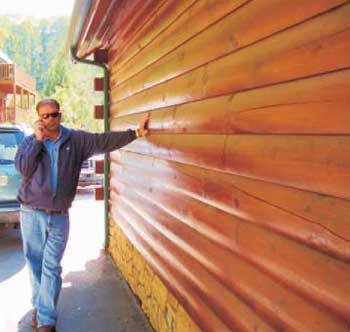
Just as clear coats are vital to the performance of today’s automotive finishes, our Lifeline Advance™ topcoats are an integral part of all exterior finish systems. Not only do they extend the life of the color coats, but they do much more to protect your log home.
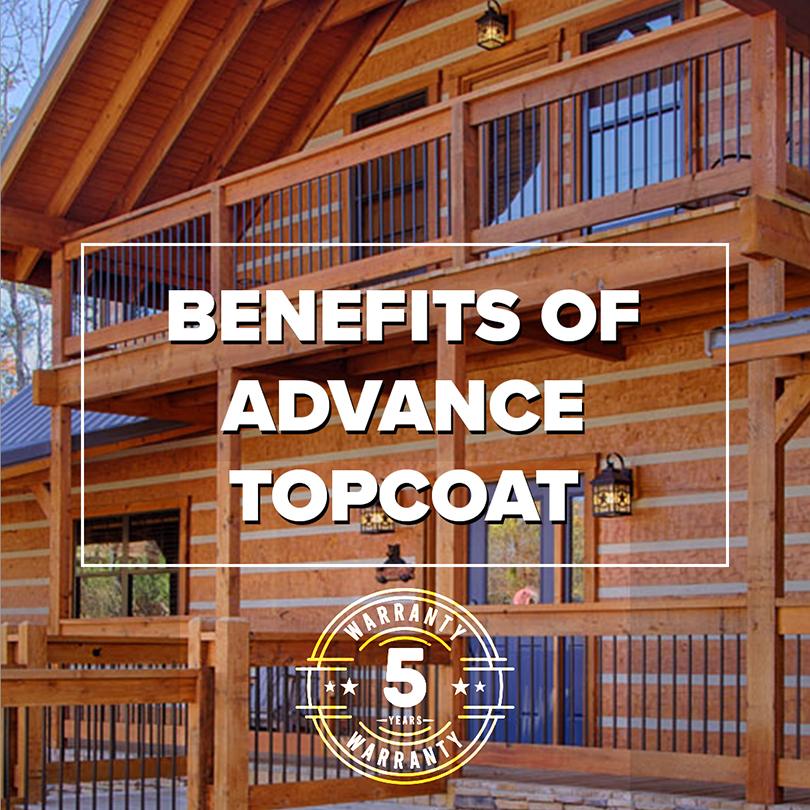
The Benefits of Lifeline Advance
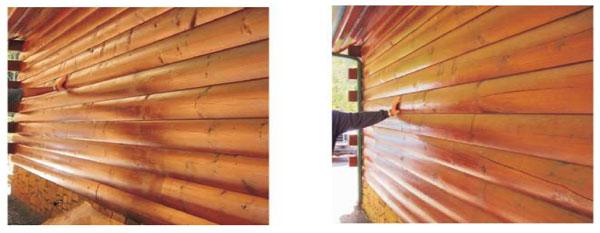
Advance Topcoat significantly improves the look of the finish by enhancing the color, clarity, and depth of the finish. In other words, they make our finishes the most beautiful log home finishes in the world. Second, they help keep the surface clean. The very nature of a pigmented stain makes it susceptible to dirt pick-up through adhesion or impregnation. Since we have designed Advance to form a smooth, strong film, it makes it much more resistant to dirt accumulation. In addition, the smooth surface makes it easy to clean off any dust or pollen that may accumulate on the surface of the logs. A simple application with Log Wash™ and a rinse with a garden hose will remove the dirt and grime that may be hiding the beauty of your home.
 compared to same color coat with Advance")
Another feature a smooth topcoat provides is greater mechanical resistance to the growth of mold, mildew, and algae. In addition to water, these organisms need something to grip onto. If the spores land on a tough, smooth surface that rapidly sheds water, they won’t have an opportunity to germinate and spread. The surface of your logs stays free of unsightly mold spots and patches of algae.
Of course, the best feature of Advance Topcoat is the protection it provides to the color-containing stain. Years ago, cars left the manufacturer with a coat of paint. More expensive cars may have had several coats of paint, but no matter how many coats were applied, after a few years on the road the paint turned dull and started to flake off. Then car coating experts discovered the benefits imparted by clear topcoats.
Today’s car finishes remain shiny and last longer than ever thought possible, all due to the application of clear topcoats.
 with same color coat with Advance, after 15 months of accelerated weathering")
How Advance Contributes to Stain Performance Improvement
What is there about topcoats that contributes to this performance improvement? The most performance-enhancing feature of a clear topcoat is that it reflects sunlight. Sunlight is composed of several components, including ultraviolet (UV) light. It’s the UV that is responsible for fading colors and, in the case of wood homes, damaging wood fibers through a process called photo-oxidation. The more UV light that’s reflected off the surface, the slower the color coats will fade. Wood fibers will be also be exposed to less photo-oxidation, thus extending the life of the entire finish system.
Although satin finishes reflect a significant amount of sunlight, gloss topcoats reflect more, which is why car finishes are shiny and not dull. The same holds true for our Lifeline™ exterior finish systems. Because Advance Gloss reflects more sunlight over Advance Satin is one of the reasons that log home gloss finishes are becoming more popular. Read more about the differences of Advance Gloss and Satin finishes here.
An additional beneficial feature of a clear topcoat is the protection it provides to the color coats against degradation by airborne contaminates like sulfur dioxide, ozone, and particulates. Even natural contaminants like tree pollen and bird droppings can damage or discolor the color coats by chemical reactions, or promote mold growth. Our Advance Topcoats provide a barrier that prevents these negative events from occurring.
These are some of the reasons why Lifeline Advance Topcoats play a key role in the performance of all of our exterior film-forming finish systems.
Order Your Advance Topcoat Today
Contact us at 1-800-548-3554 or your local Perma-Chink Store to place your order during business hours, or order online at Store.PermaChink.com. We’ll be glad to help you choose the right sheen of Advance, too, either gloss or satin. If you want to try each sheen on your logs, order free samples online.
Stretching Your Dollar With Lifeline Ultra-2
For 45 years Perma-Chink Systems has cared for log and timber homes through exceptional products designed to outlast and out-perform anything on the market. Getting the most for your money is something we can all identify with, and we endeavor to create significant value for our customers.
One key feature that makes our stains and finishes a better value than other options on the market is the coverage rate. An average-quality wood stain available at any big-box home improvement store offers a coverage rate of 150 square feet (sqft) per gallon. Even a finish specifically made for log homes only averages 150-250 sqft per gallon for a first coat, and 300-400 sqft per gallon for second or maintenance coats.
But one stain brand rises above the rest – expertly formulated to complement the unique character and demands of large logs and heavy timbers.
It’s LIFELINE.
Maximum Coverage Rate Means Lower Total Cost
Our Lifeline Ultra-2 stain comes in with a whopping 350-450 sqft per gallon first coat and 600-800 sqft per gallon second coat. That’s double the coverage rate of other products on the market. Additionally, our other Lifeline family of Ultra-7, Exterior, and Accents finishes have similar coverage rates, making any of our exterior finishes an excellent value.
| Finish Brand | First Coat Coverage Rate Per Gallon | Second Coat Coverage Rate Per Gallon | Price per Gallon (as of 6/2026) | Total Price per Square Foot |
| Lifeline Ultra-2 | 350-450 sqft | 600-800 sqft | $119.99 | $0.47 |
| ProLuxe Log & Siding Stain-(former Sikkens) | 150 – 225 sqft | 300-400 sqft | $105.95 | $0.87 |
| Sashco Capture | 150-250 sqft | 250-350 sqft | $90.99 | $0.80 |
“High” Sticker Price Isn’t the Whole Story
Lifeline brand is not the lowest-priced option on the market by design. The science behind Ultra-2 engineered it to be better than available products, made with the highest-quality components, creating exceptional value when you look at the total cost. We’ve analyzed the cost difference between low-quality finishes and high-quality finishes in our Money Matters article, where labor expenses are a significant factor that gets overlooked when comparing project pricing.
For DIY projects, the material cost of Ultra-2 might be more expensive than the lower-cost choices, but the extra gallons needed to equal the coverage rate and years of durability of Ultra-2 negate any savings. Throw in the 5-year Limited Warranty Lifeline Ultra-2 has when properly maintained, the total cost can not be beat by competitors. Lifeline finishes cover double the square footage and can last more than twice as long. Lesser quality finishes degrade faster and do not offer the superior protection Lifeline finishes offer. The inexpensive finish will easily end up costing twice as much for the same coverage, and twice more again when it comes to refinishing the home in two or three years.
Here’s a comparison of the estimated total cost to stain 1,000 sq. ft. log home using the two stain options:
| Lifeline Ultra-2 at $119.99 per gallon | PPG Proluxe Log & Siding Stain (Sikkens) at $105.95 per gallon |
| • First Coat Coverage: 350–450 sq. ft. • Second Coat Coverage: 600–800 sq. ft. Coverage Efficiency Estimated Total Cost: Low Coverage $542.80 High Coverage $349.97 | • First Coat Coverage: 150–225 sq. ft. • Second Coat Coverage: 300–400 sq. ft. Coverage Efficiency Estimated Total Cost: Low Coverage $1,059.49 High Coverage $735.76 |
✅ Summary
• Lifeline Ultra-2 is more cost-effective for both low and high coverage scenarios.
Based on average material costs, staining a 1,000 sq. ft. wood surface with Lifeline Ultra-2 costs approximately $446, compared to $898 for Proluxe. As a result, Proluxe is nearly twice as expensive as Lifeline Ultra-2 for the same project size.
Get More with Ultra-2 – Performance That Pays for Itself!
At the end of the day, Lifeline Ultra-2 offers better coverage and longer durability than any product at a local big-box retailer. With less frequency between coats over the long, long life of your log or timber home, and impressive coverage rates, the value of Lifeline Ultra-2 is simply unmatched.
Don’t wait – order your free samples today! Lifeline Ultra-2 free samples
Custom colors are available in any shade, or we can match your desired color. Call 1-800-548-3554 to get started.

Stains & Finishes Application Guide
Download the full Application Guide for Stains & Finishes here.
Sealants Application Guide
Download the full Application Guide for Sealants here.
Application Surface Temperatures for Perma-Chink System products
Most of our labels list the recommended surface temperature range for the application of the product, but there are always situations when you may need to know a bit more detail about application temperatures in order to schedule or complete a job. This is a high-level recommendation for application temperatures. For more in-depth information, it’s recommended you please read the Application Temperatures article. In some cases, there are steps that can be taken to help cope with extreme hot or cold temperatures. Just remember that we are concerned with surface temperatures, not air temperatures. It is the temperature of the logs that must be considered, not the temperature on the thermometer hanging on the porch.
Lifeline™ Exterior Finishes
- Recommended Range
- All Lifeline stains 40°F – 90°F
- Lifeline Advance 40°F – 90°F
- Log End Seal 40°F – 90°F (not stated on label)
Sealants
Recommended Range
- Perma-Chink® Above 40°F
- Energy Seal™ Above 40°F
- Woodsman™ 40°F – 120°F
- Check Mate 2® 40°F – 90°F (not stated on label)
Finish Removers
Recommended Range
Cleaners & Brighteners
Recommended Range
- Log Wash™ 40°F – 90°F (not stated on label)
- Cedar Wash™ 40°F – 90°F (not stated on label)
- Wood ReNew™ 50°F – 90°F (not stated on label)
- Oxcon™ 50°F – 90°F (not stated on label)
Step 2 – Schedule Interviews
Perma-Chink Systems maintains current contact information, insurance and license information for all contractors on the referral list. Obviously, you’ll want to interview the contractors to determine their reliability, reputation, and experience, as well as their procedures that best meet your individual needs.
So here are the top 4 Key Questions you should ask each contractor candidate:
1. Does the contractor carry insurance?
A contractor should carry comprehensive liability insurance and workers’ compensation insurance to protect you in the event of a job accident. Ask for proof of general liability and workers’ compensation coverage for the type of project.
2. Is the contractor licensed?
Ask if the contractor is licensed by your state and/or city. Not all states or cities require contractors to be licensed.
3. Will the contractor provide references from previous jobs?
Most experienced log home contractors will have a portfolio of past jobs, along with photos and customers testimonial letters.
4. What is the contractor’s workmanship warranty?
Some contractors typically warrant their workmanship for one year or more. Longer warranties are not necessarily more valuable than shorter warranties. The length of the warranty is less important than the intent and ability of the contractor to stand behind his warranty. That is best evaluated using customer references.
Choosing a Contractor
There are several more important things to consider as you narrow down your contractor selection. All job bids (if well written) should contain enough detail provisions and terms to clearly state both parties’ expectations. Your contractor’s knowledge of local building laws, their schedule to do the work and, of course, the total price they bid for your project, is all part of the equation. When it comes to caring for your log home, it’s reassuring to know that you can choose a contractor on whom you can rely on for good advice as well trust that they’re dedicated to providing you with the best results possible.
Again, Perma-Chink Systems is happy to offer you all our resources to make this process a successful experience. We will contact you within 7-10 days to follow-up on the contractor’s response and also log information and future follow-up if the job was awarded to one of our preferred log home contractors. Give us a call at 1-800-548-3554 or e-mail info@permachink.com to get a referral to contractors in your area.
Choosing a Log Home Contractor: Getting It Done Right
Are you the hands-on type—someone who enjoys weekend trips to the hardware store and tackling projects yourself? At Perma-Chink Systems, we proudly support DIY enthusiasts by offering user-friendly products, expert how-to articles, and robust customer support. But while we make the DIY route possible, it’s not always preferable—or realistic.

Sometimes, life simply demands a professional. Whether it’s due to time constraints, physical limitations, lack of confidence, or simply not wanting to shoulder the task yourself, hiring a contractor becomes the smart move. And not just any contractor—a log home specialist.
Why a Log Home Contractor?
Think about it this way: would you hand over your car keys to a golf-cart mechanic? Both may know engines, but the experience gap matters. Similarly, log and timber homes require a specialized touch. Log home contractors understand the unique materials, techniques, and challenges these structures present. Their expertise means better results and fewer mistakes—and their existing relationships with product manufacturers often work in your favor.
Perma-Chink Systems offers a nationwide referral network of experienced log home contractors homeowners can access online on our website, our Find A Contractor tool. While these professionals aren’t directly affiliated with us, most are self-employed specialists trained to use our products with precision and care. Many of these relationships span years, and we continuously review our referral list to maintain the highest standards.
Two Key Steps & Four Critical Questions
Step 1 – Get Informed
Before speaking with any contractor, empower yourself. Knowledge gives you confidence and ensures better conversations. Dive into our literature, explore detailed application guides, attend one of our free homeowner workshops, or schedule a private webinar with our team of log home experts. Our specialists are ready to walk you through the process, explain the products, and help you understand what to expect. An educated homeowner is a contractor’s best client.
Step 2 – Conduct Smart Interviews
We keep up-to-date records of licensing and insurance for all contractors on our referral list, but it’s essential to vet them yourself too. Ask the right questions to ensure the contractor’s reliability, reputation, and fit for your project.

Here are four questions that should top your list:
- Do you carry insurance?
Look for comprehensive liability and workers’ compensation coverage. Always request proof before work begins. - Are you licensed?
Licensing requirements vary by state and city—make sure your contractor is properly credentialed according to local laws. - Can you provide references?
Seasoned contractors will happily share photos, testimonials, and previous work portfolios. - What warranty do you offer?
While warranty durations vary, what truly matters is the contractor’s integrity and track record of honoring their work—something former clients can confirm.
Making the Right Choice
When reviewing estimates, pay close attention to the details. A well-written bid should spell out clear expectations on both sides. Consider your contractor’s availability, knowledge of local codes, and, of course, overall cost.
Ultimately, you want someone you can rely on—not just to complete the job, but to do it with care and craftsmanship. With the right contractor, maintaining your log home becomes not just easier, but a whole lot more satisfying.
Let Perma-Chink Systems be your guide. We’re here to support you every step of the way, from initial exploration to follow-up after your project is complete. Within 7–10 days of your request, we’ll reach out to record your contractor’s response and keep tabs on next steps.
To get connected with qualified professionals in your area, call us at 1-800-548-3554 or email info@permachink.com. Let’s bring your log home project to life—with the right expert by your side.
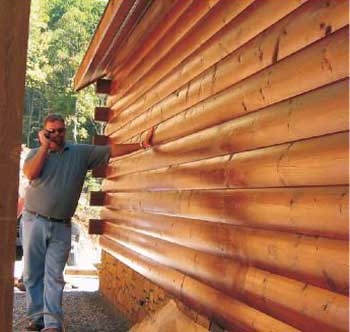
The key indicators that your logs need a little R & R (repair and refinish)
It’s difficult to ignore a log home; they possess a personality that always turns heads. Such natural good looks are part of their allure, but the attention they command extends to more than admiration. Log homes need regular maintenance to protect their beauty, performance and longevity. Fortunately, a few simple indicators will tell you exactly what your home needs (and when!). Here’s how to assess your logs’ status:
Annual Inspection of Log and Timbers
An annual inspection and exterior wash are an easy way to stay on top of your home’s maintenance needs. Sometimes a stain may look faded when, in fact, its appearance is just dulled by layers of dust, dirt and pollen. A simple wash will brighten everything up and return your home to its sparkling beauty. Ideally, this annual cleaning and inspection is done in late spring, after pollen season. A product like Log Wash from Perma-Chink Systems, Inc., which is environmentally friendly and is formulated with low pH, cleans the wood and preps it for a new coat of stain or topcoat if one is needed.
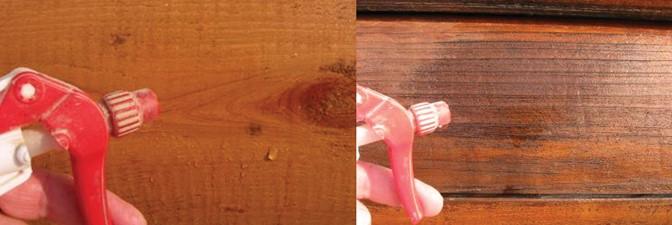
Perform a Water Test for Finish Integrity
Washing your home is also the perfect opportunity to do a water test, which tells you if you need to reapply a topcoat or the stain. When you wash your home, if you see water sheeting over the logs and being repelled, it’s a sign that the finish is working. If you’re unsure, perform a spot test by using a spray bottle filled with plain water to spritz a small section of the dry log with water. If the water soaks in, it’s an indicator that you need to re-apply the finish. If it beads up, your finish is working and you’re in good shape.
Is Your Log Color Beginning to Fade?
Stains add color and dimension to logs, enhancing a home’s aesthetic. However, they play another critical role. A log home’s stain, whether oil or film-forming, is responsible for protecting the wood. So, when the appearance begins to fade, that means the protection is, too. Keep an eye out for areas where your wall color is beginning to fade, indicating it’s time for reapplication of stain.
How to Perform a Tape Test
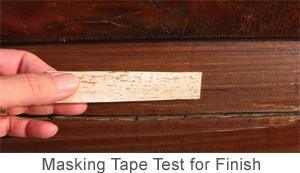
What if you purchased an older log home and don’t know what was applied prior to your arrival? Conduct a tape test! Simply take a short strip of high-adhesive masking tape and place it on the exterior wall, making sure the tape has good adhesion, then pull it off. If you see 50% or more pigment or stain color on the tape, that’s an indicator that not only do you need to re-stain the exterior, but you need to strip it down to bare wood. If you apply a new stain on top of a product that is peeling or flaking off, the new product isn’t going to stick.
Re-Application Made Easy
Once you’ve assessed your home and decided it’s time to reapply, Perma-Chink’s products not only prevent fading but also make application easier in the future. Unlike most film finishes, Perma-Chink’s system is a two-step process that involves a stain, such as LIFELINE™ Exterior, Ultra-2, or Ultra-7, Accents, then a topcoat finish of LIFELINE Advance. The extra step of adding a topcoat finish may seem like more work at first, but it saves you maintenance headaches down the road. That’s because with the LIFELINE brand, the stain protects the wood and the topcoat protects the stain, therefore extending the life of the stain.
Because the topcoat protects the stain, it may be years before you find that the stain needs to be re-applied. With conventional film-forming products or an oil-based stain, the stain will likely need to be re-applied every 2-3 years depending on the sun exposure.
Alternatively, if your log home has been repeatedly treated with an oil-based stain, it might be a good candidate for Log & Timber Defense. This product is a stain and sealant in one. It’s not film-forming and performs more like an oil by penetrating the wood, yet a water-borne finish that cleans up with soap and water.
Looks and Longevity
Knowing how to take care of your log home and choosing products that make maintenance easy will help ensure the beauty and durability of your log home for years to come. With Perma-Chink Systems, you get peace of mind, gorgeous looks, and a minimal maintenance routine that will give your home the longevity you desire. Order your stains today at Store.PermaChink.com or call us at 1-800-548-3554.