Blog
A fallacy that many people have accepted as fact is that water beading on the surface of wood is the only sign that a finish is repelling water and beading water is an attribute of a quality finish. Nothing could be further from the truth. Beading water is only an indication of the presence of a hydrophobic additive (water-hating or repelling water) like oil, or more commonly, paraffin wax. In addition, there is no correlation between beading water and protecting wood from sun (UV) damage. Furthermore, water beading holds water closer to the finish for a longer period of time, thus increasing the chance of softening the film.
We get calls from homeowners asking if they need to apply another coat of Advance on their home, since they’ve tested by spraying water on the finish and the water does not bead up. Since none of our current finishes contain oil or paraffin wax, they “sheet” water – but do not “bead” water. Why don’t we add wax to our finishes? Wax may contribute to water repellency for the short term, but it weathers away fairly quickly, especially in areas that are in direct sunlight. Once it is gone, it leaves microscopic voids that may allow water penetration, and roughens the finish, making it not as easy to keep clean.
By maintaining a wax-free smooth polymer film, we’ve been able to significantly increase the long-term performance of our exterior finish systems. Finishes containing wax also increase the difficulty of applying additional coats or applying a water-based finish on top of the wax finish.
There is also a misconception that only the topcoat imparts water repellency to our finish system. The fact is that all of our exterior and interior primers, stains, and topcoats prevent liquid water from coming in direct contact with the wood fibers. So even though the topcoat may show some signs of wear, it does not mean that the finish system has lost the ability to prevent water penetration.
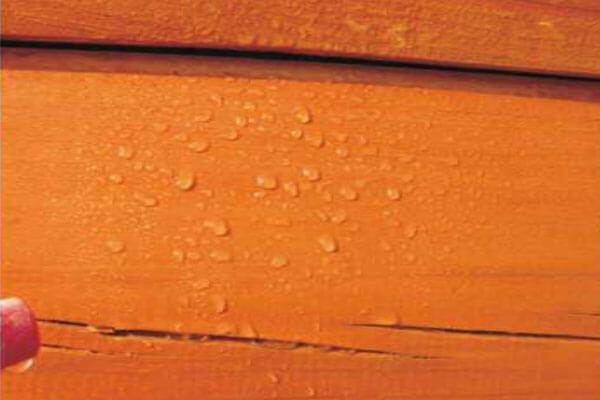
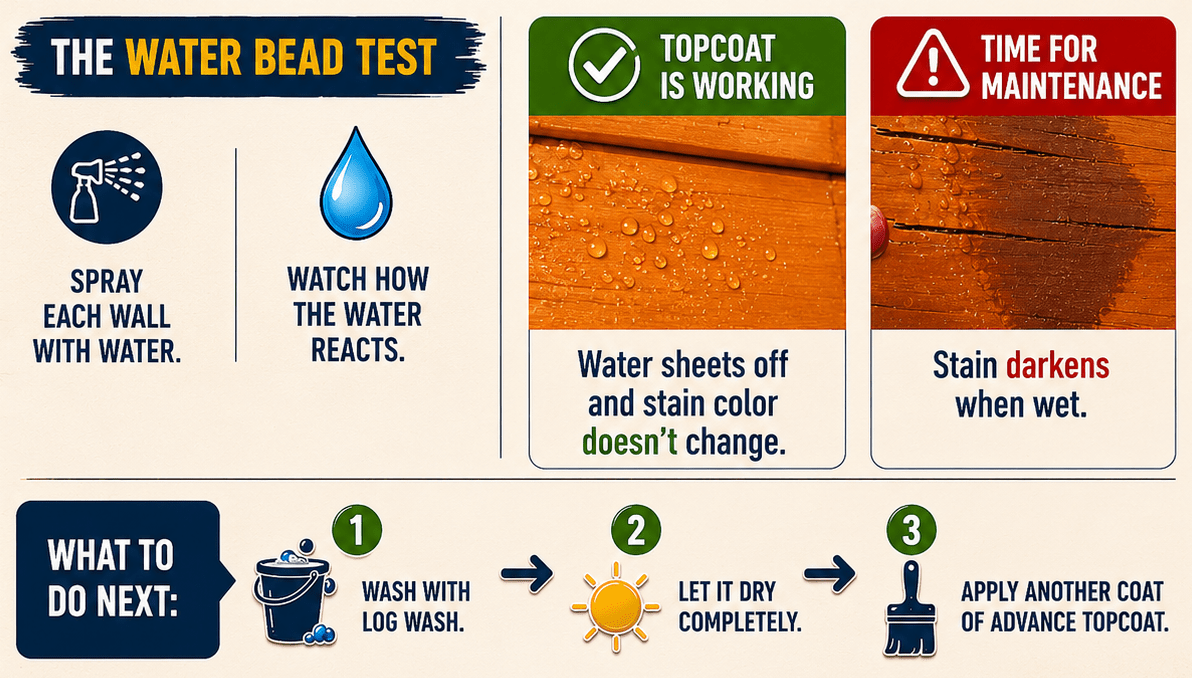
The Water Bead Test
So how can you tell if a finish no longer repels water? If the wood is dry, it is pretty easy. When dry wood is sprayed with water and there is no change in color, it is a sign that the wood is not getting wet. On the other hand, if the wood turns dark it’s an indication that the wood fibers are getting wet, and the finish is no longer water repellent.
All Lifeline™ finishes are water-based, film-forming coatings. Although we refer to our pigmented coatings as “stains,” they do not “colorize” the wood like penetrating oil-based products; they form a film on the surface of the wood, thus protecting the underlying wood from the effects of wind, water, and sunlight. Since they form a film on top of the wood, they rely on proper surface preparation to ensure good adhesion.
The presence of dirt, dust, mill glaze, chemical contaminates, or non-compatible finishes will compromise adhesion of the Lifeline finish to the wood. In addition, sanding exterior surfaces using sandpaper or Osborn Brushes finer than 80 grit will also prevent proper finish adhesion since Lifeline finishes need some surface texture in order to bond tightly to the wood fibers. However, even with coarse sanding the final finished surface will be quite slick and smooth. If you have any questions about what constitutes proper surface preparation, call a Perma-Chink Systems location before proceeding.
For weekend do-it-yourselfers we recommend working on one wall at a time, start to finish. It is better to complete one entire wall than it is to have several walls in some stage of the process and be interrupted for days, weeks or months by a change in the weather or other unforeseen circumstances. Also be aware of extreme temperatures when applying finishes to the log home. For guidance, review our Tech Tip on Application Temperatures.
Equipment to Have on Hand
- Ladders, ladder jacks and platform, if necessary
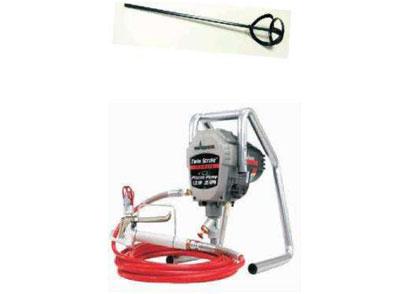
- Electric Drill
- Paint mixer (available from Perma-Chink Systems or most paint stores and DIY outlets)
- An airless sprayer equipped with a 0.015 or 0.017 orifice tip
- A high quality stain brush
- Clean rags
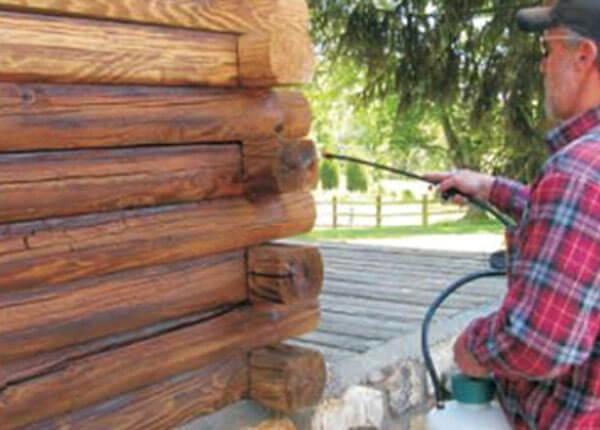
- Although our finishes may be applied with a brush or pad, they are designed to be most easily applied using an airless sprayer. Using one will result in a more uniform, professional looking finish. Do not use a pump-up garden type sprayer!
Weather Conditions
You don’t want to start the job if there is a chance of rain within the next 12 hours. You also don’t want to stain a wall if it’s going to be in direct, hot sunlight during the staining process. If it’s a clear day and you are working on a south or west facing wall, start early in the morning before the sun starts beating on it, but make sure it’s dry. It’s better to work on a wall that’s a bit cool than it is on a wall that’s still hot from being exposed to the sun for most of the day. High surface temperatures accelerate the drying process, and you may not have sufficient time to properly brush out the product. The labeled ambient temperature application range is between 40°F and 90°F. Note that it is the surface temperature of the logs that is most important, not the temperature of the air. This is especially important during the winter when you can get a nice February day, but the logs are still frozen. You may need a few warm days before the temperature of the logs reaches the 40°F+ range.
Application
Mixing is also required for all clear Lifeline exterior finishes, including Prelude™ and Advance™ Gloss or Satin. When using pigmented stains, we also recommend “boxing” containers to avoid any slight color differences as you go from container to container. The best way to do this is to mix up each pail then pour some Lifeline from at least two pails into a separate container. As the working container gets low add additional Lifeline but be sure to mix the pail again before pouring any stain from it.
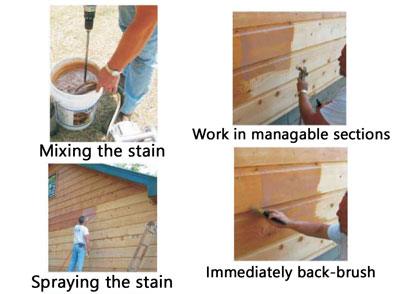
Step 1: Remove the lid from the pail and stir the contents for at least 5 minutes using an electric drill and a paint mixer. Be sure that all of the pigment is uniformly dispersed throughout the finish and there is no pigment still adhering to the bottom of the pail.
Step 2: Set up the airless sprayer according to the manufacturer’s directions or if brushing, pour a small amount into a separate container. Manually mix the pail whenever additional material is removed and occasionally turn on the sprayer’s re-circulator during use.
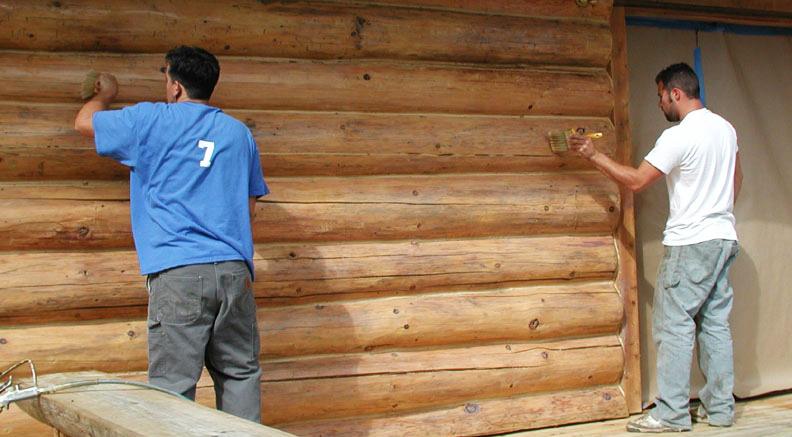
Step 3: Start your application at the top of the wall and work your way down. This avoids having to set your ladder against a wet finish and allows you to work out any drips and runs that may occur during the application process.
Step 4: Work on one or two courses of logs at a time. Hold the spray tip about a foot or so from the surface and apply the finish to no more than two running feet of logs. If the Lifeline™ begins to run down the wall you are applying too much.
Step 5: Once applied, immediately back-brush the area making sure to get Lifeline into all of the checks and fissures in the wood. Continue back-brushing until you have spread the Lifeline out as far as it will go. Lifeline finishes are made to go on in thin coats. If your brush becomes saturated, it is an indication that you are applying too much finish.
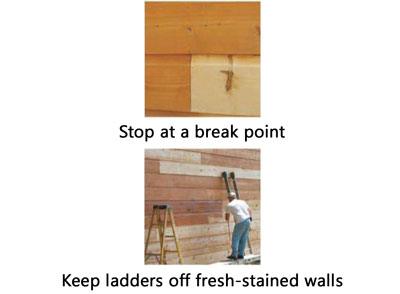
Step 6: While maintaining a wet edge, continue the application process until you come close to a break point like a window frame or butt end of the log. Never stop in the middle of a log. If you do, you may end up with a lap mark that will be difficult or impossible to hide. When you get close to a break point, feather the edges and empty the brush. Then start to spray from the opposite direction so you can blend the stained areas together and avoid lap marks.
Step 7: Continue the application process, working your way down the wall. Once the finish coat is dry, you can move your ladders and complete the logs that you may have skipped to make room for the ladders. If you need to take a break, be sure to submerge your spray tip in water to prevent it from blocking up with dried product.
Step 8: Allow the finish to dry before applying subsequent coats. Drying time depends on temperature and humidity. In warm, dry conditions the surface may be dry to the touch in as little as one hour. On the other hand, on a damp day when the air temperature is below 50ºF it may be impossible to apply more than one coat per day.
Step 9: Lifeline Advance Clear Gloss and Satin Topcoats are best applied using exactly the same application techniques as the color coats. However, boxing containers is not necessary since they are colorless. Advance is somewhat sensitive to cool, moist weather, and if it has not had an opportunity to dry before the sun sets, cool evening dew can cause “blushing,” a hazing of the finish created by the interaction of water with the uncured Advance topcoat. In the spring and fall when evening temperatures drop below 60°F, it’s best to apply Advance early in the day so that it gets several hours of drying time before being exposed to the evening dew. Blushed Advance will turn clear after a few warm, dry days.
Step 10: Clean brushes, tools and equipment with soap and water.
Tips and Bullet Points
- Never use sandpaper, sanding pads or Osborn Brushes finer than 80 grit
- Make sure the surface has been cleaned within seven days of applying the first coat of Lifeline. Do not use bleach! Log Wash™ is a much better product to use.
- Check the weather forecast. Do not start if there is a chance of rain before the finish has a chance to dry.
- Ambient air temperatures should be between 40°F and 90°F at the time of application. Log surface temperatures should be between 40°F and 160°F
- Thoroughly mix all Lifeline finishes before and during use
- Use high quality brushes
- Do not use a pump-up sprayer or a roller to apply Lifeline
- Use a 0.015 or 0.017 orifice tip on airless sprayers
- If working up high, use ladder jacks and a platform
- Apply thin coats, back-brushing is critical
- Work on one or two courses of logs at a time
- Do not stop in the middle of a log. Continue to a break point.
- Start at the top of a wall and work your way down the wall
- Do not lean ladders against freshly stained surfaces
- Allow adequate drying time between coats
- During the cool spring and fall months do not apply Advance Topcoats late in the afternoon
- Clean your hands and tools with soap and water before the Lifeline dries
If you have any questions, give us a call at 1-800-548-3554, we are more than happy to help with your project.
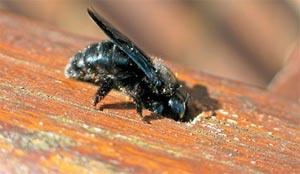
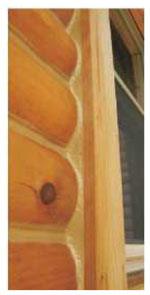
Every spring we get lots of calls about carpenter bees drilling into logs, fascia boards, eaves, decks and other unpainted wood surfaces. Carpenter bees are big, black solitary bees that look similar to bumblebees but have bare, shiny backs whereas a bumblebee’s back is hairy. Unlike honey bees that reproduce in hives, carpenter bees drill into wood in order to lay their eggs. Their holes can be identified easily as they are perfectly round and about 1/4 inch in diameter.
Although carpenter bees prefer softwoods such as cedar, redwood, or cypress, they happily attack pine and most other species of wood. Even pressure treated wood is not immune from carpenter bee attack. As the bee drills into the wood, coarse sawdust may be seen coming out of the hole and piling up beneath the hole. Since it only takes a couple of hours for a carpenter bee to drill a hole a few inches deep, lots of holes can appear over a fairly short period of time.
Most carpenter bee activity occurs in early spring when male and female bees emerge after spending the winter in old nest tunnels. Once they have paired and mated, the female bee drills into a suitable site while the male stays nearby to ward off intruders. Male carpenter bees often frighten people with their aggressive behavior but since they have no stinger they are essentially harmless. Females have a stinger but only use it if molested.
Once the initial hole is drilled through the surface, the bee will make a turn and excavate a tunnel along the grain of the wood. This tunnel, which may run for several inches, becomes the cavity where the female deposits her eggs. Several eggs are laid in individual chambers separated by plugs of pollen on which the larvae feed until they emerge as adults during the summer months. In addition to making new holes, carpenter bees also enlarge old tunnels. If left unattended for several years, serious damage to a wood member may result.
In late fall, activity may again be seen as both male and female carpenter bees clean out old nest cavities where they stay over winter. Since carpenter bees tend to migrate back to the same area from which they emerged, it is important to implement some control measures in order to prevent logs and wood members from becoming riddled by these bees.
Prevention
Although carpenter bees prefer bare wood they will attack wood that is stained. Painted wood surfaces, on the other hand, are rarely attacked since the bees must see or feel the grain of the wood in order to recognize it as wood. One of the most effective measures for preventing extensive carpenter bee damage is to fill old or empty holes with Energy Seal. Carpenter bees are attracted to existing holes. Be sure to treat the hole before you fill it since live adult bees will drill right through the caulk on their way out.
One way to keep carpenter bees from drilling into wood is by spraying pesticides that contain either cypermethrin, deltamethrin, or bifenthrin (Ortho Home Defense Max) onto wood surfaces. When it comes to carpenter bees, these products act more as repellants than contact poisons. However, the effectiveness of these applications is only about three to four weeks, so the treatment will have to be repeated every so often. Pesticides should only be used during the periods of peak activity in the spring and perhaps again in late fall. Be sure to follow label directions and read and understand any precautions that must be taken when using these products.
Treating Carpenter Bee Holes
Any carpenter bee holes you can reach should be treated and plugged since existing holes attract more carpenter bees. The way to treat an existing hole and tunnel depends on the time of year, and if bees are present at the time of treatment. If the female is drilling away when you find a hole (you can see sawdust coming out or hear her working inside) spray a contact pesticide like wasp and hornet spray into the hole. She will quickly back out and die. Immediately fill the hole with wood putty or Energy Seal. You need to treat the hole even if it appears empty since the bee may be resting and, if left alive, will drill back through the plug you’ve just inserted.
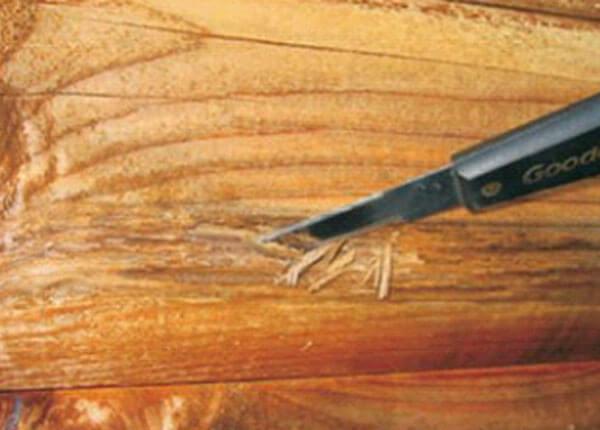
If you find carpenter bee holes in late spring or early summer it’s difficult to tell if there are bee larvae developing in the tunnels. The best thing to do is to run a length of flexible wire into the tunnels in order to break through the pollen plugs separating the chambers. Then spray a pesticide into the hole and seal it up. The same thing should be done on holes found in the fall or winter to kill any bees that may be over-wintering in the holes. Just remember to plug the holes since they will attract more carpenter bees come spring.
Several people told us that although they sprayed a pesticide into the holes, carpenter bees later emerged, in some cases even after the holes were plugged. How can this happen?
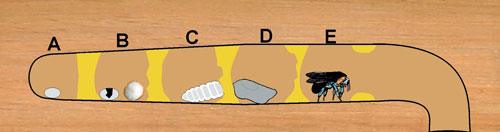
If we take a look at a cross section diagram of a carpenter bee gallery we can see how. After drilling out a four to five inch long gallery, the female carpenter bee lays an egg in back of the gallery then places a plug of pollen she has gathered to form a chamber (A). She continues doing this until there are four to six egg chambers in place. After a few days the egg hatches and a small white grub emerges (B). The grub feeds on the pollen plug for a few weeks (C) until it is ready to pupate (D) and change into an adult bee (E).
If you look at the way the gallery is constructed you can see why spraying a pesticide in the hole may not kill all of the developing bee larvae. The pollen plugs prevent the pesticide from getting to the rear chambers. So before you spray any pesticide into a carpenter bee hole be sure to run a stiff wire all the way to the back of the gallery to break through any pollen plugs. That way all of the larval chambers will be exposed to the pesticide.
A few years ago we requested information about the effect of our gloss topcoat on reducing carpenter bee activity via survey. Out of over 20 responses by letter, phone and e-mail only two reported any penetration of the gloss topcoat by carpenter bees. One home went from 20 to 30 holes the previous year down to 2 this past year and the other went from over 20 holes to 4 holes. This confirms our suspicion that the Lifeline Advance Gloss exterior topcoat appears to provide a finish to the wood that carpenter bees do not find very attractive. That is not saying that the gloss finish repels carpenter bees. It does not. Although bees would occasionally land on the gloss topcoat, they just did not drill through it. So why is it? Well, let’s be clear that the Lifeline Advance Gloss topcoat is not a pesticide nor does it have any pesticide properties. It appears to form a coating on the surface of the wood that carpenter bees are reluctant to drill through. Why? It could be the glossy look or that the hard, slick finish does not appeal to them.
Other Pests?
Dealing with more pests than just carpenter bees? Read our article on best practices for pest prevention for your log home.
More wood is replaced each year because of decay damage than all other factors combined! Commonly called rot, wood destroying fungi need three things to survive: air, water, and food. Since we can’t eliminate air and their food is the wood in our homes, the only mechanical control mechanism available to us is the elimination of water. Water is the enemy of wood! Although we’ve all heard the term “dry rot,” dry wood will not rot!
There are three basic categories of wood-destroying fungi: soft rot, brown rot and white rot. Soft rot fungi are typically found in wet wood showing the first signs of decay. Wood infected with soft rot can become quite soft and spongy. Other than the softness of the wood and perhaps discoloration of the surface, there may be no apparent signs of a soft rot infestation.
Brown rot fungi commonly attack softwoods like pine, spruce and fir thus turning the wood dark brown. In advanced stages of decay, wood attacked by brown rot becomes friable and splits appear across the grain giving the wood a “checkerboard” appearance. Infested wood may be structurally weakened in a relatively short period of time.
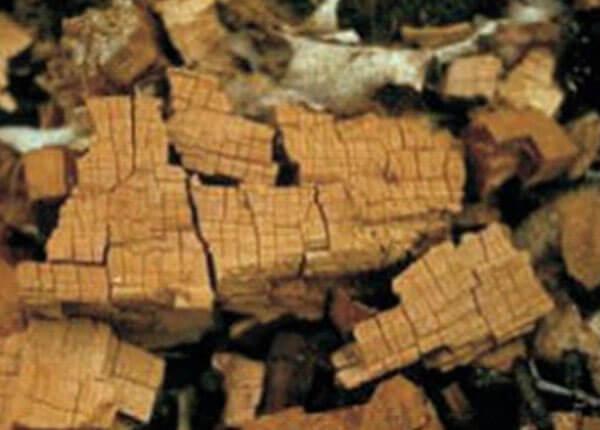
Once brown rot has extracted all of the nutrients from the wood, the wood may become dry and powdery. This gives the impression that dry wood has rotted (dry rot) but in reality it is the result of an old infestation of brown rot. One of the most destructive types of brown rot fungi is poria (meruliporia) incrassata, otherwise known as the water-conducting fungus. One indication of a poria infestation is the presence of rot in wood with no visible source of water. This type of fungus actually transports water through root-like structures known as rhizomorphs. Infestations of poria can progress quite rapidly destroying portions of flooring and wood members in a year or two. Thankfully, infestations of poria incrassata are fairly rare.
White rot fungi attack the cellulose and lignin in wood, eventually giving the wood an off-white appearance. In the later stages the wood may become spongy to the touch. Wood attacked by white rot lacks the cubical checking appearance of brown-rotted wood. Shelf fungi, bracket fungi, and mushrooms are all forms of white rot fungi.

Preventing Decay – 7 Rules
Moisture control should be an integral part of any program designed for preventing wood decay.
The following 7 rules are a good place to start:
- Wood should never be in contact with the ground. Wood posts, piers, supports, etc. should rest on metal plates imbedded into concrete footers raised above the level of the surrounding soil.
- Basements should be waterproof and equipped with a floor drain. If the relative humidity in the basement exceeds 50%, a dehumidifier should be installed.
- Crawlspaces should be adequately ventilated with at least one square foot of free vent area for every 500 square feet of crawl space floor area along with a moisture barrier covering at least 80% of floor. One vent should be placed within three feet of each corner to prevent “dead air” spaces. In high humidity environments additional vents should be considered.
- Plumbing leaks should be repaired as soon as they are noticed.
- Rain gutters need to be clear of debris and roof leaks fixed.
- All exterior wood surfaces should be coated with a long lasting, water repellent finish system. This is especially important on log homes. Water-based, breathable film-formers like LIFELINE stains and topcoats work best since they allow water vapor to escape while preventing liquid water from penetrating into the wood. Log ends should be provided an extra measure of protection with Log End Seal.
- Upward facing checks should be sealed with Check Mate 2 to prevent water from entering the interior of the logs.
Borate Preservatives
There are four borate products designed for the control and prevention of decay fungi. Bora Care® and PenaShield® are borate-glycol liquids that kill wood decay fungi and when properly applied to bare wood and protected with our finish system, provide permanent protection against decay.
Tim-Bor® is a pure borate powder that is dissolved in water and applied to the wood. Since it does not exhibit the depth of penetration of the Bora-Care borate-glycol products, Tim-Bor should only be used to protect new, un-infested wood. Any time the surface is stripped of its finish, another application of Tim-Bor should be made.
Cobra™ Rods are two-inch-long, borate glass rods that can be used to spot treat decay prone areas such as log ends that are already coated with a finish. Once inserted into damp or wet wood, the borate/copper complex in Cobra Rods dissolves, spreading the active ingredients into areas surrounding the rod. Cobra Rods eliminate active decay fungi and help prevent rot for eight to ten years.
If you have any questions about controlling decay fungi or repairing decayed wood, give Perma-Chink Systems a call at 1-800-548-3554. We have number of products that are designed for repairing damaged wood and preventing future problems from occurring.

Perma-Chink Systems offers wood preservatives designed to protect your home from insects and wood rot. Below are our Tech Tips for our preservatives, along with some general product knowledge on storing procedures.
Following are some comparison points of Lifeline™ finish systems to typical oil-based products.
Environmental Issues
Most oil-based finishes contain some type of organic solvents that evaporate into the air when they dry. These components are known as Volatile Organic Compounds (VOCs). When VOCs are in the vapor state and interact with NOx (Nitrogen Oxides) in the presence of ultraviolet (UV) light, ground level ozone or smog, a health hazard to humans, forms.
Some oil-based products are promoted as being “green” since they are made from renewable plant oils like linseed or soybean oil but even these products require mineral spirits or turpentine (high VOC, disposal regulated products) for clean-up. Although Lifeline water-based finishes also contain some VOCs, they are at a much lower level than oil-based products and clean-up requires only soap and water. That’s why environmental organizations promote the use of water-based products whenever possible.
Preparation
One of the requirements of oil-based finish systems is that the wood must contain less than 18% moisture content before they are applied. Everyone knows that oil and water do not mix. A film of oil will repel any water and water vapor that’s contained in the wood, as well as what hits the surface. On the other hand, if even a minor amount of water is present on the surface of the wood during the application of an oil-based stain, the coverage, adhesion, and penetration of the oil will be compromised with a resulting decrease in durability and performance. This prevents the use of oil-based products on even slightly moist logs or green wood. Recommendations typically include waiting at least three days after stripping or cleaning walls before applying the first coat of any oil-based product.
Lifeline is a film-former that behaves like a semi-permeable membrane allowing water vapor to escape from the wood but preventing liquid water from penetrating into it. That is why Lifeline can be applied to logs containing 30 to 35% moisture content. In addition, Lifeline may be applied the day after cleaning, as long as the wood cells at the surface are not filled with water.
Application Rates
Most oil-based finishes require heavy applications, especially for the first coat on bare wood. Recommended application rates ranging from 75 to 150 square feet per gallon are not unusual. This translates into a lot of oil-based product required to stain a home.
Let’s look at 2400sqft of wood surface that needs staining. If we assume an average coverage rate of 100sqft/gallon, it means that it will take 24 gallons of an oil finish to apply one coat. If two coats are necessary it may take an additional 12 or more gallons to finish the job for a total of 36 gallons. That’s a lot of product.
Lifeline stains have a much higher coverage rate than oil-based products since they do not soak or penetrate into the wood, are specifically designed with low viscosities to maximize the coverage rates, and are easy to apply using airless sprayers. Other than Lifeline, very few stains that we’ve seen and evaluated- including other water-based products- have an initial coverage rate of 350 to 450sqft/gallon on bare wood.
When we compare the amount of Lifeline required to cover 2400sqft to the oil-based example, we end up with 6 gallons for the first coat and 4 gallons for the second coat for a total of 10 gallons of Lifeline stain, verses 36 gallons of the oil-based product.
Product Application
Without a doubt, some oil-based penetrating stains are easy to apply. Some even recommend the use of garden sprayers with no mention of back-brushing. On the other hand, multi-coat oil-based products can present a challenge to the applicator. Virtually all multi-coat oil-based stains require at least 24 hours between coats. Another problem with oil-based finishes is their drying time. Most stay tacky for a week or so after application. If a multi-coat product is used, it is difficult to avoid ladder marks while applying the second or third coats. Of course dirt, dust, leaves, bugs and other flying debris tend to stick to the finish until it finally dries.
Lifeline finishes do require some knowledge to be applied correctly. They are a bit more susceptible to runs, drips and lap marks than oil-based products, but that is why we try to provide product training especially to homeowners through our literature and seminars. To professionals, Lifeline offers some distinct advantages such as being compatible with most airless sprayers and fast drying times which allows multiple coats to be applied the same day.
Clean-Up
The only effective way to clean oil-based products from hands and equipment is with turpentine or mineral spirits. Although the labels of some oil-based products claim soap and water clean-up, we have yet to see one that does not make a mess when these directions are followed. The disposal of used turpentine and mineral spirits in a responsible way is a real challenge to both homeowners and contractors.
Water-based products like Lifeline are easily cleaned up with soap and water. The effluent from washing hands and equipment presents no environmental issues and application equipment like sprayers and brushes can be easily and thoroughly cleaned in preparation for the next job.
Performance
On sun exposed walls, the life expectancy of even the best one- or two-coat penetrating oil-based stain is two to three years- at most. Since they are made to penetrate into the wood, they leave very little protection on the surface where it is needed most. Multi-coat, film-forming oil-based products exhibit better performance than the penetrating products, but the new VOC requirements have had a detrimental impact on them. They are not the same products they were five or seven years ago.
For those products that contain extracted plant oils like linseed, tung, or soybean oil, mold growth is a real concern. Although they may claim to contain mildewcides, the level of mildewcides is rarely enough to overcome the susceptibility of these organic oils to biological growth.
Another characteristic of film-forming oil-based finishes is that they darken with age. This is due to the oxidation of the oil components contained in the stain. As previously stated, film-forming oil-based products do not allow water vapor to escape from the wood. They are not breathable. If water does enter the logs through fissures and checks, there is a good chance that the finish will begin to peel off as water vapor builds up pressure under the finish.
Performance is where our Lifeline products differentiate themselves from oil-based and other water-based stains. There is no question that some water-based products perform no better than the poorest quality oil-based stains. But our Lifeline systems are designed for performance, and we have yet to discover another transparent stain system with the equivalent performance of Lifeline finishes with our Advance Topcoat.
When we talk about performance what exactly do we mean? From a technical perspective, we discuss terms like vapor permeability, adhesion, UV resistance, etc. But to a homeowner, performance comes down to how long will it be before the finish looks so bad that it has to be reapplied. We all know that it is impossible to give a definitive answer to this question since so much depends on environmental factors. But we can say that in side by side comparisons, our Lifeline systems have lasted longer than all of the competitive products that we have tested.
Lifeline Stains versus Oil-Based Stains
Lifeline Finishes
- Low VOC, low environmental impact. Considered the product of choice by environmental organizations.
- For best results, we recommended moisture contents of 20% or less.
- Can be applied the day after cleaning as long as surface is dry to the touch.
- High coverage rates. Low viscosity allows application of thin coats.
- Fast drying. Wait 2 to 4 hours between coats. Topcoat provides a hard protective surface within hours.
- Clean-up with soap and water.
- Ultra-2 or Ultra-7 and Advance are warranted for three to five years.
- Advance topcoat helps retain color for years.
- Advance adds addition water repellency and UV protection to the finish system.
Oil-Based Finishes
- Not friendly to the environment.
- Wood must contain less than 20% moisture content.
- Must wait at least three days after cleaning.
- Low coverage rates, takes much more product to stain a home.
- Slow drying. Wait at least 24 hours between coats. May stay tacky for weeks.
- Clean-up requires turpentine or mineral spirits.
- One coat products last one to two years.
- Film forming products darken with age, especially around knots.
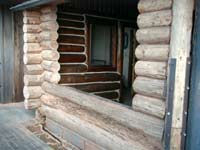
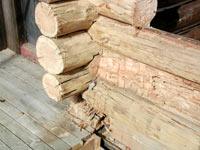
Log Home Restoration with Major Log Repair
When you look at these pictures, you probably think to yourself: how is it possible to repair these logs?
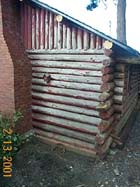
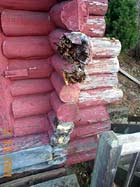
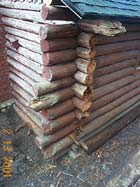
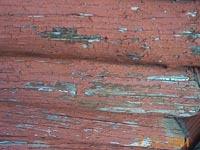
Chris Hastings, the second generation of log home restorers knew the answers. The major problem was in the design of the house. The house was designed improperly for the building site. The extensive damage on the lower third of the wall on the exposed side of the house was due to the insufficient overhangs and water damage.
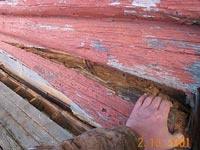
What kind of work will bring this house back to life? The first step for this project is exterior media blasting, followed by log repairs, washing and brightening the exterior wood surface, applying borates to preserve the logs and interior and exterior chinking. Exterior visible water damage prompted Chris to cut away the outer half of this log which shows major water damage in the log’s core.

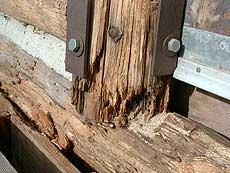
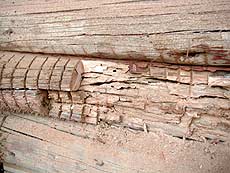
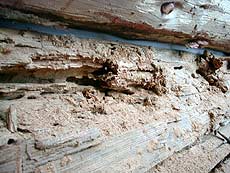
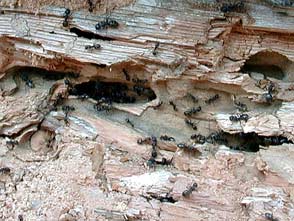
You can see how carpenter ants ( which are attracted to high moisture content in wood) have the ability to destroy logs in your log home, often in a short period of time, and in this case, causing major structural damage. Prevention of water intrusion by using a high quality log home finish (Lifeline Ultra–7 with Lifeline Advance) and sealants (Perma-Chink and/or Check Mate 2) would have helped eliminate this costly problem.
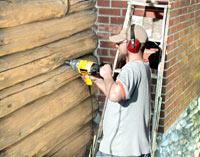
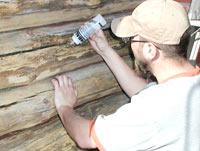
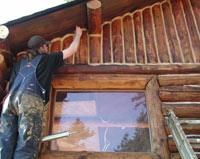
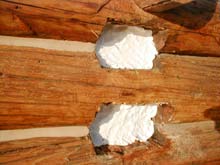
Following the use of the finish removal system, that stripped off previously applied paint and UV discoloration, you can see (below) how a treatment of Oxcon further brightens the logs without damaging wood fibers. Following a rinsing of the logs with water, your home is now ready for the borate treatment.
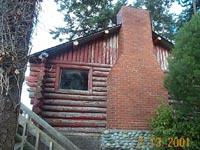
After a borate treatment was completed, M-Balm was injected (squeeze bottle) within the log cavity. M-Balm not only hardens the wood, but also stops any further spreading of wood rot. Following the borate treatment and Oxcon to brighten the wood, Chris installed one window to the left for better appearance of this home. Now that house is protected against wood-destroying insects, an application of stain and topcoat will not only enhance your home’s aesthetic appeal, but will offer protection as well.
The semi-transparent stain will protect your wood from the damaging effects of UV exposure. We recommend one coat of Lifeline Advance (clear coat finish, similar technology used in the automobile industry) over the stain color for protection and extending the life of the pigments in the stain. It also will give a maximum protection against water penetration.
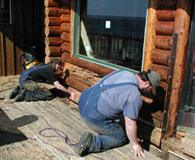
The repair of water-damaged log ends will bring us to the final step: applying Perma-Chink between all logs to further protect against air and water intrusion. Prior to the last step of chinking the featured structure, Chris Hastings and his crew replace the outer half of the structurally damaged lower log with a fresh, sound log section.
The final step in the restoration process is to chink all seams (both vertical and horizontal). Perma-Chink chinking that permanently bonds to wood will retain its elastic features in all climates and will provide year round energy efficient comfort.


Why do my choices regarding surface prep, stain, and color matter?
When it comes to choosing a finish system for your log home exterior there are many factors to consider and depending on what choices you make it will have a significant impact on the longevity of the finish system. For example, some of these choices include surface preparation, type of stain, and color choice. Let us take a closer look at each one of these factors and discover how they each contribute to a systems performance.
Surface Preparation
First, surface preparation is often overlooked, not taken seriously, or even dismissed entirely. At Perma-Chink Systems we have learned through many years of testing and experience that this is an important step and forms the foundation for a successful finish system.
Does the surface of the wood have mold, dirt, discoloration, existing finishes, metal contaminants or greyed weathering? All these wood conditions will likely lead to problems with your finish system if left unaddressed. Perma-Chink Systems offers a full line of wood restoration and cleaning products and literature to deal effectively with each of these wood conditions.
Increased wood surface porosity is also important and to achieve best results, we recommend sanding your wood with 60 grit sandpaper. This allows for improved mechanical adhesion of the stain with the wood fibers and increases overall performance of the system as well as color uniformity. The overall color development will be much darker than on un-sanded wood. Nevertheless, the protection of the wood surface is increased substantially. Staining on smooth/un-sanded wood can look splotchy due to the reduced porosity and unevenness of the wood. As a result, not much stain goes on the wall and the performance is reduced accordingly.
If, however, surface preparation is skipped or done improperly prior to an application of stain, it will impact the appearance and longevity of the final system. Some of the likely outcomes such as peeling and early discoloration and unhappy homeowners are the usual result.
Choosing the Right Stain
The type of stain you choose also will impact performance. For all horizontal surfaces it is more advantageous to go with a penetrating type of stain such as our Deck Defense™. If you want to coat both horizontal and vertical surfaces another penetrating flat stain such as our Log and Timber Defense™ is an excellent choice. For all vertical surfaces film forming stains such as Lifeline Ultra 7™, Lifeline Ultra 2™ or Lifeline Exterior™ are your choices. For long lasting color fastness and protection on vertical surfaces the best option is our all-acrylic Lifeline Ultra 7.
Two broad categories for stain type are oil and water-based stains. What distinguishes these two types from each other? The advantages of oils are ease of application, extended drying time and initial high gloss appearance. The disadvantages of oil types are, more hazardous to work with due to dangerous flammable solvents as a primary ingredient, the gloss appearance dulls relativity quickly with exposure and due to its high solid content is less breathable and can chip and peel more easily than a water-based stain. Clean up of oils requires dangerous paint thinner solvents and is arguably more difficult. All our water-based stains are non-hazardous and easy soap and water cleanup as well as breathable making them less susceptible to peeling and chipping.
Choosing the Right Colors
Finally, color strongly influences the performance of any finish system. Our stains are designed to be semi-transparent. This allows the observer to more easily see the unique features of the wood such as grain and texture. However, by their very nature transparent type finishes do not offer the kind of protection afforded opaque systems such as paint. In many of our exterior formulations we use Transparent Oxide type pigments. These pigment types still allow light to pass through so that you can see the grain while at the same time providing a high level of protection from the sun. In addition, we avoid using organic type colorants that are not as colorfast as oxide-based colorants. In general, the darker tone colors will provide more protection and longevity for your home while lighter honey tone colors offer reduced protection. Nevertheless, at Perma-Chink we understand that color is a very personal preference and we all cannot agree on exactly what we would like our home to look like. Perma-Chink offers a broad range of color choices to meet our customers’ expectations and desires when it comes to color. Color formulation have been carefully evaluated for color longevity. Pigment loading levels have been formulated to give the greatest protection possible while at the same time providing color choices that meet our customers’ needs.
Some additional choices such as how many coats of stain, topcoat or no topcoat and surface porosity are also important factors. In general, two coats of Lifeline stain are better than one. It helps to even the color out and provides increased protection of the wood. Having a clear topcoat, such as our Lifeline Advance™, is also a great benefit. This helps keep the system sealed, dirt pickup is greatly reduced, performance of the system is increased, and it provides a great look to the final product.
Contact Us for Assistance
As a log homeowner you have many important decisions to make when it comes to the care and maintenance of your home. At Perma-Chink Systems we have spent the last 40 years developing solutions to help meet your needs. Your choices as well as ours do matter and will make a difference. Let us work together to keep your log home looking great well into the future. For more information about our products please give us a call at 1-800-548-3554 and tell us what your needs are. You can also visit our website at www.permachink.com where you can find more information and order our products directly.
Dear Terry,
I cannot thank you enough for your support with my staining challenge! You clearly went above and beyond to resolve my issue, and I truly appreciate it!
As first time users of your stain for our new log home build, we love the Perma-Chink Systems line of products and will be loyal customers! Stain colors as advertised and displayed in your samples, and the customer service, such as yourself, as well as the speedy arrival of our products is why you have such a solid reputation!
Out of a five star rating, you have earned six stars with us!
Thank you, again!
Sincerely,
Kathy N.
I would like to express my extreme satisfaction with my customer service experience at Perma-Chink. My service representatives, Joanne and Stephanie, were very helpful, polite and professional and worked hard to resolve my issue.
I have used Perma-Chink for all my staining needs and with a log home there are many! Their representatives are knowledgeable and know well the products they sell and guide their customers to what they need and explain how to use them.
When my home needs to be re-stained in a couple years, I will, without hesitation, purchase stain and Log Wash, brushes, etc., from them again.
Thank you so much all!
Nancy K.
Centipedes, millipedes, pill bugs, roaches, crickets, ants, beetles, spiders, wasps, squirrels, opossums, raccoons, bats and mice are just some of the pests that manage to find their way into homes. It’s just about impossible to keep all of them from getting in, but there are several things that you can do to significantly reduce the number of pests that make it inside your home. Most have to do with blocking the ways they can enter. Furthermore, there are also some things you can do outside to make your home less attractive to pest invaders.
Landscaping
Most pests including rodents and insects like shaded, moist environments. All of the plants and shrubs surrounding your home may appeal to you but they also appeal to numerous pests.
It’s not that you have to cut them down and get rid of them, just move or trim them away from your foundation or log walls. What you need is a two foot clear space between the shrubs and your walls and foundation.
Once you move and/or trim them, you need to put some type of cover on the ground to prevent weeds from growing. Do not use pine needles, wood or bark mulch! The objective of these types of mulch is to hold moisture and that’s what you don’t want to do. You want to provide a dry environment that bugs and rodents don’t find attractive. The best thing to use is about three to four inches of coarse crushed stone or pebbles. Yes, it’s more expensive than organic mulch, but it’s permanent. Just keep debris like leaves from building up on top of it, and the stone will keep doing its job for many years.
Gutters
All log homes should be equipped with gutters. One of the most common problems we see is deterioration of lower log courses due to splash up from rain coming off the roof; however, gutters only work if they are kept clean. Blocked gutters provide ideal moist environments for a wide variety of insects including carpenter ants and termites. Although subterranean termites typically live in soil, they can also establish nests above ground as long as there is a consistent source of water. These types of termite colonies are known as aerial infestations and, if left unattended, the termites can cause significant damage over the course of several years.
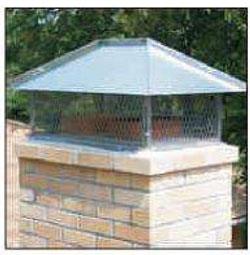
Chimney Caps
If you don’t already have a cap on your chimney, they are a good investment. It is not uncommon for squirrels, raccoons, and birds to take up residence in a chimney during the summer months and become a nuisance. Raccoons are often infested with fleas that can end up in your living areas.
Door Sweeps, Screens and Weather Stripping
Make sure that you have door sweeps installed on all doors accessible to the outside and check to see if they are in good working order. If you can see visible light coming in at the corners they need to be replaced. It only takes a gap of 1/4” for bugs and mice to gain entry. While you are at it, check the bottom seal of your garage doors. Once mice get into your garage they will probably find a way to get into your living area, too.
Windows are the most common entry points for flying insects in particular. Flies, ladybugs, boxelder bugs, stink bugs, and flying ants are just a few of the insects that can find their way into your home through the windows. Check to see if there are any rips or tears in your window screens, and make sure that the screens fit tightly into the frame. See if the weather stripping is still flexible and maintaining a tight seal when the window is closed. If you have sliding glass doors, check them too.
Weather stripping has a lifespan of about ten to fifteen years so if yours is hard and brittle, it’s time to replace it.
Attic and Crawl Space Vents
Normal window screening is not enough to deter determined pests like squirrels. They can gnaw through normal window screening in a matter of a few hours. To prevent entry of bats, rodents, squirrels and raccoons use 1/4” hardware cloth on the outside followed with small mesh screening on the inside to keep out wasps, ladybugs and large ants.
Caulks and Sealants
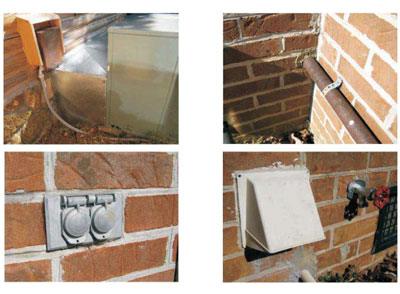
If you take a walk around your home and count possible insect entry points, you may be surprised at how many there are. Besides all of the windows and doors you’ll find electrical, telephone, cable, gas, outdoor faucets, air conditioning, and plumbing entry points. If you have a crawl space, you may have a number of vents, plus a door. And don’t forget your clothes dryer vent. All of these are common entry points for insects and rodents.
Let’s first address windows and doors. Round log or log sided homes, in particular, present a real challenge when it comes to sealing around windows and doors. All too often once a window or door is set into place, the edges of the opening are covered with a piece of trim and that’s it. Rarely is the trim properly sealed to the logs and large voids behind the trim are left empty (see “Log Gap Cap and Energy Seal” and “How to Apply Energy Seal and Woodsman” for the proper method for sealing around windows and doors). If these voids are not filled, they become perfect nesting sites for several species of ants, many of which will get into your home.
A good product to use for filling these voids is a Log Gap Cap™. A Log Gap Cap is a pre-cut foam insert that is available in two different sizes that fit most log profiles and log diameters. Once in place, the Log Gap Cap needs to be covered with a layer of Energy Seal™ or Woodsman™, since direct UV light will degrade the foam fairly rapidly.
Foundation vents also need to be sealed to the walls. Screening the vents won’t do any good if open gaps are left between the vent housing and the wall. If there is room for backer rod be sure to use it. If the foundation is brick, block or stone, Energy Seal in gray provides a good color match to the existing mortar.
Examine all of the electrical and plumbing penetrations mentioned earlier. Most were probably initially sealed with mortar. Most likely you’ll find cracks or gaps where the mortar has fallen out over the years. If a cheap construction caulk was used, it’s probably hard and brittle. Try to dig out as much as you can and replace it with a high-quality sealant like Energy Seal or Woodsman. When properly applied, they will keep those pesky bugs out of your home for many years to come.
Common locations to seal in home:
Pesticides
We at Perma-Chink Systems, Inc. discourage the broadcast use of pesticides just to keep nuisance pests out of your home. We are a firm advocate of Integrated Pest Management and since there are so many mechanical methods of control available to homeowners, we believe that they should be used as the primary means of preventing pest invasions. Pesticides should be used only as absolutely needed. Yes, there are situations when the use of pesticides may be the only solution to a problem but you may be surprised how effective some of these simple mechanical recommendations can be.
By Jared Turner
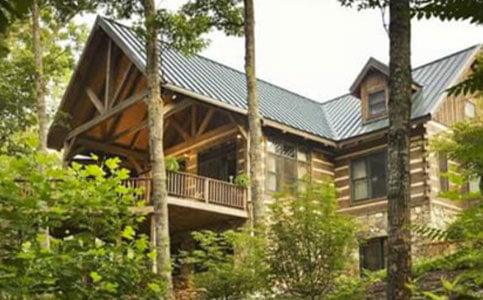
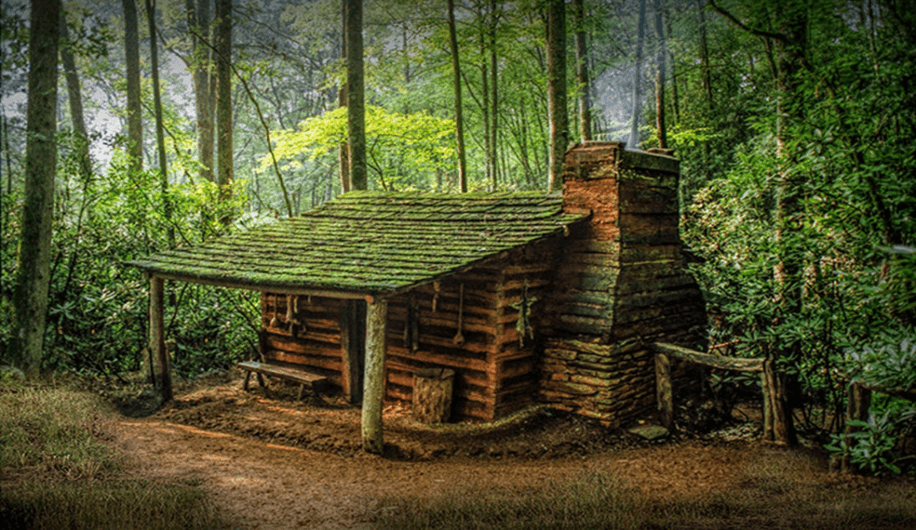
Folks have been trapped inside their homes for lengthy periods of time this winter. Whether it was to escape the cold or shelter from Covid, you are ready for a change. So, as you emerge from your long winter hibernation, take time to stretch, rub the sleepy out of your eyes and put the coffee on. Once you have all of that out of the way, it is time to open your door to Spring and consider the benefits of Forest Living.
For most folks, exposure to forests and trees has wonderful health benefits. For example, both of my parents happen to live in a densely populated urban area. However, each spring and fall they take the time to travel hundreds of miles to dive deep into the forests of Appalachia. They, as well as millions of others, have found these trips to be beneficial to their overall health and wellbeing.
So, what is it about the forests that make them so wonderful for our health? In recent years there is evidence that link people’s exposure to forest with a strengthened immune system, lower blood pressure, reduced stress, improved mood, increased energy level and improved sleep. What is not to like about this list? I believe many of us would be thrilled with improvements in these areas.
Are there other benefits that forests bring to our lives? Absolutely! They help to remove harmful pollution from our air by behaving like giant environmental filters removing harmful toxins from the air we breathe. In addition, forested watersheds provide quality drinking water for over 180 million Americans. Not only do trees filter through the air they also filter through the ground. With temperatures on the rise in most places, forests also help to lower air temperatures by 20-45 ֯F. The evaporation of water from trees has a wonderful cooling influence! Trees absorb carbon dioxide, a harmful greenhouse gas, and store it as carbon while releasing beneficial oxygen back into the air. In addition, trees, properly placed around your home, can help reduce your energy consumption by lowering the cost to cool your home. Finally, trees provide a wildlife habitat for animals to live and thrive.
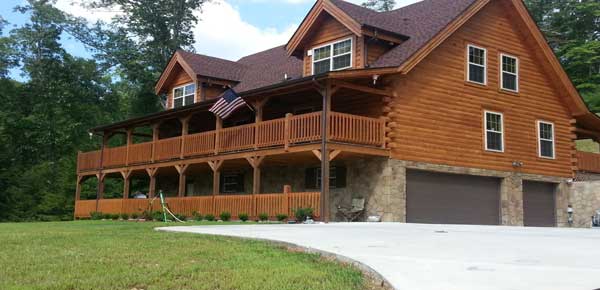
Densely populated urban areas are just now catching on to all these benefits and are working hard to transform their cities by planting more trees and providing more green space for their citizens. They rightly understand that this approach is part of a more sustainable future. However, living this close to nature does bring with it challenges. At Perma-Chink Systems® we have been helping homeowners live in harmony with nature for over 40 years and as more folks transition to Forest Living, they are going to need a partner who knows how to integrate the two successfully.
Perma-Chink Systems happens to be a one-stop shop for forest living. We supply knowledge, experience, and quality products to help meet the needs of homeowners living in the forest. For example, with spring comes trees blooming and plants flowering, bringing with it pollen and dust. All this dirt, dust and pollen collecting on your home creates challenges for the longevity of your finish system. Once or twice a year we recommend giving your home a good washing. To help with this need we have developed Log Wash™, a highly effective, low pH cleaner designed not to damage your logs or your finish. By removing these contaminates, it will cut down on mold growth and damage caused by absorption of water and sunlight on your finish.
Spring is also a wonderful time to conduct an inspection of your home. Look for damage that needs repaired, cracks or openings that need to be sealed, and observe the overall condition of your finish system. Depending on what you discover, Perma-Chink Systems has products designed to solve most of your needs. We at PCS are actively helping to transition folks to a healthier way of life through a more sustainable Forest Living lifestyle. Please take some time to visit our website for more information.